The veranda in a country house is an important part of the interior, both in terms of effectiveness and efficiency. At the same time, it should be a beautiful and comfortable place. There should be the possibility of a long and pleasant pastime, including a family dinner in the open air. As can now be seen in glossy magazines, the veranda is an important part of the interior of a country house. And modern technologies and trends go further and further.
One of these manifestations is a veranda with a barbecue or grill. Today there are many offers on the market, but you can build a barbecue with your own hands - this will completely satisfy your needs. You can choose the design yourself, bringing it to life with your own work. You know the size and features of your site much better.
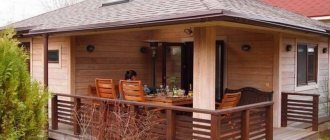
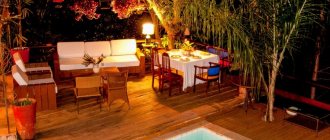
Terrace with barbecue in a private house
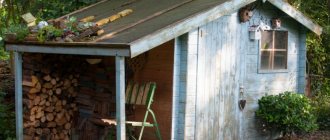
While living in a country house, every owner sooner or later thinks about increasing the functionality of their site. For this purpose, bathhouses, gazebos and, of course, terraces are built. A terrace is an open summer area, an extension for outdoor recreation. Thanks to the barbecue, you can gather family or friends around a large table, which is why the terrace is becoming increasingly popular. Separately, it is worth noting the fact that a terrace with a barbecue can be used as an extension to the house or located separately from it.
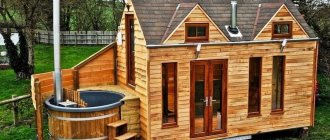
Corner gazebo ideas
When choosing designs of this format, it is necessary to distinguish between two different entities:
- Angular shape. The building itself can even be located in the middle of the site, but its shape will be angular - with two open walls. Sometimes a similar approach is used in Japanese construction, although it is also present among our buildings.
- Corner location. In this case, the gazebo is located directly in the corner of the site or next to the fence. Thanks to this location, the space of the site is seriously saved, so this position can be called extremely practical.
Below will be shown a dozen ideas for such buildings. Some options look even more interesting than boring square and rectangular structures.
With a complex roof in the corner of the plot
Many of them are complemented by a platform (in Spanish it is called a patio) and small terraces. You can find examples with a barbecue grill, a barbecue, and even a full-fledged oven complex. It’s amazing how such beautiful gazebos can be placed in such a small area.
Materials and tools for construction
The choice of materials directly depends on what materials were used to build the house. If the terrace and housing are under the same roof, then it is best to choose the same material. At the same time, if the main building is built of brick, then to create an open terrace with a barbecue, you can use any building material, be it a wooden frame or a metal canopy.
The construction of the extension includes the following stages:
- Foundation.
- Flooring.
- Construction of walls or fencing.
- Installation of a canopy or roof.
- Finishing work.
It is also worth thinking about how many exits the terrace will have (external, through from the house to the terrace, or both). It is worth noting that any extension, even a light one, needs a foundation that provides good stability. In order to make the base of the terrace you need to prepare:
- Roofing materials.
- Wooden boards for sheathing.
- Gravel and bitumen.
- Concrete.
- Brick chips and fragments.
In addition, you need to prepare the tools that you will need to build a terrace with a barbecue with your own hands:
- Electric saw.
- Sledgehammer.
- Hammer.
- Building level.
- Tape measure and other standard construction tools.
We draw up a work plan
The very first step is project development. You should decide on the size, shape and design of the gazebo (presence of a terrace, barbecue area, etc.). Also consider the following:
- Will the gazebo be used only in summer or during any season?
- Do you want a closed (solid walls) or open structure?
- What material will you build it from (usually boards, logs, timber, bricks are used)?
- Do you plan to do electrical wiring, run water into the gazebo, and how possible will it be to do this?
Even at the planning stage, think about what communications are needed.
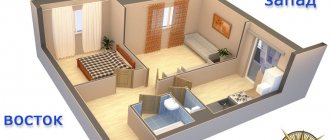
The next step is drawing up a drawing. Determine and mark the main areas of the building - where there will be a terrace, where there will be a place for relaxation and / or eating, where you will install a barbecue. The final stage is calculating the amount of material and drawing up an estimate.
If you are not strong in design, you can look for a ready-made project with all the calculations. Below we will look at the option of a wooden gazebo.
Important! When designing your roof, take into account the amount of snow that falls in winter. The larger it is, the steeper the roof slope should be (for northern latitudes it is recommended to tilt at least 30 degrees).
Construction of a foundation for a terrace with barbecue
As mentioned earlier, the terrace is an open summer area for relaxation, so it is light in weight. In this regard, it is not necessary to create a monolithic foundation; a columnar foundation made of bricks is sufficient. When creating supports, it is important that the distance between them is about 0.5-0.6 meters, otherwise the extension will sag.
First of all, you need to make a plan, carefully work out the design of the future terrace, after which you can proceed to marking. According to it, pits are dug, the depth of which is 1 meter or more. At the bottom of the hole you need to pour 0.2 meters of sand (sand cushion) or 0.1 meters of gravel if the soil is sandy. Hot bitumen is used as a waterproofing material.
The main advantages of columnar foundations:
- Construction speed.
- Possibility of construction on any type of soil.
- Possibility of independent implementation.
- Reliability and durability.
As for the choice of pit depth, it depends on the climatic conditions of the region and soil freezing. All this must be taken into account when designing the extension, otherwise problems cannot be avoided. The simplest and most reliable solution is to hire professionals who can implement the project in the shortest possible time.
Before making a columnar foundation, you need to clean the area, removing excess debris. After this, the terrain is marked and the surface is leveled. The pillars must also be at the same level, which is very important. Piles (100*100 mm) are laid on top of them.
What influences the choice of winter gazebo project
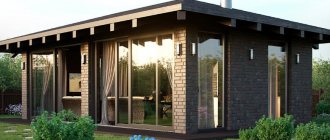
To highlight the features of warm gazebos, you must first find out what the differences are between winter modifications and summer modifications. The main difference is the presence of insulation. Usually in closed conversations a fireplace is installed to warm the room. You can also turn a summer building into a winter one if you insulate it. But it’s better to build a new facility using a ready-made project from the Internet.
Universal gazebos suitable for constant use are popular. It's comfortable. For example, if you open or remove the windows of a winter gazebo, it immediately becomes a summer gazebo. However, the seasonal transformation of a veranda with a barbecue area should be in the spirit of the general concept of a summer cottage.
Important! The terrain and climatic conditions also influence the choice of the type of building and building materials for its construction.
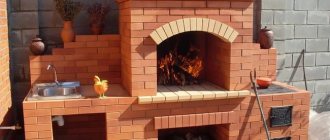
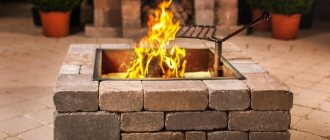
Construction of a barbecue for the terrace
When designing a terrace with a barbecue, you should immediately forget about mobile (movable) structures, since they are not practical and do not have an attractive appearance. The ideal solution would be to build a barbecue out of brick. A brazier is a special brazier for cooking meat, fish and vegetables, which is located in free space, in a summer kitchen, veranda or terrace. Thanks to it, you can gather a large company around one large table located in nature and have fun while preparing delicious food.
Before you start building a brick grill, you need to determine its location, eliminating all risks and their possible occurrence. This design performs several functions at once, namely:
To create a high-quality barbecue, you need to follow the general principles of building a brick barbecue. Often it is located with its back to a private house, thanks to which you can create a cozy atmosphere. At the same time, you need to remember that this does not apply to wooden buildings, because the barbecue has a high temperature and is dangerous. The distance from the barbecue to the wooden wall should be at least 0.2 meters. In addition, it is better to place the terrace itself closer to the kitchen or make a through exit between them.
As for the height of the grill, this parameter is individual and depends on the height of the person who will be cooking over an open fire. The length of the grill should be no more than a meter, as this affects heat loss, and therefore the quality of the meat and the efficiency of its preparation. Depth – 0.15 meters, width – 0.4 meters (for internal surfaces).
To build a brick barbecue you will need:
- Brick.
- Waterproofing material (roofing felt).
- Concrete mixture for the foundation.
- Template for the arch.
- Gravel and sand.
- Fittings.
As for the choice of brick, it can be of any type and color, and the only parameter that matters is the ability of the building material to withstand high temperatures. Before erecting a barbecue for the terrace, you need to dig a hole for the foundation, the depth of which is half a meter.
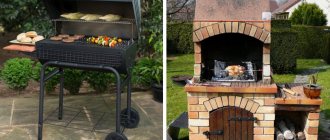
Where to install a stove and build a gazebo
Before choosing a location for these structures, decide on the type of structure. Stationary barbecue stoves are erected together with a gazebo. But there are also projects where the roaster is located separately. Both methods of installing the stove are justified.
56d20ddab83d4edd915d6590eb5a42c5.jpe 6a8eb579ac78750e6efab7587503f5a4.jpe
When setting up a fireplace, remember that fire not only provides the heat necessary for cooking, but also produces smoke, which can interfere with rest or irritate neighbors. It is better to install a gazebo equipped with a stove away from the house, especially if the wind often blows towards the home. The same applies to nearby areas, so that barbecue does not become a cause of discord with people living nearby.
Photo: brick grill installed on the second floor of the building
If it is planned to build an open or semi-open structure, choose drawings of a gazebo with fences on the north side. Cold winds blow from there, so it is better to protect yourself from them in advance. A practical solution is to equip the structure with removable walls or thick curtains that will close the openings in bad weather.
The hearth itself in the gazebo is usually installed near the northern wall. A stationary stove is installed according to the rules. First of all, it is necessary to properly design the smoke exhaust system to ensure good draft for fuel combustion. It is better to consult with an experienced stove maker on this issue.
Original and functional barbecues can be purchased ready-made and then modified for a specific project. For example, make the brazier portable on high legs or install it permanently on a stone base.
A functional solution is to have a countertop near the stove where a sink, cutting boards, and shelves for food and utensils are located.
Photo: square gazebo project
Don't forget about the cook
There is nothing worse than cooking for the whole company and only hearing peals of laughter behind you. Food preparation and seating areas should flow into one another, on the one hand isolating guests from the hot zone, and on the other hand allowing the cook to become the center of the party. The best way to cope with this is a high bar counter raised from the other edge of the cooking area. After all, watching the chef prepare meat for you on the grill is a great start to any feast.
This is interesting: Japanese-style gazebo - features of oriental design.
Veranda with barbecue: nuances of construction and examples of projects
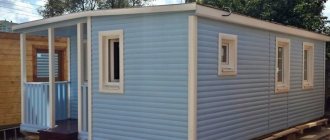
Owners of private plots sometimes think about ordering an extension where they can spend family leisure time. The most attractive option is a veranda with a barbecue. This building can be closed or open. In most cases, preference is given to the open option, since less money will need to be spent on construction. After reading the information from the article, summer holiday lovers will learn what materials need to be purchased, as well as about the stages of construction.
Features of a barbecue on the veranda
You can order a barbecue oven on the veranda attached to the house in several varieties: stationary or portable. Each one has its own advantages.
Advantages of a portable barbecue:
- Compared to a stationary structure, it takes up virtually no space indoors.
- Much less money will be spent on manufacturing or purchasing .
- If desired, it is possible to easily move the barbecue to a new location.
Typically, a portable type of stove is a metal structure on 4 legs. They can even be on wheels for easy transportation.
Advantages of a stationary oven:
- Attractive appearance. A large barbecue oven will attract attention with its solidity and will also play a decorative role in the room.
- It is possible to add additional compartments to the project for storing dishes and other kitchen utensils.
- On a stationary oven it is possible to cook several dishes at once.
- The design will last much longer than its portable counterpart. Moisture and temperature changes are not a problem for a well-made stationary barbecue.
The choice of a stationary or portable model depends primarily on the size of the veranda and the expected frequency of use of the stove.
Stationary roofs and barbecue shelters
In the above projects, the roof supports are rigidly connected to the barbecue body. On the one hand, this solution simplifies the design and makes it easier to manufacture. On the other hand, the forces from the wind that rock the canopy are transferred to the body of the brazier and can ultimately lead to damage to the entire fireplace. Therefore, it would be more competent to make the racks and roof over the barbecue in the form of a separate separate structure, as in the photo.
The advantages of this solution are obvious:
- To build a roof, you can use any available materials, from wooden beams to bricks;
- The racks do not interfere with handling the fryer; there is enough space to turn around on the leeward side when the wind changes and not breathe in the fumes;
- Smoke, soot and soot do not settle on the support elements;
- If desired, the high barbecue box can be replaced with a barbecue stove, or just a fireplace.
Traditionally, a separate roof over the hearth is built in two ways: in the form of a light gazebo - canopy or in the form of a permanent structure. The latter option is most often used for prefabricated structures, when a stove, barbecue and smokehouse are combined in one brick building.
Capital roof structures for barbecues
The most interesting budget option for a permanent roof can be made of metal, as in the photo.
In this case, the body of a brick barbecue with a chimney is used as a load-bearing support. To secure the metal arch, two straight vertical posts and two arched supports with a large radius of curvature were used. This solution allows you to simultaneously very firmly fix the roof overhang and remove the support posts from the working space of the barbecue, so that the cook can safely cook and not cling to the elements of the steel structure with his hands or utensils.
For a full-size stove with a barbecue, the roof is made in the form of a canopy or a permanent gazebo with a foundation and a platform for installing a table with chairs. For a small barbecue, a space of 2x1m will be enough.
The easiest way is to install the roof on wooden beam supports. In such structures, as a rule, they use a closed hearth and an exhaust chimney; if this is not done, over time the surface of the roof will become covered with a dark coating, and under the canopy there will be a constant rancid smell of burnt fat. The most difficult element of any gazebo or canopy is the installation of the passage of the chimney through the roof. To avoid fire or deformation of the chimney due to roof vibrations, experts recommend making a transition unit according to the diagram shown in the drawing.
Which roof option is better?
Many masters answer this question directly - the best option will be the one that you were able to come up with and make yourself, based on your own experience and capabilities.
For those who like to cook meat with their own hands and taste it without leaving the stove, we can advise you to make a roof in the likeness of a Finnish stove.
Such a grill or barbecue can be placed even in a summer kitchen, if you make a separate outlet for the protective cap - the chimney - outside the room.
For a large group feast, the stove and canopy should be made in the form of a separate extension, at least 5-7 m away from the table.
For small family picnics at the dacha, you can make a canopy in the form of a small wooden gazebo, under which a small table and a few chairs will fit.
For outdoor recreation, you will need to make a small canopy of a collapsible design.
What are barbecue ovens made of?
To assemble a stationary barbecue, natural stone or special brick, as well as metal parts, are suitable.
In other words, all those materials that can withstand open fire. The ideal option is fireclay brick. It is made of clay - a natural material that can easily withstand constant exposure to open fire.
In addition, the stoves are additionally decorated with various cladding to make them look as attractive as possible. Natural stone – basalt or marble – is used for decoration.
Metal structures are usually used if the veranda is small or medium in size. Cast iron stoves are considered the highest quality. If you do not buy a ready-made barbecue, but order its manufacture from a master, then you can take part in the selection of decorative elements and decorate the structure externally.
Advantages and disadvantages
Advantages:
- practicality is the main advantage. A country grill with a roof can be used all year round, feeling comfortable;
- the possibility of directed smoke removal, which will not disturb others during the process of preparing barbecue;
- protection of the fryer and auxiliary equipment from weather conditions, which extends the service life, protecting it from destruction and rust;
- the ability to organize additional space for preparatory work and placement of the company.
Flaws:
- low mobility. The design is more often used in a stationary design because it has significant weight and is difficult to carry;
- higher cost due to the presence of additional elements.
What to consider when installing a barbecue
You cannot install the barbecue in any free space. This is an open fire and neglecting safety rules can cause serious consequences. First you need to choose the location wisely. In this way, it will be possible to reduce the risk of fires, and then the holiday will be as pleasant and comfortable as possible for everyone present.
The requirements for a barbecue on the terrace of a house are quite simple, but they must be followed:
- It is advisable to decide in advance on a place where you can put logs for lighting a fire. If finances allow, then there is the option of ordering a stationary barbecue oven with a special compartment for storing firewood.
- Often the stove is placed near the wall of the house to make the design beautiful and convenient. But if the house is made of wood materials, then the stove should be at least 20 cm away from the wall.
- Any stove should allow residents to move freely throughout the room. In any case, the veranda should remain a veranda, and not a place where the stove occupies absolutely all the space.
Following these rules will make barbecuing on the veranda safe and convenient.
Advantages of a corner gazebo
The list of benefits is presented below:
Forged metal and brick
- Space saving. In classical construction, the space around the gazebo is not used in any way, except as a woodshed or utility block in some cases. The corner option “eats up” these square meters, as a result of which the dacha plot remains in the black.
- You can save on finishing corner walls. Since no one sees the far walls (from the outside), you can go many years without renewing the paint on them or washing them off from dirt and stains. This is true when corrugated sheeting or siding is used as cladding.
- You can practically place a chimney from the barbecue. In the center of the site, a smoking stove complex does not look like the best solution, but in the corner near the fence it is very interesting.
- Aesthetics. To some extent, the structure looks beautiful in the corner. By adding wood carvings, interesting lighting or forged elements, you can create an architectural masterpiece.
With barbecue
What materials will you need?
The following materials are used to build the veranda:
- Concrete mortar with the addition of crushed stone, cement and sand.
- Clay-based mortar for laying a stove.
- Any type of gravel.
- A large amount of broken bricks that will be used to pour into large holes along with cement.
- Bitumen.
- material .
- Boards.
- Ceramic tile.
- Metal sheets.
- Lattice.
You also need to take care of purchasing windows and doors. There are no special recommendations here, and it all depends on the taste preferences of the owner.
But if the veranda is of a summer type, then single windows are sufficient. And to preserve heat, it is advisable to use two- or even three-chamber ones.
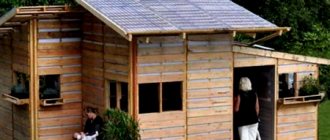
DIY veranda with barbecue + photo
For every owner of a private house or cottage, the fact that you can have an extension and a place to relax is an excellent prospect. The most attractive and popular option is a veranda with a barbecue attached to the house. In this case, the extension can be made either open or closed. The covered veranda with barbecue can be used all year round, regardless of the weather. However, its construction requires more effort and time. It is much easier to open a veranda with a barbecue. But there is no way to sit in it in winter. This option is more suitable for summer cottages. In any case, it is important to know how to make a veranda with a barbecue with your own hands.
This is exactly what we will look at in our article. You will learn how to organize a barbecue area on the veranda, what tools and materials will be needed to create it, and also how to do it yourself step by step.
Types of warm winter gazebos and features of each option
All buildings of this type are divided according to several criteria - the building material from which they are made, area, style and equipment of the gazebo with additional accessories. Gazebos are also divided by design:
- a single building is an independent building, equipped with everything necessary for a comfortable stay, regardless of the weather outside the window.
- A combined modification, which is not considered an independent construction, but only a part.
Features of the construction of an insulated gazebo:
- The room should be equipped with windows and doors so that air circulates normally.
- To construct the structure, it is necessary to use heat-resistant and moisture-resistant building materials.
- A gazebo is a small building for which you need to prepare at least a couple of heating devices.
- When choosing and laying a fundamental structure, it is necessary to take into account the load of both the building itself and the internal structure (general decor, furniture products and the number of vacationers).
BBQ area on the veranda
It is noteworthy that the barbecue oven on the veranda can be made of two types: portable or stationary. As for the materials for manufacturing, it is metal, natural stone or brick, resistant to fire. In the case when your site is not very large and the cost of other buildings is not entirely appropriate, then a metal structure is ideal. If it is possible to make a veranda or terrace, then it is recommended to make a stationary stove. Veranda with barbecue at the dacha photo.
Below are some requirements for placing a barbecue oven, as well as simple safety requirements. Then a barbecue on the covered veranda will only delight you and spending time there will be pleasant and safe:
- The location of the stove should be done in such a way that it does not interfere with the residents’ ability to move freely around the room, since the veranda is still a veranda.
- At the creation stage, you should immediately think through and make a place where the firewood and coals necessary for operation will be stored.
Whatever one may say, the barbecue on the veranda, which is attached to the house, will remain a favorite place for all family members. And your friends will be glad that you invite them to your dinner party. But, here you need to understand something: in the case when the veranda has not been built, but is only in development, then the first question that needs to be resolved is its type. It is in this case that you can decide what the design will be: a summer veranda with a barbecue or a winter one. Barbecue on the closed veranda of the house photo.
Now you can begin to create the design step by step. We will look at everything you need, as well as the project of a veranda with a barbecue in the photo.
Types of fuel for garden stoves
To light a fire in nature, coal, firewood, gas, and briquettes are used. Not all types give the same heat, and the smoldering time is also different. Fuel is selected based on the technical characteristics of the stove.
An environmentally friendly type of fuel that does not emit smoke when heated deserves special attention. These are stones of volcanic origin that are heated by an electric coil. As a result, the heat from the stones is no worse than from wooden firewood, and there is no smoke. This option is indispensable for a small summer cottage, where a residential building and neighbors are in “dangerous proximity.”
Regardless of what drawings, materials and interior arrangement are chosen, a gazebo with a barbecue will certainly become a favorite place in the country house. After all, it’s so nice to spend time with family and friends near the fireplace!
Stay warm in the gazebo
In cool weather, to retain heat and protect from the wind, you can use special PVC curtains in the gazebo. If purchasing such curtains seems like an unnecessary luxury to you, you can make them yourself. You will need to buy PVC film, cut it to the size of the gazebo openings, edge it with durable fabric and put eyelets along the edges. Using a cord threaded through the eyelets, you can attach the curtain to the gazebo.
Using additional heat sources in the gazebo, such as infrared lamps, is always a good idea. They can be placed near areas of maximum functionality - the dining or cooking area.
We select materials and tools for work
It is logical that the material for the veranda should be identical to the material from which the house is made. Then everything will look organic and beautiful. If the structure is made of brick, then, accordingly, the veranda will be made of brick. But for such houses you can choose other options, such as wood.
Here are all the steps you need to follow to build a brick barbecue on your veranda:
- Build a foundation.
- Build walls.
- Install the roof.
- Do finishing work.
- Build a barbecue oven.
To do all this, you need the following materials:
- concrete mortar (cement, sand, crushed stone);
- gravel;
- broken brick;
- bitumen;
- lathing boards;
- roofing material.
Of course, you need finishing materials, windows, doors, etc. If this is a summer veranda, then you can buy single windows. And in order to keep warm there, it is better to choose two or three-chamber ones.
If we talk about tools, you will need a level, a hammer, a sledgehammer, a power saw, a tape measure, and a pencil. This is not the entire list; other tools that are most often used for construction are also needed. During the work you will understand what they are.
We are building a pavilion
Now we begin to build the walls, floor and roof.
- We cover the pillars with timber, and fasten the timber with self-tapping screws. For a tight connection, a longitudinal notch is made at the junction of the beam along its side.
- The floor can be made of stone or wood. The first option is more convenient if the level of the gazebo is level with the ground, and not raised. If you choose a wooden floor, first lay a 10x10 cm beam between the posts, along the perimeter of the future gazebo, then make a screed by connecting the opposite sides of the floor in the center with a 10x5 cm beam. Next, lay the flooring with 10x30 cm boards. You can use laminate or linoleum as a covering.
The most popular material for building a gazebo is wood. - The technology for constructing a roof depends on the design you choose (the roof can have a different number of slopes, be dome, tower, hipped), but the main elements here are always beams and rafters. The simplest option is a gable roof. Here the order of work is as follows: attach rafters to the strapping beam on 4 sides and connect them with a cross member. Secure the rafters together (temporarily) using slats. Then the roof covering (made of plywood) is installed. During this work, the slats are gradually removed. The final stage is covering the roof with tiles or other material. The ceiling of the gazebo can be covered with clapboard or decorative panels.
- If you have a closed gazebo, you will need to design window openings, perform finishing work - wall cladding, decorative design.
Advice. It is most practical to make at least one of the walls of the gazebo blank - for example, to install a barbecue near it or to arrange a kitchen area.
We build the foundation for the structure
The foundation is the base of the veranda. Since it will house a permanent barbecue oven, it is important to make the foundation strong. Most often, a columnar type of base is made for the veranda. The pillars are bricks. It is necessary to create several supports at the corners and in the middle, maintaining a distance of no more than 60 cm. First, markings are applied on the ground using pegs and rope. After that, a pit is dug along it with shovels, the depth of which is not less than 1 m. The bottom is compacted and a 20 cm layer of sand is poured, after which it is compacted again. For sandy soil, gravel is used, in a layer of 10 cm. To perform waterproofing, bitumen is used.
What is special about columnar foundations?
- It is quick and easy to build.
- The base for the veranda is suitable for various soils.
- Even a non-professional can start building it.
- It is reliable, practical and inexpensive.
As for the depth of the pit, it is recommended to pay attention to the freezing point of the soil. The foundation should be lower. And in order not to make mistakes in the calculations and do everything correctly, we recommend drawing up a detailed plan with drawings and features.
The final stage is the formation of pillars and the top trim. All pillars must be perfectly level relative to each other. Then the veranda itself with the barbecue will be level. That's why you need a level. All that remains is to lay 100x100 mm piles on the pillars. This will be the harness. The finished foundation of the veranda with barbecue is visible in this photo.
Further work will depend on what type of veranda you have chosen. It is imperative to make a floor. If the veranda is open, then it is enough to install support pillars and make a canopy that will protect you from precipitation. But if the structure is closed, then it is important to build walls, finish them and install doors and windows.
Beautiful examples of finished buildings
Gazebos can be decorated not only inside, but also outside. Lush climbing greenery and pots of flowers near the porch can be an excellent decoration.
An additional shelf above the counter or sink can be used to place spices and kitchen utensils.
The main requirement for any gazebo with a barbecue is that it should be convenient to cook on. And so that the cook spends less time and effort on additional movements, it is worth setting aside a place for a barbecue and a corner specifically for storing firewood.
And so that the cook does not get bored while preparing meat, you can build a bar counter behind him.
Gazebos made of brick and wood look practical, aesthetically pleasing and modern. In addition, such buildings are more resistant to temperature changes and changing seasons, and are also more reliable and durable.
Street lighting outside the gazebo looks expressive. You can choose an LED strip or curtain to decorate the walls and roof. And near the gazebo it is good to place street lamps that are charged with natural sunlight and create a special romantic mood in the dark.
Green spaces around the perimeter of the gazebo look very original and stylish
Thus, they highlight and emphasize the importance of the gazebo
The subtleties of building a brick grill
When the veranda is ready, you can start building the barbecue or barbecue oven itself. This is the structure in which meat and other food will be cooked. Before starting work on its creation, it is important to choose its location correctly. Thanks to this, you can reduce the likelihood of a fire to a minimum, your vacation will be pleasant and calm.
Such a design on the veranda will allow the owners to perform several tasks. The construction will combine the following types of devices:
- cooking oven;
- regular grill;
- oven.
In order for your construction to be of high quality, it is important to strictly follow the principles and rules for creating a brick barbecue. Very often the stove is created with the back facing the house to make the design beautiful. You just need to remember that if the house is made of wood, then the stove moves away from the wall by at least 20 cm.
As for the height of the grill, it is important to calculate it taking into account the height of the person who will spend the most time cooking. The length of the barbecue should not exceed 1 m, this will result in increased heat loss. As a result, the efficiency of cooking meat will be lost. The recommended width of the structure is 30 cm, and the depth is 15 cm. For construction, you can use a special project, or create everything yourself. The project for a veranda with a barbecue is pictured below.
To be honest, a beginner will not be able to cope with building a barbecue oven with his own hands. To do this you need to have certain skills in bricklaying. We can briefly look at how exactly the oven is made:
- First, a pedestal is created on the foundation for the furnace. Its height varies, we talked about this above. And to make it convenient for you to store firewood and coals, it can be made with a woodpile for these purposes.
- The second stage is the creation of the furnace itself. It is made from refractory bricks. The structure is made of bricks and clay mortar. The entire process is controlled using a building level. The layout is carried out from the corners of the oven to its center. In this case, each subsequent row must be shifted by half a brick. To increase the heat resistance of the structure and simplify its maintenance, you can sheathe the walls of the firebox with sheets of metal in its inner part. As you lay, you must remember to make projections for the gratings. And some places are made with holes, which will serve as air flow and create traction.
- Next, when the stove is ready, they begin to build the chimney. It is made from the same bricks, which are laid on a long edge and connected with clay mortar. In addition, it is important to make grills and barbecues with teeth on the veranda. This is a kind of bend that is responsible for creating good traction inside. A damper is installed inside the chimney.
- The final stage is finishing the finished stove for the veranda. To make the veranda beautiful and pleasant to relax in, it is important to pay special attention to the finishing. Some people prefer the natural look of bricks, while others finish everything with stone or plaster.
That's all, the oven is ready for use. All that remains is to start arranging the veranda and bringing everything to mind. Barbecue oven on the veranda photo.
As for the arrangement, everyone decides for themselves how to design the veranda. It is important that there is a place to relax inside. For this you need chairs and tables. Thanks to additional elements and accessories, you can diversify the design. Some people put pillows on chairs, install a sofa, partially cover the structure with curtains, etc. Here, as they say, flights of fancy are encouraged. Everyone decides for himself what appearance his barbecue terrace or veranda in houses and cottages will have.
Which barbecue options do you prefer?
If you look at the existing layouts and designs of outdoor barbecues, it becomes clear that a roof for a barbecue is not only a way to protect a brazier with hot coals from wind and bad weather, it is an opportunity to make the cooking process as comfortable and convenient as possible:
- If you make the roof of the barbecue wide enough, you can protect stored food and prepared coal with firewood from bad weather, and most importantly, keep the cook’s workplace dry;
- A properly planned roof for a barbecue with a chimney allows you to get rid of most of the acrid smoke; to do this, it is enough to make a ventilation hatch with a blow-out channel;
- A classic barbecue for a summer house with a roof provides a more complex closed brazier design with an exhaust pipe made of metal or stone, which can also be used for cold and hot smoking.
For your information! Drops of rain or moisture on hot coals can not only make the cooking time of barbecue meat or vegetables take forever, but also change the taste of the food being cooked.
Therefore, instead of risky tricks in the rain, as in the photo, it makes sense to take care of at least the simplest protection and build a barbecue with a roof with your own hands.