Ideally, cable laying in drywall should be carried out in parallel with finishing work. If you compare this process with installing electrical wiring using other methods, then much fewer difficulties arise.
The main thing is to follow the list of technical recommendations and rules. For example, the electrical network should be reliably protected from any mechanical damage associated with the installation of sheathing on the frame.
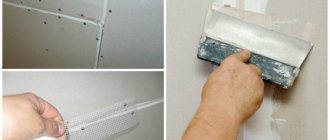
Laying cables in a plasterboard wall
The finished system must guarantee complete safety during operation. It is imperative to think about situations where there is a need to replace components installed under sheets of drywall. In this case, you will need free access to cables and other elements without damaging the wall finish.
Features of the work
Since there is no universal method for installing electrical wiring under plasterboard sheets, the main methods will be discussed below. In any case, you should start by drawing up a detailed diagram. The locations of the sheets themselves, joints and screws for fastening are indicated on the walls.
Any socket or switch must be installed at least 200 mm away from the edge of the drywall. The requirements are similar when working with metal profiles, so installation lines are calculated with an eye to future installation. After this, they begin to take measurements and transfer the diagram onto paper. Having completed all the steps, upon completion of the installation of the gypsum board, you will know where to lay the communication elements.
Cable wiring and installation of the frame under the gypsum board
Which cable to choose for electrical wiring under gypsum boards
Finishing in a house or apartment can be done with three different types of plasterboard sheets: ordinary, moisture- or fire-resistant (GKL, GKLV and GKLO, respectively). GCRs are suitable for ceilings and walls: they are inexpensive and look aesthetically pleasing. The main disadvantage is poor protection from moisture, the possibility of smoldering of the internal part with subsequent inflammation and release of toxins. For this reason, when installing hidden wiring, it is important to use gypsum boards.
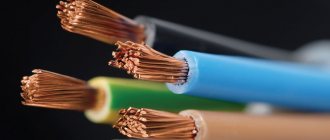
As for the wire, the VVGng cable is suitable here. The last two letters indicate that the product is non-flammable. When installing the cable under the ceiling and in a free space with a height of at least 15 mm, you can additionally use corrugated PVC pipes. If clearance is limited, pay attention to the VVGng-LS wire, which has double insulation. However, its cost in comparison with conventional VVGng will be 1.5–2 times higher.
Power cable VVGng-LS 3x1.5 with double insulation
Installation of distribution panel
To install the distribution board, you need to find a suitable place for it, taking into account the electrical wiring layout. Mounting the panel includes the following work:
- It is necessary to install an electricity meter in accordance with the requirements of regulations.
- A circuit breaker must be used that trips when the current exceeds a specified level.
- Connecting external phases and zero.
- A connection to the machine is established.
- Wires are connected from the circuit breaker to the internal electrical network of the house.
When introducing wires into the house, a circuit breaker must be installed. In this case, the fuse must be designed for the maximum permissible current. To calculate this value proceed as follows:
- Determine the maximum total power of all electrical appliances used in the house.
- It is divided by the value of the network voltage and a correction factor equal to the cosine “phi” (0.8).
- The resulting current value is multiplied by a correction factor equal to 1.1.
This determines the current strength at which the circuit breaker will have to trip. In most cases, a threshold value of 25 A is used for wooden houses.
Laying hidden wiring
It is necessary to take into account the number of phases used. If we are talking about one, then a single-pole switch must be used. In the case of using a three-phase network, a three-pole is required. This unit is installed immediately after the electricity meter.
Wiring protection
Modern cable for electrical networks is made of copper and covered with a special sheath. When installing systems under a plasterboard finish, there is a high probability of damage to the wires, since the gypsum boards are attached directly to the perforated frame with self-tapping screws. Thus, it is important to use protective corrugation to eliminate the possibility of damage to the wire by self-tapping screws.
Corrugated tubes are characterized by increased flexibility, so they do not complicate the installation process, providing reliable protection from mechanical stress. This approach eliminates the risk of short circuits. Additionally, such products increase the waterproofing properties of the wiring, which is important when using the network in the kitchen, bathroom or toilet, and also protect the cable from rodents (in private homes).
Installation of wiring under plasterboard in corrugation
Alternative options are polyvinyl chloride tubing and plastic cable ducts. Their protection is slightly better, but the installation process is significantly more complicated. Unlike corrugation, it is almost impossible to bend ordinary plastic.
Corrugation for drywall
Electrical corrugation for plasterboard is produced from the following materials:
- Self-extinguishing PVC. Outer diameters 16, 20, 25, 32,40, 50 mm, light and heavy series.
- Made from polypropylene. The diameters are the same.
- HDPE (low density polyethylene).
- Polyamide.
- Halogen. Special-purpose corrugation, fire-resistant grade FRHF.
A characteristic feature of all types of electrical corrugation is the presence in it of a so-called probe. A probe is a metal wire placed inside a corrugated pipe to tighten an electrical cable into the corrugation.
Please note that the presence of a probe in the corrugation clearly indicates its electrical purpose. The absence of a probe, especially in small-diameter flexible pipes, may (but does not necessarily) indicate that this product is NOT for electrical purposes.
The second sign that allows you to distinguish a corrugated wire is its rigidity. You must understand that corrugation is a flexible pipe, and not a decorative product. The electrical corrugation should be hard to the touch and not wrinkle when pressed and twisted. Of course, you cannot walk on such a pipe, but its rigidity should be tactilely felt.
The color of corrugation for drywall is not standardized. It can be gray, red, blue, yellow, black. Gray corrugation is most often sold.
Laying and fastening of wiring
Plasterboard sheets can be installed on walls or ceilings with or without a frame. Even partitions in the house can be created from them. The second option has recently become less relevant. However, if this is the one chosen, then you should prepare in advance special places where the cable will be laid. You will have to groove the surface of the walls, and then hide the electrical wiring inside the groove.
The situation is similar with the installation of sockets, switches and panels, only you will have to make not grooves, but entire “pits”. To fix the cable on the wall, use special clamps.
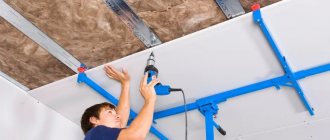
The frame method of installing gypsum boards looks different. As in the option discussed above, you can hide the wiring inside the groove, holding it with clamps. However, it is much more convenient to fix the cable on a metal frame to which the drywall is attached.
Fastening the cable to the metal frame with plastic ties
The frame may have pre-drilled holes for plastic ties. If they are not available, they can be done independently using a drill. This option is the most preferable.
What to do if repairs have already been made
Sometimes a situation occurs that gypsum plasterboard sheets have already been installed and it becomes necessary to add another socket or switch under the drywall. To avoid dismantling the plaster, you can do the following:
- Take a thread with a heavy nut.
- Make a round groove at the location where the future socket/switch will be installed.
- From the bare ceiling (if it is not yet protected with plaster or the film is not stretched), a thread is lowered over the new groove. The nut acting as a weight should fall to the level of the hole made.
- The cable is secured to the upper end of the thread using electrical tape.
- The thread stretches from below until the electrical conductor comes out.
Everything is very simple, so if there was a need to hide wiring under plasterboard sheets, we recommend using this technology. By the way, if you decide to make a plasterboard partition in your house, then for ease of installation, you first need to “sew up” one of the walls with sheets, and then proceed to laying the electrical wiring!
Pay attention to this nuance
Useful recommendations from a professional
That's the whole essence of electrical work. As you can see, there is nothing complicated, the main thing is to carefully stretch the wire between the profiles. We hope that the instructions for installing electrical wiring under drywall with your own hands were interesting and useful for you!
Also read:
- List of electrician's tools
- How to install electrical wiring in a bathroom
- How to find a junction box in a wall
The use of plasterboard in repair and construction processes has reduced the complexity of work related to leveling surfaces and constructing partitions. But there is one important operation in this whole process - electrical wiring under the drywall. It seems that there is nothing complicated in this operation, but given the safety requirements for using electrical networks, it is necessary to know exactly how this work is carried out.
First, let's start with the fact that, for example, leveling walls is carried out in two ways:
- Using a metal or wooden frame.
- Using an adhesive composition.
Secondly, taking into account the technology of assembling the frame plane, it is necessary to carry out electrical wiring. Therefore, there is a need to understand the two options separately.
Wiring for adhesive drywall
Leveling the walls using this method is taken as a basis if the plane difference does not exceed 5 mm. The most commonly used adhesive is Perflix gypsum solution.
Since the distance between the base wall and the gypsum board sheets is tiny, electrical wiring under drywall is carried out in exactly the same way as under plaster. That is, this is hidden wiring with wires laid in grooves.
Wiring diagram
First of all, on the base surface of the wall it is necessary to draw a diagram of the laying of wires, the installation locations of sockets and switches. Please note that the electrical cable should only be laid vertically and horizontally. And if the vertical sections will be determined mainly by the location of switches and sockets, then the horizontal ones are located under the ceiling or near the floor at a distance of 10-20 cm from them.
Wall chipping
Grooves (grooves) are made according to a precisely drawn pattern using a conventional hammer drill or grinder. Their depth is not determined by anything. The main thing is that the cable is completely buried in the grooves.
In places where sockets, switches or junction boxes will be installed, it is necessary to make round holes up to 3.5 cm deep. This can be done with a drill and a special attachment - a crown. Here it is important to accurately select the diameter of the crown to match the diameter of the hole.
Installation
Everything is ready, now in both a regular and wooden house you can do the wiring under the plasterboard using grooves. No special fasteners are used for this. Simply, at different points for attaching the cable, the grooves are covered with putty.
When the entire circuit is laid, the grooves are completely puttied. After which the wall is leveled with gypsum board sheets. Before installing each sheet, it is necessary to accurately mark the installation location of switches and sockets. Because after finishing the work it will be necessary to make through holes in the drywall for these electrical devices. Again, a drill with a crown is used for this.
Wiring under the frame
This wiring installation technology is several times simpler. There is no need to punch the walls, use a hammer drill, or putty. Although the wiring diagram is exactly the same as in the first case.
Most often, this option is used in wooden houses, where it is not possible to use hidden wiring in the walls. It is impossible to chip wood, and there is no point in doing so.
So, it all starts with drawing a wiring diagram on the drywall on the wall of a wooden house. If a partition is being built as a free-standing element of the room, then first a frame is constructed, then on one side it is sheathed with gypsum board sheets, and the diagram is already marked on them.
- After the wiring outline has been applied to the wall, you can assemble the sheathing.
- Now holes for the cable are drilled in the profiles exactly along the drawn lines. This can be done with a drill. Although the master should always have a cutter in his weaponry. It can be used to make holes without using a power tool. It is very important here that the diameter of the holes being made is sufficient to pull the corrugated hose and the wire inside it through them.
- The electrical wiring of a wooden house is carried out under drywall.
- Particular attention must be paid to the fastening of electrical wiring. The corrugated hose is attached to the profiles either with plastic clamps or with insulated copper wire. The most important thing is that the wiring does not dangle freely. Therefore, the more attachment points, the better.
- After which the frame is sheathed with gypsum board sheets.
Installation of sockets and switches
Installation of electrical appliances is carried out after all finishing work has been completed. But preparation must be done at this stage. First of all, holes are made on the plasterboard surface for switches and sockets. For this, a drill with a crown is again used.
The ends of the wires are brought out into them and are insulated. After which the finishing work of the wall is carried out. But when everything is over, the socket box is first installed, and the socket itself with a decorative cover is installed in it. The same goes for switches.
Important little things
- When assembling a wiring diagram for drywall, you need to remember it. After all, there is always a high probability that shelves, cabinets, frames with photos and drawings will be hung on the wall. The main thing here is not to damage the electrical cable during installation.
- When making holes in the profiles for laying wires, it is necessary to determine the locations of the holes so that they are as far as possible from the self-tapping screws used in the process of assembling the frame.
- Wiring under drywall in a wooden house can be done directly along the wall. That is, there is no need to make holes in the frame. It is important here that the installation diagram does not fall under the installation locations of direct hangers.
These are the two technologies for installing electrical wiring under sheets of drywall that are used in construction today. I would like to hear the opinion of our readers, maybe someone has assembled the circuit with their own hands. We will be interested in your opinion.
Author of the article
32 years
5th category plasterer in a construction company - 9 years of experience.
Installation of electrical wiring in a wooden house is carried out in several stages. It is better to entrust this work to professionals rather than rely on your own strength. But if you have a technical education as an electrician, or you have experience in this field of activity, then you can try to wire the house yourself.
Wood is the most fire-hazardous material, so if you decide to take on the task yourself, then you need not only to have certain skills, but also to read a bunch of literature on the topic of wiring a private house with your own hands. Or use the Internet, enter into a search engine the phrase electrical wiring in the house with your own hands, and you will see a huge number of articles and forums discussing this topic.
There are two types of wiring that are ideal for a wooden house. Taking into account the rules of electrical installations, both open and hidden wiring can be installed in a wooden cottage.
Methods for installing wiring under gypsum boards
Below are four options for laying wiring under plasterboard walls.
If the sheets are glued to the base wall
In construction, this finishing method can be compared to applying conventional plaster: between the wall and the finishing material there is only a thin adhesive layer. Therefore, to lay the wires you will have to ditch the walls. Unlike plastered walls, grooves can be made less deep. However, remember: the distance between the inside of the drywall and the outer protection of the wire should be 5 mm or more.
Important! Under no circumstances should you try to lay sheets directly on the wiring. Drywall is less durable than plaster, so it can be easily damaged, which increases the risk of mechanical stress on the cable.
Grooves in drywall for wiring.
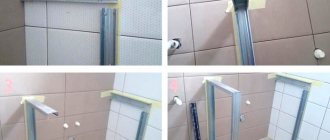
Let's move on to the socket boxes. There are two types of products: internal and external. External ones are attached directly to the wall surface (in our case, drywall). For internal ones, you need to make a 20 mm recess in the base wall. The cable is hidden in grooves, the end is placed in the form of a ring directly in a pre-made “hole” for the socket box. The recess in the drywall is drilled after finishing work is completed (most importantly, do not forget to mark where the recess for the socket is located).
If simple boxes for electrical installation products are installed, then recesses in the drywall should be made in advance. The diameter should be selected with a margin of 5–10 mm, taking into account the dimensions of the product being installed. Further actions are similar to the previous method: hide the cable in the grooves, make a ring from its end and place it in the recess.
Fastening socket boxes in plasterboard
Before installing the plasterboard sheet, glue should be applied around the recess for the electrical installation product. After placing the gypsum board, remove excess plaster to create a monolithic hole. Make sure there are no gaps between the wall and the drywall. Then place the box in the hole, securing it with a layer of alabaster.
Drywall is fixed to a special metal frame (no insulation)
Using this method, electrical wiring is installed under the drywall between the wall and the finishing gypsum board. You need to create recesses in the profile, then process all the edges using sandpaper, which will protect the wire from damage to the insulating layer. Next, stretch the cable according to the pre-selected pattern.
Regardless of using a cable with a three-layer sheath or a corrugated product, when pulling it through the profile, place special bushings in the holes. If you don't want to buy, make these items yourself using pipe scraps. On the outer surface of the plasterboard you need to apply a schematic display of the wiring. When screwing in self-tapping screws, it is important that the fastening elements are positioned with a distance of at least 100 mm from the cable. This will reduce the risk of damage to the wire and the likelihood of a short circuit. A screw can become a phase conductor, transferring it to a metal frame for attaching drywall. It is important to perform high-quality grounding of the profile.
Try to place the cable away from the drywall itself. Move it as far as possible from the areas where drilling will be done.
Another option for installing wires is fixing them on a load-bearing wall using special clips. It is necessary to make holes in the wall, observing technological gaps. In this case, the likelihood of cable damage is minimized. Any gap in the profile is shown on the markings to avoid screwing screws into the void. In the case of vertical installation, the cable is fixed with clips or a tie to the profile itself.
The presence of insulation between the sheet and the base wall
This process of installing electrical wiring is identical to the previous option, but some fire safety measures must be observed. If the insulation is mineral wool or other non-combustible material, you can proceed according to the method above. It is enough to carefully place the insulation next to the cable. If the material is characterized by some kind of fire hazard, then the wires should be hidden in metal corrugations. Tubes made of flame retardant plastic are suitable. It is advisable to install the bushings described above.
Cable laying in insulation
Similar rules must be followed when installing wiring in a wooden house, the walls and ceiling of which are finished with plasterboard sheets. It is even possible to lay special steel pipes, which will completely eliminate fire due to a short circuit.
Insulation and drywall are glued to the base wall
If the insulation material is rigid (classified as structural), then you can do without a metal profile. In this case, the insulation and drywall are attached to the wall in turn using special glue. A certain air gap is formed between the base wall and the insulation. The cable is hidden in the grooves. An alternative option is to make channels in the insulation itself. Glue the sheets over the insulating material. If the thickness of the finished sandwich panel is acceptable, it is possible to install socket boxes with mounting on a load-bearing wall.
Installation of wires under drywall with insulation
Safe electrical wiring in a wooden house: not a myth, but a reality
How to make safe electrical wiring in a wooden house?
The most popular material for the construction of country houses has been and remains wood. Which, for all its many advantages, has one serious drawback - it is, as firefighters say, “a combustible material.”
Fire statistics show that more than half of fires in wooden houses occur due to faulty electrical wiring. In practice, the main cause of malfunctions and subsequent short circuits is most often a violation of the integrity of the wire insulation in the electrical wiring. As a rule, this occurs either due to increased load on the wires or due to mechanical damage to the insulation.
Why does this happen?
Most home-grown “jacks of all trades”, in order to save time, effort and money, lay hidden electrical wiring on wooden bases, boldly hiding it behind the ceiling lining, under the wall cladding, behind the baseboards, in the voids of the ceilings and explaining to the “unreasonable client what exactly This is what you need to do.
Remember! to install hidden electrical wiring in wooden houses using a corrugated PVC pipe or plastic box !
Why?
In fact, there are several reasons. Below we will look at the two most typical situations that arise when operating electrical wiring in a wooden house.
Firstly. In the process of laying the cable, the electrician may slightly damage the insulation of the wires, and control electrical measurements of the damage may not be recorded.
However, when all the necessary electrical equipment is connected, the electrical wiring begins to function at maximum load. Naturally, such operation, which causes increased heating of the cable or wire, inevitably weakens the insulation, which causes a short circuit in the electrical wiring.
The rather thin walls of plastic pipes and PVC boxes are unable to withstand a short circuit without burning out, therefore, a short circuit, alas, will inevitably lead to a fire.
Secondly. Hidden electrical wiring using a corrugated pipe or PVC duct, laid in the voids of wooden walls, ceilings and floors, is the object of increased attention from rodents, which are not uncommon in wooden houses, trying to “test the teeth of the details of your communications.
It is not difficult for mice, and even more so for rats, to gnaw through a fairly thin pipe or PVC box, exposing the wire strands, which results in a short circuit in the hidden electrical wiring.
The situation is aggravated by the fact that over time, huge amounts of wood dust accumulate in the voids of the walls and ceilings of wooden houses. As a result, the slightest spark leads to a fire. The worst thing is that it is almost impossible to immediately determine the location of the fire and eliminate it, since the combustion process that occurs BEHIND the walls and ceilings is hidden from view. Therefore, even if you pour water and foam all around, you still won’t be able to quickly put out the fire.
Is it possible to avoid these problems?
At first glance, if you install electrical wiring in a wooden house in accordance with the requirements of SNiP, PEU, there will be no problems. However, in reality it is not so simple. First of all, because the PUE requirements for the installation of electrical wiring in wooden buildings are extremely stringent. By the way, it is the rigidity of the standards that most often forces “home-grown electricians” to violate them.
However, laying fireproof electrical wiring in a wooden house is actually doable, and you can choose which wiring to use.
The table below shows the types of electrical wiring and methods of laying wires and cables in accordance with fire safety conditions.
Let's take a closer look at all types of fireproof electrical wiring in a wooden house.
Hidden wiring
Although most competent sources on this topic do not recommend installing hidden wiring on combustible, in our case, wooden structures, however, provided that fire safety requirements are met and there are no financial problems, such wiring can be done.
Below we present the regulatory document (PEU-6) in its part concerning the installation of hidden wiring indoors.
In fact, there are only two ways to fireproof hidden wiring in a wooden house .
One of them is laying hidden electrical wiring using a metal sleeve (pipe) . The main advantage of this method is that in the event of a fire, the metal pipe will protect adjacent structures from fire.
When using this wiring method, you will need to meet several strict conditions: to protect the pipe walls from corrosion, it must be painted or galvanized on the inside. To protect the cable insulation from sharp edges resulting from cutting pipes, special plastic plugs must be placed on their ends. Plus, for such wiring you will need to drill holes in the thickness of the walls in the form of channels, into which, in fact, metal pipes are then laid.
The best option for this wiring option is copper pipes. Due to the fact that copper pipes bend quite easily and can be laid without special tools, wiring installation is at least somewhat simplified. However, for simplicity and convenience you will have to pay a high, literally, price - copper pipes are very expensive.
In accordance with GOST R 50571.15–97 (IEC 364 5 52 93): clause 522.3.2, pipes should be laid with a slight slope to ensure the possibility of condensate flowing out. But be prepared for the fact that in practice it is extremely difficult, if not impossible, to check the quality of installation of metal pipes, the same angle of inclination or the tightness of connections.
The second method of laying hidden electrical wiring in a wooden building is over a layer of plaster (marking) at least 10 mm thick on all sides.
The method seems to be simple, but when using it, the question arises: how to comply with the PES standards regarding the replacement of electrical wiring. As an option, you can embed the electrical cable in plaster, having previously packed it in corrugation. Formally, of course, the PES standards will be met, but in fact it will no longer be possible to re-tighten the rigid wire.
Moreover, no specialist will be able to predict how plaster on wooden surfaces will behave after some time. Will there be any cracks? Will it start to fall off? Not to mention that on beautiful wooden surfaces a thick layer of cement mortar will look, at least, strange.
It should be emphasized that both of these methods are quite expensive in terms of money, effort, and time. Plus, they require electrical wiring planning at the construction stage.
Open wiring
– Wiring in electrical corrugated pipe
This method involves pulling the cable into a flexible corrugated pipe made of special plastic that does not support combustion. Two or more cables can be placed in one pipe.
The disadvantages of this method include, first of all, its unaesthetic quality - you are unlikely to like the prospect of “decorating your home with several rows of corrugated tubes. Taking into account the number of electrical appliances in a modern house, there can be 5-7 such rows! In addition, since it is almost impossible to lay a corrugated pipe with a cable stretched into it straight, “on line,” all its bends and sagging will also not add charm to your home.
Another disadvantage: a corrugated pipe is an excellent “dust collector”, from which it is very difficult to remove accumulated dust.
– Wiring in electrical boxes (cable ducts)
With this method, the cable is laid in special boxes (cable channels) made of flame-retardant plastic and closed with snap-on lids.
The main problem when using this method is associated with the inevitable shrinkage of a wooden house. On average, it is 1 cm per 1 m of house height, and these values are given for houses made of high-quality laminated veneer lumber, the shrinkage of which is minimal. In practice, this means that a shrinkage of three centimeters (for a typical two-story house) will compress all the boxes, the lids will fly off, and the boxes themselves will crack. As a result, the wiring will have to be redone!
Secondly, installing plastic boxes neatly and evenly will require some skill and dexterity. Add to this the problems with fittings - alas, manufacturers offer a rather meager assortment of turns, corners, plugs, joints, without which it is almost impossible to accurately install cable channels.
Another significant drawback of electrical wiring in cable channels is its boring, office-like appearance.
The advantages of this method include its low cost, minimal labor costs and the ability to easily make any changes in the future.
– Open cable wiring
Lastly, we will consider the most optimal of all methods of installing electrical wiring in a wooden house - wiring with an open cable.
Naturally, when using an unprotected open cable, there is also no need to talk about the aesthetics of the room. Not only does the cable itself in conventional insulation (for example, the most common PUNP) look rather dull, but underneath it you will also need to install an asbestos or metal gasket protruding from all sides by at least 10 cm.
However, there is another way. This is the so-called retro wiring on insulators. Its main advantages are the ability to comply with all necessary safety requirements , plus an original, extremely popular interior design in retro style.
You will learn more about installing such wiring in our next article.
What to do when drywall is already installed
Options for installing electrical wiring in parallel with wall finishing were discussed above. Now let's figure out what to do if the finishing materials are already installed on the walls. First, decide what is between the drywall and the base wall.
The first option is to place drywall on the wall using an adhesive compound. You will need to cut through the finishing surface and then groove the material for the cable installation. After such installation, you will be forced to restore the wall by painting it or wallpapering it.
The second option is simpler. It implies that the sheets of drywall were fixed to a metal profile. However, it is important to know the electrical wiring diagram and where exactly the metal frame is located. If you don't want to damage the front part, try running the wire through the baseboard. Drill a hole for the outlet or switch, then use a regular plumb bob to determine where to insert the cable. Remove part of the plinth, lower the rope along the plumb line, threading it through the hole. Tie a cable to the rope and pull it up. After this, the box is placed using any convenient method, and the cable is pulled to the shield.
Pulling the cable under the installed plasterboard
The third option is when insulation materials were installed between the wall and the gypsum board. To enter the cable, use the steel wire left over after installing the corrugation. If rigid insulating boards are used, then it will not be possible to get out using this method.
Since in any of the above options the cable under the drywall will be located chaotically, it is advisable to install it together with a protective corrugation. An alternative is a wire with three layers of insulation. Finally, be sure to make appropriate changes to the room's electrical circuit.
Do-it-yourself electrician for a country house.
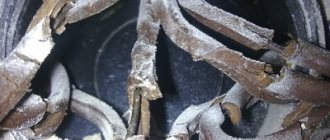
Repairing electrical wiring, replacing a socket or switch, re-changing electrical wires and completely doing all the electrical work is easy; knowledge of Ohm's and Kirchhoff's laws is not necessary, but you need to remember these people, because they were pioneers in electrical engineering. There is no time to study theory here; there are textbooks for that. We will simply shed light so that its end does not come. I advise you to do everything yourself, then you will never be left in the dark, you can easily find any malfunction. I'll tell you how to start from scratch and not get tangled in wires. When I see electrical wiring diagrams, tangles of wires hanging from the walls, sometimes it resembles the insides of a submarine, I am also a little afraid, but I think such photos are given specifically to scare away, so that you can turn to the help of a specialist and not stand up for the price.
| It was. |
| So it became. |
And so, the first thing we will begin to practice is to lay light. Where they will be and what kind of light bulbs or switches have already been decided. While we are making the lights, there is still time to think about where and how many outlets there will be.
Chapter first. Let there be light!
Let's draw an electrical diagram of the connections.
Everything is simple here, nothing complicated, a very simple scheme. Switch and light bulb
(lampshade or chandelier).
Let's reproduce a sketch of the rooms on paper and mark the places where the lighting lamps and switches will be. We choose convenient places for switches, usually next to the door, enter and turn on the light.
| Installation diagram. The circles contain wire connections. The dotted lines indicate two junction boxes. |
| Electrical diagram. |
We fix the switches in the marked places. We attach hooks for lamps, install distribution boxes, wire cases, or stretch wires through corrugated tubes, having previously measured the distance with a small margin, we install fasteners for the tubes.
| The three brown phase wires are connected together. Three blue neutral wires are connected together. |
| The brown phase wire will connect to the switch, and from the opposite end of the switch, the blue one will return to the box. The brown wire will return from the lamp and connect to the blue one. |
| The connection is wrapped with insulating tape. |
| It is advisable to put a heat shrink tube on the tape. |
| It's almost a painting. |
| The wires are connected in one plane and twisted. |
If you don’t like this installation process, I recommend using connectors from WAGO; however, I recommend twisting and soldering the stripped stranded wire. When using connectors, the soldering points in this case must be washed with a solvent, such as acetone. This technology is necessary to forget about the first photo.
| Connections on connectors. |
| Lighting wiring diagram using connectors. |
| The circuit breaker breaks the brown phase wire. |
There is nothing complicated when you do everything yourself!
And only now let’s do the calculations.
Let the equivalent of 500 Watt light bulbs burn in each room (a chandelier of 5 lamps of one hundred candles each), well, that’s what I wanted, maybe it’s some kind of holiday. There are four rooms, which means the total power is 2000 watts. We won’t count anything, there are GOST standards for that. The closest power value (2400 Watt), according to the table, for open wiring made with stranded wire, corresponds to a wire cross-section of 0.5 mm, with a current of 11 A. However, people do not take risks and choose wires with a larger cross-section from 1 to 1.5 mm, with a reserve, just in case, most likely not for electrical reasons, but for mechanical reasons, it suddenly breaks. The circuit breaker (fuse) sets the current to a lower current so that the lampshade does not melt. I don't mind, I'm like everyone else.
The light can also be carried out with a three-core wire, which will later be used for sockets. Do not use the third wire, green with a yellow stripe, but it may be required if you install a two-key switch. To be continued.
Wiring in rooms with high humidity
Water is one of the best conductors of electric current, therefore, when installing wiring in a bathroom, toilet, or bathhouse, certain recommendations should be followed:
- The switch and distribution panel must be placed outdoors with a high level of humidity.
- Sockets must be located at least 65 cm from the water supply.
- Any electrical appliances used indoors must be grounded.
- The electrical line for this room must be protected by a separate fuse.
- It is important to connect all ground bars to equalize the electrical potential.
In rooms with high humidity, it is necessary to provide grounding for devices.
Wiring diagram. The need to compile
Before installing electrical wiring, you should draw up a diagram of the room, where you should note the location of switches, sockets, lighting fixtures, and their number.
The drawing identifies the installation points of electrical appliances, wiring routes, and locations of junction boxes. The electrical circuit of the room also includes the power of each energy consumer and the total power of the devices. This is necessary to determine the load level on the circuit breakers.
In addition to the diagram, you should draw up a wiring plan. The cable is routed in a straight line to avoid kinks. The wiring is placed at a distance of 15cm from the floor or ceiling. The wires converge in junction boxes made of metal. Distributing the cable correctly, distributing the load between consumers, providing protection against short circuits is the task of a person who decides to independently cope with the installation of electrical wiring in a wooden house.
Cable under suspended ceiling
This option has several fundamental differences from installing wiring in plasterboard walls. The wires for ceiling lights are routed along the top edge of the walls. You need to drill holes in the plasterboard sheets in order to thread the cable through them. Run the cable before the drywall is installed. As a last resort, you can dismantle the sheets to provide convenient access to the space under the ceiling.
Organization of electrical installations under a suspended ceiling
Selection of materials and necessary tools
For high-quality laying of wires under sheets of plasterboard you will need:
- Plastic or metal corrugation that protects the cable (suitable when the wire is located between drywall and the base wall). Metal corrugation is necessary if flammable insulation is used.
- Cable channel (it can replace corrugation, but this will increase overall costs and complicate the work).
- Power cable, which is selected depending on the specific situation. If corrugation is not used, then three-layer insulation should be chosen. If the cable is hidden in the grooves of the base wall, double insulation is suitable.
- Ground wire to equalize potentials.
- Fastening elements: clips, bushings, ties and so on.
- Special socket boxes for drywall or regular boxes if the sheets are glued directly to the wall.
- A drill or other tool for making holes.
Tools and materials for electrical wiring installation
Hammer
The method of forming a recess with a hammer drill has also proven itself to be quite good. By the way, when using this tool, less dust is generated. To work, you need two attachments: a drill and a spatula. A mark is glued to the drill, moving away from the tip, in order to control the depth of the holes.
Let's look at how to make a groove for wiring with this unit:
- According to the markings, holes are drilled at a distance of 1-1.5 cm from each other;
- the blade attachment is changed;
- in the “no drilling” mode, the “jumpers” between the holes are removed;
- The side bevels are leveled.
By the way, holes for distribution boxes, switches and sockets are also made with a hammer drill. In this case, a special attachment is used - a crown.
It should be noted that the work will be quite long and noisy, and the quality of the grooves is not entirely good: there will be unevenness and chips. However, this is not a reason to refuse to use a hammer drill. All defects can be corrected with plaster.
Step by step laying
Below are step-by-step instructions for installing electrical wiring under drywall trim.
Step 1. Preparation
Assemble the metal profile, but do not rush to install the plasterboard sheets. Decide where to place the wiring: under the ceiling or along the walls. It all depends on the specific situation. If you have a suspended or suspended ceiling, it is better to hide the wires at the top and then lower them vertically to sockets, switches and other boxes.
If the ceiling in the house is made of concrete or wood, and only the walls are plasterboard, then the wiring should be placed in them, closer to the top. The distance from the ceiling must be at least 10 cm. Remember: when choosing places to install sockets and other equipment. Once you have your diagram on a piece of paper, transfer it to the wall. Calculate materials and proceed with installation.
Installation of a frame under plasterboard
Step 2. Installation of the box
Place distribution boxes. There should be one of these in every room of the house. Attach the component to the wall or ceiling using self-tapping screws.
Installing distribution boxes under drywall
Step 3. Laying the wires
Prepare the necessary materials and tools, and then proceed with installation. Secure the clips along the cable route. The distance between the fastening elements must be at least 30–40 cm. It is possible to use plastic clamps, which will speed up the work, but will increase the likelihood of damage to the corrugation due to the sharp ends of the profile.
Before pulling the corrugation through the metal frame, drill holes of a suitable diameter. You can buy a profile with holes already made. A similar method is used to connect the junction box and the points where sockets and switches will be installed. Mark on the drywall where the corresponding component will be, and then sew the sheet to the frame.
Step 4. Switching electrical installation products
All that remains is to install sockets and switches. They are usually called electric points. Using a drill, make holes in the places where they should be located. Install the socket boxes into the drywall. You need to make holes in the bottom to thread the wiring through. Pull out the cable and place the socket box in the groove. When everything is done, check the electrical circuit by supplying power to the apartment or house from the distribution panel.
Installing sockets and switches in drywall
Wire pulling methods
Laying cables in plasterboard partitions is a simple task. Before you install electrical wiring under drywall in your home, you need to prepare for the process to prevent possible future problems. Those who have installed plasterboard structures know that the sheets are attached to a wooden or metal frame. The problem is that the profiles can damage the wiring, leading to a short circuit. How can this be avoided? A corrugated pipe will help you. Protect the wires with it. Additionally, this precaution will stop the spread of flames if the electrical wiring under the drywall catches fire.
Corrugation is the most convenient way to protect wiring, but in its absence you can resort to other pipes or boxes.
To decide on the installation method, you need to choose the method by which the drywall sheets will be attached to the wall. There are two such ways. Plasterboard sheets can be attached directly to the wall. However, a more reliable way is to fasten the sheets to a frame made of metal profiles. Drywall is rarely attached without a frame, since this requires perfectly smooth walls, and such a miracle is rare.
In the diagram below you can see the method of pulling the wire through the metal frame.
http://samelectrik.ru/wp-content/ uploads /2015/03/electroprovodka_pod_gipsom-8. jpg
As you can see, the wiring passes through special holes in the profiles and is thus completely hidden in the wall. This is quite simple to implement, since this design does not require additional fastenings.
A more complex wiring diagram in the version with gluing sheets directly to the wall.
How to save money
Here are some practical recommendations that will allow you to install electrical wiring while spending a minimum of financial resources:
- Avoid purchasing cheap materials, including cable, corrugation, fasteners, socket boxes and boxes. Poor quality will lead to the fact that the wiring in the drywall will fail after 2-3 years. In the worst case scenario, electrical appliances may break down. Rewiring is a complex process that requires removing some sheets of drywall.
- Take your time and make sure the quality and reliability of the system. Separate power and lighting lines.
- If you replace the cable, check that the old wiring is in good condition. If all is well, you can leave the circuit that was used. In addition, some parts of the wiring may not need to be replaced.
- The cable cross-section is calculated depending on the load it must provide. At the same time, it is important to make a certain reserve. You can't know what you'll want to use 1-2 years from now. The reserve in cross-section will allow you to play it safe and avoid the need to replace the wiring.
- If you don't want to drill holes for sockets, use overhead hardware.
Installing an overhead socket on drywall
Remember that the open method of wiring on drywall violates all electrical and fire safety rules. Therefore, it is not used in this case. Do not forget to turn off the circuit breakers before installing or replacing the cable. All electrical installations (sockets and switches) should be installed at the very end. This approach will prevent damage to the decorative part.
Entering the house
The introductory section, from the main power line to the distribution panel, is considered the most critical. There are two ways to properly supply electricity to your home.
Laying cables in the ground
This is a more reliable method because the conductor is completely hidden and is not exposed to any external influences. In addition, in the event of a short circuit and fire, there is no possibility that people or property will be harmed. Due to such high fire safety, underground input is especially recommended for wooden housing construction. In addition, it does not spoil the appearance of the site at all.
At the same time, considerable costs will be required. It will be necessary to dig a trench at least 0.8 m deep. If access to the house will be through the foundation, the installation of a thick-walled metal sleeve will be required. And it is advisable to protect the cable itself from the chemical effects of soil, microorganisms and rodents, and pressure from vegetation roots. To do this, it is not simply placed in a trench, but is pre-stretched in a metal pipe or corrugation.
It is advisable to use the underground method at the stage when a new house is just being built, so you can think about the passage of all communications in advance.
Cable laying over the air
If the structure has already been erected, then an overhead line would be a cheaper, more convenient and easier option. A tap is being made from the nearest support of the main power line.
Remember the main thing! Neither you nor your friends, even with the highest electrical engineering education, have the right to climb this support to make connections. This work is done by electricians from the staff of the energy supply organization servicing this power line (they have a special permit for this).
It is recommended to use SIP wire (self-supporting insulated wire) as an introductory wire.
Its insulating layer is made of a material that can withstand temperature changes, sunlight and precipitation. Under the insulation layer, the SIP wire has not only conductive cores, but also a steel cable, which will ensure good tension. If you use another cable, it will need to be fixed with clamps on an additional supporting cable, also stretched between the support and the house.
Another important point. If the span is more than 20 m, then additional support must be installed, otherwise the sag will be large, which increases the mechanical load on the wire.
The air supply enters the house through a hole drilled in the wall into which a piece of metal pipe is mounted
It is very important that there are no tall bushes, trees or outbuildings in the path of the wire.