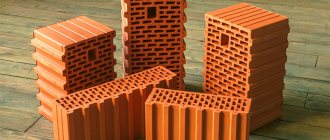
Description
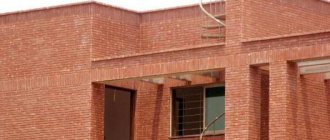
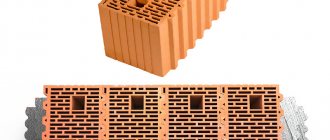
Now a new type of brick has appeared, this is the so-called warm ceramics or porous large-format ceramic block (KKB). This artificial stone has a lot of voids and is larger in size than regular brick, so there are fewer masonry joints - cold bridges. Such a brick has very low thermal conductivity; it is much warmer than ordinary hollow and, even more so, solid brick.
Porous hollow ceramic blocks are on average stronger than blocks made of cellular concrete (aerated concrete, foam concrete). The difference in strength between them can easily be 2 times. However, warm ceramics are still, on average, inferior in strength to ordinary ordinary brick, which does not have thin walls and air chambers. However, the strength of KKB is more than enough for the construction of a private house.
Another advantage of ceramic blocks is the ability to lay hollow facing bricks close to the blocks, i.e. without ventilated gap. Thanks to this, the facing brick participates in the resistance to heat transfer of the outer wall.
Many manufacturers recommend using factory-made warm mortars when laying warm ceramics (read about them below).
The characteristics of ceramic blocks (thermal conductivity, strength, etc.) may vary significantly from one manufacturer to another, so you need to check them in advance.
Before buying a large-format brick, you must check it to ensure that all sizes match. Some sizes vary from batch to batch. The correct precise geometry of the block is very important for convenient and quick laying! The manufacturer can grind the blocks, after which their height becomes the same, but, unfortunately, in Russia, most popular manufacturers do not produce polished ceramic blocks.
To create small pores in ceramics (not to be confused with air chambers), a porous agent is used in porous ceramic blocks: sawdust, waste paper, polystyrene, etc. In this case, you must definitely check with the manufacturer what exactly he puts into the brick composition, because combustion products polystyrene (and bricks are actually fired) are very toxic.
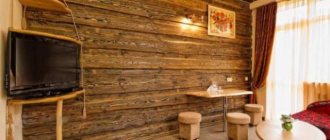
When using warm ceramics in external walls, in places where doors and windows will stand and heating radiators will be attached, sections of the walls “to soothe the soul” can be lined with solid brick, because it is stronger and is guaranteed not to crumble from powerful fasteners of the front door or a heavy battery. And in order to better retain heat in these areas of the walls, you can thicken the wall a little on the outside, then there will be a protruding relief near the door or window. Or you need to calculate exactly where the anchors and dowels will be placed, and only lay solid brick there.
Manufacturers of large-format blocks usually indicate the size in the form of the letters NF and a number. This came from Europe, where NF is a normal format, i.e. about the same as our single ordinary brick. In Europe, ordinary bricks have dimensions of 240x115x71 mm. The size in NFs shows how many regular NF bricks the block replaces. For example, a 14.3 NF ceramic stone (510x250x219 mm) is equal in volume to approximately 14.3 NF size bricks.
In addition to the main size blocks chosen for building a house, manufacturers produce additional blocks.
We must remember that pallets with large-format ceramic blocks can take up a lot of space on the site. You need to come up with a flat, dry and convenient place to store them in advance.
Before purchasing warm ceramics, you should definitely look at the specific blocks you will be purchasing. Don’t be lazy, go to the warehouse and visually inspect them there so that they don’t slip in defective parts with cracks (I already said about geometry). By the way, the dealer’s very low price compared to other dealers suggests that this is most likely a reject or a different “grade.” You also need to monitor the shipment so that the blocks are not broken.
Blocks can also be broken during delivery if the truck drives a hundred kilometers and jumps through potholes. The unloading of pallets onto the site also needs to be controlled.
Laying ceramic blocks
When working with KKB, it is very important to correctly follow the installation technology. It is imperative to read the accompanying instructions for the KKB and let the builders familiarize themselves with it. It is necessary to hire only experienced masons, and in no case any cheap jack-of-all-trades.
The brochures-instructions of the manufacturer of ceramic blocks should describe most of the options for technical solutions: laying walls, laying corners, combining with floors, foundations, building bay windows, etc. I have studied the instructions for the blocks of most manufacturers of warm ceramics, recommendations for laying may vary!
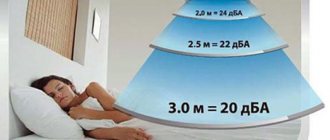
It is advisable to lay walls made of warm ceramics at positive temperatures above +5°C. Some manufacturers allow blocks to be laid at slightly below zero temperatures if “winter” masonry mortar is used. The finished masonry must be protected from precipitation by covering it with film to prevent rain or snow from getting into the vertical chambers of the blocks. You should always cover with film at night, even if the sky is clear in the evening - rain can fall at night without any warning and fill the air chambers of the blocks with water.
In the masonry of external walls made of large-format ceramic blocks, the masonry mixture is not applied between the vertical sides of the stones: they are usually “dry” butted end to end, the so-called tongue and groove joint. In this place, the blocks must be pressed tightly. The remaining narrow space of vertical dry joints is then finally “sealed” by, for example, plastering the wall on both sides. If there is no plaster, then the vertical dry joints must be covered with mortar.
The bed (from the name of the side of the brick - bed) masonry joint should not be too thick or too thin. The entire brick block should lie evenly on the mortar without gaps. It is better to find out the exact thickness of the seam from the manufacturer for a specific block and a specific solution. For example, the Wienerberger company for its Porotherm in its brochure recommends a bed seam of an average of 12 mm, and the companies BRAER and RAUF also recommend 12 mm for their blocks. The manufacturer SKKM recommends a thickness of 12 mm for its KERAKAM blocks for ordinary mortar, and no more than 5 mm for special glue.
Bandaging blocks. The manufacturer BRAER writes in the instructions that the ligation of blocks should be done in half a block. The manufacturer Wienerberger writes in the instructions that the blocks must be shifted by at least 0.4 block heights.
If facing brick is chosen for the facade, then it is necessary to connect the masonry of blocks and the masonry of facing bricks. For example, BRAER recommends using galvanized mesh (reinforcement d=3 mm, B-500 (Bp-1), cell 50x50 mm) with a pitch of 440 mm, i.e. every two rows of blocks (6 rows of facing bricks). Manufacturers RAUF and SKKM recommend inserting anchors (S-shaped brackets) in a checkerboard pattern into each horizontal seam in 75 cm increments. Anchors are bent from stainless or galvanized steel.
To prevent the solution from getting inside the voids of the blocks, you can use a mesh. Again, different manufacturers have different recommendations for different blocks! Some manufacturers do not recommend using mesh in bedding solution; others, on the contrary, write in the instructions that it is necessary. SKKM writes that it is necessary to lay a plastic mesh with cell sizes of 5x5 mm.
The laying of the first blocks should not be done on a flat, clean surface. It is better to start laying blocks from the corners of the building. The stacked blocks must be checked with a level and compared with a stretched mooring cord. The horizontal plane formed by the rows can also be double-checked with a hydraulic level (a hose with water inside and two flasks at the ends). If you do not follow the horizontal line, then due to fluctuations in the thickness of the mortar and different heights of the blocks, by the end of the laying of the first floor there may be a discrepancy of several centimeters.
There is a limitation on the maximum overhang of a block over the foundation or floor depending on the length of the block (i.e. its depth).
When installing window lintels, it is important to avoid the formation of a cold bridge. Alternatively, you can use several jumpers and EPS for this: one jumper is placed on the outside, then EPS insulation is installed, then several jumpers, depending on the thickness of the KKB used. The window is mounted flush with insulation; at the top it is attached to adjacent lintels using special plates. In addition, the use of several lightweight jumpers allows you to install them manually, without the use of a crane.
Most manufacturers of warm ceramics allow prefabricated floors (i.e. slabs) to be supported on ceramic blocks without an armored belt, although it is better to clarify this point with a specific one; you can lay several rows of solid bricks, and then lay the slabs on top. In the laying of solid bricks, it is necessary to provide an EPS insert 5 cm thick.
If necessary, ceramic blocks can be sawed if it is not possible to use additional blocks. A special electric saw is used for porous ceramics; the cut is smooth.
There is no need to be tied to the height of the block when laying the window sill space. It is necessary to determine in advance the comfortable height of the window sills, taking into account the thickness of the window sill and the height of the finished floor. The top of the masonry on which the window and window sill will be placed can be laid out of ordinary brick, not forgetting to use insulation in those places where a cold bridge may appear.
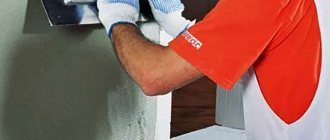
Drilling and scoring
Still from the ForumHouseTV project video. The ceramic block is grooved with a hammer drill without the formation of cracks after cutting the grooves with a wall chaser.
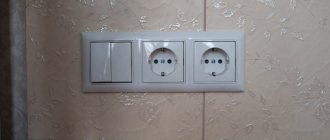
There is an opinion that ordinary dowels do not hold well in warm ceramics, but you can easily find demonstration videos on YouTube where you can see that the dowels hold well there. It is usually recommended to drill through at least three “layers” of the block. The drill does not need to turn on the impact mode, then the hole will be smooth and nothing will be destroyed. The greater the load, the longer the dowels and screws need to be used and, accordingly, deeper into the block. Conventional dowels and screws are used with KKB with a load of up to 50 kg (the exact value must be checked with the manufacturer!), with a higher load, chemical anchors are used.
If necessary, warm ceramics can be tapped for laying, for example, wiring. The scoring is done using a double-disc wall chaser, and then the core is removed with a hammer drill. If you don’t have a wall chaser, then you can cut through the groove directions with an ordinary “grinder”, and only then carefully groove the blocks with a hammer drill. The groove should be up to 3 cm deep and 2 cm wide.
Production technology
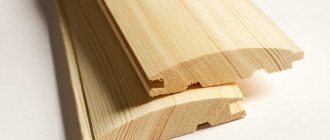
The main component for producing bricks is clay, from which all impurities, dirt, and small stones are removed in advance. Up to 25-30% of the total volume of raw materials consists of fillers: peat, sawdust, straw. During firing, all the filler will burn out, and pores will remain in its place.
After combining the filler with the base and additives, the mass is ground so that it becomes completely mixed and homogeneous. Then it is pressed and molded, and during these manipulations all excess air is released.
Using a steel string, bars are cut to the required size, which are sent to the workshop to dry for 60 hours. For large bricks, the drying time is increased to 70 hours.
Porous block production line
The final stage of production is firing. It can last up to 50 hours and is carried out in a special oven at a temperature of about +1000 degrees. The quality of the finished brick depends on the correct firing. Its strength will be quite high, all organic components will burn out completely, and the weight will become much less than it was at the beginning.
Warm masonry mortars
Large-format ceramic blocks are not recommended to be laid on ordinary mortar due to its high thermal conductivity; a special masonry mixture is usually used. Popular manufacturers of warm ceramics themselves produce masonry mixture for their blocks. Typically, such a solution contains granules of expanded perlite, which has low thermal conductivity. Of course, masonry mixtures are more expensive than ordinary cement-sand mortar, but with them the wall will become warmer, because The cold bridges, which are the layers of the CPR, will disappear.
Warm masonry mixtures are packaged in 20 kg bags. A summer or winter version of the “execution” is possible; the winter solution can be used at sub-zero temperatures. The proportions for water consumption should be written on the bag, usually an average of 12-15 liters per 20 kg of dry mixture. The “lifetime” of the prepared solution is 1-2 hours, the winter version is much shorter.
The most famous KKB manufacturers recommend a horizontal mortar joint thickness of 12 mm. There are no vertical seams. Therefore, if the height of the block of warm ceramics is, for example, 21.9 cm and the thickness of the layer of masonry mixture on it is 1.2 cm, it turns out:
100% * 1,2 / (21,9 + 1,2) = 5,2%,
those. of the wall area, only 5.2% of it is “risky”; this is quite small. Now I’ll compare walls made of warm ceramics with different masonry mortars, taking into account their thermal conductivity coefficients (in a dry state):
0.58 W/(m °C) - thermal conductivity of a cold solution (CPR) 0.19 W/(m °C) - thermal conductivity of a warm solution 0.15 W/(m °C) - thermal conductivity of the CSC (for different different manufacturers)
In all cases, I will take the thickness of the materials to be 51 cm, i.e. 0.51 m. Now I will calculate the heat transfer resistance of all materials.
RKKB = 0.51 / 0.15 = 3.40 m2 °C/W RTP = 0.51 / 0.19 = 2.68 m2 °C/W RХР = 0.51 / 0.58 = 0, 88 m2°C/W
Now I will calculate the heat transfer resistance of walls with different solutions, taking into account their percentage in the wall area.
3.40 * 94.8% + 2.68 * 5.2% = 3.2232 + 0.13936 = 3.36 m2 °C/W (KKB + warm solution) 3.40 * 94.8% + 0.88 * 5.2% = 3.2232 + 0.04576 = 3.27 m2 °C/W (KKB + cold solution)
The difference is not significant; with a warm solution the wall is only 1.03 times warmer, i.e. by 3%. There is a very small difference, all due to the fact that large-format ceramic blocks have large geometric dimensions and do not have vertical seams.
If the blocks of warm ceramics were smaller in size, if vertical joints were used, then, of course, the efficiency of using warm masonry mortars would be higher. But according to calculations, it turned out that the difference is minimal, and I don’t understand where manufacturers get the figures that a wall with a warm solution is 15% warmer than with a regular CPR.
Ready-made masonry mixture is usually not cheap, but if you compare it with CPR and calculate the delivery of materials and the cost of manually mixing the mortar, the difference will no longer be so significant. The ready-made masonry mixture has one more advantage - the factory uniformity of the composition.
General conclusions
As we can see, the thermal conductivity of warm ceramics is an extremely important parameter. However, in addition to this, other factors should be taken into account when choosing, including the climatic conditions of the region and the absence or presence of additional insulation or finishing with facing bricks. In general, all ceramic blocks are suitable for central Russia. However, if you do not want to use additional thermal insulation, then it makes sense to buy blocks with a thickness of 440mm or 510mm, or some varieties of 380mm blocks. If the future installation of an additional “thermal coat” does not bother you, then it is quite possible to get by with blocks for wall thicknesses of 250 mm and 380 mm, provided that you provide additional thermal insulation in the form of mineral wool or polystyrene foam, and decorative plaster. The advantage of this option is that a thinner foundation will be enough for you, which will reduce the costs and time of its construction.