All things tend to wear out over time. It is for this reason that every few years we renovate the apartment, re-sticking old wallpaper, changing flooring and baseboards, and rearranging sockets. But all these actions are only cosmetic. In the case of a major renovation or moving from an old apartment to a new one, there is much more work, some of which are recommended to be completed. These include replacing wiring. Today we will talk about how to replace old wiring.
Pulling in existing cable channels
The method is suitable if the old wiring is laid in cable channels. To transfer the wiring, the circuit is de-energized and the channel is opened at the starting and ending points (for example, a distribution box and a socket). The new cable is attached to the old one, for example, in a junction box. The old cable is pulled out from the opposite end of the channel - from the outlet. In theory, everything is simple and instead of old wires, the wiring will be done with new wires. But this method has its drawbacks:
- There may be cement plugs inside the channel through which it will not be possible to pass a new cable.
- The wires in the channel may be twisted, which will also prevent pulling.
- The inner surface of the channel, pieces of cement can damage the braid of the new cable, which creates a danger.
No matter how carefully you try to replace old cables with new ones using this method, there will be no confidence that the wiring is intact. It's better to replace it differently.
After how many years is replacement necessary?
Damaged, crumbling insulation
The old panel house, built at the end of the last century, was equipped with cables with aluminum conductors. This was considered economically beneficial, which was the basis for mass municipal construction. Over time, engineers realized the mistake.
Aluminum electrical wire has the following disadvantages:
- Fragility. At bend points, the core breaks off after 10-15 cycles. Because of this, you have to extend the line and make twists.
- The current passing through the metal changes its structure. The wire becomes porous and brittle.
- Aluminum oxidizes even under insulating tape. Corrosion first impairs the conductivity of the contacts, and then the connections disappear completely.
Depending on the operating conditions, replacement of electrical wiring in Soviet-built buildings must be carried out no later than 20 years after their commissioning. If cables with copper conductors were installed in the apartment, their service life is 50 years.
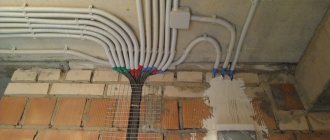
Gasket in plaster
The essence of the method is the same as for grating; the wiring is laid in prepared grooves, but not in the walls, but in the plaster. This method is used when the coating thickness is at least 1 cm. The walls are not affected. Cable routing is carried out at the pre-finishing stage; the cable can be laid directly into a groove or into a cable channel.
The advantages of the method include:
- Maintaining the integrity of the walls.
- Possibility to perform hidden wiring.
- Less work compared to laying wires in the wall.
Disadvantages of the method:
- Wiring can only be replaced during repairs, as the decorative finish of the walls will be damaged.
Distribution panel
As a rule, previously in panel houses the electric energy meter and the input machine for the apartment were installed on the staircases.
Now one circuit breaker is not enough; the panel is assembled from residual current devices (RCDs) and individual circuit breakers for each group of consumers. In principle, the counter and the input machine can remain on the site. Moreover, this is required by the energy supply organization in order to easily take readings from the meter.
You can assemble the rest of the distribution panel yourself and install it at the entrance to the apartment. In this case, it is best to use a metal or plastic special box, that is, you will have a mounted switchboard. In a panel house, making it hidden is very problematic, just imagine the size of the niche that will need to be hollowed out in a reinforced concrete slab. Choose among the materials at your discretion. A plastic box will be more practical, it weighs less and has a more attractive appearance in terms of aesthetics. The metal box is characterized by durability and reliability.
Think over the cable branching diagram from the input panel in advance.
This scheme is also convenient because if there is a need for repair work on any of the branches of the electrical network, it will be enough to turn off the required circuit breaker, and not leave the entire apartment without voltage.
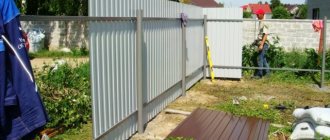
Open installation
In this case, the cables in the cable channels are laid on top of the final finish. Part of the wiring can run in the baseboard - for this, special profile baseboards with space for wires are produced, the second part is removed into the box:
Boxes with decorative designs are available, which allows you to disguise exposed wiring and fit it into the interior.
Among the advantages of open installation are:
- Easy to install and replace wires.
- Possibility of carrying out work after finishing.
- Ability to quickly move and add points.
The method has one drawback - it is impossible to completely hide communications, which can introduce restrictions into the interior of the room.
Distribution panel
As a rule, previously in panel houses the electric energy meter and the input machine for the apartment were installed on the staircases. Now one circuit breaker is not enough; the panel is assembled from residual current devices (RCDs) and individual circuit breakers for each group of consumers.
In principle, the counter and the input machine can remain on the site. Moreover, this is required by the energy supply organization in order to easily take readings from the meter.
You can assemble the rest of the distribution panel yourself and install it at the entrance to the apartment. In this case, it is best to use a metal or plastic special box, that is, you will have a mounted switchboard. In a panel house, making it hidden is very problematic, just imagine the size of the niche that will need to be hollowed out in a reinforced concrete slab. Choose among the materials at your discretion. A plastic box will be more practical, it weighs less and has a more attractive appearance in terms of aesthetics. The metal box is characterized by durability and reliability.
Think over the cable branching diagram from the input panel in advance.
This scheme is also convenient because if there is a need for repair work on any of the branches of the electrical network, it will be enough to turn off the required circuit breaker, and not leave the entire apartment without voltage.
Where to start
You need to start work by drawing up a diagram of the future wiring. A diagram or drawing of the location of cables and consumption points is needed for at least three reasons:
- Fixing places for laying wires with dimensions. This information is especially important if you decide to do hidden wiring. If you later want to hang furniture or a TV, you will know exactly where the wires go so as not to accidentally damage them when drilling.
- Calculation of the number of necessary elements - socket boxes, sockets, switches, cables, cable ducts, connectors and other components.
- Determination of the optimal electrical communications scheme. The plan shows where it is best to lay the installation to take into account the location of the equipment, interior elements, and so on.
After drawing up the plan, components are calculated and purchased.
Materials and tools
To replace the wiring, you may need a grinder.
To replace the electrics, you will need the following tools:
- hammer drill, grinder, screwdriver;
- level, tape measure, square;
- hammer;
- tester, indicator;
- wire cutters, pliers;
- Screwdriver Set;
- spatula, paint brush;
- stationery knife;
- soldering iron;
- headlamp.
Calculations of materials and devices are made based on the diagram.
It is necessary to stock up on insulating tape.
To change the internal line in an apartment, you should stock up on the following materials:
- cable with copper conductors with a cross section of 1.0-2.5 mm;
- tin or solder;
- rosin;
- insulating tape;
- socket boxes;
- mounting boxes;
- switches;
- bags;
- connecting blocks;
- putty;
- primer;
- finishing.
For convenience and safety of working at height, you need to purchase a stable stepladder. To protect your skin, vision and respiratory organs, you should work in a construction helmet, protective gloves, goggles and a respirator. You will also need a 1 kW dielectric mat.
Recommendations on how to save money
Another thing that affects the price is how the unit is cleaned. If you want an electrician to clean the grooves, it will definitely be more expensive than a mason.
It is good to tighten the grooves and the entire wall entirely so that not a trace remains after installation.
- The best option that may arise is when the apartment is empty and starts with the so-called green field.
- If you need to carry out reconstruction in a residential apartment, you will have whole days moving furniture, and during work it is better to move your family to the country.
Installation in a 2-room apartment takes about 4 days, in a 3-room apartment about 5 days. Now let's look at some details.
Our prices
| Work area | Price | |
| One-room apartment (up to 35 sq.m; 14 electrical points; boxing up to 8 machines) | from 16,000 rub. up to 35,000 rub. | |
| Two-room apartment (up to 45 sq.m; 16 electrical points; boxing up to 10 machines) | from 22,000 rub. up to 40,000 rub. | |
| Three-room apartment (up to 60 sq.m; 22 electrical points; boxing up to 12 machines) | from 30,000 rub. up to 50,000 rub. | |
| House area up to 70 sq.m (22 electrical points; boxing up to 14 machines) | from 38,000 rub. up to 60,000 rub. | |
| House area up to 110 sq.m (45 electrical points; boxing up to 18 machines) | from 60,000 rub. up to 95,000 rub. | |
| House area up to 150 sq.m (60 electrical points; boxing up to 24 machines) | from 90,000 rub. up to 125,000 rub. | |
View full price list
Electrical wiring diagram in an apartment in a panel house or new building: design and calculation
Every owner should know how the apartment electrical wiring works in his home. And if no one forces you to study this information thoroughly, then the basics will definitely help in any emergency situation. Usually the wiring diagram is standard and there is nothing complicated about it.
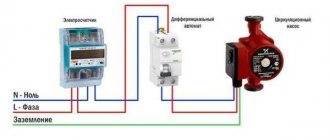
The first and, perhaps, the most important component in the apartment electrical wiring diagram is the interior panel. It is to it, passing through the fuse along the way, that the cable is directed from the main power panel, which is located on the landing. It consists of an electric meter, several circuit breakers and a residual current device
All this is assembled into a single unit using a mounting rail and one or more auxiliary rails
It consists of an electric meter, several circuit breakers and a residual current device. All this is assembled into a single unit using a mounting rail and one or more auxiliary rails.
The number of internal power lines directly depends on how many rooms you have. Although this is also affected by the power consumption of some devices. They may require an additional dedicated line. There are usually only two wires: “phase” and “zero”, but there is also an option with a third, which is “grounding”.
Calculation of electrical wiring in an apartment can be carried out in two ways. The first is the formula P:U=I, where the current is equal to the power divided by the network voltage. The second option is much simpler; you should separately sum up the electricity consumed by all devices located on the same line. Don't forget to add an extra ten percent to this number as a reserve.
Grilling panel houses - recommended rules
1. When changing wiring, use the wiring method as much as possible and use channels for wiring in concrete panels of houses;
2. Avoid gating of floors and ceilings in panel houses; use floor slab channels for wiring;
3. Try to avoid horizontal chipping of the wall panels of the apartment. And if you use horizontal grooves, you will eliminate cutting the reinforcement of concrete slabs;
4. Avoid chipping concrete wall panels at the joints of wall panels and floors;
Gouging the panel support is prohibited
5. Adhere to the rules for routing electrical wiring, namely, make electrical wiring no closer than 100 mm from the floor and 150 mm from the corners of the rooms. Let me note that the rule “no closer than 100 mm from the floor” is extremely difficult to avoid in kitchen electrical wiring. According to all kitchen electrical wiring diagrams, the placement of sockets behind kitchen furniture is done at a distance of 10 cm from the floor.
Important advice! To minimize the loads on the concrete panels of a panel house, it is necessary to use the method of cutting concrete to the depth of the groove and inclined gouging of the groove with a perforator blade to make grooves. Try to avoid making grooves by drilling grooves and then gouging them out.