Spring is the ideal time to start construction. Russia is a big country. Therefore, when there are still snowstorms in the north, in the south the earth is already warming up. However, you can plan preparations for construction! The strength and durability of any building depends on the reliability of the foundation. The first and very important step in constructing the foundation is the correct marking of the area for the foundation.
Foundation marking
Materials and tools
You will probably need the following materials to mark the foundation:
- pegs or pieces of reinforcement of sufficient length. You can use U-shaped structures made of reinforcement or wood;
- cord;
- boards;
- sledgehammer (or ax) for driving in pegs, hammer, nails;
- a long steel tape measure, or even better, a laser tape measure;
- large square;
- level or water level.
The cord is tied to a peg
Basic calculation parameters
When creating a drawing of the foundation of a house, it is necessary to use the results of calculations made when designing the foundations. In particular, it is necessary to take into account:
- total weight of the house under construction;
- an increase in the load on the house during its operation, for example, the construction of a second floor;
- groundwater level;
- type of soil on the land plot.
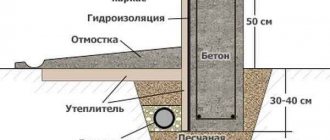
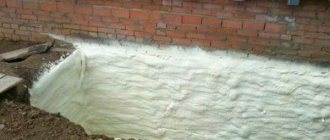
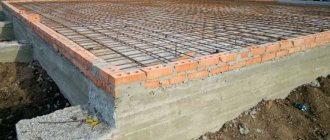
These data take into account not only the geometric dimensions of the foundation, but the materials that will be used in its construction (grade of concrete, size of reinforcement, etc.). In addition, the designer will determine the type of hydraulic and thermal insulation. When building a foundation on land with high groundwater, it is necessary to design a drainage system that will drain excess water from the foundation structure, thereby extending its service life.
Ideally, the design of foundations for buildings and structures should be carried out by a company that has experience in such foundation design work. When designing building foundations yourself, it is advisable to use current guidelines and instructions for foundation design.
Marking for the foundation: preparation
Clear the area of trees, bushes, plants, large debris, and large stones. The soil surface is leveled. Marking for the foundation is carried out only on a horizontal surface. The markings on the inclined plane will not be accurate - the horizontal projection will be smaller than the dimensions in the drawing. It is likely that on a site with a large slope, bulldozer equipment will have to be used to level the surface.
Not only the site is cleared, but also additional places:
- for storing land;
- for storing building materials;
- access and turning around of earth-moving equipment and vehicles.
Free configuration
If the future building is of any shape, then it has its own characteristics. To know how to mark the foundation for a house of irregular configuration, you need to remember the following:
- a rectangle is marked;
- the necessary structures are added;
- a rectangular base is made for the chimney and porch;
- marking of arcs and circles is carried out from their center;
- When marking a polygon, a square is outlined, and then the figure itself is formed, castoffs are placed near all corners, and the perimeter is outlined using a cord.
Sometimes irregularly shaped supports are used. A coordinate grid is superimposed on the drawing, and reference points are marked. Then a coordinate grid is stretched on the site, and the points are transferred to the ground.
Irregular shaped foundation Source eurodom-ural.rf
We comply with building regulations
When choosing a location for a building on a site, you should be guided by sanitary and fire regulations. The distance from the wall to the fence should be at least 3 m, from the windows to the wall of the neighboring house - at least 6 m. It is advisable to mark the foundation so that the distance to the wall and fence is slightly greater than the standard values. At least 30 cm. The reserve is needed for two reasons:
- As a rule, it is impossible to perfectly lay out the future wall and calculate the thickness of the plaster/finishing/insulation;
- in the future, owners will have the opportunity to additionally insulate the walls or decorate them with textured materials.
Moreover, having a reserve distance to the fence and neighboring buildings will help avoid claims from neighbors in the future.
External works
To build a house, you need to bring building materials, equipment, tools, and people to the site. This means that an access road is needed along which heavy vehicles can enter and turn around.
If the plot of land for construction is located in a cottage community or in an urban area, it is often enough to fill the last 3-5 m with a sand-gravel mixture before the entrance. If the house is built in an uninhabited area, then you will have to lay a full-fledged gravel road on a sand cushion from the nearest highway. At the same time, the access road must be designed so that it is passable in any weather, does not erode too much, and does not require repairs for at least three years.
In addition, it is necessary to connect the building site to electricity to power tools and lighting, and, if possible, install plumbing and sewerage. If this is not possible, instead of a water supply you will have to drill a well or dig a well, and instead of a sewer, make a septic tank.
Marking the foundation
Marking the area for the foundation begins with determining the location of the longest wall of the building on the ground. It is best to tie it to other buildings on the site or to a fence (boundary). Mark the main point in the corner of the outer wall - install a peg, then mark the outer foundation of the long wall and install a peg in the other corner.
foundation marking
Pegs installed in the outer corners will interfere with excavation work. As a rule, therefore, another pair of pegs is installed - at a distance of 0.5-1 m from the edge line of the foundation. They pull the cord on them. Then the pegs are installed and the cord is pulled along the outer perimeter of the perpendicular walls. Then mark the opposite parallel wall.
The inner perimeter of the base of the walls is also marked with pegs and cords. The internal perimeter lines run parallel to the external walls at a distance equal to the width of the foundation strip. As a rule, the base for the façade walls is first marked, then for the interior walls.
Marking scheme
All foundation marking pegs are located outside the building envelope. This is done so that when digging a trench the markings are not disturbed. The distance from the outer perimeter is 0.5-1 m or even more. This distance depends on the density of the soil. The lighter and looser the soil, the farther the pegs are placed from the future trench.
How to make right angles
You can use a large square made of wooden slats. In practice, in particular, they use the “Egyptian triangle” with sides of 3.4.5 m from the cord. Take a cord 12 m long, make marks after 3 and 4 m. When measuring an angle, a three-meter section is usually placed along a stretched cord. A four-meter section is placed perpendicularly, the end of the cord is connected to its beginning. If the cord is well stretched, the resulting angle between legs 3 and 4 m long will be exactly 90°. A cord is pulled along a leg 4 m long, marking a perpendicular wall.
Egyptian triangle
Why is markup needed?
Method of securing lacing
Many non-professional builders do not understand the importance of preparatory work. Below are the problems that may arise if the markup is done incorrectly or if it is completely neglected:
- violation of the geometric dimensions of the building;
- inaccuracies in angular dimensions;
- improper operation of load-bearing structures due to deviation of foundations and walls from the design;
- When using prefabricated floors, their elements, manufactured according to design values, may not fit the existing dimensions, which will lead to additional financial and labor costs.
Marking the contour of the foundation for the house allows you to position the supporting structures in strict accordance with the decision made.
The location of the future walls of the building and the size of the premises depend on the location of the foundations.
Marking for the foundation: checking for correctness
The simplest and most effective way to check the correctness of the markings for the foundation is by measuring the diagonals. This method is suitable for checking square or rectangular houses (or individual parts of the house). In principle, the difference between the diagonals should not exceed 1 cm. If it exceeds, you will have to adjust the location of the pegs and cords.
Checking diagonals when marking
Types of designs
As you know, the foundation is the foundation of every house. Depending on the type and composition of the soil and its application, several types are distinguished. Its main task is to transfer the weight of the house to the ground.
What should be done first during construction:
- Conduct a soil analysis.
- Make a quality layout. How to mark the area for the foundation, features of the work and calculations - this is the first and most important stage of the work.
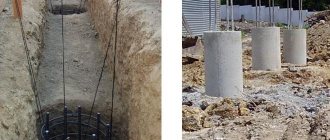
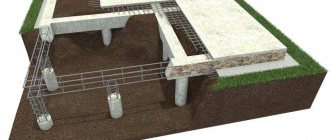
- Make waterproofing using columnar or pile foundations
- Purchase quality materials.
How to fix errors
If a discrepancy between the lengths of the diagonals is detected, the foundation markings need to be adjusted. In this situation, the rectangle or square does not have all right angles and is usually similar in shape to a parallelepiped.
If the deviation is noticeable, check the angles. If the angles deviate, firstly, the angles are re-measured, pegs are driven in and the cords are pulled. Secondly, the location of the cords marking the position of the parallel wall is adjusted. Check the diagonals. As a rule, the old markup is removed.
If the house has a complex shape
In the case when the foundation diagram is presented not in the form of a rectangle, but as a figure with convexities, then the work becomes more complex, but still feasible.
If there are no bay windows, the markings are as follows:
- first, a rectangle is marked and a foundation of a complex shape is placed in it, while the ropes are placed around the perimeter of the protruding elements of the future house;
- check the lengths of the diagonals and sides, correcting if necessary;
- inside the resulting boundaries, parallel ropes are stretched, indicating the edges of the protruding elements of the house, and the intersections of these cords are the corners of the proposed foundation strip;
- the resulting figure contains several rectangles, and you need to additionally check the lengths of the diagonals and sides of all of them.
Tear-down of foundations
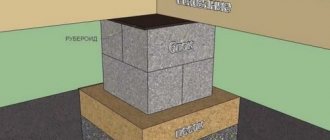
During the process of digging a pit or trench under the foundation, the pegs may move. In addition, during the construction process it is necessary to mark the axes of the walls and foundations, and the boundaries of the walls. To do this, they perform casting - a device made of posts and boards around the foundation markings. As a rule, cast-offs are used for control measurements.
Foundation stripping
Two columns are dug in at a distance of 1.5-2 m from the corner of the building on each side. A board about a meter long is nailed horizontally to the posts. The stripping is done on all sides of the building, in a simplified version - just opposite each corner. Horizontal boards are nailed at the same level. The level corresponds to the upper edge of the base (foundation). Nails are driven into them, marking the axes of the building, the level of the internal and external surfaces of the walls and foundations. If it becomes necessary to mark the corresponding planes, simply pull the cords or wires onto the corresponding nails.
Video to help you:
Distances between buildings on a plot of land
In order to properly place buildings on their own land, the developer must strictly comply with all rules related to development. To minimize errors, it makes sense to perform zoning of the site. That is, divide it into zones in which buildings for different purposes will be erected.
The following zones are distinguished on the land plot:
- residential, a house will be built in it;
- utility zone, which will house auxiliary buildings;
- a recreation area where you can build a playground or gazebo;
- area for placing garden trees, bushes and a vegetable garden.
Existing standards have determined the following requirements for the distance between a residential building and auxiliary buildings:
- from buildings with an area of up to 50 m2 - 15 m;
- from the location of latrines, compost pits, waste collection pits - 15 m;
- from a well, with a productivity of up to 1 m3/day - 8 m, with a productivity of 3 m3/day - 10 m;
- from a septic tank with a throughput capacity of up to 1 m3/day - 5 m, if the amount of waste is from 1 to 3 m3/day - 8 m.
How to correctly mark the foundation: step-by-step description of the work
The very first thing the developer must do is level the site for the foundation of the future structure. This will completely eliminate errors and allow you to mark more accurately. To do this, you will need construction equipment to remove the turf and level the area. The dimensions of the prepared site must exceed the area of the future building.
Marking begins with drawing lines of external boundaries. You will need pegs, tape measure and fishing line. Find a point on the ground from which it will be convenient for you to mark the outer boundaries of the building. Place a peg in this place and measure a distance from it equal to the length of the wall.
It is more difficult to mark the places so as to set right angles. You need to make them equal exactly 90 degrees. To do this, you can use the following methods:
- Using a theodolite. The most accurate method, but not suitable for private construction, since this device requires certain skills to use.
- Using a regular triangle. You should not try to use it seriously, since even a small error on the ground can cause serious discrepancies and inaccuracies.
- Egyptian triangle method. Quite difficult to understand and requires certain skills to build.
- According to the Pythagorean rule. The simplest method that does not require serious skills from you. Based on the existing two pegs, we will construct a right triangle. To do this, you need to tie a cord to one, measured along the length of the wall. Tie a rope to the second peg, the length of which is calculated using the formula known to everyone from school (to do this, add the squares of the wall sizes and calculate the root of this sum). Next, tie pegs to the cord and use them like a large compass. Draw arcs on the ground from each point and at the place of their intersection there will be a peg that will accurately indicate the location of the third corner. The fourth corner is located according to the same principle. To check the accuracy, you need to measure the diagonals of the resulting rectangle (they must be equal).
General rules
Without preparation and following the sequence of rules, it will not be possible to mark the site correctly. The following so-called reference point must be taken into account. The location of one of the corners of the foundation must be tied to any object located on the site. This is done to make it easier to correct yourself if you accidentally make a mistake. An example of such an object would be a fence.
Many people try to position the house so that it is parallel to the fence structure. To do this, equal segments are laid off from the fence at several points, perpendicular to the plane of the fence. You can use twine for this. After this, you need to build a right angle from the starting point. Now you can begin the remaining stages of marking.