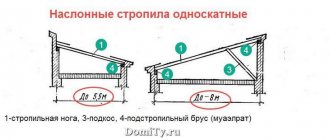
If it comes to designing a gable roof with a complex structure, then one cannot do without mentioning the need to use atypical sized elements for the frame. These include, for example, hip and half-hip types of roofs, in which the diagonal ribs are more elongated, which may not correspond to the length of conventional rafters. This most often happens when constructing valley ribs. In order to ensure the strength of the entire structure, it is important to understand what length of rafter fusion is optimal and how it is performed correctly.
Selection of section
Before starting the calculation, loads on the rafters are collected. They come in two types: permanent and temporary. Constants include the mass of all layers of the roof:
- filing;
- rafters;
- insulation;
- sheathing;
- roofing covering.
The mass of vapor barrier and waterproofing can be ignored. Approximate values may be used. For a roof covered with metal tiles, the constant load is assumed to be 60 kg/m2, for a roof with bitumen tiles - 70 kg/m2, for a roof with ceramic tiles - 120 kg/m2.
Snow load depends on the climatic region. It is indicated in the joint venture “Loads and Impacts”. To avoid confusion, use special cards. When the roof slope is more than 45 degrees, the snow load is considered zero.
After finding the mass of the roof, a calculation is performed. It is made according to two limiting states: strength and deflection.
The first formula for calculating strength is to find the design load:
q1= (1.1*gn*cosα + 1.4*pn*cosα2)*a,
- where q1 is the design load,
- gn - constant load,
- pn—snow load,
- cosα - cosine of the roof inclination angle,
- a is the pitch of the rafters.
Next, find the calculated bending moment M = 0.125*q1*l2*100. Here l2 is the span of the rafter leg squared. The next step is to find the calculated moment of resistance W. To do this, M is divided by the calculated bending resistance of the wood, equal to 130 kg/cm2.
W = b*h2/6. W is already known, b is the width of the rafter section, which is taken to be 5 or 10 cm. The only unknown remaining in the equation is h - the height of the rafter leg.
The following calculation is for bending. First of all, find the load:
q1н = (gn* cosα + pn*cosα2)*a.
Very similar to the first option, but without coefficients. After this, the moment of inertia I = (5* q1н*l3*200)/(384*1000) is calculated. l3 is the span of the leg in cubic degree. I = b*h3/12. I is known, b is taken the same as in the first part of the calculation. There is one unknown remaining in the equation, h. After two calculations from h for the rafter leg, the one that is larger is assigned. This will be the minimum size.
Also, when choosing the height of the rafter beam, it is worth considering the thickness of the insulation. It is laid when using the under-roof space as an attic or warm attic. The thickness of the thermal insulation material is selected depending on the climatic region. It is recommended to set the height of the rafters 2-3 cm more. This is necessary to provide a ventilation gap.
Factors influencing lumber parameters
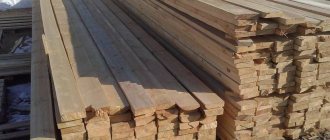
The wood for the rafter system is chosen to be well-dried, with a small number of knots and other defects. As a rule, coniferous species are used, which are easy to process and additionally impregnated with antiseptics and fire retardants.
The parameters of the support beams are affected by the angle of inclination of the roof, the geometry of the slope, the distance between the ridge and the mauerlat, the distance between the rafter legs and the calculated load on the rafters, which includes the weight of the roofing, the weight of the sheathing, wind and snow loads.
A competent calculation must necessarily take into account all these indicators.
Options for attaching rafters to the Mauerlat
A feature of a building inclined frame is that its components can have a movable and a fixed connection with each other. If we are talking about a wooden building, then the last crown of a log house or beam, which belongs to the upper frame of the walls, acts as a mauerlat. If there is a need to attach the rafters to the mauerlat, then the connection of the upper ends with the ridge is made articulated and movable. This also applies to the pairing of the lower part. This requirement is due to a reduction in the resulting internal stresses that are characteristic of the rafter frame. The causes of such stress are temperature fluctuations, deformation of wooden buildings, shrinkage of the house, as well as uneven loads from snow and wind. If manipulations under the ridge are carried out at a considerable height, which is not very convenient, then it is preferable to choose a rigid connection of the rafter boards. This leaves freedom of movement for the lower ends.
Types of rafter splicing in the ridge
There are three ways to do this:
Method number 1. overlap
This method differs from all previous ones in that here the rafters are connected by side planes and tightened with a pin or bolt. Quite a popular technology today.
If the house is wooden, then the top log or timber will be suitable as a support for this method, but you will have to put a mauerlat on the blocks.
The most popular type of fastening is splicing rafters into half a tree:
You can, of course, use a metal fixing plate - but this is only a connection, not a tightening. The essence of the tightening is that it is located lower and takes on part of the load.
Overlapping ridge rafters are most often connected using nails. Usually these are the roofs of gazebos, sheds, bathhouses and garages - there are no special requirements for the strength of the rafter system.
Method number 2. Butt connection
To do this you need:
- Cut the edge of the rafter at an angle so that this angle is equal to the angle of the roof slope.
- Support the rafters.
- Apply fastener.
It is much easier to make such trims using a template - just make it in advance. So all the planes will fit tightly against each other.
If you are fastening rafters with nails, use at least two of them. Hammer each of the nails into the upper cavity of the rafters at an angle so that the nail goes into the cut of the second rafter being joined. Additionally, strengthen the splice of the rafters in the ridge with a metal plate or wooden overlay.
Or partially end-to-end:
The essence of this design is that the edges of the two rafters are adjusted so precisely that they evenly distribute the load placed on them with each other. But it will not be enough to secure this connection with one nail - you also need metal or wooden attachments. Take a board 30 mm thick, secure it to one (preferably two) sides of the unit and nail it.
Method No. 3. Connection to timber
In this method we will attach the rafters directly to the ridge beam. This design is good in that the beam can be provided with central supports, and each rafter can be fastened separately and at a convenient time. This method is irreplaceable if you don’t have time to make a template.
A connection to a ridge beam is recommended in cases where the roof is wide enough - wider than 4.5 meters. This design is quite reliable, but sometimes it requires the installation of additional supports underneath, which reduces the functionality of the attic significantly. After all, there are now beams in the middle of the room! For small attic roofs this, of course, is not a problem, but in the attic it will have to be used as an element of the interior. But no template is needed for this design, and small discrepancies are not scary.
Variation:
You can, of course, use a metal fixing plate - but this is only a connection, not a tightening. The essence of the tightening is that it is located lower and takes on part of the load.
This is a combined splicing of rafters, because it is performed end-to-end, exactly the same as when focusing on the mauerlat.
Choosing the angle of a pitched roof
The angle of the slope is chosen taking into account the fact that the resulting roof forms a triangle, one corner of which will always be right. The legs are the floor beams and the pediment part of the building, and the rafters are the hypotenuse. This can be clearly seen in this diagram.
- Lс – length of the rafter used;
- Lbс is our leg, indicating the height of the pediment from the floor beam to the roof plane;
- Lсд – width of the building;
- A – selected or desired angle of a pitched roof.
Taking into account the basic values, it is possible to calculate all the parameters of a lean-to structure. There is a formula for this. The first is used when the width of the building and the planned height of the pediment are taken as a basis. In this case, the formula is as follows:
Docking
The main thing you should pay special attention to when assembling rafters yourself is the quality of the connections. Let's talk about this in more detail. Rigid connection
Rigid connection
To connect the rafter legs to the Mauerlat, a rigid connection is often used. Its essence is that at the end of the rafter leg a cut is made at an angle of 90 degrees. This part of the leg rests securely on the Mauerlat.
For a more durable connection, the rafter is fixed to the horizontal beam with a metal corner or three nails: two at an angle, one at the top.
Sliding joint
With a sliding connection, a groove is made in the mauerlat into which the rafter leg is inserted. Fastening is carried out using “sleds” with self-tapping screws or nails.
Connecting the rafters to each other
There are several ways to fasten the rafters together at the top. Method 1 - butt fastening. To do this, the ends of the rafter legs are laid overlapping each other. Next, a vertical cut is made. After this, the rafters are placed end to end and secured with two nails at an angle. Additionally, you can use a metal plate that is mounted between the rafters at the top.
Extension of rafters: timber
You can build up rafters from timber using the cutting method. To do this, cuts are made at the ends of the beams, with a length equal to twice the height of the section. The height of the cuts should be equal to 1/5 of the height of the beam.
After joining the bars, a hole for a bolt is drilled in them, and the bars are connected.
Extension of rafters: board
There are more connection options here. You can overlap the boards. The length of the overlap is approximately the same as half the length of the board.
A secure connection is made using ten nails driven in at a 45 degree angle.
You can join the boards end-to-end and nail the board along the seam on both sides.
When installing rafters with your own hands, you must constantly ensure that they are positioned exactly at the same level. It is better to assemble trusses directly in the attic, since they are very heavy, and lifting them is quite difficult without special equipment. The dimensions and shape of the rafters are also acquired at the top.
Before starting construction of the roof, it is necessary to separate the floor using a ceiling
Floors in a house made of foam blocks are part of the overall structure of the house, which is not inferior in importance to the foundation and roof
If you have already made the ceilings, then think about whether you want to make a roof for the room. Houses in which part of the volume under the roof is equipped as a living space are called houses with an attic. You can find out how to build such a house here.
Self-installation of the rafter system
Installing a rafter system is a simple process. First you need to assemble a truss on the roof. You can do this however you like, depending on its type.
It is convenient to make a truss with a tie at the bottom.
First, a beam or board of the required length is cut. They will play the role of tightening. To do this, measure the distance between the walls of the house, including the walls themselves. Next, a vertical beam (board) is prepared, which will stand between the tie and the rafter legs. Its length must be adjusted so that when the rafter legs are connected to it at the top point, the required slope of the slopes is obtained. Make calculations taking into account that the roof should hang over the eaves by at least half a meter.
The first truss should be used as a template. A second farm is immediately built on it. All calculations must be written down. After you have built the rafters with your own hands, you need to install the assembled structures along the edges of the roof and stretch the rope between them. When installing intermediate trusses, it is necessary to control their height along it.
Before installing intermediate trusses, markings must be made along the perimeter of the roof in order to accurately maintain the pitch between the rafters during installation. When all the roof trusses are installed, you can begin installing the sheathing, counter-lattice, laying roofing material and insulating the roof.
Calculation features
The pitch of the rafter legs is no more than 60 cm. If you build large spans between them, the roof will “play” from wind, hail and rain. The snow will cause the roof and sheathing to sag. Some craftsmen place rafters much more often. The above does not mean that thick boards or beams should be placed too close - the weight of the roof together with the ceiling, horizontal, vertical and diagonal beams may be too high, and walls made of foam or gas blocks may begin to crack and sag.
One board for a rafter leg - extended or solid - reaches a weight of up to 100 kg. 10-20 extra rafter legs can add a ton or two to the entire structure, and this leads to accelerated cracking of the walls during hurricanes, during the passage of teams of workers servicing the roof, during rainfalls and snowfalls.
Let, as an example, build a small country house from foam blocks with the following parameters.
- The perimeter of the foundation and walls (external) is 4*5 m (occupied area of the site is 20 m2).
- The thickness of the foam blocks from which the walls are built, as well as the strip foundation outside, is 40 cm.
- There are no partitions in the building - the internal area of the house is similar to a studio apartment (one room zoned into kitchen, bathroom and living blocks).
- The house has one entrance and four windows - one in each wall.
- A 20*20 cm beam was used as a mauerlat - a wooden element encircling the top of the perimeter walls.
- As horizontal floor beams - a 10*20 cm board placed horizontally on its edge. Vertical stops and diagonal reinforcing spacers (“triangles”) are made from the same board, preventing them from sagging. All elements are connected using studs and bolts of at least M-12 (nuts, press and lock washers are included). The ridge (horizontal) spacers are laid out with a similar board – also with “triangles” (diagonals).
- The same board – dimensions 10*20 cm – lays out the rafter legs.
- The sheathing is made of 5*10 cm boards or timber, for example, with a section of 7*7 or 8*8 cm.
- The thickness of the roofing sheet is 0.7-1 mm.
- Steel cladding was installed around the perimeter and gutters with storm water were installed.
Conclusion - the cross-section of the rafter leg should be 1.5-2 times smaller than that of the Mauerlat. For the final calculation, the density of the wood species used in the construction of the ceiling-attic and roof structures is taken. Thus, according to GOST, larch has a specific gravity of 690 kg/m3. The total tonnage of the roof assembly is calculated by cubic meters of boards and timber, calculated during the project and ordered at the nearest lumberyard.
The following must be calculated.
- Subtracting the height of the beams from the meter, we get 80 cm - the length of the ridge stops. We make markings as we proceed further.
- According to the Pythagorean theorem, we calculate the length of the rafters from the ridge to the edge of the front or rear wall - 216 cm. With offset (to prevent precipitation from getting on the walls), the length of the rafters is, say, 240 cm (24 constitutes an allowance), by which the roof will extend beyond the perimeter of the building.
- A board with a length of 240 cm and a cross-section of 200 cm2 (10*20 cm) occupies a volume of 0.048 m, taking into account a small margin - let it be 0.05 m3. It will take 20 such boards per cubic meter.
- A gap between the middles of the rafters is maintained at 0.6 m. It turns out that for a structure 5 m long you will need 8 rafters on each side. This is equal to 0.8 m3 of wood.
- Larch with a volume of 0.8 m3, spent purely on rafters, weighs 552 kg. Taking into account the fasteners, let the weight of the rafter subsystem - without additional supports - be equal to 570 kg. This means that a weight of 285 kg presses on the Mauerlat from either side. Taking into account a small margin of safety, let this weight be equal to 300 kg per mauerlat crossbar. This is how much the rafter legs will weigh.
Why is it better to make rafters yourself?
After all, the easiest way is to purchase ready-made rafters, thereby receiving many bonuses:
- Short production times.
- Technological precision of all details.
- Identical, already adjusted dimensions of all structural elements.
But then be prepared for the following disadvantages:
- High cost (at least twice as much as if you planed the rafters yourself).
- Delay in delivery (especially during the season).
- Using low-quality or under-dried wood (and then the roof will “sink”).
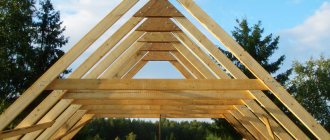
So convenience or quality? If this is not your first time carving or planing something out of wood, feel free to take on making rafters! Here's what it all looks like in real life:
In the construction world, in simple language, rafters are usually divided into the main ones, i.e. load-bearing ones, on which the roof is supported, and auxiliary ones, which are located inside the roof and serve as support for hemming the ceiling and walls of the attic (if one is planned). The strength and reliability of the future roof depends on how accurately and correctly you calculate the rafter system in advance.
The rafter system of any gable roof itself consists of the following basic elements that you need to make:
- Mauerlat.
- Vertical racks.
- Crossbars.
- Rafter legs.
- Spacers.
- Ridge run.
It is better to entrust complex roofing structures with multiple elements to a professional, but you can handle a small roof of a private house. To do this, you will need these simple formulas that will help you find out how thick the rafters should be, with what slope and what span:
We also invite you to use our free calculator.
Connecting boards together in width and length. Basic workflow requirements
Sometimes, when carrying out construction and other work using wood, it is necessary to make elements longer or wider, but very few people know how to do this correctly.
That is why we will look at how to splice boards yourself and what methods and techniques exist. It is important to choose the option that is best suited in a given situation and requires minimal investment of time and money. In the photo: microspike joints are widely used by manufacturers of various wood products
Skate attachment process
As an example, we can take the fastening of a ridge to a metal tile roof.
To ensure its functionality and reliability, it is necessary to carry out the following actions: At the same time, holes must be drilled on both skates. The hole should also be on the flat side of the block. Two holes must also be drilled on the line of the timber hump located longitudinally. During work, it is necessary to ensure that the holes on the lapels pass through the crests of the waves of the material. The process of installing the ridge must begin from one of the ends, installing the element on top of the end strips. The edge of the ridge must be extended outwards by at least 2-3 cm. The process of installing a flat ridge requires the indispensable joining of all parts with an overlap of 10 cm or more
It is also possible to use tin technology. When connecting the parts of a semicircular ridge, the joining is carried out along the stamping lines. The specific location for strengthening the ridge board and the methods of fastening are directly dependent on the slope angle of the roof. To avoid possible mistakes, during the installation of the sheathing, you should model the assembly of the future ridge, and pay attention to how the model of the ridge strip and the roof slope angle are combined. Then you need to adjust the angle of the ridge strip to the angle of the roof slope. For this purpose, you can bend and unbend the skate (as necessary).
- In many cases, it may be necessary to additionally install a ridge board. It is installed above the level of the top sheathing board, while an 80-mm gap is maintained between adjacent slopes and the ridge boards of these slopes, which ensures ventilation of the under-roof space. The ridge board should be 10-15 cm thicker than the step sheathing boards.
- The final fastening of the ridge strip is carried out by tightening it using self-tapping screws to the highest areas of the metal tile sheets. The pitch of the screws should be within 0.8 m.
- To prevent snow from getting under the ridge, an aerial roller should be installed between the ridge strip and the metal tile.
Making a connection point for rafters in the ridge
One of the main components of the rafter system is the junction of the elements in the ridge. This is one of those parts that is responsible for the strength of the entire structure. Improper execution usually results in an emergency situation. The fastening of the rafters in the ridge determines whether the rafter legs will diverge to the bottom under the influence of their own weight. To make a rafter connection in a ridge, the following methods are used: end-to-end, purlin, overlap.
Butt connection of rafters in the ridge
In order to connect the rafters in the ridge end-to-end, it is necessary to cut the wooden elements at an angle that will correspond to the angle of inclination of the slope. Nails must be used to connect the rafters together. The nails should be driven in such a way that an angle is formed. This method will allow the fastener to penetrate into the opposite part of the wooden beam. To make the structure more reliable, metal and wood linings are used. To secure the wood trim you will need nails, and the metal trim will require bolts.
Connection of rafters in the ridge for the run
When making this type of connection, the rafter elements are supported on the roof ridge beam. Connecting the rafters in the ridge for a run is suitable only if the distance between the walls is large and the length of the rafters exceeds more than 4.5 m, and also if the owner does not plan to use the attic space for its intended purpose or there is no space at all. After all, installing ridge beams will require installation of supports.
Overlapping connection of rafters in the ridge
The most common method of connecting rafters in a ridge is an overlap connection. In this case, the joint will be on the side surface, and not on the cut of the ridge. Bolts or studs with washers are used as fastening elements. Under no circumstances should nails be used!
The above methods of connecting rafters to each other along the length and at the ridge make it possible to obtain a reliable rafter structure. The safe operation of the roof in any conditions depends on the reliability of the truss structure. Using these methods, you can create a roof of any complexity, using standard building materials and fasteners.
Wooden rafter legs are made of timber or boards, the cross-section of which depends on the design load on the structure. If necessary, rafters are spliced to increase the length of the element.
Choosing a joint location
The rafters are spliced along their length where the bending moment is practically zero. It is not allowed to connect mid-flight. This is where the bending is strongest, and any connection (even the best quality) weakens the section and creates a hinge. When exposed to loads, the leg will bend in this place. Most likely, this will happen in the first snowy winter.
The distance from the connection point to the nearest support should be 0.15*l, where l is the span length. In this case, the fulcrum points are considered to be the places where the rafter leg rests on:
- Mauerlat;
- ridge transom;
- intermediate racks;
- struts.
The span is taken to be equal to the distance between two adjacent supports between which the element is planned to be spliced. The same rule applies when installing sloped beams.
Attaching the rafters to the mauerlat
Correct fastening of the rafters to the ridge beam and to the mauerlat is an indispensable condition for professionally performed roof installation.
To install the rafters to the Mauerlat, one of two types of coupling is used:
- sliding;
- hard.
The choice depends on the shape of the roof and its structural features, and accordingly on which rafters are chosen - layered or hanging.
The rigid method assumes that the connection of the rafters and the Mauerlat is carried out in such a way that the possibility of rotations, shifts, bends, and torsions between these two elements is excluded (read: “How and how to attach the rafters to the Mauerlat”).
To achieve this result, you can use one of the following methods:
- using corners for fastening rafters and supporting frame beams;
- by making a gash on the rafter leg and further securing the connection with nails, staples and wire.
As for the second method, it is used more often than the first. It provides that nails are nailed from the sides at an angle towards each other (as a result they intersect inside the Mauerlat). After this, the third nail is driven vertically. The resulting fastening points for the rafter structure provide high rigidity (read also: “Rafter fastening points - structural elements”).
Additionally, both connection methods are secured by fastening the rafters to a brick or concrete wall using rolled wire and anchors. Prepare the rafters for installation if they have the same angle of inclination throughout the roof by using a template.
Installation of the rafter system, details in the video:
A sliding connection, also called a hinged connection, is achieved by creating a special fastener that allows one of the mating elements to move freely within specified limits. In this particular case, such a part is the rafter leg, and it will move in relation to the mauerlat.
There are the following methods for installing rafters to the mauerlat, providing offset:
- with the help of sawing and subsequent laying of the rafters, the place was washed on the mauerlat;
- by driving two nails diagonally from the sides in the direction one to the other;
- connection using one nail, which is nailed in a vertical position from top to bottom through the rafter leg into the mauerlat. An alternative is to use rafter fastening plates that have holes for nails;
- fastening method using a bracket;
- by extending the rafter leg beyond the wall using single plate fastening;
- by using steel fasteners specially designed for rafters, which are called “sleds”.
All the described methods, on the one hand, make it possible for the rafter leg to rest against the Mauerlat, and on the other hand, if the structure moves, its elements can move relative to each other.
The sliding type is found quite often in the construction of houses; this connection of rafters and mauerlat is especially popular when arranging wooden houses that are built from logs or timber. Over time, the original geometry of the structure is distorted as the walls shrink and the use of rigid joints leads to the integrity of the walls being damaged. Attaching the rafters to the frame using a sliding connection allows the log walls, gables and other elements of the building to adjust to shrinkage.
It is also not possible to rigidly fasten the rafters in the ridge. The entire structure is assembled first on the ground. Before installing the rafters for the roof, measurements are taken, cut-outs are cut into the mauerlat and rafter legs, and then a careful adjustment is made.
Splicing rafters at the ridge of a gable roof
When resting on the ridge girder of a gable roof, the rafter legs can either rest against each other with their beveled ends or be apart.
If the rafters rest against each other with their ends, in other words, end-to-end, then their ends need to be connected with overlays on nails or bolts. If the ends of the rafter legs in the ridge assembly are located apart, then they are connected with corner brackets and bolts. If the rafter legs rest on two purlins at once, then the ends of the legs also rest on each other. Naturally, a certain thrust arises, the tension of which is relieved with the help of horizontal crossbars. If there is no purlin at all, then the junction of the rafter legs in the ridge unit is made by placing the beveled ends of the legs against each other. Additionally, such joints need to be secured with paired overlays, which are nailed to the legs or connected with bolts. To secure the rafter leg with the crossbar, the joint is made using wooden side plates. They are nailed directly to the crossbar or bolted - it all depends on the cross-sections of the materials used. Next, a block is placed under the crossbar to absorb transverse forces. But rafter legs made of logs with a crossbar are already attached without overlays. Only at the end of the crossbar itself is a recess made ½ from the section of the truss. To ensure that the system ultimately turns out to be stable, the rafter legs are reinforced in the transverse direction with struts and crossbars.
Especially when it comes to the span width between external load-bearing walls of 8 meters or more. If strong winds are not uncommon in the area, it is extremely important to protect the roof ridge from possible displacement. And for this purpose, the ends of the rafters are additionally connected to the ridge girder with corner brackets. Plus, the rafter legs and masonry of the house must be secured with wire. If you are splicing a rafter system from logs or round timber into a ridge, then expect that it will be quite heavy.
Plus, the rafter legs and masonry of the house must be secured with wire. If you are splicing a rafter system from logs or round timber into a ridge, then expect that it will be quite heavy.
Note that when there are significant loads on the rafter system, it is not recommended to make a tie-in in the rafter leg at all - only use intermediate gussets.
Here are more details:
If the rafter structure is inclined, external loads are transmitted by supports (mauerlat, purlins, racks, struts and beams), while compressive and bending stress forces arise in the rods themselves. And the steeper the pitched roof, i.e. The more vertically the rods are tilted, the bending is less, but the horizontal loads, on the contrary, only increase.
Simply put, the steeper the roof, the stronger all horizontal structures should be, and the flatter the slope, the stronger the vertical structures of the rafter system should be.
A little about fastening elements
For greater reliability, the docking units are additionally reinforced with bolts, metal corners, plates, and staples. The dimensions of the fasteners are determined based on the thickness of the rafters. Steel parts with existing holes are secured with screws or self-tapping screws, the purchase of which should not be saved. It is better to buy high-quality (factory-made) products with guaranteed strength, since overheated cheap screws easily burst when screwed in. It is worth remembering that nails have plasticity. If the nail bends and stretches, the self-tapping screw will immediately break under pressure. Today, rough nails are in great demand.
Holes are drilled in the connection parts for bolts. The drill size is selected 1 mm less than the bolt section.
Which method of building rafters to choose depends on the loads and deformations that a particular rafter structure will experience. For example, an oblique joint in half a tree is used for compression joints, but not for tensile and bending joints.
How to install rafter legs on floor beams?
Once the floor beams are ready for the rafters to be installed on them, proceed to fabricate the rest of the structure and connect the rafters to the beams.
To connect the rafter leg to the beam, its end is cut at the desired angle, or a more complex cut into tenons is made. Let's look at both of these options.
You can do without cutting if you use fasteners later - this is a normal solution. So, to make a simple cut on the rafters, make a template:
- Step 1: Take a building square and place it on the board.
- Step 2: Mark the cut location at the top of the rafter.
- Step 3: Using a wood protractor, draw a line parallel to the first saw across the rafter. This line will help you determine the line from the weight on the edge of the building.
Here's what it looks like in practice:
Making such rafters is much easier than for cutting. The main thing is to correctly determine the angle of the roof and the correct location for the future cut:
As a result, in real life such a design looks like this on a gable roof:
The mounting configuration itself depends more on the angle of inclination of the slope. For example, for a roof with steep slopes, where the snow load is small, you can use a single-tooth mount. With the single tooth method, additional tenons are often made to help the rafters not move under loads. And for such a spike you will already need a nest in the beam.
But, you probably know that any such places can weaken the beam, and therefore their depth should be no more than 1/4 the thickness of the beam and no closer than 20 cm from the edge of the beam (to avoid chipping).
But if you have a roof with a slope of less than 35 degrees, then it makes sense to use a double tooth, because such fastening allows you to achieve high strength of the joints. As in the previous version, you can add two spikes.
With this method, each tooth can have the same or different depth. For example, you can cut the first tooth only 1/3 of the thickness of the support beam, and the second - half:
The bottom line is that two rafter legs in a structure supported by beams are secured with a tie. But, if the ends of these legs slide, then the integrity of the tightening will be quickly compromised. To prevent such sliding, it is necessary to insert, or rather, cut into, the rafter leg into the very tightening with the help of a tooth - with or without a spike.
In the process of cutting the rafters into the end of the tie, you need to move the tooth as far as possible. If you need to strengthen the fastening of such rafters, then use a double tooth. Another point: the teeth themselves can be of different sizes.
And finally, it is advisable to fasten the end of the rafter legs with twisted wire so that the wind cannot tear off such a roof. As a wire, it is better to take galvanized wire, and fasten it with one end to the rafter leg, and the other to a crutch, which is first laid in the masonry of the wall at a distance of 30-35 cm from the top edge.
Here is a good example of a neat cut-in rafter, which at the same time serves as a floor beam already in a hipped roof:
Metal fasteners for such a unit are still necessary, because the notch itself cannot support the rafter legs under load.
Basic methods
In carpentry or construction, it is often necessary to join two boards together. Quite often, a connection is necessary when there are several short segments and you need to make one of them with a specific length. Of course, this method cannot be used for all products. For example, gluing is appropriate if a door leaf or rafter is being made, but the component parts are not suitable for the floor or benches.
During his time working with wood, people learned how to fasten boards together in a variety of ways. For example, it will not be difficult for an experienced carpenter to make one out of three. It is important to know that the fewer segments are used in the splicing process, the stronger the final product will be. You should also take boards for joining along the length with the same width. To better understand how to qualitatively connect boards to each other, it is worth considering each of the methods in more detail.
Width
Lumber of small widths is fastened together to obtain a shield of a certain size. To do this, you can use various docking methods.
Hanging rafter systems
The hanging variety of rafter systems is a triangle. The two upper sides of the triangle are folded by a pair of rafters, and the base is the tie connecting the lower heels.
The use of tightening allows you to neutralize the effect of the thrust, therefore, only the weight of the sheathing, roof, plus, depending on the season, the weight of precipitation, acts on walls with hanging rafter structures.
Characteristic features of hanging type rafter structures:
- The obligatory presence of a tie, most often made of wood, less often of metal.
- Possibility to refuse to use the Mauerlat. A timber frame can be successfully replaced by a board laid on double-layer waterproofing.
- Installation of ready-made closed triangles – trusses – on the walls.
The advantages of the hanging scheme include the space under the roof free from racks, which allows you to organize an attic without pillars and partitions. There are disadvantages.
The first of them is restrictions on the steepness of the slopes: their slope angle can be at least 1/6 of the span of a triangular truss; steeper roofs are strongly recommended. The second disadvantage is the need for detailed calculations for the proper installation of cornice units.
Among other things, the angle of the truss will have to be installed with pinpoint precision, because the axes of the connected components of the hanging rafter system must intersect at a point, the projection of which must fall on the central axis of the Mauerlat or the backing board replacing it.
The tie is the longest element of a hanging rafter structure. Over time, as is typical for all lumber, it becomes deformed and sags under the influence of its own weight.
Owners of houses with spans of 3-5 m are not too concerned about this circumstance, but owners of buildings with spans of 6 meters or more should think about installing additional parts that exclude geometric changes in tightening.
To prevent sagging, there is a very significant component in the installation diagram of the rafter system for a long-span gable roof. This is a pendant called a grandmother.
Most often it is a block attached with wooden pegs to the top of the truss. The headstock should not be confused with the racks, because its lower part should not come into contact with the puff at all. And the installation of racks as supports in hanging systems is not used.
The bottom line is that the headstock hangs, as it were, on the ridge assembly, and a tightening is attached to it using bolts or nailed wooden plates. To correct sagging tightening, threaded or collet-type clamps are used.
The tightening position can be adjusted in the area of the ridge assembly, and the headstock can be connected to it with a rigid notch. Instead of a bar in non-residential attics, reinforcement can be used to make the described tension element. It is also recommended to install a headstock or hanger where the tie is assembled from two beams to support the connection area.
In an improved hanging system of this type, the headstock is complemented by strut beams. The stress forces in the resulting rhombus are extinguished spontaneously due to the proper placement of vector loads acting on the system.
As a result, the rafter system is stable with minor and not too expensive modernization.
In order to increase the usable space, the tightening of the rafter triangles for the attic is moved closer to the ridge. A completely reasonable move has additional advantages: it allows you to use the puffs as a basis for lining the ceiling.
It is connected to the rafters by cutting with a half-pan and duplicating with a bolt. It is protected from sagging by installing a short headstock.
A noticeable disadvantage of the hanging attic structure is the need for accurate calculations. It is too difficult to calculate it yourself; it is better to use a ready-made project.