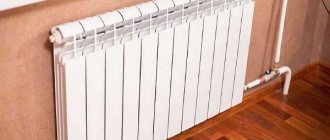
When installing a heating system ourselves, among other issues, we need to decide at what distance from the wall to hang the radiator. Although this aspect may not seem important enough to some, in fact, the efficiency of the system largely depends on compliance with the installation parameters.
In our article we will tell you why it is necessary to monitor the distance from the battery to surfaces, and also provide recommendations for installing a radiator on a wall or floor.
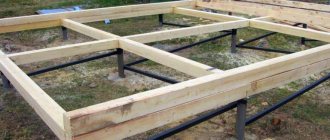
Installing the battery close to each other is not a good idea!
Step-by-step installation algorithm
Silicone tape promotes better sealing of connections
After calculating all the necessary values and choosing a connection method, you can proceed to installing radiators. All work must be carried out in accordance with the requirements of SNiP. You must also follow the manufacturer's instructions. If the instructions are violated, there is a risk of loss of warranty service. According to regulations, you do not have to remove the protective film from the devices during installation. This way the device will be protected from dust and scratches during installation work.
Items required for connection:
- Hooks with plastic dowels - at least 3 pieces. Needed for mounting to a wall or floor.
- 2 side plugs with right-hand thread. They are designated D.
- 2 plugs with left-hand thread with the letter S.
- Stub.
- Silicone sealing thread or flax.
- The elements required by the scheme are taps, valves, valves.
- Pipes. Metal or polypropylene are selected. Metal products are distinguished by high quality, durability and long service life. Polypropylene pipes are cheaper.
Tools you will need:
- Electric drill and drill bit. Selected according to the hardness of the wall.
- Screwdriver.
- Building level.
- Key.
- Tape measure and a simple pencil.
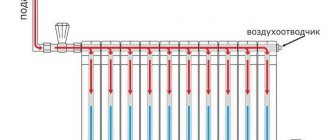
Depending on the design of the radiator, an air vent is selected.
The general installation procedure for various parts of the heating system is also regulated by SNiP.
- Making markings for brackets. This is done using dowels or cement mortar. There must be at least three brackets in total.
- Installation of plugs, adapters, Mayevsky taps and other parts.
- Installation of the radiator itself. It is necessary to connect its pipes to the heating system.
- Installation of an air vent. It should be automatic.
- Removing the protective film.
If these requirements are met, the installation of the system will be of high quality and durable.
Wall mount
Wall mounting material
Wall mounting is easier to make than floor mounting.
Installation is carried out as follows:
- Preparing the mounting site. First, the heating circuit pipe is connected. The wall behind the radiator needs to be covered with foil material.
- Preliminary marking of the mounting location for the clamps.
- Installation of fasteners using dowels. The depth into the wall must be at least 6 cm to securely fix the battery.
- Mounting the radiator onto the brackets. Fixing and leveling the device.
- Connection to pipes. Checking the tightness of all connections.
- Test run of the system.
During installation, it is important to make horizontal alignment of the battery. Otherwise, air will accumulate in the device, which reduces the heating intensity and leads to corrosion.
It is also important to comply with the location of the battery. It must be installed strictly in the center of the window
Fastening elements are different. They can be made in the form of suspensions, brackets and other structures. Regardless of the type, they have the same task - securely fixing the radiator to the wall. Instructions for attaching the clamps are included along with the elements themselves.
Floor mount
Floor mounting for large, heavy radiators or thin walls
Heavy and massive radiators cannot always be hung on the wall. Not every fastener can withstand such a load, so they use a floor installation method. For this, special brackets are used. They are more expensive, but their mounting reliability is higher than that of wall-mounted models.
Stages of floor-mounted radiator installation:
- Selection of brackets that are designed to support the weight of the battery.
- Installation on the base area allocated for the radiator. Fixation is carried out using anchor bolts at a distance of at least 6 cm from the wall. The height of the radiator from the floor must be maintained.
- Carrying out concrete work. Filling the base of the brackets and bolt heads with screed.
- Putting hooks on the racks. They are adjusted to the desired height and secured with bolts. If provided by the package, protective metal gaskets are installed.
- Installation on hooks at the pre-calculated height of the battery from the floor. The radiator, as in the case of wall mounting, must be aligned horizontally.
The floor system has an important advantage. All the weight from the battery falls on the floor and is not distributed along the wall
By moving away from the floor, a gap will be created that allows air to circulate. Typically, this scheme is used for heavy cast iron heating radiators, but aluminum or bimetallic devices can also be mounted using the floor method.
What sizes are there?
Radiators are available in the following sizes.
Cast iron
According to the specification, standard dimensions:
- Width - 93 or 108 mm.
- Depth from 85 to 140 in increments of 5.
- Height - 588.
Sections made to order can have almost any size.
Knowing the length, the dimensions of the assembled device are determined, since a paronite gasket 1 cm thick is placed between the parts.
If installation is carried out at a point with insufficient space, add the size of the flushing tap.
Important! The distance between the axles is usually 500 mm. Small batteries with a value of 350 are rare
Each section is capable of delivering from 160 W if the average daily air and coolant temperatures differ by 70 degrees. Cast iron can withstand operating pressure up to 9 atm.
Aluminum
Different models have similar internal dimensions. The width is 80 or 88 mm. Depth varies in the range of 10-90 mm. The height is 50 or 35 cm. Models for the bathroom reach three meters in length.
Photo 1. Aluminum radiator model Indigo 500/100 with side connections, section power 196 W, , Russia.
The power of the sections depends not only on the dimensions, but also on the fins of the structure. Low ones develop 150-170 watts, and 500 mm - 185-220. Aluminum can withstand almost twice the pressure than cast iron.
Bimetallic
Standard values are in the ranges:
- Width 80-82 mm.
- Depth 75-100.
- Height 400-420, 550-580.
Power depends on the size, but rarely exceeds 200 watts. This type of section is known for its ability to withstand high pressure, which is due to the steel core. The operating value reaches up to 30 atm, and the test value is 50.
Connection methods
SNiP prescribes the basic rules for installing heating radiators
The ability of the radiator to withstand pressure is important. The manufacturing material should not react with the pipes that are connected to the product in order to avoid corrosion processes
The battery should be placed 10 centimeters below the protruding part of the window sill to release heat flow.
The distance between the floor and the bottom of the radiator should be more than 10 and less than 15 centimeters. This is a fundamental issue, otherwise the processes of uniform heat transfer will be disrupted. All sections must be connected evenly and have no significant differences in height.
In order for heat transfer to occur most efficiently, it is important to place the heating radiator correctly. Experts recommend placing it under the windows to minimize heat loss through these areas.
If there is an external cold wall, it is recommended to place additional devices on it.
In general, batteries in an apartment can be located in several ways:
- lateral location;
- lower;
- diagonal;
- sequential.
The most popular is the side arrangement of batteries. It is characterized by high heat transfer. The pipe through which hot water flows is inserted into the upper pipe, and the outlet comes from the lower one. In the case of bottom placement, both pipes are located at the bottom. The diagram is relevant if the pipes are located in the floor or under the baseboard.
Diagonal is used when the battery has a large number of sections, 12 or more. The coolant enters through the top pipe and exits from the bottom. Consistent is relevant when the plumbing system has sufficient pressure so that hot water passes through all radiators.
In cases where it is necessary to install an additional radiator, the coolant must first be removed from the system. After securing the brackets, the radiator is attached, the connections are secured with a special key. You need to install a Mayevsky tap on the free hole, and close all the others with a plug. Next, you should attach the battery itself and carefully align it. After this, the remaining elements are brought in and everything is connected into a single system, which must be absolutely sealed.
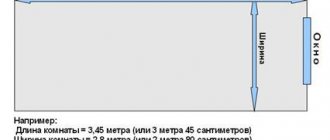
How to determine the required distance
Many construction works carried out inside residential premises are regulated by building codes and regulations (SNiPs). There is also a SNiP for the installation of heating batteries.
From it you can not only find out what distance between the wall and the radiator must be maintained, but also other parameters for its installation:
- the device should be placed directly under the windows so that the centers of the opening and the battery coincide;
- the width of the heating device should not exceed 70% of the width of the window sill niche, if any;
- the distance to the floor should not exceed 12 cm, to the window sill - 5 cm;
- the distance to the wall is within 2-5 cm.
There are several parameters that influence the selection of the optimal gap. Most often it is influenced by the material of the walls of the house and the size of the window sills. In some rooms you can observe an unsightly picture when the batteries protrude significantly beyond its limits.
How to place batteries
First of all, recommendations concern the installation location. Most often, heating devices are installed where heat loss is the most significant. And first of all these are windows. Even with modern energy-saving double-glazed windows, it is in these places that the most heat is lost. What can we say about old wooden frames?
If there is no radiator under the window, then the cold air descends along the wall and spreads along the floor. The situation is changed by installing a battery: warm air, rising upward, prevents cold air from “draining” onto the floor. It must be remembered that in order for such protection to be effective, the radiator must occupy at least 70% of the width of the window. This norm is prescribed in SNiP. Therefore, when choosing radiators, keep in mind that a small radiator under the window will not provide the required level of comfort. In this case, there will be zones on the sides where the cold air will go down, and there will be cold zones on the floor. In this case, the window may often “sweat”, condensation will form on the walls in the place where warm and cold air collide, and dampness will appear.
For this reason, do not try to find the model with the highest heat output. This is justified only for regions with a very harsh climate. But in the north, even the most powerful sections have large radiators. For central Russia, average heat transfer is required, for southern regions, low radiators are generally needed (with a small center distance). This is the only way you can fulfill the key rule for installing batteries: blocking most of the window opening.
In cold climates, it makes sense to install a thermal curtain near the front door. This is the second problem area, but it is more typical for private houses. This problem may occur in ground floor apartments. The rules here are simple: you need to place the radiator as close to the door as possible. Choose a location depending on the layout, also taking into account the possibilities of piping.
What is needed for installation
To secure heating devices, you will need to purchase various materials and additional devices. Their set is almost identical, but for cast iron batteries, for example, larger diameter plugs will be required, and the installation of an air vent instead of a Mayevsky tap.
The installation of bimetallic and aluminum batteries is absolutely the same.
When choosing a radiator, you should take into account that many manufacturers provide a warranty on devices only when installed by organizations that have the appropriate license.
Required tools and materials
When installing radiators with your own hands, you will definitely need to use brackets or holders. Their number is determined depending on the size of the radiators:
- if you plan to install the device in no more than eight sections or up to 1.2 m in length, two points will be enough for reliable fastening - above and below;
- Every subsequent 5-6 sections or 50 cm of battery length requires adding another pair of fasteners.
To install batteries you also need to purchase:
- linen winding or fum tape;
- drill with a set of drills;
- level;
- dowels;
- elements for connecting fittings and pipes.
Mayevsky crane or automatic air vent
The Mayevsky tap is a device that is used at an unoccupied upper outlet. Serves to remove accumulated air. Such a device must be installed on every heating device when installing aluminum or bimetallic batteries. The cross-section of the Mayevsky tap is much smaller than the cross-section of the collector, therefore the connection is made using an adapter device supplied in the kit.
Mayevsky crane
In addition to the Mayevsky tap, you can also install automatic air vents on the battery, manufactured in nickel-plated or brass. For standard batteries, devices in white enamel housing are not available.
Stub
When connected to the side, the radiator has four outlets. Two of them are for supply and return, the third is occupied by the Mayevsky valve or air vent, and the fourth needs to be closed with a plug. They are made from a variety of materials to suit any type of battery.
Shut-off and control valves
To install and connect the battery correctly, you will also need a pair of shut-off or control valves installed at the inlet and outlet of each battery. Ordinary ball valves are required to quickly disconnect the device from the network during dismantling. The system will continue to work.
The advantage of ball valves is their low cost, the disadvantage is the inability to regulate heat transfer.
Ball valves
The same functions, but with the ability to regulate the intensity of coolant flow, can be performed by regulating shut-off valves. Their cost differs greatly, but, at the same time, their aesthetic characteristics are higher. They can be angular or straight.
You can also place a thermostat on the supply pipe behind the ball valve - a small device that allows you to change the heat transfer of the radiator. However, if the battery does not heat well, thermostats cannot be installed, as they will reduce the already low flow. Heat transfer can be controlled by turning the knob to the required division (mechanical devices) or by pre-programming the operating mode of the radiator (electronic thermostats).
Distance from the floor for the office and kitchen
A wider window sill will allow the surface to be used for utilitarian purposes
In such rooms, the placement of the window sill largely depends on the arrangement of the furniture. In offices, the main natural lighting of the workspace is important, so the dimensions should be selected to ensure this condition.
Some people specifically make wide window sills and use them as a desk. On average, the distance from the floor should be about 60-65 cm. These are the optimal dimensions; they will illuminate most of the office.
In the kitchen, the window sill is often combined with furniture, increasing the usable area
In the kitchen, the window sill is often located at a distance of 90 cm from the floor. Most of the kitchen furniture has the same height. With such dimensions, if you place the dining table in the center, it will be fully illuminated.
If you plan to install a bar counter, the height will need to be increased. Under such circumstances, it should be about 120 cm from the floor.
The choice of placement in the corridor is not so critical, because no one stays there for a long time. A landing at 80 cm is considered optimal.
Recommendations from experts
- In order for air circulation near the radiator to be of high quality, it is necessary that the distance between the inner surface of the heat-insulating layer and the battery be at least 3 - 4 cm. If this gap decreases, then air circulation will be difficult, convective exchange will be disrupted, and as a result, the efficiency of the heating system will decrease.
- If the placement of heating radiators does not allow the wall to be insulated with a special heat-insulating material, then foil is attached to the inner surface of the wall facing outside.
- Since heating devices are most often located under window sills, a board that protrudes above the radiator prevents warm air from spreading upward. Therefore, the battery is mounted on an external wall, and the distance from the floor should be up to 10 cm, while the gap between the window sill and the battery should be at least 8 cm.
- For purely aesthetic reasons, decorative screens are installed near the radiators, which block the heating radiator and prevent the flow of thermal energy from the heating device into the room. In this case, the room will be heated by convection, and this will significantly reduce the efficiency of the system.
If there are large windows in the room, then use batteries 30 cm high and in this case condensation will not appear on the glass.
The distance from the radiator to the floor should be 5 - 10 cm, to the window sill and to the wall 3 - 5 cm.
The radiator is installed at an angle of 90 degrees, since any deviation from the norm leads to corrosion of the heating device, as well as to the accumulation of air.
Requirements for installing heating radiators
Create an account
Register in our community. It's very simple!
Already have an account? Sign in.
Or login using one of these services
Google recommends
Our recommendations
Table made of slabs. Swallows Hoffmann
Sano published a blog post in Slab Furniture, Sunday at 20:28, blog post
I make a table to order, the tabletop is made from slabs of elm or otherwise elm.
In one of the slabs there is a fairly extensive and sometimes through crack. I cleaned it and also filled it with epoxy resin, it will seal the crack and also level the surface of the countertop.
As an additional blocking from the opening of the crack, Hoffman swallows are embedded, which not only enhance, but also create a decorative effect.
Some will say that they spoil the appearance, and they should have been placed on the back side of the countertop. But the fact of the matter is that you can’t put them there because of the features of the countertop.
I personally like these swallows and besides, their presence was approved by the customer of the table.
They were made from scraps of the same tabletop, two dark swallows lay on the light half, and one light one was cut into the dark half of the tabletop.
A short excursion into where this furniture element came from. For me, this Homphan did not invent anything, but simply took what has been used for centuries in carpentry and other art. In fact, this is the same dovetail connection.
Let's leave this to the author's conscience; besides, the name swallow or Hofmann's butterfly stuck to this type of connection, just as, for example, all copying machines are called Xerox.
In 1985, while still a student at Harvard University, Thomas Hoffmann developed a system for joining parts made of wood and chipboard materials (MDF and chipboard), which was named “Hoffmann Swallow” and was soon adopted throughout the woodworking industry.
Ceilings yin and yang
Ramon published a topic in Our works, December 12, 2008, topic
One of our first works supported the oriental theme with a sakura branch
birch suvel
Sano published a blog post in Slab Furniture, January 23, blog post
This is the cut of birch we brought to the workshop, while we are preliminary planning to make a coffee table.
The preparation of such material itself was not the easiest thing, not only was it found in the forest, it was also difficult to remove, then the suvel was cut into pieces, but after that it was cooked using a special technology for a couple of weeks, and then dried for a couple of years.
In general, this is a whole epic, and due to the fact that so much has been done just for the blank and based on the size, the price of such material is already becoming very high. And this is not the table itself.
You need to approach the work thoughtfully and make a smooth tabletop with minimal loss in the thickness of the workpiece.
What is it for?
Phoenix posted a topic in Tools and Equipment, January 15, topic
I suggest warming up for those who are interested.
Does anyone have any guesses as to what this is for?)
What are the rules for installing sockets in the kitchen?
Question: There is a sink in the kitchen and there are sockets nearby, at what distance from the sink should the sockets be located?
I'm afraid that splashes of water will fall on them and give them an electric shock. Thanks in advance for your answer. Answer : There are never enough sockets in the kitchen. There are always nearby assistant appliances for the kitchen owner that must constantly work - a refrigerator, a microwave oven, an electric kettle, an extractor hood, and much more. The figure shows how you can arrange sockets in the kitchen to connect additional household electrical appliances.
What are the rules for installing sockets in the kitchen?
1. 1.All kitchen sockets must be installed at work kitchen tables at a distance of 100 mm from the floor surface.
2. 2. For built-in kitchen appliances, it is allowed to install sockets behind the walls of adjacent buildings; holes for sockets of appropriate sizes are pre-cut in the back walls of the cabinets. Such sockets are installed at a height of 30-60 cm from the floor level.
3. 3. The length of the connecting wire from the socket to the kitchen appliance should be no more than 1.5 meters.
4. 4.The distance from the sink to the first socket and from the stove to the socket should not be less than 200 mm.
5. 5. It is allowed to install sockets for kitchen appliances inside a cabinet with a kitchen sink. For such an installation, it is necessary to use waterproof sockets with a degree of protection IP 44 (see photo).
6. 6. The outlet for the hood is installed at a height of 50-60 centimeters from the top mark of the installed kitchen cabinets. In this case, it is necessary to take into account the fact that the outlet is not covered by the ventilation duct from the hood to the ventilation wall hole in the kitchen. It is also necessary to maintain the distance from the middle of the hood itself to the location of the socket; it must be at least 200 mm, this will prevent the socket from getting behind the installed air duct.
7. 7.For lighting built into kitchen furniture, sockets must be placed above wall-mounted kitchen cabinets; they will be invisible and at the same time easily accessible.
8. 8. Sockets for kitchen small household appliances are all installed on the kitchen apron above the working surface of the countertop at a height of 200-250 mm, this reduces the likelihood of splashes on them during cooking.
1. Place sockets for kitchen appliances behind the housings of household appliances built into the kitchen, behind kitchen drawers.
2. Place the sockets behind the dishwasher, freezer, sink and oven; the sockets for them should be located on the side of them on the wall.
3.Install sockets above the sink and stove.
If you have any doubts about the correct installation of the socket near the sink, buy a waterproof socket as shown in the photo and your doubts will disappear.
Features of installing radiators in an apartment
The given rules for installing heating radiators are general for both individual systems and centralized ones. But before installing new radiators, you must obtain permission from the management or operational company. The heating system is common property and all unauthorized alterations have consequences - administrative fines. The fact is that with a massive change in the parameters of the heating network (replacing pipes, radiators, installing thermostats, etc.), the system becomes unbalanced. This can lead to the entire riser (entrance) freezing in winter. Therefore, all changes require approval.
Types of wiring and connections of radiators in apartments (click on the picture to enlarge its size)
Another feature is of a technical nature. If it is vertical (one pipe enters through the ceiling, goes to the radiator, then comes out and goes to the floor), when installing the radiator, install a bypass - a jumper between the supply and discharge pipelines. Paired with ball valves, this will give you the opportunity to turn off the radiator if desired (or in an emergency). In this case, no approval or permission from the manager is required: you have turned off your radiator, but the coolant continues to circulate through the riser through the bypass (that same jumper). You don't need to stop the system, pay for it, or listen to your neighbors' complaints.
A bypass is also needed when installing a radiator with a regulator in an apartment (the installation of the regulator also needs to be coordinated - it greatly changes the hydraulic resistance of the system). The peculiarity of its operation is that it blocks the flow of coolant. If there is no jumper, the entire riser is blocked. Can you imagine the consequences...
Design, technical characteristics and features
Structurally, these heating devices are sectioned batteries consisting of two different metals: steel and aluminum.
The steel part of the radiator has direct contact with water or other coolant, and heat transfer is carried out by aluminum plates with excellent heat conductivity.
Due to the successful combination of the properties of these metals, bimetallic radiators have the following advantages:
- High heat transfer coefficient;
- Pressure up to 4 MPa;
- Corrosion resistance;
- Silence;
- Can work in networks with any pipes;
- Thanks to the sectional design, you can dial any estimated number of sections.
The height of radiators is usually 26, 42 or 58 cm. The standard center-to-center distance is 200-800 mm. The width of one section is usually 80 mm.
This choice of geometric dimensions allows you to install bimetallic radiators in any niches, under regular and panoramic windows.
Bimetallic radiators are coated with durable polymer paint, which reliably protects them from external influences and corrosion, in addition, they have a very attractive appearance.
In closed heating systems with a pH of 7 to 9, where the dissolved oxygen content is extremely low, the steel of the internal structures is almost not subject to corrosion, and rusting occurs only when the system is aired.
After some time, a dark, insoluble sediment forms on the inner surface of new radiators, preventing their destruction.
Thermal power (heat transfer) is the main technical characteristic of heating devices that determines their efficiency. For bimetallic radiators, this figure ranges from 100 to 200 W, depending on the height of the area of the aluminum plates.
This property is due to the excellent heat transfer of aluminum.
Aluminum radiators, which have similar heat transfer, but a lower price, resist corrosion much worse, and when the coolant reacts alkaline, they also emit hydrogen, as evidenced by noise and bubbling in the pipes.
They are distinguished from cast iron or steel sectional batteries by their compact size, light weight and attractive design, while the thermal power of bimetal radiators is higher. Their resistance to internal corrosion differs slightly.
In terms of resistance to increased pressure and water hammer, bimetallic radiators have no worthy rival: they can easily withstand pressure of 3-4 MPa. This indicator for cast iron and steel radiators does not exceed 2 MPa, for aluminum radiators – 1.6 MPa.
This feature is especially important for residents of high-rise buildings, where there is significant pressure in the heating system.
The only drawback is their price - it is higher than other heating devices. However, high reliability and efficiency completely compensate for this drawback.
Distance from window sill to radiator
Almost all modern radiators and sectional heating radiators amaze with their high efficiency and efficiency, providing such indicators due to air convection and its natural flow through the heat exchange system. It is precisely because of these design features that it is not enough just to buy highly efficient radiators and power them with coolant; it is necessary to provide conditions for convection - the natural transfer of heat by air. Let us indicate the required distance from the window sill to the radiator, as well as the main installation recommendations, as conditions for maintaining high efficiency.
Window sill board.
When installing marble window sills in an apartment or private house, many focus only on the upper gap of 100 mm, completely forgetting that by choosing an overly protruding, wide window sill, you can disrupt not only the thermal cutoff of cold air, but also change the overall air circulation along the windows. The window sill board should not block the radiator, creating a kind of niche for the battery, suggesting an enveloping movement of heat along it. Unfortunately, a specific size cannot be recommended, and the protrusion of the board should minimally interfere with air convection near the radiator and move it away from the glass.
Radiator mounting.
Before drawing the first mounting point on the wall, carefully study the included instructions for the radiator, as... Most manufacturers inform about the recommended installation gaps that ensure high heat transfer of this particular battery. In the absence of such recommendations, they use general ones, according to SNiP 3.05.01-85. "Internal sanitary systems":
The minimum distance from the bottom of the window sill to the radiator is 100mm, since reducing it reduces the heat flow of air. From the floor to the bottom of the radiator, the gap is in the range of 100-150mm, and increasing the distance increases the temperature difference in the entire room, and decreasing it again reduces the intensity of heat transfer
It is also important to take into account the distance from the wall to the radiator; it is made 25-30mm, because the rear surface is also actively involved in heat transfer
If the factory recommendations differ from SNiP, they are guided by the manufacturer who developed the battery.
The efficiency of its operation and the comfortable temperature in the room depend on the correct installation of the heating device. For the efficient operation of the heating system, it is important not only the correctness of its assembly, the quality of the equipment and the tightness of the connections, but also compliance with the standardized distances from the heating devices to the surrounding structures (floor, walls, window sill)
It is especially important to maintain the distance from the battery to the window sill, because obstacles from above can interfere with the normal circulation of convection currents. We will list the standards for installing heating radiators in apartments and private houses
Today you can find radiators on sale in different designs and from different materials.
They are also divided according to installation methods and come in the following types:
- Floor-standing devices have special legs for installation on the floor in the room. In any case, such radiators are installed at some distance from the wall surface and the protruding horizontal structures of the window opening.
- Wall-mounted radiators are mounted on supporting brackets fixed to the walls of the room. They are usually installed under window openings so that rising convection currents create a thermal curtain in front of the window, because it is through the glazing that the room loses the most heat.
In any case, when installing a heating device, you must follow the rules for installing batteries. It is easiest to maintain the required distance from the wall to the unit when hanging on walls, because in this case special brackets are used, which, due to their configuration, provide the required clearance. When installing a floor-standing device, the distance will have to be adjusted manually.
conclusions
It is always necessary to maintain the correct distance from the wall to the heating radiator, regardless of the design of the product, its shape or other operational characteristics.
It does not matter what kind of heating system in a house or apartment: single-pipe or two-pipe, central or autonomous heating. In any case, space is needed for heat exchange between the air and the radiator.
If this rule is not followed, the energy efficiency of the heating system will be significantly reduced and the radiators will have a shorter service life. As a result, costs for energy resources, repairs or replacement of heating system components will increase.
Primary requirements
The distance from the floor to the window sill may vary depending on the type of window. However, GOST provides for the permissible coefficient at which heat is best retained in the room, and the figure is 0.55 W/°C×m². This means that in order to achieve the desired effect, you need to use a plate that will have low thermal conductivity.
The distance of the radiator to the window sill plays an important role: in this case, there is SNiP, the main provisions of which require:
The window sill should have a slight slope into the room - at least 1˚. There must be thermal insulation between the wall and the structure. During installation, the height from the floor is taken into account. All window sills must be at the same level. The length of the window sill should not be more than 3 meters. The length is set relative to the window opening, with a difference of 4 mm. The distance required to retreat from the battery to the window sill should not be less than 8 cm. It is recommended to saw off the excess parts at room temperature.
a brief description of
Today, buyers have a huge selection of batteries on the heating systems market. They differ in design options, as well as in materials of manufacture. It should be noted that radiators are:
- Floor-standing. They are installed directly on the floor, as they are equipped with small legs, which are made taking into account the standards for the gap between the floor, window sill and radiator.
- Mounted. Their sections are attached using special metal hangers to the internal walls of the house near the window openings.
Connection
Amendments to calculations and advice
The methods discussed above for calculating the number of radiator sections are perfect for rooms whose height reaches 3 meters. If this figure is greater, it is necessary to increase the thermal power in direct proportion to the increase in height.
If the entire house is equipped with modern plastic windows, in which the heat loss coefficient is as low as possible, it becomes possible to save money and reduce the result by up to 20%.
It is believed that the standard temperature of the coolant circulating through the heating system is 70 degrees. If it is below this value, it is necessary to increase the result by 15% for every 10 degrees. If it is higher, on the contrary, reduce it.
Premises with an area of more than 25 square meters. m. heating with one radiator, even consisting of two dozen sections, will be extremely problematic. To solve this problem, it is necessary to divide the calculated number of sections into two equal parts and install two batteries. In this case, the heat will spread throughout the room more evenly.
If there are two window openings in the room, heating radiators should be placed under each of them. They must be 1.7 times more powerful than the rated power determined in the calculations.
Having purchased stamped radiators where sections cannot be divided, it is necessary to take into account the total power of the product. If it is not enough, you should consider buying a second battery of the same type or one with a slightly lower heat capacity.
Many factors can influence the final result. Let's consider in what situations it is necessary to make correction factors:
- Windows with regular glazing – magnifying factor 1.27
- Insufficient thermal insulation of walls - increasing factor 1.27
- More than two window openings per room – magnifying factor 1.75
- Manifolds with bottom wiring – magnifying factor 1.2
- Reserve in case of unforeseen situations – increasing factor 1.2
- Use of improved thermal insulation materials – reduction factor 0.85
- Installation of high-quality thermal insulating double-glazed windows – reduction factor 0.85
The number of amendments made to the calculation can be huge and depends on each specific situation. However, it should be remembered that it is much easier to reduce the heat output of a heating radiator than to increase it. Therefore, all roundings are made upward.
If you need to make the most accurate calculation of the number of radiator sections in a complex room, do not be afraid to turn to specialists. The most accurate methods, which are described in specialized literature, take into account not only the volume or area of the room, but also the temperature outside and inside, the thermal conductivity of the various materials from which the frame of the house is built, and many other factors.
Of course, you can not be afraid and add several edges to the result. But an excessive increase in all indicators can lead to unjustified expenses, which are not immediately, sometimes and not always, able to be recouped.
Types of radiators
In Soviet times, all batteries were identical in appearance, resembling accordion bellows. Modern radiators, including bimetallic ones, are produced in different types. Monolithic samples form a section assembled entirely from steel tubes that cannot be disassembled. The dimensions of such a heater device cannot be changed: reduce or increase the number of pipes. If the thermal power of the battery for a particular room is calculated correctly, then a more reliable heating device cannot be found. Such batteries will withstand pressure up to one hundred atmospheres. They are the most expensive bimetallic heaters on the market.
Collapsible (sectional) models make it possible to determine the parameters of the radiator section required for a single room. To ensure real warmth in the apartment, before purchasing a device, you must first determine what its power should be, taking into account any heat loss. The capacity of the heater directly depends on its size. The smaller the capacity, the more economical the heating device operates.
The importance of the gap between the wall and the battery
The minimum distance between the wall and the radiator is 25 mm; no thermal insulation layer is laid on the wall.
When installing radiators, it is important to create a distance between the heating device and the wall. The outer wall is constantly in contact with the surrounding air, causing significant cooling
When the battery is mounted on the inner surface without a gap, most of the heat will be spent on heating the wall material rather than the room. The low thermal insulation properties of concrete walls do not allow creating an optimal microclimate; about 70% of thermal energy will be wasted. By moving the heating system a short distance, air insulation will be created, increasing heating efficiency.
There are other reasons why it is necessary to create a gap according to the given standards:
- Creating a sufficient level of air mass circulation. If this condition is violated, part of the energy will be lost.
- When placed close to the wall, the device begins to heat up faster. As a result, the radiator may fail.
- Dust and debris will accumulate between the wall and the battery, which also impede heat transfer.
- In the absence of a heat-reflecting plate, the radiator will waste heat on the external walls.
- If an electric battery is installed, there is a risk of short circuit. Hydronic heating systems can be susceptible to corrosion if there is no clearance.
When installing heating devices, you must adhere to the following recommendations - the greater the radiator power, the wider the gap should be. Its specific dimensions are made up of two important parameters:
- Window sill width, niche dimensions. The possibility of creating distance depends on these individual characteristics.
- The power of the battery itself.
What should not be placed near radiators
Not all equipment and items in the house can be placed near radiators during the heating season. High temperature sometimes has a detrimental effect, although at first glance it does not seem dangerous. What should not be placed near the battery?
- Fridge
- Bed
- Microwave
- Furniture
- Flowers
Fridge
It is strictly forbidden for a refrigerator or freezer to be near radiators. The entire system is cooled through the back wall of the refrigerator; if it constantly interacts with heat, then first of all, in order to avoid overheating, the equipment begins to work harder. This increases energy consumption, and the overall voltage increases. As a result, the refrigerator, not designed for such a volume of work, cannot withstand it and fails.
Bed
The optimal temperature for sleeping is 16 degrees, at which people feel rested and healthy. In addition, the room must have humidified air. Placing the bed next to heating appliances makes it difficult for people to get quality sleep.
The air around the batteries is very hot and dry. If you inhale it all night, in the morning a person wakes up lethargic, tired and as if sick. Doctors say that sleeping in such conditions provokes frequent relapses of colds and other diseases. Due to dry air, breathing difficulties and peeling of the skin occur.
It is best to place the bed two meters from the radiator. If for some reason this is not possible, you should cover the radiators with thick multi-layer fabric or reduce the heating power. It is recommended to install a humidifier in the room.
Microwave
Microwave ovens should not be placed in close proximity to devices that emit heat. The battery around itself burns air, which is necessary for normal operation of the microwave. If this condition is not present, then after some time the electrical appliance will fail, and the heating element inside may simply burn out.
If it is impossible to place the microwave in another place, it is necessary to insulate the battery so that hot air does not interfere with the operation of the oven.
Furniture
Any cabinets, sofas, armchairs and shelving should not be placed near radiators. If the quality is poor, the surface in places of heating may change its original appearance. In addition, furniture interferes with the normal heat exchange between the battery and the surrounding space. The room may become very cold.
Flowers
If the radiators get very hot, then there is no place for flowers next to them. Tender leaves and stems will wither, turn yellow, and are unlikely to recover. In addition, such a neighborhood greatly dries out the soil and the root system located inside.
Height calculation
The distance between the radiator and the window sill must be at least 10 cm, regardless of what type of heating device is used. You also need to take into account the height of the battery itself. It is necessary to retreat 8 cm from the rear. The battery itself should rise above the floor by 10 cm, that is, when installing a window sill from the floor according to SNIP, you will need to retreat 70-80 cm.
The projection of the window sill also plays an important role.
: It may extend significantly from the wall or be invisible. If there is no radiator under the window, it is not necessary to meet any requirements, but if heating is present, the projection must be strictly regulated. The task of the window sill is to redirect heat flows. Without it, they will rise upward, and proper heating of the room will not occur, since some of the heat will evaporate and be distributed on the ceiling.
Poor convection can also be caused by a window sill that is too wide. It will not allow warm air to escape, as a result, condensation will begin to accumulate on the window, since the main air flows will go up, and some of them will get stuck under the window, heating the atmosphere
In this case, it is very important to calculate the distance from the window sill to the heating radiator, both in height and how much of a protrusion can be made. You can avoid the problem described above by using a slab that does not extend beyond the wall by more than 8 cm
Tip: when calculating the dimensions, you need to take into account the level of the wall with decoration.
The best option is a solution in which no more than 10% of warm air will be retained in the window niche. To do this, the window sill should not protrude more than 6 cm beyond the radiator, but it should not be shorter than the heating device. If the design solution of the room requires the installation of non-standard wide structures, it is necessary to provide ventilation holes in them. Their size must be sufficient for proper air circulation.
Is clearance necessary?
Some window owners believe that the window sill extends deep under the window frame, but this is not the case. The distance between the window and the window sill is approximately 10 mm. Otherwise, the structure may become deformed. The fact is that under the influence of warm air, the material from which the slab is made expands. The gap is left so that the structure can take the desired shape without being damaged. Visually, this technique is invisible.
How to position the curtain?
The distance of the window sill curtain also plays a role. In order for the curtains to move without clinging, without leaving marks on them, and for warm air to circulate freely, the distance must be at least 5 cm.
Conclusion: it is not always possible to apply the standard distance from the floor, radiator, curtains to the window sill, but you can find a way out by observing certain requirements.
Video: Installation of heating radiators (batteries)