Ensuring a comfortable temperature for people living in a private house or apartment in winter is a priority task for every owner. When organizing individual heating or heat supply in an apartment building, all elements are important, starting with what should be the distance from the floor to the heating radiator, and ending with the fluid pressure in the system. Before starting work, you should study the building codes and regulations (SNiP) relating to the organization of heat supply, and also find out at what distance experts recommend hanging the heating device.
In the living room
Standards
SNiP standards are advisory in nature, but when replacing batteries in an apartment in an apartment building with a central heating system, their implementation is mandatory. This is due to the fact that when designing the house, all the conditions for its further maintenance were taken into account, including, among other things, economical heat supply.
According to established standards, a brick or panel house requires the following:
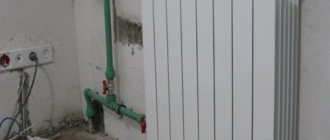
- The distance from the floor to the battery or radiator should be within 80–140 mm. A smaller installation height will make it impossible to carry out wet cleaning under the device and will provoke the accumulation of dust that is undesirable for human health; a larger one will reduce the useful heating zone.
- The distance between the battery and the window sills should be 100–120 mm. If the distance from the radiator to the window sill is reduced, the conversion of air masses will decrease and the efficiency of the heating battery will decrease.
- Installing heating radiators from the wall more than 30–50 mm is not recommended due to the fact that, as in the previous case, the conversion is reduced and the accumulation of dirt is provoked with minimal possibilities for its elimination.
In the kitchen
The radiator must be hung above the floor exactly in the center of the window opening. This will ensure the creation of a heat shield in the area of the glass filling of the window, while maintaining the aesthetic appearance of the room.
Why are batteries placed under our windows and nothing else?
We remember from the physics textbook that warm air is lighter than cold air, so it always tends to occupy the upper position. Even a schoolchild can explain these features of the movement of air flows. You also need to take into account that the temperature of the window glass is always lower than the temperature of the wall.
It turns out that in winter, when the central heating is turned on, the following process of movement of air masses in the apartment occurs:
- near the window the air cools and tends to move from above to the lower part of the room;
- then the cold air spreads across the floor throughout the house, displacing warm air that accumulates above the ceiling;
- As a result, an unpleasant atmosphere is created in the room when the area where people are located becomes cold.
To avoid such a development of the situation, you need to place a heating radiator under the window. In this case, the warm air flow, rising from the heater, will mix with the cold air flow from the window. This mixing allows you to maintain a comfortable air temperature in the lower part of the home, cutting off cold currents descending from the window opening.
Now it’s clear why radiators are placed under the window and not moved to other places.
In addition, you need to understand that the radiator under the window also helps prevent fogging and freezing of the window. Remember how in a private village house, in which the main source of heat is a stove, frost often accumulates on the windows, the glass becomes covered with a pattern of frost and does not allow sunlight to pass into the home.
In general, the correct location of the heating elements of an apartment depends on the climate and the materials from which the house is built. In the southern regions, where there are rarely frosts below 20 degrees and relatively dry air, when glazing the room with high-quality double-glazed windows, the batteries can be placed anywhere, while the windows will remain clean without frost, and the apartment will have a comfortable temperature.
Connection diagrams
Several schemes for connecting radiators into a single thermal system have been developed and are used. They are presented in the following types:
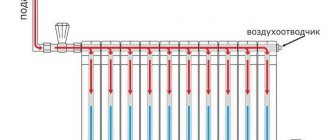
- maximum thermal output occurs with a lateral connection, which involves installing the input in the upper sector of the battery, the output is at the bottom on the same side;
- if the heat sink is of significant size, the best option is considered to be a diagonal connection, where water enters through the upper pipe and is discharged through the lower one, on the opposite side;
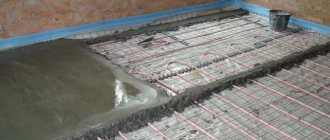
- When installing hot water supply pipes hidden under the floor surface, a bottom connection scheme is used, popularly called “Leningradka”.
Bottom wiring
If the heat supply pipes are placed in a rough screed, then significant heat losses should be expected due to contact with the concrete and the ceiling of the lower floor.
Sequencing
It is necessary to thoroughly insulate and install double glazed windows!
So, the legal and technically correct sequence of actions if you want to place a heating radiator on the balcony consists of the following steps:
- insulation of external walls;
- coordination of redevelopment, obtaining relevant permits and conclusions;
- choosing the optimal type of radiator and installation method;
- wall preparation - installation of thermal insulation, finishing;
- direct installation.
If you are firm in your intentions, then for apartment buildings it is recommended to move the radiator from the room to the balcony, and not to install an additional one, which will immediately significantly reduce the efficiency of the general building system - this is unlikely to please the neighbors and will entail inspections.
Types of heating batteries
The efficiency of heating a room will depend not only on how far from the floor the radiator or radiator is hung, but also on their connection diagram, the material and design of the heating devices themselves. The following models are available on the market today:
- Cast iron batteries. The adult generation probably knows them firsthand. During the Soviet Union, only these models were used in heating systems. Today they have a more presentable appearance. They are characterized by a high level of heat capacity, long-term heat transfer, absence of consequences from water hammer, and they also have an increased service life.
- Steel radiators. They have low heat transfer rates - heating occurs quickly, but they cool down no less quickly. The welded structure is sensitive to hydraulic shock. There is no way to add sections yourself. At the same time, the weight of the product and ease of installation attract many homeowners. Products of the German brand “Kermi” are in particular demand.
- Aluminum radiators. They are characterized by low weight, beautiful shape, and increased thermal output. They are presented on the market in two versions, where in the first the design consists of one monoblock, with a volume that provides different powers, in the second - a stacked sectional one.
- Bimetallic batteries. The innovative design of the placement of heating collectors made it possible to achieve the level of heat transfer of aluminum models, as well as the strength and reliability of their cast iron counterparts.
Minimum clearances
The radiators purchased must meet GOST standards. They check compliance by reading the documents for the goods in the store. Their absence may serve as a reason for refusing to purchase a product at this outlet.
Alternative
Of course, you can save space by using furniture. For example, put a kitchen island with everything you need for cooking or a small corner equipped with everything you need. However, this will not really solve the problem, especially if there is a large window and you want a wide window sill, which will also take up some of the space. There is a good option - to combine business with pleasure.
Positioning the kitchen along the window is a design solution that is far from new, but very popular. Especially when it comes to a small room. Usually the entire wall along the window is empty if furniture is placed along other walls. And it turns out that the use of space is not entirely rational. If furniture and interior items are placed along the wall with a window, then along the other two you can organize a relaxation corner and a dining area.
This option has another plus - light and air. That is, it turns out that in case of strong fumes, in addition to the hood, you can open the window and quickly ventilate the room, getting rid of heavy odors. However, there is another side to the coin. In the case of the sunny side, bright light can interfere with cooking, so if you still decide to install the kitchen along the window, you can close the window with special blinds or shutters to protect from the bright sun. Another important detail in this arrangement of the room is the absence of curtains and drapes. They will not only be inappropriate, but also dangerous, because there should be a stove or hob nearby.
Battery
Another seeming obstacle to conquering space is the battery. It is no secret that in most rooms the battery is located strictly under the window. When installing furniture there, you need to come up with a good way out of the situation. In principle, you can go in two ways: complex and simpler.
Battery transfer
This is rather a very difficult path. After all, it is impossible to do this on your own, without the skills and, most importantly, special equipment. More precisely, it is possible, of course, but the one who does it will be responsible for the consequences. In this situation, the old fittings along with the pipes are cut off. From the remaining ends of the pipes, special polypropylene or other polymers intended for this product are carried to the desired place where the battery will be located. After which everything is welded back.
Decoration
The furniture can be placed under the window sill, leaving a gap for the battery. You can cover it with a decorative screen or decorate it a little yourself. For example, paint it in an original way. If, for example, the color of the furniture is black or white, you can paint it in the spirit of a piano with keys, but if the kitchen is multi-colored and suggests the presence of bright colors, then it would be appropriate to paint the radiator in a rainbow pattern.
Hide and forget
Another simple way would be to disguise the battery, for example, under a false wall. To do this, it is enough to make a sheathing from a metal profile, and then tighten everything with plasterboard, leaving special ventilation or vents with doors. In this case, the wall will look quite neat along with the furniture.
Conclusion
Furniture placement is an important issue, especially with small rooms, so it’s worth planning and thinking about everything several times before taking action.
Radiator installation
Installation of all types of heating radiators is carried out using the same technology. The difference is represented only by the selected connection diagram and the need to purchase plugs for cast iron batteries of a larger diameter than other types, as well as installing an air vent on them, rather than a Mayevsky tap.
In the bedroom
Tools and accessories
The installation of heating elements is accompanied by the use of the following:
- a set of locksmith tools;
- drill or hammer drill with a set of drills;
- hammer;
- screwdriver or screwdriver;
- accessories for measuring and marking;
- building level and corner.
Purchase the following components and accessories:
- Radiators with a set of brackets or holders.
- Mayevsky cranes that meet the requirements of GOST are better than domestic or European production. Others may be difficult to attach to the radiator.
- Fastening elements for fittings and pipes.
- Plugs, taking into account the installation of one Mayevsky tap per battery.
- Shut-off valves for quickly shutting off a failed heating element from the system for replacement.
Under the window
Installing faucets with smooth heat control on each radiator will significantly save energy consumption and create a comfortable atmosphere in rooms for different purposes. Cranes are available in mechanical or electronic versions.
Preparing the premises
Before starting installation work, it is necessary to prepare the room. If you plan to connect according to the Leningradka scheme, then you should dismantle the floor coverings in the rooms. In other cases this is not necessary.
To ensure that the furniture does not interfere with the dismantling of old heating elements and the installation of new radiators, it is removed to the center of the room. Prepare accessories for collecting residual water from removed batteries, as well as putting things in order at the place where they are attached.
Scheme of recommended deletions
DIY installation
After preparing the tools, accessories and premises, installation begins. The work is performed in the following sequence:
- Make markings. To do this, use a building level and a tape measure. Measure the height of the heating element, add the distance of the radiator from the floor, and make a mark on the wall. Using a level, draw a strictly horizontal line along the mark. The installation points of the holders are retreated from this line and fixed on the wall plane.
- Using an electric drill or hammer drill, drill holes for the dowels. Keeping a distance from the battery to the window sill, screw in the holders. Check the horizontal position again.
- Unpacking the radiator. The device is sold in a protective film. If installation is carried out during the construction period, it is not recommended to remove it until the work is completed. In circumstances where it is necessary, for example, to hang it in the kitchen to replace the old one, the film is removed before installation.
- Heating element layout. A mechanical or automatic air release device is installed. It is screwed into a seat in one of the upper manifolds, opposite the hot water inlet. Plugs are screwed into unused outputs. If there is a difference in diameters, special adapters should be used.
- Ball valves are installed at the inlet and outlet. They provide the ability to dismantle an individual heating element without stopping the operation of the entire system.
- After assembling all the components of the thermal element, it is carefully hung on the brackets. They check the accuracy of maintaining distances in accordance with the requirements of SNiP 2.04.05-91.
- Connect the inlet and outlet pipes. Their fixation depends on the type of connection used - threaded, by crimping or pressing.
Distance from the floor and wall according to SNiP standards
When the battery is first started, water is supplied under low pressure, ensuring smooth filling of the cavities.
Turning on the system abruptly can lead to water hammer, which will damage the housing or destroy the inlet valves.
The kitchen along the window is not scary
An eternal problem is lack of space. Especially in the kitchens of old houses, where this room was not given enough space and most of them today are from 6 to 9 squares, which is very small. Once you look at a photo of such a room, you immediately wonder how to properly arrange it so as not to reduce the space and accommodate everything you need.
Some people solve this problem with square footage by combining several rooms or making a kitchen-studio, that is, a separate corner for cooking and a living or dining area. This is a fairly good option, but not everyone agrees, especially if the apartment is one-room. On the one hand, the kitchen automatically becomes visually larger, and on the other, you get the feeling of sleeping in the dining room.
Recommendations
Replacing heating elements yourself is often associated with a number of mistakes. How to avoid them and ensure high heat transfer of the system is indicated in the following recommendations:
- strong fastening of batteries is the key to long-term operation, therefore there should be no less than three fixation points;
- ensuring the correct horizontal level will eliminate the formation of “air jams”;
- regardless of the location of windows in corner apartments, all walls bordering the street must be equipped with radiators;
- creating a reflective screen on the wall side in the plane of the heating element will increase the useful thermal output;
- in a single-pipe wiring diagram, a bypass is installed between the pipes, in the form of a jumper between the inlet and outlet of the coolant, which will allow replacement or repair without shutting down the entire system;
- to calculate the number of heaters, taking into account that the formulas include a significant number of coefficients, it is better to use calculators on construction sites or contact specialists;
- In order to avoid conflicts with the management company when replacing central heating elements in an apartment, actions must be approved in the manner established by the collective agreement.
DIY installation diagram
Even with completely correct installation of heating elements, owners can violate the heating mode themselves. Thick curtains or curtains, decorative screens, wide window sills and flowers on them reduce work efficiency by up to 20%.
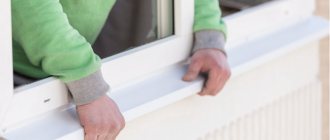
How far should the window sill protrude from the wall?
The width of the model has a functional and aesthetic meaning, which participates in heat exchange, increases the usable area and is the finishing touch of the renovation.
In the kitchen, this element is used as an additional countertop. In other rooms this is a place for plants, so choosing the optimal width is very important.
When replacing window structures, owners want to make maximum use of the usable area and do not know how far the window sill should protrude from the wall.
A model that is too wide will interfere with normal air circulation, the room will not warm up properly, and the glass will fog up.
If non-radiator type heating is used, then you can install a model without a protrusion or a wide 0.5-0.7 m element.
The best arrangement for a PVC and wood slab is to extend it by 6 cm. For wider models, manufacturers provide technological holes for the circulation of warm air with a diameter of 1.0-1.5 cm.
Installation with a protrusion of more than 6 cm is possible by covering the radiator with special ventilation grilles or by choosing a battery with a horizontal flow of heat output. Installing a model made of stone, which does not transmit heat well, requires a protrusion of no more than 5 cm.
Heating systems as an interior element
Each model line of heating equipment has a segment where radiators of small height are presented. This group includes products in which this parameter does not exceed 450 millimeters. A low heating radiator under a window is indispensable for heating constantly wet and cold walls facing the street along their entire length.
Such devices are used in the following cases:
- the presence of large panoramic windows;
- location of the heat supply system in the baseboards.
When choosing heating equipment, you need to take into account a number of technical parameters of the products:
- material of manufacture;
- dimensions;
- power;
- resistance to corrosion processes;
- scope, etc.
Models without housing
In this case, heating radiators are installed in a specially prepared niche. Its walls are insulated. The most commonly used is polyester foam. Batteries of this type are mainly located in new buildings, where their installation is provided for in the design documentation.
Diagram and principle of operation of a liquid electric radiator
The heating circuit is installed inside the niche at a height of 10 cm from the bottom. This is due to fire safety regulations. Also, the presence of an air gap improves the movement of warm masses and increases the efficiency of the heating device.
The channel with heating elements is closed with a special grille. It must withstand significant loads that are possible during operation.
Also, the grill must be removable so that the channel can be cleaned of accumulated dust. It can move completely away or collapse.
Areas and features of application, effectiveness
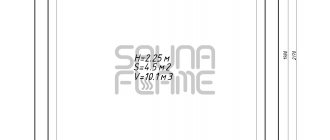
Model SOLIRA 2020/4 No. 12 with a height of 200 mm and a depth of 70 mm.
Narrow batteries have become an alternative to conventional batteries in the face of changing building standards. They are ideal for panoramic and stained glass windows. In addition, large radiators do not always fit into bathrooms, toilet rooms, and balconies. With their miniature size, low batteries are practically not inferior to standard analogues in terms of efficiency, if the installation is carried out without violating technology.
Low horizontal structures are used in narrow rooms where there are low walls, partitions or panoramic windows. They are also indispensable for small loggias and balconies, as they do not take up much space. Narrow horizontal radiators are also installed in long rooms and corridors.
The main feature of such radiators is not even the size and dimensions, but the specificity of heating the room: the lower and longer the heating device, the more even the temperature of the room and the better the entire volume of air is heated.
Floor convectors
Another common way to heat a room with panoramic windows is to install floor convectors. This option is simpler than in-floor ones in terms of installation - you don’t need to prepare a special niche on the floor, just place the model in the area next to the power source.
Among the advantages of floor heaters are:
- compactness and stability. Many models are equipped with durable legs that support the entire structure;
- small dimensions. Thanks to the design features, it is possible to create very miniature models;
- ease of operation and maintenance. There are no difficulties, everything is very easy.
But there is also a drawback: such heaters do not provide enough heat; they can be used as auxiliary equipment.
Built-in devices
Heating radiators built into the floor are used to heat office, retail and residential establishments. They can be used in greenhouses and conservatories to create temperature conditions that are comfortable for plants. The operation of the device is based on the principle of convection. Built-in units promote intensive air circulation, so they heat the room faster and more efficiently, which reduces heating costs.
Worth knowing! There are built-in radiators on sale with automatic temperature control, condensate removal function, and the ability to program the microclimate in the room.
The unit has a simple design. Inside the metal housing there is a heat exchanger with convective plates. The body of the device is built into the floor, and is covered with a durable decorative grille on top.