Everyone furnishes their home based on their own taste preferences and idea of comfort. Even if you do not touch on the early stage of finishing work, but immediately move on to the selection of furniture, many will have difficulties with its implementation. Furniture items can be purchased or made yourself. The first option is faster, and the second is cheap, interesting and exciting. We invite you to learn how to create a kitchen with your own hands from furniture panels, a master class from experienced craftsmen.
How to choose the right furniture panel for the kitchen
Before you start developing a design or drawing up a diagram, you need to decide how to choose the optimal wood. Today, manufacturers offer a wide range of tree species used in the manufacturing process of furniture panels. In most cases, property owners prefer pine, oak, cherry, beech, poplar, and yew.
Most people mistakenly assume that furniture board is made from waste wood products or pressed wood.
IMPORTANT! Softer material is intended for creating interior elements that will not be subject to heavy loads, for example, facades, decor, top cabinet lids. Hardwoods (yew, beech, oak) are intended for the construction of frames.
Its production is based on the process of gluing wood lamellas, which subsequently undergo several stages of surface polishing.
The selection of furniture panels based on the type of wood depends on the required functions, financial capabilities and purpose of the finished product. In addition to these characteristics, it is important to pay attention to the following parameters:
- absence of knots, cracks, chips on the surface of the workpiece;
- uniform distribution of annual rings.
Furniture made from furniture panels belongs to the category of deep-processed products.
An equally important parameter is the grade of furniture panels, which is determined depending on the number of defects on their surface. Traditionally, products are divided into varieties such as Extra, A, B, C. Sometimes the sides of the shield are represented by two varieties, in which case a double meaning is used. According to the requirements for the quality of furniture, the use of class “C” products is prohibited, so we suggest considering the features of only the first three types.
The final product is not inferior in density even to solid wood.
"Extra"
These furniture panels are characterized by the absence of visible defects and damage. They are made from a single lamella. Property owners can select products based on appearance and texture, which significantly affects the overall appearance of the room.
A rich assortment will allow you to choose the material that best fits into your existing interior.
"A/B"
This designation indicates that one side of the product is represented by grade “A”, and the other “B”. A shield with such characteristics in terms of the number of damages, on the one hand, is practically not inferior to the “Extra” category. When choosing, you must remember that solid or spliced lamellas can be used. The second side of the product may be represented by small defects, knots and minimal cracks.
Furniture made from this material is considered durable and of high quality, its service life is very long.
"IN"
This type of material can be made from spliced or solid lamellas. The presence of minor errors is allowed, for example, knots, cracks and other types of defects that do not significantly affect the quality of the board. The selection of products is made exclusively by color.
Wooden furniture panels are extremely resistant to moisture, while the surface structure is completely preserved.
Benefits of use
The kitchen frames created from furniture panels are original in appearance, practical, highly functional and cheap decor for a city apartment or country cottage. Such operational parameters of a furniture set are ensured by the high characteristics of furniture panels. This is a very popular material today that can be found in almost every building materials store.
Such a wide prevalence of such material can be explained by the large list of advantages that are inherent in it:
- environmental friendliness, naturalness, absence of substances hazardous to human health, does not provoke the development of allergic reactions, has a pleasant natural smell;
- when laminating, furniture panels become resistant to moisture and deformation under mechanical stress, unlike natural wood;
- high strength, durability, practicality;
- low weight;
- hold fasteners well;
- screws, nails and other materials have a surprisingly attractive aesthetic. The laminated surface of the material is made in a variety of color shades of tree species, so you can make a furniture set that matches the color of the room’s decoration;
- affordable price. Furniture can be conveniently made from such materials because its cost ends up being very affordable. In addition, kitchen doors are also made from furniture-type panels.
Furniture panels from which it is worth making a kitchen are practically free of drawbacks. Therefore, experienced craftsmen recommend that consumers concentrate their attention on this material. And how to make a kitchen on your own using furniture panels, we will tell you further.
Kitchen drawings and diagrams with dimensions
Creating kitchen drawings from furniture panels with your own hands is an important process that can subsequently become a lifesaver for any craftsman. The plan of the kitchen space must be created taking into account the dimensions of the furniture. The document displays information about the size of the room, communication diagram, ventilation system, electrical wiring, and the presence of sockets.
To draw up a drawing, you need to take measurements of the kitchen.
It is also important to indicate in the drawing the location of the entire furniture set, indicating their sizes, for example, a table, a wardrobe with shelves for storing food, chests of drawers and bedside tables, a refrigerator, a gas or electric stove, a sink and other components.
You should always start from these initial data when developing the sizes and names of furniture.
Dresser
This type of furnishing item can be ideal for the kitchen area. For this reason, it is necessary to consider its location in the room, design features, size and number of shelves, compartments, and dimensions of the upper surface. All these parameters are indicated in the diagram in order to avoid problems and troubles later.
When choosing a specific option, consider all factors.
Closet
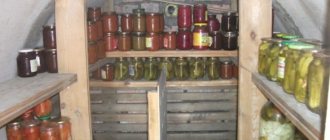
Many craftsmen believe that creating a wooden cabinet is difficult and time-consuming. But with sufficient experience and carpentry skills, its production will take very little time. The drawing must indicate the type of structure and its dimensions (height, width). It is very important to include in the diagram information about each element that makes up the cabinet - depth, width, height of shelves, doors, partitions and other components. This approach will allow you to clearly calculate the amount of material needed, as well as correctly carry out all planned work so that the product fits harmoniously into the room.
You immediately need to make a list of elements indicating their quantity and material of manufacture.
Table
A DIY table made from furniture panels or any other material is one of the most important elements of the kitchen. It can be made in the form of a square, rectangle, circle, corner shape, as well as folding or sliding. A prerequisite for this piece of furniture is a flat tabletop. On the kitchen diagram, it is necessary to indicate the shape and dimensions of the table; for example, in most cases, rectangular structures have dimensions of 270x60 centimeters.
Not only the list of items, but also the comfort of use also largely depends on the location of the furniture.
Finishing process
After assembly, kitchen structures made from furniture panels can be opened with varnish, which will significantly increase the resistance of the surfaces to wear and give them an attractive appearance. To do this, the furniture is sanded, varnished, and dried indoors. Do not forget that drafts will only spoil the process. Lacquered cabinets and cabinets look classic, laconic, and stylish.
Almost the same technology is used when painting furniture made from panels. Only after sanding should the surfaces be coated with primer, and only after that should they be painted. Then the paint will stick better. If you want to apply some original idea, then it is better to refuse varnish and paint.
We will describe the simplest, but at the same time very interesting ways of decorating kitchen furniture that was made independently, without the help of professional furniture makers and expensive equipment, namely:
- using photo wallpaper - cover parts of the cabinet with newspaper and secure it with tape. Photo wallpaper will subsequently be pasted in these areas, and the remaining parts can be painted;
- we create the effect of antiquity - for this decoration technique you will need to use foam baguettes with curls. They are cut and fixed to the cabinet doors using liquid nails. Next, the entire structure is painted, and after the paint has dried, some abrasions are left in the corners and on the curls with sandpaper. If you want gloss, then you can use a sponge to apply golden strokes to the curls of the baguette.
The following video details design options for DIY kitchen furniture made from panels.
Preparation of all materials and tools
An equally important step is creating a work plan. This document specifies such important parameters as:
- the type and composition of the future furniture set;
- list of fittings and accessories;
- necessary tools and materials.
You need to have a full set of carpentry tools, a workshop, basic furniture making skills and a great desire.
In most cases, the following components may be required:
- furniture panels in the required quantity to create all planned interior items;
- special impregnation, varnish, stain, paint;
- plywood sheets;
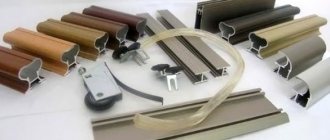
- fittings, doors, handles and other decorative details;
- sandpaper or grinder;
- electric or conventional drill;
- wood saw or electric saw;
- screwdriver;
- boards;
- screws, nails;
- measuring instruments (large ruler, centimeter);
- a pen or pencil for recording measurements;
- screwdrivers, hammer.
It is possible that other adaptations may be required. The final list depends on the preferences of the master, the planned design of the kitchen and the assembly features of the furniture set.
Photo design ideas
Separate corner
Desktop as a basis
Photo of a bar counter in a small kitchen
Zoning option
Interesting lighting
As a base for a coffee table
In the spacious kitchen))
Bar counter made of brick or stone - stylish
Non-standard appearance and color
Bar counter in a studio apartment
You can also have lunch
Two sketches for implementation
Bar counter for a small kitchen
Video on the topic
If you want to place a bar counter in an open summer kitchen, you can borrow the idea from this video. The guy built an interesting stand using driftwood and a thick board found in the forest.
Most often questions arise about how to make a countertop for a bar counter. You can decorate it with mosaics. And how - look in the video. In general, the technology for laying mosaics is simple: use a special white glue, followed by grouting the seams between the tiles. It can be difficult to form an uneven edge. Here's how to do it - watch the video.
Tabletop glued from bars
Cutting panels to required sizes
Cutting must be carried out taking into account safety precautions in order to prevent injuries and other troubles. When buying furniture panels, it is important to remember that they can be available in different thicknesses. In most cases, manufacturers offer 15, 20 and 25 millimeters.
Products that are 15 mm thick are used to decorate the back wall of a furniture set. Products with parameters of 25 millimeters are intended for creating more complex design structures; other types are used for other elements of a rack or cabinet.
Cut the furniture board to size. You can work with an electric circular saw, but it is better to do this operation on a circular saw.
The wood is cut according to the created drawing. It is important to carry out cutting very carefully and carefully, because even a slight inaccuracy can lead to deformation of the entire furniture. An electric jigsaw is used for this.
INTERESTING! There are construction stores that offer their clients an additional service - cutting the board into the necessary components. This option is ideal for beginners who have not worked with a jigsaw or have not carried out such work.
After completing this procedure, the master must have all the components for each cabinet and shelf, as well as doors, countertops, fittings, and sink.
If you do not have the opportunity to do the cutting yourself, then do it in the store.
Purpose and types
If the kitchen area allows, a bar counter is placed in the kitchen for its intended purpose: to sit down for a cup of coffee or something stronger, or to have a snack. Then its “equipment” is appropriate: holders for glasses, wine glasses, glasses, next to it is a shelf/holder for juices, bottles, etc. They place it with one edge resting on a wall or the edge of a kitchen unit, sometimes they place it in the form of a frame - in the middle of a free zone.
Bar counter in a large kitchen
In small kitchens it is often multifunctional. It can also be used as a divider into zones - dining room and kitchen; in very small areas it is often used as a dining table. Moreover, it can be located non-standardly - against the wall.
Bar counter along the wall
In medium-sized kitchens - 10-12 meters - it is often made in the form of a peninsula - a small protrusion on the side. In order to make more efficient use of space, the space under the countertop is used for shelves or a cabinet. This design is very simple - the bar top is often supported by several pieces of straight or inclined pipes fixed to the cabinet table.
Bar counter in the kitchen - peninsula
Such multi-stage kitchens have recently become popular: it is more convenient to perform different operations in the kitchen on surfaces with different heights.
Two surfaces one above the other
The surface of the stand is slightly shifted relative to the table
But, nevertheless, more often a bar counter for the kitchen is present in studio apartments to delimit two zones: the kitchen from the living room or from the hallway - who has what is combined. Moreover, it is often a continuation of the desktop island or peninsula.
Bar counter for the kitchen as a continuation of the island table
They also make it in the form of a partition. In this case, the base is most often made of plasterboard, and a surface is “attached” to it - from above or to the side.
Bar counter-partition made of plasterboard
This option is easy to do
In general, there are many options, variations and different types. You adapt the idea that you like to your conditions, and you can begin to implement it.
We assemble the kitchen and install it
Now you can assemble the kitchen furniture set. Before you begin this important event, you need to make sure that all additional components are present: handles and door hinges, guides, legs and other elements.
The cabinets can be coated with wax or varnish; painting is not recommended so as not to hide the beautiful structure.
Next, each detail of all modules is laid out step by step. Be sure to do this in the order in which the connection will occur. This approach will avoid confusion and troubles with the loss of elements. The process should be carried out from below, from the base, and then proceed to creating a frame and filling it with components.
Now that you have a little furniture making experience of your own, you can begin making more complex base cabinets with drawers, desks and tabletops.
A kitchen made from furniture board is a great opportunity to add a creative touch to the room. The creation and assembly of such a furniture set can be implemented in any living space. The quality of the material contributes to the durability of the kitchen, functionality and compliance with any interior design style.
The main thing is not to be afraid of work and carefully calculate the consequences of each step.
Useful videos
In this video you can see how to solve the problem if you want to install a bar counter outside, within an open summer kitchen. It is enough to find a snag in the forest, as well as dry thick branches and install a board on them.
BAR COUNTER MADE OF WALNUT SLAB, STABILIZED WITH EPOXY, PRIMER AND VARNISH
Many people are interested in the question of how to make a countertop for a bar counter yourself. The next video shows a tabletop in the form of a mosaic. Here it is shown and explained how it is done.
9 mistakes in a kitchen with a breakfast bar
Drawing
Any sliding wardrobe or other similar structure is assembled only after the preliminary creation of a special diagram presented in the form of a drawing. To do this, you should first decide on the main features of the future furniture, for which you decide:
- what height, width and depth the structure will have;
- what number of different doors, compartments, drawers and other compartments will it have;
- what height will the mezzanines have if they are planned in such a cabinet;
- what will be the filling of the cabinet, and it can be represented by numerous partitions, shelves, drawers, rods or other high-quality elements that increase the comfort of using this product.
After answering these questions, the procedure for creating a sketch of the future cabinet begins. To do this, you need to draw it. If you have experience in creating drawings, then the diagram can be made on a sheet of paper. If you do not have the necessary skills, then it is considered optimal to use special computer programs for design. All you need to do is enter predetermined data, after which the required drawing will be automatically obtained. It is on this basis that you can correctly assemble the cabinet yourself.
Thanks to a well-made drawing, you can get answers to many questions regarding the future cabinet:
- details are drawn up;
- the required amount of materials is calculated;
- it is determined what dimensions furniture panels intended to create an interior item should have;
- it is decided how they will be cut.
Often a new cabinet is created to replace an old design, and in this case it is possible to make exactly the same product. After creating the diagram, it is recommended to carefully consider it, since it will be possible to understand on its basis what appearance the future piece of furniture will have. It is advisable to make changes in advance, since during the actual creation of the structure this will no longer be possible.
Cabinet assembly technology
After all the preparatory stages, you can begin to directly create the cabinet. You will assemble the structure quite simply if you strictly follow a certain sequence of correct actions. The entire cabinet assembly process is divided into several stages, each of which has its own characteristics.
Assembly
If the work is being done for the first time, it is recommended to start with the procedure for creating a standard double-door cabinet, equipped with a small number of internal elements. It does not have any specific elements, so you do not need to spend a lot of time or effort on its creation.
To form the structure, certain elements are certainly cut out, and for this it is recommended to use an electric jigsaw, which ensures truly smooth and high-quality parts. This tool creates structural elements:
- 2 walls, which are the side parts of the future cabinet;
- the bottom, and it must be highly durable if it is intended to store shoes on the bottom or other elements and structures of significant weight in such furniture;
- the lid, and it should not be too heavy, and it is also recommended that it be slightly larger than the width and length of the cabinet, as this ensures an attractive cabinet;
- a plinth that ensures the closure of the hole formed between the bottom of the cabinet and the floor of the room;
- two doors;
- the back wall, and furniture panels or standard thin plywood can be used for it;
- shelves, and their number should be determined in advance when creating the diagram of the future cabinet.
It is advisable to make grooves at the bottom of the sides of the structure for the plinth, and they can be rounded or rectangular, and thanks to such elements it is possible to move the furniture close to the wall of the room.
Before assembling the cabinet itself, it is recommended to coat all elements with a special varnish designed for working with wood. It is advisable to apply this product 2 times to ensure a truly high-quality and reliable coating. After applying the first layer, the surfaces of the structure must be sanded, but the second application can be performed after the cabinet is directly assembled.
Assembly is a fairly simple job, carried out in sequential steps:
- holes are marked for fastening elements and future fittings;
- in places where there are marks, holes of the required size are created;
- during the work, it is taken into account that the hinges are usually fixed at the top and bottom at a distance of 10 cm, however, in the presence of massive doors, it is recommended to use three hinges;
- the bottom is fixed between the two side walls using self-tapping screws;
- you can immediately start fixing the base, for which self-tapping screws are also used;
- a cover is installed at the top, and it is advisable to use a level or other measuring equipment during work to prevent any distortions or other shortcomings;
- if no problems with evenness are detected, then the rear wall is securely fixed, for which small nails are usually used, since this wall has a small mass;
- the process of installing the door begins, for which the hinge bowls are inserted into pre-made recesses, and the hinges themselves are fixed to the structure with standard self-tapping screws;
- door handles are fastened using ordinary screws;
- The doors are hung, for which hinges are fixed to the side walls, and it is advisable to use adjustable fasteners, which allow you to obtain a truly even fastening.
Thus, the cabinet assembly procedure is a simple job that can be easily done on your own. To do this, only simple sequential actions are performed. During the work process, it is necessary to constantly use a level or other similar equipment in order to quickly see various distortions or other problems, since they must be eliminated promptly.
Creating markings Fixing the base
Fixing the bottom
Holes
Filling
The assembled structure must certainly have different compartments and other elements to ensure ease of use for its intended purpose. To do this, it is necessary to provide for the presence of drawers, different rods or compartments. Boxes are easily made in successive steps:
- custom plywood is purchased, onto which markings are applied in accordance with the required dimensions of the main elements of the future box;
- holes are drilled, and to prevent the thin material from breaking during this process, it is recommended to make holes at a distance of approximately 10 cm;
- to create drawer fronts, a narrow panel of high attractiveness is used;
- the resulting elements are securely connected to each other;
- To make the drawers easier to use, it is recommended to install special guides, thanks to which the elements simply slide out and slide back in.
In addition to drawers, any closet must have a rod. It is intended for hanging various clothes on hangers. To fix it, special high-strength rod holders are used.
Marking
Creating holes
Connecting plywood
Installing guides
Facade
It is important to get not only a strong and durable cabinet, but also an attractive piece of furniture that fits perfectly into the existing style of the room. Various methods can be used for this. The initially obtained structure is certainly coated with a reliable varnish, ensuring a high-quality protective coating. Various methods are used for decoration:
- painting in different shades, for which it is necessary to use special paints designed for working with wood, and it is also taken into account that the resulting color must fit perfectly into the existing color scheme;
- creating different carvings with your own hands;
- use of various films;
- hand painting, which can only be done if you have the appropriate skills;
- the use of expensive, bright and beautiful fittings that attract attention and provide excellent decoration to the structure.
Thus, if you were going to purchase a wardrobe for any room in a residential building or apartment, then creating it yourself is considered an excellent solution. For this, different materials can be used, but the use of standard furniture panels is considered optimal. Designs made from them have many advantages. The procedure for creating a cabinet is considered simple if you carefully study the instructions in advance and use only high-quality materials.
Tools
If you plan to assemble the structure yourself, you should prepare the necessary tools for this work in advance. These include:
- varnish for wooden structures;
- self-tapping screws for reliable fastening of individual elements of the product;
- an electric drill, which should have different drill bits;
- chisel, screwdriver, pencil and tape measure, as well as a hacksaw for working with wood;
- sanding machine for wood processing.
All of these tools are simple, so they are usually available to every man who does a lot of housework.
Tools
Recommendations for selection
When choosing the best furniture board (laminated or otherwise), you should adhere to some rules. even dissimilar materials can be functional and beautiful if made using technology.
When inspecting, pay attention to the following important parameters:
- Product class - boards without a single knot are marked “extra”, and class I/V are spliced with an adhesive composition without toxic components.
- Gluing method - solid lamella panels are used for furniture, and spliced panels are mainly used to create load-bearing structures.
- Price – products made from coniferous trees are the cheapest, the premium segment is bamboo, beech and oak. Average price and excellent quality for hardwoods like cherry, maple and alder.
- Purpose - if you are planning to make a window sill, door or staircase, do not overpay for solid slats and choose the stacked option. For facades and countertops, the preferred option would be high-quality panels without noticeable signs of gluing.
- Uniformity - popular manufacturers use one type of wood for panels, and if the structure of the fibers is very different, then the material can hardly be called high-quality.
Taking into account the recommendations, you can easily choose the best material for yourself.