In the electric heating of the IPO structure and mats, there are already fixed steps of the heating elements, which cannot be said about water heating.
Therefore, the number of pipes in the calculation depends on the selected distance between them. We will consider below how to choose the distance between underfloor heating pipes, what are the main parameters and how to calculate everything correctly.
How to determine the area of a room
To do this, use the simplest formula, which is studied in elementary school.
S=a*b , where:
a is the length of the room;
b is its width.
That is, you need to multiply the width by the length.
We recommend excluding the area where you plan to place large furniture. It is completely impractical to heat the floor under the furniture on which the kitchen wall or wardrobe will stand. In addition, reducing the heating area will reduce the cost of purchasing underfloor heating pipes.
System Features
Before learning how to lay heated water floor pipes, you need to pay attention to the features of the system:
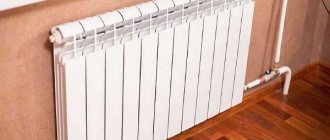
- Rooms with underfloor heating systems are heated evenly. The same cannot be said about rooms with radiators.
- Underfloor heating systems are not suitable for rooms with low ceilings.
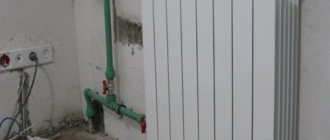
The service life of a heating structure depends on the elements from which it is made. If metal-polymer or polymer components are used for this, it can reach 50 years. Electric heating elements will last 20 years, and metal radiators are recommended to be replaced every 25 years.
How view affects distance
The pitch of water heated floor pipes is also affected by the material, since each has its own thermal conductivity.
The maximum value is for corrugated stainless steel and copper pipes. In third place is metal-plastic, followed by polyethylene and polypropylene.
It turns out that polypropylene has the lowest thermal conductivity. Therefore, it is recommended to use it only in extreme cases.
Logically, it turns out that the higher the heat transfer coefficient, the wider the step can be between laying pipes. And the smaller, the closer the pipes must be laid to each other. Same thing with diameter. If it is large, then we lay the pipes wider, if it is small, then it is denser.
To determine the step based on the coolant temperature, you can look at the table:
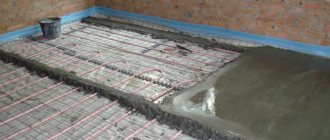
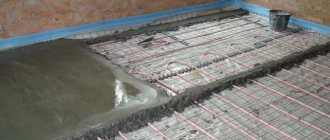
Solution
Cement mortar for this purpose is prepared simply; you can make it yourself. Purchasing a ready-made mixture will save time, but financial costs will increase.
So, a modern heated floor is able to function independently. But it can be combined with other methods of heating a home.
In this case, it is necessary to calculate the distance between the pipes of the water heated floor - Correctly applied technical design features can warm the home in any season.
- Related Posts
- What kind of substrate is needed under a laminate for a warm water floor?
- How much does a heated floor consume?
- How to lay a heated floor under PVC?
- How to connect heated floors in an apartment?
- How to install a heated floor?
- How to lay cable heated flooring?
How to calculate pipe length
There is a simple formula that helps determine the required length: L = (S / N) * 1.1 , where
S is the total area on which it is planned to lay the water floor. Measured in square meters.
N is the laying step distance.
1.1 - additional pipe reserve for turns.
Also indicate where your manifold will be located and what additional pipe distance is needed to it. And multiply by 2, since you need a reserve of both supply and return.
As an example, let's look at a simple problem with which we will determine the required length of pipe for a room.
Given: 15 m2 area of the room where the water floor will be installed. The distance from the warm floor to the collector is another 3 m. And the pitch between the pipes is 20 cm (it should be calculated in meters, like other parameters, it turns out to be 0.2 m).
We solve: (15/0.2)*1.1+(3*2)=88.5 m. This is exactly the length of the pipe we need for work.
Is it possible to join pipes to each other?
If a water floor made of copper pipes is laid in a screed, then the pipes will have to be joined to each other. This will make the structure more reliable and durable. When installing polypropylene products, the connection is made by soldering, and in cases with a polyethylene circuit, the connection is made by welding a heat-resistant coupling.
The situation is more difficult when connecting PE-X and PE-RT pipes with fittings. Installation of press fittings is acceptable, but not recommended, as leakage may occur. But to connect the pipeline to the collector unit you cannot do without press fittings.
Important! Connecting circuits using push and compression fittings is prohibited. This also applies to push-in connectors for HDPE.
It is better to take a flexible pipeline for a warm floor, in one solid piece. This is more reliable and practical, since if there is a leak, repairing the lower floor will cost more.
Warm floors are a modern heating system that, with the correct choice of material and accurate calculations of the distance for laying loops, can create an ideal microclimate in the house.
Calculate the maximum length of one contour
If we consider heated floors, then they encounter the effect of a locked loop. When coolant circulation is impossible at any pump power. This effect occurs with a pressure loss of 20 kPa (0.2 bar).
It is quite problematic to calculate on your own using formulas, so it is better to use a number of recommendations that have already been developed by experts.
If you have a pipe with a diameter of 16 mm made of metal-plastic or polyethylene, then the loops need to be made no more than 100 m, and to further protect yourself, it is better to increase it to 80 m.
With a diameter of 18 mm, the maximum is taken to be 120 m, and better not more than 100.
With a diameter of 20 mm, the maximum is 120-125 m. Ideally, it should not go beyond 100.
How to make the system work more efficiently
To increase the efficiency of such a heating system, it is worth considering several important aspects:
- Using water flows from the return circuit as an additional source of thermal energy will help reduce the load on the boiler.
- At the design stage, a detailed plan for the passage of the pipeline must be drawn up, indicating the pitch and marking places where floor heating is not required (under large pieces of furniture, household appliances, etc.).
- The total length of one circuit must not exceed the threshold value. This rule will reduce heat loss to a minimum. So, for pipes with a cross-section of 20 mm, the length of the route should be no more than 120 meters, for 16 mm - 100 meters.
- One circuit can effectively heat a room of about 15 sq.m. If the area of the room is larger, it is worth considering the installation of more circuits, and it is advisable to make their length approximately the same.
Note! To ensure the reliability of the heated floor, it is recommended to use only whole pieces of pipe when laying.
Select the preferred styling form
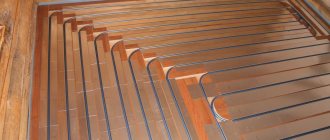
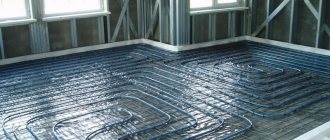
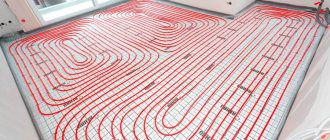
Many different forms of laying heated floors have been developed. The most common and frequently used ones are: a snake (various: regular, double or angular) and a snail.
Some specialists combine 2 patterns in one outline. The edges are laid with a snake, and the center is laid with a snail.
In order not to damage the pipes after installation, it is necessary to stop other construction work in this room until the screed is poured.
Room temperature
Also, the length of the heated floor contours for pipe 16 affects the heating level. To maintain a comfortable indoor environment, a certain temperature is required. To do this, the water pumped through the system is heated to 55-60 °C. Exceeding this indicator may have a detrimental effect on the integrity of the utility material. Depending on the purpose of the room, on average we get:
- 27-29 °C for living rooms;
- 34-35 °C in corridors, hallways and walk-through areas;
- 32-33 °C in rooms with high humidity.
In accordance with the maximum length of the underfloor heating circuit of 16 mm in 90-100 m, the difference at the “input” and “output” of the mixing boiler should not exceed 5 °C, a different value indicates heat loss on the heating main.
Which pipe laying for heated floors is better?
The snail shape is ideal for large rooms with a square, circle or rectangle shape. These mainly include living rooms, kitchens, corridors, halls, and living rooms.
When the pipes are laid out like a snail, the heating of the area is as uniform as possible than with a snake. This is due to the fact that supply pipes, which have a hotter coolant, alternate with return pipes, in which the coolant is slightly cooler.
It's not a mistake to line a large room with a snake, it's just that one part of the room will always be a little hotter than the other. This may cause discomfort. For small rooms this is not so critical.
If the laying area is geometrically complex, then use a snake; it will be easier to handle. We also recommend that you draw out the project on graph paper in advance so that you don’t get stuck in your work.
Drafting
At the initial stage, a project is drawn up on graph paper. A detailed installation diagram should be shown here. The dimensions entered must fully correspond to the scale scale.
The project contains not only the parameters of the room where heating is planned to be installed, but also the location of all immovable objects under which the pipeline is not installed is recorded.
Drawing up a project for laying heated floors
The order of placement of pipes is selected from the most common ones (snake, spiral). Comparing these methods, each of them has strengths and weaknesses. The “snake” technique is simpler and faster, but does not ensure uniform heating of the plane.
Spiral laying is more difficult to perform, but it provides uniform heating and eliminates kinks in the coolant.
Now all that remains is to measure the length of the pipes (in total) and convert them to actual dimensions according to scale.
Is it possible to have a floor contour of different lengths?
Ideally, this is when all the loops are equal to each other. In this case, there is no need to further balance or configure anything.
In life, this is often impractical to achieve, although it is possible.
For example, on one of the floors you need to lay water heated floor pipes. Of the 3 rooms there is a room for a bathroom. The working area of which is only 4 m2. It turns out that the length of the pipeline for this room with all the costs and the distance to the collector will be around 30 m. Is it worth dividing the area of other rooms into 4 meters in order to get the same contour everywhere?
This will be extremely impractical, just like fitting a pipeline from a 20-meter room to a 4-meter bathroom. This is why balancing fittings exist.
There are many formulas, but they are complicated, and not everyone will understand, so it is better to focus on average experience indicators. Let's just give the optimal numbers for the location of the pipeline. Often, for different complexities of objects, a variation in the length of pipes of individual circuits from 30 to 40% is allowed. In addition, you can vary the diameter of the pipes by laying increments, reduce the area of a large room and select the middle one from them. Do not forget to exclude large-sized and stationary furniture from the area of large rooms.
Heat loss and location
With additional insulation of the floor and walls, the laying step may be wider.
The heating circuit is a complex system, so the pitch between the loops may not be constant. If heated floors are used in rooms with strict air temperature requirements (bathrooms, industrial facilities), the step can be constant. The following values are respected:
- Large industrial premises, swimming pools, water parks - 20 cm between loops with a pipe diameter of 20 mm.
- Bathroom – laying step 15 cm.
In other cases, the values are approximate and unequal along the length of the entire pipeline. It is necessary to maintain a minimum distance between turns along the walls, since this is where the greatest heat losses are observed. As you move away from the walls, the step increases. If the heat loss of hot pipes is less than 50 W/sq.m., the step will be 30 cm. If the heat loss exceeds 80 W/sq.m. the minimum step must be observed.
Traditionally, pipes are laid in such a way that there is a distance of 100-300 mm between them. More accurate values are obtained after a general calculation.
The approximate distance in the bathroom is 10-15 cm. In the living room, the interval increases to 25 cm. For corridors, kitchens, utility rooms, storage rooms, the optimal value is 40-35 cm. Values may vary in different parts of the room.
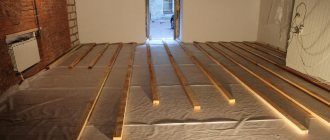
Installation of water heated floors in the house
The coolant in the floor is mounted in the form of a single or double snake or spiral. The total length of the pipe depends on the choice of circuit location. The ideal option is coils of the same size. However, in practice, creating uniform loops is difficult and impractical.
When the flooring is done throughout the house, the parameters of the premises are taken into account. In a bathroom, bathroom, hallway, which occupy a smaller area compared to the living room, bedroom or other rooms, it is difficult to create long coils. They do not require many pipes to heat them. Their length can be limited to several meters.
Some prudent owners bypass these rooms when installing a water circuit. This saves materials, labor and time. It is more difficult to install heated floors in small rooms than in spacious ones.
If the system bypasses such nooks and crannies, it is important to correctly calculate the maximum pressure parameters in the system. For this purpose, balancing fittings are used.
It is designed to equalize pressure loss across different circuits.
Possibility of connection to one unit and pump
The number of loops that can be connected to one collector and one pump is determined depending on the power of the equipment used, the number of thermal circuits, the diameter and material of the pipes used, the area of the heated premises, the material of the enclosing structures and many other various indicators.
Such calculations must be entrusted to specialists who have knowledge and practical skills in carrying out such projects.
A competent approach to insulating a balcony: a calculator for calculating the thickness of the insulator
Reading time: 1 minute No time?
It just so happens in our country that our winters are frosty, autumns are rainy and windy, and even in summer there is nowhere to escape from the ubiquitous drafts. The dream of every owner who has a balcony or loggia is to create a real oasis or recreation area on this, at first glance, unsightly territory. The only question is how to correctly and accurately calculate the consumption of materials in order to plan expenses and not overpay. Especially for our readers, the editors of HouseChief.ru have developed a convenient and visual calculator that will help home craftsmen without special training accurately calculate the required thickness of insulation for a balcony or loggia.
A warm balcony is most often a multi-layer structure that needs to be calculated correctly
Read in the article
What components are needed
To perform this type of work with your own hands, you will need the following additional materials:
- Thermal insulation for laying under pipes. Styrofoam is a good choice for this;
- Waterproofing - most often dense polyethylene is used for this purpose;
- Damper tape to compensate for the expansion of concrete screed as a result of heating;
- Reinforcing mesh - necessary to ensure the strength and rigidity of the entire structure;
- Special clamps that will ensure high-quality fastening of the pipeline;
Output of heated floor pipes - Collector - will ensure the distribution of water throughout all circuits of the system. If the design is multi-circuit, then install a manifold with a regulator that allows you to set the water pressure in each of the circuits;
- Mixing unit – ensures maintenance of a comfortable temperature and controls the mixing of hot and cooled water in the system;
- Fittings for connection.
In addition to all the components, you will also need various tools, such as:
- Hammer or drill - for drilling the necessary holes;
- Screwdriver – for fastening pipes to the floor;
- Special soldering iron if plastic products are used;
- Adjustable wrench;
- Hacksaw for cutting pipes.
When all the tools and materials are ready, you can begin installing the heated floor.