The advantages of this solution
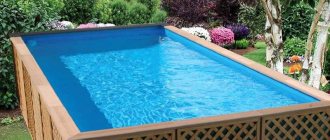
Wooden ground
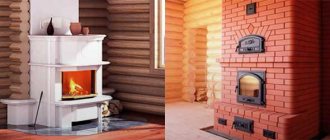
Perhaps, when thinking about a swimming pool, one immediately imagines a pit, which will then be filled with concrete and tiled. Indeed, this is done in many cases. This requires a lot of time, effort and money. But if you replace a concrete pool with a wooden structure, excavation work may not be required at all. You can independently develop a unique project that will have an intricate shape. In addition, the structure can be moved to another location at any time. With the correct selection of components, there is no need to dismantle it for the winter. The water inside may simply freeze and expand, but this will not cause any harm to the coating. Changing the fluid also does not take much time. In some cases, you don’t even need a pump; it will be enough to connect the hose to the tap at the bottom and, minding your own business, wait until the container is empty. Moreover, the drained water can be used to water garden plants. You will be surprised how quickly and easily a project like this can be implemented.
Wood is an environmentally friendly material that can fit into any space.
What needs to be analyzed
A normal desire for a person is to use his products for as long as possible. This is usually possible with good preparation and careful planning. This approach also applies to the construction of a swimming pool. Please pay attention to some points.
Swimming pool next to the house
- Neighborhood with buildings and vegetation. It is quite possible to place the container next to the house, but if this is done next to the pantry where food is stored, then the rodents that may visit there can damage the structure, which will lead to its partial or complete destruction. On hot days, shade from trees is a salvation from the scorching sun. But for the pool, such “partners” can be disastrous. For example, the root system of trees, growing, can damage the bottom. In a strong wind, a broken branch will destroy the frame when it falls. In addition, when falling leaves fall into the water, they contribute to the development of bacteria and algae, which will require frequent water changes and pool cleaning. It is better to avoid areas that are under high-voltage transmission lines. This, in addition to electromagnetic radiation, poses a risk of electric shock.
- It is better to plan for the construction of a pool on an area that has a slight slope. This will make it possible to simplify your task with draining used water, since it will be able to flow away by gravity. It is great if the soil is clayey, because it has good density and also does not allow water to pass through. In addition, such a coating will support sufficient weight without deformation, which could lead to a change in the configuration of the structure.
- Wind. The issue of determining the preferential direction and strength of the wind is very important. The air flow can raise clouds of dust and dirt, which will settle into the water. It is best to locate the pool on a certain side of the building so that it covers the pool from gusts of wind. It is useful to take this parameter into account when choosing the shape of the pool. If it is a rectangular container, then it should be placed with the long side facing the wind. In addition, holes for overflows must be made in the far part, where the wind predominantly blows, then the garbage will flow into the drain on its own.
Optimal depth
Depth. The deeper the better. This rule does not apply to a home pool. Of course, I would like to perform breathtaking, spectacular jumps from a springboard, but this may be unsafe. If you still have such a desire, then in a place intended for diving, you can make a depression of up to 2.5 meters or more. But the optimal distance from the water surface to the bottom is 1.5 m. It is in such conditions that you can feel safe, swim calmly, and, if necessary, just get back on your feet. When there are children in the family, then the depth needs to be made even less. For younger children, it may not exceed 50 cm. Nothing prevents you from forming the bottom into several levels. This will require considerable effort, and subsequently you will need to carefully monitor that children are in a safe area. Additionally, you can erect a partition from mesh or other material that will prevent the free movement of children outside the territory allocated to them.- Communications supply. You need to think in advance about how the pool will be filled. Will a long hose be used for this or will a stationary system be implemented by supplying the pipeline directly to the location. In addition, if the pool operates for a long time, it will require cleaning, which can be done automatically using special pumps. They require electrical energy to operate. This means that cable routing will need to be done. It is worth considering the importance of ensuring good insulation and grounding so that no one in the water is harmed.
- Lighting. Will swimming occur only during the day or do you want to spend time in the pool in the evening. In this case, you should think about good lighting. It can be placed either on top of the pool or directly in the pool itself. There are many solutions for this, which will be discussed below.
Operation and maintenance of a wooden pool
To successfully use a wooden pool, experts recommend carefully and carefully removing all debris from the structure after construction is completed. This is because the presence of any fragment with sharp parts can damage the film, resulting in the need to replace the entire layer.
Before starting operation, it is recommended to test a wooden pool, during which on the first day the pool is filled to 1/3, monitoring the liquid level throughout the day. If no liquid leaks or drop in level are detected, the wooden pool can be completely filled. When filled, monitor the liquid level for 5-7 days. If it remains constant or has minor changes, the wooden pool is considered suitable for use.
In order to prevent the development of pathogenic microflora during the use of a wooden pool, it is recommended to add copper sulfate. The approximate ratio of this substance is 2 tsp per 2500 liters of liquid.
To ensure safety when there are small children in the house and to increase the period between cleanings of a wooden pool, it is recommended to provide additional material (for example, a tarpaulin).
Design selection
All pools can be divided into several main groups.
Surface pool
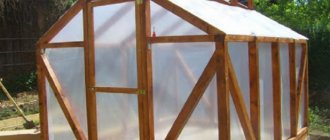
Superficial . In this option, the entire structure is installed without excavation. When work needs to be done quickly or you are going to make a collapsible frame that will be removed when the pool is not in use. Typically, such solutions provide for a shallow depth, for example, up to 1.5 m. Otherwise, the load that will be placed on the walls of the vessel may destroy them. It will also be difficult to enter the water; you will need to make a fairly high ladder.
Partially buried
Partially buried . Something in between the previous and next options. In this case, you can increase the depth of the pool to the required one.
Inground wooden pool
Recessed . Depending on the chosen configuration, large-scale work involving heavy equipment may be required. In this case, replacing the fluid will be significantly difficult; it will be impossible to do without a pump. But the main advantage is that the area remains uncluttered. It is much easier to dive into such a container.
Wooden pool with podium
The form of implementation is the desire and needs of the owner. It could be a triangle, square, rectangle, circle or something else. In some cases, for example, when building a round pool, it is impossible to do without the help of an experienced carpenter who knows his job well, because the upper rim must have the correct shape, which will ensure high stability.
Panel frame
The frame can be panel or knocked down from individual boards. Both options can be quite durable with the right approach. The choice will depend on the budget invested in construction, as well as the availability of certain types of building materials.
Striped glass
Another interesting point related to the operation of this facility. When the pool was launched, it was discovered that the condensation falling on the glass formed frequent long stripes, lining the windows vertically. Contractors spent the entire winter figuring out what these streaks were and how to get rid of them? It turned out that the glass supplier was aware of this problem. On glass coated with a coating applied by sputtering in a magnetron system, the following phenomenon is observed from time to time: when conditions of moisture condensation are created, light parallel traces appear on the side opposite the coating, left by the conveyor rollers on the low-emission coating application line.
After removing drops of condensation or drying the glass surface, the marks disappear. When moisture condenses again, they appear again. Although the glass manufacturer assured that over time the stripes disappear completely as a result of wiping the glass, the owners did not imagine the process of wiping the roof of the pavilion, did not believe in these statements and demanded that the pavilion manufacturer eliminate the defect. As a result, the winter garden supplier, after consultations with jewelers, manually polished the glass using a cerium oxide suspension, which solved the “aesthetic” problem.
| 21. The vertical glazing of the pool pavilion was made of single-chamber double-glazed windows with low-emissivity glass |
| 22. When the pool was launched, it was discovered that the condensation falling on the glass lay out in frequent long stripes |
| 23. Specialists made calculations and installed a water-heated floor (the owners refused to install convectors) |
| 24. To let the surrounding nature inside the pool, two double-leaf swing doors were made in opposite walls opposite each other |
| 25. A recreation area was paved next to the pool: with a swing, barbecue, hammock, table and chairs |
26. Beautiful upholstered furniture with white upholstery practically dissolves against the background of a snow-white floor, which is decorated with illuminated niches
These articles may also be of interest to you:
- Pool pavilion IPC Team
- Choosing a swimming pool for your dacha. Types and types of swimming pools
- Ceramic tiles and adhesive mixtures for pools
- Swimming pool without chlorine and chemicals. Which method is better to choose?
Preparatory work
Pool markings
- The selected area of land is thoroughly cleared of debris. The grass is being mowed, which will only interfere with the entire construction.
- The territory is marked in accordance with the selected project. If a rectangular and square shape is chosen, there are unlikely to be any difficulties, but if a polygonal pool is planned, you need to listen to some tips. So, if the structure is octagonal, then you can proceed in the following way. The central point of the selected territory is determined. A wooden peg or a piece of metal reinforcement is driven into it. Take a rope that does not stretch. A loop is made at one end that will move freely along the landmark. Its length should correspond to half the width of the future structure. Another element with a pointed end is attached to the second end, which can be used for drawing. A circle is drawn. Two perpendicular lines are drawn through the circle to divide it into 4 parts. Pegs are driven in at the points of contact with the circle. The distance between them is measured, it should be the same. Then 2 more perpendiculars are lowered to each of the drawn lines. Points are also marked with pegs. The distance between the pegs is measured again. Next, all the pegs are connected to each other using a rope or fishing line. Another method is to first mark a square on the site. Its side should be equal to the width of the entire structure. To make it even, it is necessary to clearly control the equivalence of the diagonals. A string is stretched between four pegs. Using a tape measure, each side is divided into 3 equal parts. Two more pegs are driven in. There are 4 marked points on one side. Next, the marks are connected to each other so that you get a square with beveled corners. The result is an octahedron with equal sides. Hexa and other polygons can be drawn in a similar way.
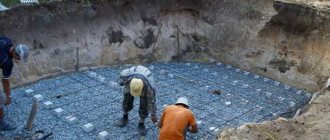
- It is necessary to dig a small pit inside the marked figure. If the structure is planned without deepening, then the excavation must be made at 40 cm. The bottom of the pit must be formed in such a way that there is a slope towards the middle. A hole is dug there to a depth of 20–30 cm with dimensions of 50×50 cm or more. It is filled with gravel and will serve as drainage (in order to speed up the removal of liquid that may overflow, you can lay a sewer pipe inside the drainage hole and lead it to the drainage receptacle). The entire plane is also covered with a 20 cm layer of gravel and compacted well. The remaining space is filled with sand and compacted using a manual or mechanical tamper.
- If the structure is planned with a large depth, then everything is done according to the instructions given above, but the depth of the pit will be the same as calculated by the design solution.
- At this stage it is also necessary to summarize the planned communications. If the water supply will come close to the structure, then you need to lay it in a trench. The depth of the trench should be below the freezing point of the ground level, so that frozen residual water does not rupture the pipes in winter. You can use metal, polypropylene or polyethylene materials. In the latter case, installation will be carried out quickly and without the need for soldering or welding. In the case when the entire structure is collapsible, then the liner can be made on top, and during cold periods simply drain all the liquid from the pipes.
In other options, the pool can be placed not on the ground itself, but on wooden panels. To do this, you need to knock them down from an edged board according to the shape of the future structure. This solution will allow you to create a ventilated bottom. This will prevent the development of various fungi due to exposure to moisture.
Tips and tricks
If you have a choice between buying and making a wooden pool with your own hands, done at the dacha, experts recommend preferring the second option. Firstly, with this approach it becomes possible to build a pool of any type, size and shape. Secondly, by making the structure yourself you can save a lot. Its construction takes no more than 1-2 days. The cost of a wooden structure for a swimming pool, made at home, is approximately 7-15 thousand rubles. At the same time, for the simplest rectangular wooden structure, consisting of a frame and film, the buyer will have to pay about 75 thousand rubles, and for a product with an octagonal shape, about 145 thousand.
Construction experts give some recommendations regarding the technology of making a wooden pool, among which are the following tips:
- You can use paving slabs as a foundation or dig a small pit 100 mm deep. After preparing the area, it is necessary to fill it with cement and wait until the material hardens completely, after which, having laid the substrate, they begin to build the pool itself.
- When using unedged boards, a mandatory step is to clean the surface from bark, strip it and treat it with antiseptics or agents that prevent damage by insects, for example, drying oil or wax.
- After completing the construction of the frame, it is recommended to create steps to make it easier to enter or exit the pool.
- When attaching a film or awning to the surface of the frame, it is necessary to avoid tension and the formation of folds, which leads to disruption of the shape and failure of the product.
To improve the appearance of the boards used in the construction of a wooden pool, giving them a stylish and attractive look, experts recommend that after cutting the workpiece to size between the supports, treat the surface of the lumber with sandpaper and cover it with a layer of stain.
Semi-recessed
This option will require a more careful approach, but it will be easier to connect all the required systems.
Semi-inground pool
- The territory is marked as described above. But the size of the pit walls should be 10 cm larger than the walls of the pool frame. This gap must be maintained so that there are no installation problems later.
- The pit is dug to a depth that will cover 2/3 of the height of the container wall.
- The bottom is processed in the same way as described for the previous version. All walls are well leveled and compacted so as not to crumble during installation. Once all the work is completed this will no longer be a problem.
- For such a pool, you can make a full-fledged water drainage system. At this stage it is necessary to carry out preparatory work. A trench is dug, its level should start from the compacted bottom. In order for the water to drain by gravity, a slight slope is maintained. It can be arbitrary here, because heavy particles, as in the case of sewerage, will not be discharged. The bottom of the trench is also filled with sand and compacted. The sewer pipe is being laid. A bedding of sand is made around it and also compacted. After this, it is completely covered with soil.
- A hole is dug at a short distance from the pool, into which the filter can then be placed. It must be connected to the pit for the pool with two holes through which the hoses will pass. They can be made using a regular garden drill. To prevent them from being filled up, metal sleeves are inserted into the middle.
- The main frame is easier to assemble on the surface. A 10×10 cm beam is used for the racks. A rectangular or square structure is made, as provided for in the project. The accuracy of all dimensions is checked, diagonals are measured so that there are no errors. The columns are set according to level, they are located every meter. To tie them together, 2 10x5 cm boards are used.
- The main frame is lowered into the dug hole. It must be leveled.
- The remaining components are already screwed in place. Instead of edged boards, you can use moisture-resistant OSB or plywood.
- The entire structure must be treated with an antiseptic so that it lasts as long as possible.
- Holes are cut in the walls of the finished frame in the places where the sewer pipe and filter pipes pass.
- The head of the drain pipe is brought out into the middle, hoses are laid that will lead to the filter.
- Spacer wedges are made from 10x5 cm boards. They should be equal in height to the depth of the pit. In order for them to fulfill their function, it is necessary to provide supporting elements. Sheet metal 3 mm thick and 25x25 cm in size is suitable for them. Two plates opposite each other are screwed at the bottom of the rack and two at the top.
- Spacers are placed between the frame and the walls of the pit.
- The rest of the space is filled with crushed stone and compacted well. You need to leave 10 cm to the top. This will be a layer of sand that will give a more pleasant aesthetic appearance.
- The next step is to lay the awning. It is made independently, as described earlier, or to order.
- One of the most difficult moments will be the removal of pipes through the awning canvas. To do this, before cutting the hole, glue a patch larger than the planned slot. Special fittings are purchased that have sides. The hole is clearly made for the threaded connection, and the sides hold the product in place, which is reinforced with an additional patch.
- There is no point in leading the sewer pipe directly into the awning. To do this, a special adapter with a rubber seal is installed on it. A fitting is installed closer to the bottom, it is closed with a plug, and on the other side a flexible hose is lowered into the sewer pipe. Subsequently, to drain, it will be enough to open the valve.
- Filling the pool with water can be done through a filter.
Which lumber to choose and how to calculate its quantity?
High humidity and water pressure impose strict requirements on the quality of timber and pool boards. The best moisture-resistant breeds available are:
- larch;
- pine;
- spruce.
The recommended board thickness is 5 cm. To save money, many use unedged material.
A structure made from such material is not beautiful, but it performs its function perfectly. High-quality edged boards look neater and the siding will be stronger.
Reference! Old wooden pallets are an excellent material for the frame of a pool, they make strong and even sides.
How to calculate how much material you need:
- measure the perimeter of the pool;
- calculate the number of boards in one horizontal row;
- multiply by the number of rows in height.
You will also need vertical stands. They are made from timber with a cross section of 5 x 10 cm:
- 4 columns are installed in the corners of the pool;
- a few more along the lines of the walls, 1-2 m from each other;
- The height of the racks is calculated taking into account digging into the ground 50 cm.
When cutting and adjusting workpieces to length, losses of lumber occur, so the resulting amount is rounded up.
Small elements of a wooden frame, for example, sides, thresholds, etc. made from aspen. It is not very durable, but is almost not subject to rotting.
Making a sand filter
Making a filter
This is a very important element of the entire system, which will remove organic residues and other debris from the water. If you don’t do this, then you will have to change the water very often, which will cost a pretty penny. To make it you will need:
- plastic barrel 100 l;
- fittings for HDPE pipes;
- cartridge from the filter flask;
- low-power centrifugal pump (it’s good if it’s self-priming);
- clean sand.
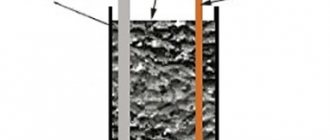
In order for everything to function, it is necessary that the barrel has a lid that will close tightly. Stepping back 10 cm from the top of the container, make a hole for the thread of the fitting. The rubber gasket is put on and the thread is inserted into the prepared place. On the other side, another rubber gasket is put on and a metal nut is tightened. In exactly the same way, you need to organize the exit at the bottom. The filter cartridge is connected to the thread of the lower fitting from the inside. It is important to close its second end with a lid of suitable diameter. Sand is poured inside; a little more than half the container is needed. Hoses through which circulation will be carried out are connected to the adapters. A pump is installed in the lower hose for the gap.
The system will function as follows: due to the fact that the container will be below the water level in the pool, the liquid will flow into the barrel by gravity. Passing through a layer of sand, it will be cleaned. Purified water will flow through the mesh of the filter cartridge into the hose that goes to the pump. The motor, in turn, will push it back into the pool.
Working principle of a sand filter
You can make an interesting design, in the form of a pot. To do this you will need natural stone or pebbles from the river. From them the elevation is laid out. A hose is placed inside through which water is supplied from the filter. As it approaches the slide, it will flow into the pool in the form of a waterfall.
There is another option that will be a little more difficult to manufacture, but the performance will be excellent. In addition, it will be possible to implement an automatic filter cleaning system. The components you will need are:
- hydraulic accumulator tank;
- fittings and pipes made of polypropylene;
- soldering iron for pipes;
- pipe cutters;
- drill and metal drill bit;
- flask cartridge;
- adjustable wrench;
- pump;
- 4 ball valves.
You need to do the following:
- The rubber membrane that is inside is removed from the metal tank. To do this, unscrew all the bolts that hold the flange.
- A little higher than this hole, another hole is drilled. Its diameter must be made such that the thread from the MRN can fit through.
- One brass nut is screwed onto the MRN until it stops, a rubber gasket is put on and the thread is inserted into the prepared hole. On the other side, another gasket is put on and secured with a second nut.
- A pipe of approximately 15 cm is soldered to the fitting with an American-type adapter.
- A filter cartridge is placed on a piece of pipe.
- The finished structure is screwed to the threaded connection that has been installed.
- The hydraulic accumulator is installed vertically and sand is poured into the middle. This is done a little more than halfway.
- A fine metal mesh is placed inside, which will serve as a limiter for the natural filter.
- The flange is installed in place.
- A tee is screwed to the thread that comes out of the flange.
- Two taps are installed in the tee. One of them will be for supply, the second will be used if automatic filter cleaning is necessary.
- A tee is soldered into the MRN, to which two more taps are connected.
- A bypass jumper must be made between the inlet and outlet openings.
- A pump is connected to the metal tee, which is located on the thread of the flange, which will supply it. A hose is connected to the second tap on the metal tee, through which debris will flow out during cleaning.
- A pipe for draining clean water is connected to one of the taps on a plastic tee. A bypass is connected to the second tap.
The essence of the system is as follows: water is sucked by a pump from the pool and supplied under pressure to the tank, passing through the sand and filter cartridge, it is returned to the bathing tank. If automatic cleaning is required, then the flow must be redirected. To do this, open a tap through which the debris flows out through a hose (it is located on the tee, which is screwed to the flange). The tap on the outgoing pipe is closed, the supply tap is also closed, but the one on the bypass opens. Thus, the water begins to move first through the filter cartridge, then through the sand. The metal mesh that serves as a fence will prevent it from being washed out. But the dirt that has accumulated above the mesh will flow away freely.
In the following video you will find instructions for making a homemade pool filter:
Installing the backlight
Wooden pool lighting
Illumination can be implemented both externally and underwater. In any of these cases, protected lamps will be needed. Electricity can be supplied from home. To do this, you will need to install a mast near the pool. It can be made from either wood or metal. Its height should be 2.5 m. This will allow you not to snag the cable when passing under it. A hole is drilled on one of the walls of the main building and an anchor with a metal hook is fixed into it. Or a separate hook that is inserted into the dowel. A cable or steel wire is stretched between it and the prepared post. It will hold a conductor, for which it is better to use a two-core monolithic copper cable in a double braid, for example, GDP. An automatic machine is installed on the entire separate circuit. The strength of the current it can withstand should be less than that of the central one, which is mounted in the main panel. For example, if the main one has 25 A, then this one will have 16 A. Now it will be possible to easily power the filter pump, as well as all the lighting elements.
Swimming pool with platform and lighting
To save electrical energy, it is most profitable to use LED emitters. There are special ones that are designed for diving. Usually they are built in when pouring a concrete base, but in this case, in order not to tear the awning, holders can be made for them from plastic containers. They can be mounted at the four corners on the bottom. To add a special atmosphere, you can take a sealing tape and attach it around the entire perimeter of the bottom or top of the pool. The most basic thing in this matter will be a scrupulous approach to ensuring the isolation of connections. To do this, you will need to use special plastic sleeves. First, the wires are connected using blocks. After this, the resulting twist is placed in a special capsule. The epoxy resin that comes with the kit is poured into the middle. After pouring, you must wait some time until it hardens. After this, the resulting connector can be lowered to a sufficiently large depth without fear that someone could get hurt.
LED lamp
If there are still concerns for the safety of those who will be in the water, then all lighting fixtures can be placed on the surface. To do this, it will be possible to build stands at the four corners. Control of all elements can be placed in a convenient place. It is best to use sealed switches that are protected from both moisture and dust.
As you can see, making a pool out of wood is not that difficult. More time will have to be spent on arrangement, which will make your stay in the pool as comfortable as possible.
Required tools and materials
According to experts, the construction of a swimming pool with a wooden frame, subject to preliminary preparation of the site for construction, takes about a day. However, in order to quickly erect a structure, you must first stock up on tools and materials.
To translate the developed project into reality, you need to ensure that you have:
- roulette;
- bayonet shovel;
- hammer;
- screwdriver;
- circular saw or hacksaw for wood;
- pencil, marker;
- scribers;
- water level;
- construction hair dryer;
- wood screws.
In addition to the listed tools, in order to make a pool from boards, you need to purchase the following materials:
- sand;
- crushed stone;
- cement;
- edged board 100×50 mm;
- antiseptic;
- wooden beam measuring 10×5 or 10×10 cm;
- PVC flooring or polyethylene film;
- tarpaulin.
In addition, it is recommended, and in some wooden (and not only) structures, mandatory, to install a pump to remove used liquid. For this purpose, it is necessary to buy a self-priming centrifugal pump of low power and lay electrical wiring at the stage of organizing the foundation of a wooden structure. Experts recommend installing a filter that allows you to separate organic debris and sediment, this will increase the period between fluid changes in a wooden pool.