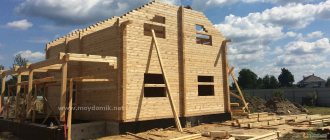
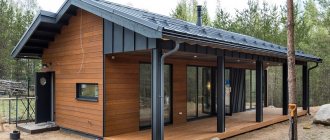
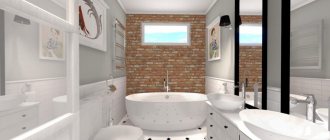
- Photo: Technology of building a house from timber 150x150
Many site owners, when deciding to build a house, begin to think about what materials are best to use for its construction. Among the abundance of modern building materials, wood, in particular timber, remains popular. This is understandable - this is an environmentally friendly material, which means there will be no negative impact on health, in addition, there are special technologies for building a house from 150x150 timber that will help make the house even better. With proper construction, treatment and care, it can last for many decades. In addition, building a house from timber can be done even by non-professionals.
Selection of timber
First of all, you need to decide on the choice of suitable building materials. If the house under construction is planned as a permanent home in which the family will live all year round, 150x150 mm timber is perfect. It is able to withstand the onset of severe frosts and not freeze. This means that the house will remain warm. For summer houses and dachas, the timber may be thinner. Large-section timber (200x200 mm) is usually used in areas with harsh climatic conditions, and its cost is much higher than others. The standard size of timber is 6 meters. Therefore, log houses are often made in dimensions 6x6. Then, when laying, the timber does not need to be mounted end-to-end.
When choosing, you should take into account such characteristics as: thermal conductivity and moisture resistance, strength, bending and compressive strength, wood density, diameter and type of section, the type of wood from which it is made.
There are several types of timber. They differ in their performance qualities:
- Unplaned (natural humidity) . This is the most economical type. This product is not subject to additional processing. During construction, problems can sometimes arise, since the seams between the crowns are difficult to caulk equally. This creates a not very neat appearance. However, with appropriate insulation and internal and external cladding, the house will look attractive and be warm. Since such a structure will shrink, it is better to begin interior work no less than 6-7 months later.
- Profiled . When processed, it turns out to have a certain shape and profile. It usually looks like a rectangle with a notch at the bottom. Such timber is subject to minimal shrinkage and moisture penetration into the insulating material between the parts. Its heat loss is quite low. But since it also does not undergo special treatment, its durability is low.
- Glued . It is created from well-dried parts (lamellas), from which defective areas have been removed. They are glued together using a press. In addition, it is treated with antiseptic and fire-fighting solutions. Glued laminated timber practically does not shrink, which allows you to quickly begin finishing work inside the structure. It also has excellent sound and heat insulation characteristics. Its high price is fully justified by the characteristics of the timber and the durability of the building.
How to make building a house from 150 by 150 mm timber even more profitable?
Ours will help you with this, significantly lower than the competition, and this is achieved through the following nuances:
- independent procurement of building materials is one of the main cost items;
- delivery of all components using our own vehicles - we minimize the use of intermediaries;
- high-quality work the first time - we exclude the costs of additional elimination of defects;
- ordering large quantities from suppliers - increased volumes help to work according to an individual price list with low prices;
- interest in each client - we deliberately underestimate the numbers due to a small increase in profit.
All this allows us to enter into mutually beneficial agreements, many of which do not exceed 1 million rubles.
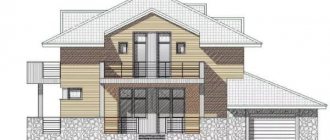
Creating a house project
Many designs of 6x6 houses have been developed. You can use ready-made ones or make a plan yourself, taking into account the needs of your family. Standard projects include all detailed information: walls, ceilings, materials for cladding and insulation, necessary utilities.
Doubts about whether it will be warm and comfortable in a house made of 150x150 timber are somewhat unjustified. As evidenced by many years of practice, if technological processes are followed and work on insulating walls, roofs and floors is carried out correctly, no problems arise. However, in areas with warm climates this can be avoided. The estimate should list all necessary materials to avoid additional costs. In addition to the walls in future premises, it is necessary to determine the locations for window and door openings, doors to the balcony or terrace, and whether there will be extensions in the form of a bathhouse, garage or utility rooms.
Manufacturing of floor and ceiling
The heat in a log house depends not only on the walls, but also on the floor and ceiling. The floor is most often made double to make the room much warmer. You can also lay a thermal insulation film between these two layers. It is best to use boards to cover the floor; among modern coatings, you can use laminate, which imitates various valuable types of wood. If the floor is covered with tiles, then the interior itself, the design of the wooden house, will be damaged by this material.
The ceiling must be created from:
- Beams that form the basis of the ceiling.
- A vapor barrier layer that will protect the rafter system from moisture.
- Then the beams must be hemmed with boards. After this, lay insulation on the boards between the beams, and thanks to it, heat will not escape from the house through the roof.
- And finally, decorate the boards with decorative material, this could be plasterboard, suspended ceiling, etc.
Construction stages
The construction of a log house includes technological stages that even a non-professional can handle. After the construction of the walls, depending on the type of timber used, the house may undergo shrinkage. Sometimes this period can be about 1 year.
Pouring the foundation
Due to the fact that a structure made from 150x150 timber is relatively light, it does not require a powerful foundation. You can choose a columnar or strip foundation (read step-by-step instructions for a do-it-yourself strip foundation for more details). If the house does not have a basement, then this option is suitable even for soil susceptible to frost heaving. Then you should choose a shallow strip foundation. In appearance, it resembles a ribbon of concrete reinforced with reinforcement. To prevent the foundation from being affected by freezing or thawing of the soil, it is insulated from the outside. If there are structures attached to the house, a single foundation is poured for greater strength. It is necessary that the foundation is completely dry, for which after pouring it must be covered with a film from the rain.
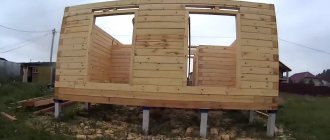
Construction of walls and floors
Before erecting walls, the foundation must be leveled and covered with waterproofing materials. The frame (lower crown) is placed on the foundation itself. To give greater strength, it is treated with mixtures that protect against rotting and the appearance of mold and mildew. Timber with a smaller cross-section (100x50 mm) is quite suitable as interior partitions and floor beams. Floor joists are laid edgewise. A rough floor made of boards (25x150 mm), a finished floor (up to 36 mm) is laid on them, and parquet, laminate or linoleum is laid on top.
The walls are made up of alternately laying out crowns, which are fastened with dowels (large wooden or metal nails) at a distance of 1-1.5 m. The walls are connected with a “warm corner”. This is a tongue-and-groove lock system, thanks to which the crowns fit together without gaps and are not blown through by the wind. Insulation (tow or flax-jute fabric) is placed between the crowns. After the log house itself has been built, you can make interior walls, which can be framed. That is, a frame is erected from timber, and then covered with clapboard. It is better to treat all wooden surfaces with a fire retardant (fire-fighting solution).
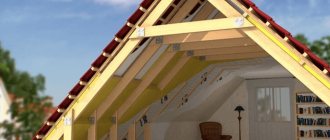
Roof construction
When the construction of the walls comes to an end, the ceiling beams are installed. A beam (150x100 mm) is suitable for them, which should protrude from the walls at a distance of 50 cm. The beams are laid at a distance of about 80-90 cm. Next, rafters are installed, to which the sheathing with a section of 25x150 mm is attached. When building a house from 150x150 timber, the choice of roofing material can be anything (various types of tiles, slate and others). In order to avoid the formation of condensation, a vapor barrier layer is laid on the roof.
Interior decoration
Window and door openings are made in the walls. For windows, metal-plastic or wooden window blocks are selected.
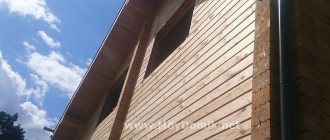
Since timber walls have an even texture and beautiful appearance, the use of finishing materials can be minimized. This is a fairly economical option. The final cost depends on the building materials used for cladding.
The technology of building a house from 150x150 timber with your own hands is not an easy task. But if you want and follow the construction tips, it is quite doable. Following the rules and instructions will allow the house to serve your family for many years to enjoy.
Making the foundation
The next stage of building a log house with your own hands is to create a solid foundation, because the wooden house itself is not light in weight. There are three types of foundations that can be made for a log house:
- Tape.
- Columnar.
- Pile.
The choice of a certain type of foundation depends on the size of the house, the presence of a basement or cellar and the condition of the soil. Tape is suitable for most wooden houses; it can withstand heavy loads. A pile foundation is made if the soil is loose and the timber house is not small in size. A columnar foundation is the easiest to manufacture, but it is only necessary to build it for a small log house.
Purposes of using compensators
There are several types of compensators. Moreover, they are classified not only by material of manufacture and design, but also by functional purpose. The second feature allows us to divide compensators into three categories:
- The first includes devices that are designed to reduce the likelihood of the appearance of cracks formed during the shrinkage process between the crowns of the log house;
- The second group of compensators is used to ensure that individual parts in building components maintain their geometric dimensions and position relative to each other;
- The area of use of the third type of device is the protection of door and window blocks from deformation during the drying of the wood of the load-bearing structures of the log house.
Different types of compensators have long been successfully used in practical private housing construction. This is explained by the high level of efficiency of their use. However, this requires correctly selecting and installing the type of compensator suitable for a specific task.
Fastening vertical bars
The corner beams are installed first. They have pre-drilled holes in the end (1 cm larger than the length of the protruding end) and are mounted on dowels. After this, they are attached to the lower level using metal corners. Having installed the corner posts, you need to additionally secure them with so-called slopes - these are boards that will prevent the beam from moving and disturbing the geometry of the frame.
After completing this stage, they proceed to fastening the remaining vertical beams. You can use two types of connections: with cutting or using a metal angle. The second method is simpler and more reliable and takes less time from the technician.
It is recommended to choose the average distance between the vertical posts within 50 cm. They also need to be leveled using a plumb line and temporarily secured with slopes.
Installation of the bottom trim
By the time the lower frame is assembled, the foundation should gain strength. Under standard humidity and light conditions, this takes 28-30 days. A frame or wooden house is lighter than a brick or reinforced concrete one. Therefore, a shallow strip or pile foundation is quite sufficient. Before installation, its surface is carefully leveled with an electric planer or using a thin layer of concrete.
A waterproofing membrane or ordinary roofing material is placed under the lower crowns. The seams are glued or coated with melted resin. Experts advise not to leave roofing felt for a long time in the sun or under precipitation. As soon as the waterproofing is laid, it is necessary to begin the installation of the frame, using anchor bolts or special embedded parts installed before pouring the concrete. The distance between the bolts is no more than 2 meters. At least 2 anchors are attached to short sections.
There are many ways to connect crowns in corners. But experts recommend the “paw-sampling” or “half-tree” methods. Additional strength is provided by nails, glue, and wooden dowels.
Nails should not be placed closer than 1.5-2.5 cm from the edge of the board. Otherwise, cracks and delamination of wood cannot be avoided. Pins - in the shape of a quadrangle or cylinder. The preferred material is oak or larch. The length of the dowel should be 10-15 cm greater than the height of the tier. Both the hole for the dowel and the dowel itself are lubricated with glue before installation to avoid displacement.
After installing each crown, it is necessary to stop work and check for the presence/absence of distortions, deviations from the vertical and horizontal. Diagonals, angles are checked, and their compliance with the design documentation.
To simplify the process, each wall or partition is assembled on the ground and installed ready-made. You will need a crane or winch, but this will make it easier to maintain the angles and geometry of the posts.
Between the beams of the lower crown, rough floor beams are mounted using 185/50 brackets. Steel thickness - from 2 mm. It is better to choose galvanized options.
Required tools and materials
Before starting work, you need to worry about purchasing:
lumber. If the house is being built according to a standard design, then the required volumes are indicated in the specifications. For the lower crown, the recommended thickness is 20x20 cm, for internal partitions - 20x10 cm;
fasteners: nails, anchor bolts for connecting the lower crown and the foundation. The washers on the nuts should be as large as possible to prevent “sinking” into the wood. The length of the anchor bolt for the bottom trim is equal to the thickness of the beam plus 10-15 cm for the concrete screed;
- carpentry tools;
- antiseptics and fire retardants for treating lumber against pests, rot, fire protection;
- casein-based glue for gluing seams;
- plumb line, building level;
- corners, brackets for connecting crowns.
If you plan to carry out the assembly on the ground and then install the finished structure on the foundation, you will need a winch or crane.
Which timber to choose for construction?
This type of material is offered in a wide variety, so sometimes it can be difficult to make a final choice. The traditional option was a 6x6 house made of 150x150 timber. This wall thickness is sufficient to withstand the harshest winter.
Since the standard length of the timber is exactly 6 meters, it does not have to be laid end-to-end. There is timber with a thicker section - 200 x 200 mm, but it costs more, and its use is far from necessary in most areas.
There are several options on the market that differ in key characteristics:
- Natural moisture timber is the cheapest type of lumber, which is the most inconvenient for construction. It is a product made from solid wood that has not been subjected to additional processing; because of this, a building made from such material requires a long period of shrinkage so that the structural elements and finishing do not deform after the wood has dried;
Important! Such material does not have protection from moisture and rot, therefore it requires mandatory additional treatment with antiseptics; external protection with siding or other material would also be advisable.
- Profiled timber is a more convenient material that has undergone additional processing, which gives it an absolutely correct geometric shape. However, it is also not subject to special protection, so it is not particularly durable;
Appearance of the end cut of laminated veneer lumber with a description of the advantages
- The most reliable option is laminated veneer lumber. This material has undergone additional treatment with antiseptics and fire-retardant compounds; a special manufacturing technology allows you to avoid waiting for the shrinkage period. This is the most expensive of all lumber varieties, but it is worth the investment.
Finishing a timber house
The 150x150 timber itself has a beautiful, even structure and the best option for finishing a house is its natural beauty, i.e. the log house can be left untouched. You can only apply a colorless varnish or other protective impregnation to it to protect it from the effects of atmospheric phenomena and other biological pests. You can also cover a wooden house with siding, block house and other finishing materials, but in such cases the texture of the timber will be hidden.
Building a frame house: brief instructions
When assembling a frame house yourself, it is important not to miss anything and avoid mistakes. Here is a brief overview of instructions that will help you see the big picture in order to calculate your strengths and capabilities:
- Design. It includes both the architectural part - the design of the house, the location of rooms, walls and partitions, windows and doors, and the structural and engineering parts - the thickness of the walls, the arrangement of power elements, the location of bathrooms, the routing of engineering systems. All parameters are preliminarily reflected on the diagram so that you can correct some points, check the correctness of the calculations, and change the layout. Working drawings are detailed diagrams of individual parts, with the help of which all work can be carried out, adhering to the specified parameters.
- Marking and ground work. First of all, the area for future construction is cleared, then markings are made for the house project. The need to dig a foundation pit and its depth is determined by the type of foundation. The choice of type is influenced by the geology of the soil, the weight and configuration of the future house. For a pile foundation (pile-screw, bored), you do not need to dig a foundation pit, but for a buried strip foundation, you do. If there is a ground floor or basement, the pit will be deep.
- Installation. If the preliminary work was done correctly, during installation all that remains is to assemble all the parts into a single whole, obtaining the finished outline of the house. The assembly includes installation of the load-bearing frame, its filling, installation of the floor and roof, installation of windows, doors, and internal partitions.
- Finishing. It is produced both inside and outside the house, in order to obtain an aesthetically attractive, durable and easy-to-use structure.
Types of expansion joints for log shrinkage
The scope and technology of using the compensator is determined taking into account the characteristics of the construction and the selected type of device. The simplest and most frequently used compensator is an ordinary wooden dowel, which is widely used as a fastening element when assembling a log house.
With proper selection of the required size and subsequent installation, it effectively performs the functions of a compensator. As a result, the shrinkage of the log house is evenly distributed over the entire wall, assembled from crowns connected with dowels. This allows you to avoid the appearance of large cracks, and small ones do not lead to depressurization of joints, thanks to the installation of inter-crown insulation.
If the shrinkage is significant, the use of a wooden dowel is ineffective. In such a situation, a spring compensator is much better suited. It is made in the form of a long metal screw, often with a spring attached to the top. As a result of installing such a device, adjacent rims are pulled together with serious tension, which prevents gaps from forming between them. The main disadvantage of a spring compensator is the high cost of manufacturing and difficulty of use.
Screw compensators are much easier to use and no less effective. They are especially often used if a veranda, terrace or gazebo is attached to the log house. In such a situation, the amount of shrinkage of the main building and the annex differs significantly. Therefore, to level the position of the roofs of adjacent buildings, screw compensators are used, which are metal plates connected by a screw. With their help, the height of the extension column is adjusted.
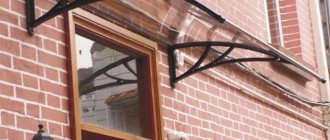
Another type of expansion joint is called casing and has a narrow scope of application, as it is used to protect the fillings of door and window openings from deformation of log walls. The casing compensator plays the role of an important part of the casing, which is constructed in most such situations. As a result of correct application, it is possible to avoid jamming of a door or window unit installed in a log house.
How to make your cherished dream of owning your own home come true?
It's easy to do it yourself. It is easier to build a house with your own hands from wooden beams. Wood is a traditional material with time-tested quality.
The production of finished softwood timber in our time is represented by a wide number of options. If you have a ready-made project, it is possible to order material for the template.
Production will take a long time, but will be compensated for during installation.
7 steps to realizing your dream
After making a decision to build housing, it is necessary to carry out a number of preparatory measures.
The best time for this is considered to be late autumn and winter. It is necessary to spend a lot of time on all actions and it is advisable to time this period by the beginning of the construction season from mid-Vienna to early autumn:
- Decide on the choice of site.
- Order or buy a ready-made standard project for your home.
- Order and purchase basic material.
- Carry out preparatory work.
- Prepare consumables.
- Purchase a tool.
- Conclude agreements with contractors.
Additional criteria for evaluating frame and wooden houses
We will just mention some more selection criteria:
- resistance to fire and wind. In this case, it will not be possible to choose a leader. Performance characteristics depend entirely on the quality of installation and the fire retardants used. But in general the characteristics are similar;
- heat loss Based on this feature, frame structures definitely “win.” If we compare heat losses in two buildings with walls of the same thickness, then in a frame building the savings will be from 50 to 90% compared to those built from timber;
- microclimate. In a frame house, it completely depends on the insulation used. The foam will not allow steam to pass through, leaving it in the room. The house will resemble a thermos. For ventilation, it is necessary to build a ventilation system: forced or natural, which leads to an increase in the cost of the project. In a wooden house, the walls will absorb excess moisture. But this increases the risk of wood “swelling” and destruction of the internal structure if the boards are initially poorly dried. If the walls made of profiled timber are sheathed on the outside with layers of insulation and a vapor-proof membrane is laid, then a “thermos” effect will also appear with attendant problems in organizing ventilation.
The issue of repairing frame and wooden houses deserves special attention
- in the case of a frame building, you will have to remove the outer cladding, layers of insulation, and remove the sheathing to get to the damaged area. After repair, restoration operations are carried out in the reverse order. The use of special equipment or complex equipment is not required;
- The situation is somewhat different if there is damage to links in a wooden building. To replace one element, you need to lift all the crowns located above using a jack or crane. The task becomes more complicated if wedges or compensators were additionally used in the work.
Based on the above, we can conclude that the repair of frame houses involves many operations, but in general it is simpler than in the situation with buildings made of logs.