Today, many are wondering how and what is the best way to heat their home if there is no gas. Firewood and coal are among the most affordable types of fuel. Therefore, the right solution here would be to build a heating stove, or even better, add a cooking stove function to it. There are a lot of design options both in form and in operating principles.
In this article I will introduce you to the features of the Kuznetsov furnace, its advantages and a step-by-step scheme for constructing such a unit yourself.
Kuznetsov sauna stoves
There are many different designs of Kuznetsov stoves. Many furnaces of different sizes and purposes have been created. There are 17 varieties of standard Kuznetsov sauna stoves (BIK). To these you need to add two varieties of BIC BC, 14 options of BIC PC. What is the difference? The size, location of the firebox, stone oven, presence or absence of a fireplace, hob and some other features. There are Kuznetsov sauna stoves with a remote tank or a built-in one, and Kuznetsov sauna stoves for black-style saunas or with an open heater. In fact, there are so many of them that you can choose a more or less suitable stove from ready-made ones, if necessary, modifying it a little to suit your bathhouse.
Kuznetsov furnaces. Diversity
Why are Kuznetsov’s sauna stoves popular? There are many reasons for this:
- They are practically omnivorous. Any fuel burns to ash in them. And if it is not recommended to heat a bathhouse with any “left” fuel other than firewood, then any type of fuel will be suitable for heating a house.
- Such efficient combustion of fuel makes BIR very economical, while not only the bathhouse is heated, but also water (up to 170 liters) and stones.
- Even when using low-quality fuel, little soot is formed. If you heat with good dry wood (after all, you choose the best for a bath), you need to clean the stove much less often than stoves of other designs under similar operating conditions.
- The oven heats up evenly due to which, firstly, the heat is retained for a long time, and secondly, cracks rarely appear.
- Kuznetsov's sauna stoves not only prepare a sauna and keep it warm for a long time. They dry the room after the procedure. All this is thanks to the high heat capacity. At the same time, the next day the water in the tank remains warm enough to swim in.
- Long service life is guaranteed with a minimum of iron parts. The whole point is that there is too much difference in temperature expansion: metal parts expand much more, as a result, cracks appear in the masonry around them.
About followers
Drawing of a homemade Kuznetsov stove
However, “blacksmithing” is not some kind of unspeakable miracle. There have already been many amateurs and professional craftsmen who not only repeat Igor Viktorovich’s original designs, but also create their own. In Fig. on the right is a drawing, and in Fig. in the section - the order of one of them.
She has two features. The first is kindling moves on the 21st row. They are quite similar to Kuznetsov’s idle air passages, but they are included in the work during kindling, speeding up and facilitating it. On a flame or smoldering, their throughput does not allow for the escape of gases, and these channels are drowned out by gas plugs.
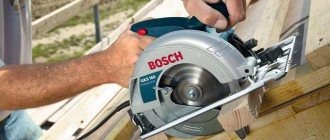
The second is sawn along, and even at an angle, bricks in the 17th, 28th and some other rows. In fact, both stove makers and just builders know that bricks are not sawed lengthwise. But this belief arose at a time when the concept of “angle drill”, aka grinder, did not exist. People only heard about diamond tools back then, saying that they were used somewhere in the secret workshops of military factories.
But it’s still impossible to saw a brick lengthwise with a grinder while it’s in weight; its strength will drop below the minimum limit due to the beating of the tool in your hands. There are two options, the first is to install the tool in a frame with a lever running in a vertical plane to create a cutting machine. You can make this yourself, there are ready-made ones for sale.
Ordering a homemade Kuznetsov stove
Another method is suitable if the farm has a circular machine with at least 1500 rpm, and better - 2500-3000. Then a diamond wheel for stone is tucked into it instead of a standard toothed saw. This option is preferable: a support board with an angle stop provides a much cleaner and more accurate cut. And if necessary, you can finish it on the other side without the risk of getting a high step on the cut.
Video: the process of laying a 3 x 3.5 brick oven
The principle of operation of the Kuznetsov furnace
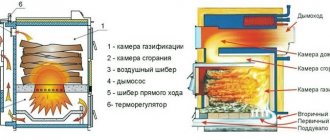
Kuznetsov proposed a completely new approach to building a brick oven. As you know, traditionally designed kilns have channels through which hot gases move, heating the brick. The main factor supporting this process is traction. This forced method of heating the furnace body is characterized by uneven heat distribution. In addition, it often leads to the formation of cracks in the walls of the structure. When building such a stove, which takes up quite a lot of space in the room, a lot of bricks are used.
The question also arises regarding the availability of space for installing a heat exchanger. This device loses the service life specified by the manufacturer if it is placed in the firebox itself. Constant contact with fire has a detrimental effect on the strength characteristics of the heat exchanger. This proximity also leads to deterioration of fuel combustion conditions, a decrease in the efficiency of the furnace and the formation of a large amount of soot.
In a furnace built according to the Kuznetsov method, gases move freely.
Scheme of operation of the Kuznetsov bell furnace
This design is based on the installation of caps inside it, which are vessels turned upside down. On some stove models, the hoods may have top holes. The vessels are located in different orders, but the main condition for their placement is the presence of vertical void gaps between them, called a dry seam. The space thus formed, up to 3 cm wide, is not filled with either a heat insulator or a solution. As a result, gases move freely, moving from one bell jar to another.
To more easily imagine the operation of the Kuznetsov bell furnace, you need to visualize in your imagination a fire lit in the open air. As a result of the fact that the air has unlimited access to the flame, little heat comes from the fire, which is immediately dissipated in space. You can change the nature of the process of heating the air around the fire if you cover it with a bell-shaped vessel, for example, a large cauldron
At the same time, it is important to leave a gap at the bottom so as not to completely extinguish the flame. As a result, hot gas naturally rises to the bottom of the cauldron and limits the access of air coming from outside
After the heat is transferred to the walls of the vessel, it, going down to the open opening, gradually cools and comes out, and its place is taken by the next portion of heat.
This self-regulating process is characterized by the possibility of dosing outside air and keeping the heated gas in the vessel until it cools completely.
Scheme of operation of the Kuznetsov bell furnace
The principle described above is used in Kuznetsov furnaces, for which two hoods are used at once, connected by a dry seam. This non-standard design helps to increase the efficiency of transferring a sufficient amount of heat from the stove to the room where it is installed. Hot gases first fill the first bell, thereby heating its walls, and then, cooling, give way to a hot flow that rises from the furnace.
Trying to optimize this process, the inventor, even at its first stage, which begins after the firebox, decided to divide the flow of gases in accordance with their temperature. For this purpose, he used a partition to separate the hood space from the firebox. In this case, the barrier does not reach the bottom of the vessel. As a result of this separation, hot gases immediately rush to the roof of the bell, and a flow of lower temperature is directed along the dry seam through a gap in the partition. Thus, due to the accumulation of hot gases under the roof and the presence of a barrier, air enters the first hood only in the required quantity. This promotes complete combustion of the fuel with the formation of a certain amount of ash.
A similar process of gas movement occurs in the cap installed above the first one.
Drawing of the Kuznetsov bell furnace
Less hot combustion products are placed at the bottom of the vessel, and hot gases tend to the roof and, when cooled, transfer heat to the brick walls. Then they go down and out through the chimney. By equipping the stove with two hoods, in which natural injection and movement of gases occurs, the creation of forced draft in the chimney pipe is not required.
Calculation of dome heating devices
Design includes methods for selecting internal fittings and equipment to obtain effective draft and increase heat transfer without loss. The heat loss of the room is calculated by volume, then the resulting value is multiplied by 21. This is the average loss for 1 cubic meter. The stove power should exceed the value by 15%.
If the projects do not suit the user, he can make the project himself, taking as a basis the general rules for the construction of bell-shaped structures. Determines the external dimensions of the heating structure, dividing the result by 300. The number means the heat power that the square of the external wall of the stove can give off. The required square footage of the walls located above the grate is obtained.
Construction of a Kuznetsov furnace with your own hands
Diagrams and drawings of brick stoves - correct masonry The sequence of actions is as follows:
First, they study the floor plan of the room where the heating device is planned to be installed. In the case when the house is not built, it is necessary to ensure uniform heating of all rooms. It is not advisable to install a heating unit into a finished building, but if necessary, you can
But at the same time, you should take into account the location of the supporting structures and beams when arranging the chimney. Then the foundation for the heating device is prepared. It is made of concrete, and the width should be 10 centimeters greater than the size of the device
It is advisable to design the foundation for the stove at the house planning stage.
Types of Kuznetsov stoves
Based on the functions they perform, Kuznetsov’s brick kilns can be divided into several main groups:
- Heating.
Their main task is to heat rooms. - Cooking.
They are used for cooking. This group also includes bread ovens and stoves adapted for cauldrons.
Bathhouses. The principle of operation of Kuznetsov’s bathhouse stoves remains unchanged - the natural movement of gases through two bells. Another thing is that there is a heater here, which needs to be heated thoroughly to obtain high-quality steam. The developer proposed and is still using an optimal technical solution, where the stone backfill is placed in an oven made of heat-resistant steel. The oven is located directly above the firebox. The thermal energy accumulated in the lower and upper hoods is used to heat water and heat not only the steam room, but also all adjacent rooms. The water coil is installed under the first hood so that it can be easily repaired or replaced. The installation location can be determined by studying the drawings of the furnaces.
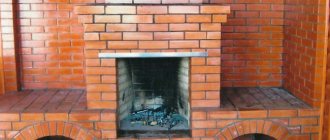
- Fireplaces.
- Grills and barbecues.
- Combined structures, complexes.
- Perhaps the most popular are Kuznetsov’s heating and cooking stoves. They will warm the house and won’t leave you hungry.
The heating and cooking option is most in demand by both summer residents and residents of rural areas. There is a simple practicality here: if you already have a fire, why not use it additionally for cooking.
Kuznetsov also has such projects.
Before you start building, make sure that this is exactly the option that you want to see in your home.
Such stoves imply the presence of a convenient ledge with a cast-iron surface, with the possibility of partially opening the holes to increase the temperature. It is also possible to make a door for a cauldron, similar to ancient Russian stoves.
The layout of heating and cooking stoves requires its own approach and individual drawings.
Bell furnaces can be erected in almost any room. This could be an apartment, a residential building, an outbuilding or a bathhouse. For example, for a bathhouse, a bell-type stove will be an ideal replacement for an ordinary standard stove.
By building this sauna stove, you can solve several problems at once. This design is capable of heating several rooms: a sink and a steam room, as well as a relaxation room. In addition, it is very convenient to heat water on the stove, simultaneously creating steam in the required quantity.
The house can be equipped with two-bell heating using a stove; this installation is very functional. Before erecting such a structure, it is necessary to carefully study the project.
A system that burns raw fuel must be organized in the most optimal way. The furnace must always be maintained at the correct temperature, otherwise the gases that are formed after combustion can be transformed into harmful waste soot and tar.
Water-heated stoves
Modern Kuznetsov stoves with water heating of the KIK series (brick boilers) are of particular interest. Essentially, this is a bell-type boiler, made of brick and has a good efficiency - about 70-80%, that is, similar to its iron “brothers”. How such high efficiency is achieved was described above.
1 or 2 registers made of steel pipes are built into the body of the furnace (depending on power). Ready-made boiler modifications have a range of capacities of 17, 34 and 63 kW. In addition, the author also offers dual-circuit models with the ability to heat water for household needs. In his recommendations for the construction of such heaters, I.V. Kuznetsov points out that to increase the efficiency and efficiency of operation, the body of a brick boiler should be insulated with basalt fiber.
Most dome furnace models have a modern technical solution that ensures afterburning of the combustible component of flue gases. For this purpose, a secondary air supply is organized under the arch of the upper hood or another place, depending on the design. When using wood of appropriate quality, such a heating device will function as a pyrolysis furnace.
Which stove is better: bell-type or channel?
Not all types of stoves were originally made to provide heat to a home. For example, the first development and application of “blacksmithing” was in metallurgy. Due to its high productivity and rapid heating of the surface, it was very successfully used in ore smelting. Channel-type structures were initially adapted for domestic needs and their primary tasks were: supplying the room with heat and preparing food. Given these features, many users constantly wonder: which of the two variations is better?
In order to answer this question, we note the main technical indicators, pros and cons of both furnaces.
Channel furnace. The operating principle of such a device is to move heated air from the firebox to the smoke exhaust system. The disadvantage of this process is the formation and release of a large amount of smoke during kindling. This is due to the fact that draft occurs only if the channel is well heated. Another disadvantage is that the chimney pipe must be high.
Bell furnace. This stove operates on the principle of natural circulation of heated air masses. Hot air rises up and is directed into the hood, gives off heat to the walls and descends to the lower part of the structure, into the smoke exhaust system through the vents. As already noted, models with several caps are also available, which are even more productive. The advantage of such a stove is that it does not need to be heated to ensure normal functioning. The chimney pipe can be located lower, the surface heats up as quickly as possible, but not as evenly as in a channel stove.
https://youtube.com/watch?v=tpqzcNvB3ik
Thus, the Kuznetsov bell-type stove is a good option for heating a house or bathhouse, and also provides the opportunity to cook food.
Video. Preparation of clay mortar for stove masonry
In a large metal container, you need to combine the clay with water and soak it for 2 days. After this, pour the sand into the container and mix well with an electric drill with a mixer attachment. When the mixture is well mixed and no two materials are separating, check the consistency of the solution with a trowel. If the mixture slowly slides off the tool, then the solution is ready. You can start laying bricks.
Step 4.
Laying the 1st level of the furnace
Before you start laying bricks on cement mortar, it is better to immediately lay out each row on the floor “dry”, according to the ordering scheme. The diagram shows that on some rows you will have to divide the bricks into ½, ¼. Where you have to grind bricks, use the manual method so as not to disturb the technical properties of the material and its aesthetic appearance.
- Row No. 1. The brick will be laid evenly over the entire area of the oven. The first row is continuous, keep even corners. Start from the side walls of the “blacksmith”, laying out using the spoon method, moving from right to left. (Figure 14). The brick is laid longitudinally in length. We lay each next layer with its edge in the center, and fill in the missing part by cutting the required size from a new brick.
- We lay row No. 2 of bricks. At this level we install a blower (according to the previously developed diagram) and a window for cleaning the oven (there can be 2 of them). The design of the bell-type furnace allows the cleaning door and ash pan to be placed anywhere, but the window must be located below the firebox. Here you will need to divide one brick in half and install them so that they protrude outward from the common row. When you lay the second row, you should not connect them with mortar. Upon completion of construction work, you will need to clean the stove from fallen clay. And after you clean the oven, then secure them with a solution.
In order to correctly install the blower doors and windows, it is necessary to thread a knitting wire into the existing holes, make a loop and twist it with a rope. Place between bricks. If there are no holes in the factory parts, then you need to make them with a drill with a metal drill attachment. Use pliers to twist the loop as tightly as possible. For now, the doors need to be secured with bricks for stability, but not connected with mortar. This will need to be done after laying the third row.
Scheme of the furnace masonry
- We place row No. 3 similarly to the previous one. From the 3rd row we begin to raise the firebox itself, laying it out of heat-resistant brick. Between the front wall of the stove, lined with red brick, and the firebox itself (made of fire-resistant brick), we lay basalt cardboard or corrugated foil. After burning out, it will create a perfectly even thermal gap of 5 cm.
The main feature of the Kuznetsov stove is its “floating” firebox. That is, it must be a free-standing module, separated from the furnace body by a dry seam. The refractory brick (fireclay) should not fit into the regular brick of the furnace body with any protrusions.
Features of the Kuznetsovka furnace masonry
- We make row No. 4 a little narrower (by 1.5 bricks) in order to reduce the connector for the combustion products to fall off (you can see it in the diagram). We design it in such a way that a partition appears in the far corner from the firebox leading to the upper compartment.
- We lay out row No. 5 similarly to the 4th row, only you need to put a grate on top of the reset rim. We lay it without mortar and fill the gaps with sand.
- Row No. 6 is laid in the same way.
Here we begin to install the combustion door with a gap of 5 mm. We carefully set it plumb to check the level deviation. In the same way as in the 2nd row, when you installed the ash pan, you need to secure the door in the brick with metal wire.
In order not to move the door while you continue to line the row, secure it with strands and press the ends of the strands on top with a brick. This will allow you to continue working without worrying about the door being out of level.
- Row No. 7. We take a chimney 0.5 bricks wide from the firebox into the adjacent air chamber.
- Row No. 8 is laid in the same way as row seven.
- Row No. 9. We build out the walls of the firebox with fireclay bricks. Here a passage is formed between the firebox and the first hood to remove combustion products (visible in the diagram).
- Row No. 10 is laid out in the same way as the previous one.
- On the 11th row, half-brick work becomes masonry of a whole brick.
- Row No. 12 - a fireclay grate is laid out. Again we continue to lay in half a brick according to the ordering scheme indicated above.
- Row No. 13 - the same installation as on the 12th row.
- Row No. 14 – remove the sheathing and leave 2 chimneys.
- Row 15 is similar, but on row 16 we use whole bricks instead of halves. We close off two chimneys into the air compartments.
- 17th row. Use a steel plate to block the movement of smoke. Thus, the channel that you created on the laying of row No. 4 now remains the only one.
Scheme of the furnace masonry
Step 5. Laying the second level of the furnace.
- Row No. 18 is laid similarly to row 17, but on this row we attach a fence plate, which is fixed on three sides with cement mortar.
- Row No. 19. We build a column at the very top of the structure. Behind the stove we make a small cavity (the width of a brick) so that the smoke escapes through the pipe.
- Row No. 20. We lay it in the same way as the 19th row.
- Row No. 21. We lay this row so as to block the channel leading to the pipe. The smoke will come out through the sinus that you left below (on the 19th row).
- Row No. 22. From a quarter of a brick, make an exhaust hood that comes from the steam collector. We cover the steel part of the ceiling.
- Row No. 23. We put it in the same way as row No. 22.
- Row No. 24. In this row, it is necessary to connect the chimney with a steam collector through a closed channel
- Row No. 25-26. We lay it in the same way as the previous row.
- Row No. 27. Installation of the fence plate.
- Row No. 28. We cover the structure with a brick roof.
- Row No. 29. We make an additional layer similar to the previous one.
- Row No. 30. The row is almost completely covered with brick.
- Row No. 31. Lays the base of the pipe. We install a pipe with a diameter of 1 brick.
- Row No. 32. The chimney pipe is formed.
Step 6. To make the stove have an attractive appearance, you can carefully round all its edges by hand grinding. This must be done after the construction work has been completed.
Step 7. Treat the created oven with a refractory compound.
Step 8. Light up the stove. There is no need to immediately set the maximum temperature. The oven should gradually “burn out”. Start with the lowest temperature and then turn up the heat.
That's all! By following the instructions, and most importantly, without disturbing the order of the masonry, you will definitely be able to assemble a reliable, beautiful stove that will last for decades.
At the end of this article, we suggest watching a video in which you can see the stages of laying out the Kuznetsov furnace.
Kuznetsov furnace made of metal
Kuznetsov stoves can be installed in small spaces. To fit such a unit in small rooms, it is necessary to reduce its dimensions. This leads to a significant decrease in productivity, which negatively affects the efficiency of the entire heating system.
To rid the bell-type stove from this drawback, it is recommended to make it from metal. In this case, it is not advisable to use cast iron. It is not only fragile, but also quite heavy. It is preferable to make the body of the unit from steel and treat it with powder paint. The high strength and reliability of steel bell-type models is ensured by the absence of large shear loads.
The only problem with the Kuznetsov steel furnace is the design of the arch of the first bell. It is in this place that exhaust gases, which have a high temperature, collect. It is quite difficult to make the lining of such stoves, especially if they are characterized by small dimensions. Therefore, brick bell-shaped models will never lose their relevance.
Device characteristics
There are no narrow channels in the structure; a bell-type stove has less resistance to the heated flow, so the chimneys are made shorter.
Reasons for effectiveness:
- two hoods contribute to uniform heating of gas and brick surfaces;
- hot smoke is retained for a long time, which gives the greatest heating and accumulates heat;
- collecting products from fuel burnout in one place reduces the likelihood of soot appearing in the chimney.
The water heat exchanger is placed in a hood, so the furnace productivity increases and efficiency increases. It is not so easy to build a two-bell structure in compliance with all standards; the master must follow the order for the Kuznetsov stove and lay bricks strictly according to the plan of each row.
Types of furnaces
The cap has been used as an element of the channel system for quite some time. In different versions, from a brick vault in a furnace to a cast iron slab or backfilled with stone. The simplest bell-type sauna stove may have a built-in steel or copper vault, which significantly improves the conditions for the movement of hot gases.
An additional cavity can be built over the firebox for better heating of stones or a built-in water tank.
Kuznetsov’s brick sauna stoves differ from the classic versions of fireboxes with a hood in three conditions:
- In the design of the hood, the afterburning of unburnt gases necessarily occurs, so Kuznetsov bathhouse stoves always have a high, too elongated body shape;
- The cap in the Kuznetsov stove creates minimal resistance to the passage of gases, therefore the draft in the chimney is higher than that of classic models of fireboxes and sauna heaters;
- For Kuznetsov, an additional pocket inside the stove body is always designed as a separate cavity; it can be made next to the firebox or moved to the upper part.
A bell-type stove - a heater operating according to the Kuznetsov scheme - can be easily distinguished by the presence of an additional window with a door located next to the ash pan.
Important! It is believed that the additional cavity of the hood not only improves the burning conditions for firewood, but also compensates for the pulsations of hot gases inside the chimney.
This means that with the correct ordering of the Kuznetsov sauna stove, you can completely avoid such unpleasant phenomena as the appearance of backdraft in the pipe and the throwing of soot from the chimney onto the roof of the sauna.
What else you should know
The combustion chamber is connected to the hood by a vertical slot, which is called a dry seam. The need for such a constructive solution is caused by convection currents moving in both compartments. A portion of the flue gas containing a large amount of steam is drawn into the combustion chamber to be re-cycled, which improves the combustion of volatile particles and causes turbulence.
The blower is filled with air not only through the grate, but also from above, through cavities in the walls. Again, this is required for complete combustion of volatile particles, because the air entering through the grate, when reaching the top of the torch, practically does not contain oxygen.
Above the combustion chamber is a grate of refractory bricks called a catalyst. It heats up to high temperatures and, as it were, burns out everything that remains after incomplete combustion of the fuel.
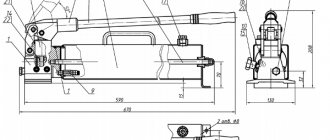
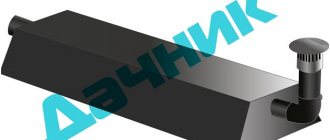
Features of cooking fish in an autoclave
When working with an autoclave, you should take into account some nuances that will help you avoid troubles when working with the device and prepare delicious homemade canned fish:
Cooking canned food in an autoclave occurs under high pressure and at high temperatures.
That is why you should take all precautions when working with it. Before lighting a fire under the apparatus, first build up the pressure and check the tightness of the autoclave. You can open the device only when the temperature inside drops to 30 degrees. Canned fish in an autoclave is prepared at a temperature of 100-120 degrees. The cooking time depends on how you want the final result: boiled stew or whole pieces with soft bones. You should not put raw materials in jars to the top; you need to leave a couple of centimeters from the edge
Otherwise, the lid of the jar may come off. The jars in the autoclave are filled completely with water, even 2 cm above the lids.
For most recipes, it is enough to place raw, cleaned fish in jars - it will be cooked during the sterilization process until fully cooked, including softening the bones. The temperature regime will ensure the destruction of all microorganisms. Autoclaving allows you to preserve the taste and beneficial properties of canned fish. In addition, there are a lot of recipes available: you can cook fish in oil and tomato, make stew and pate from it.
Small fish can be preserved in an autoclave by simply gutting them - you don’t even need to cut off the fins, because they will also get boiled. If you can preserve fish in pieces in oil, it is better to lightly fry it without breading - this will help maintain its shape. For the same purpose, you can add a little sugar to each jar. To make the taste more rich, standard seasonings - bay leaf and pepper - can be varied with coriander or cumin.
Computer
Computer wires really spoil the interior of a room, and if you get a little creative, you can hide them quite beautifully.
The first idea is to disguise all the cords from the monitor, system unit and modem under the table cover, securing them with clips on self-tapping screws or double-sided tape. This idea is clearly shown in the photo example:
You can see another simple way to hide everything unnecessary under the table cover in this video lesson:
How to remove unnecessary cords from the “computer”?
Don't want to spoil the table? You can hide the wires from your computer equipment in a shoebox, decorating it in an original way to match your bedroom interior.
You can find out how to make such a box with your own hands by watching this video:
How can a shoe box be useful?
In addition, an original idea is to buy a special cover for the extension cord, which is quite simply attached to the desk lid.
If the cord from the speakers bothers you, you can easily hide it in an appropriate case that is attached to the back of the table.
All unnecessary cords, including charging, can be beautifully removed from the table using ordinary clips, as in the picture below:
Another idea is to thread the whole bunch of wires through a hose. In this case, the chaos under the table will hide in one single shell, which will not spoil the interior of the room or even the office so much.
Using all these tips, you can disguise electrical wires and make your workspace more tidy. There's nothing complicated about simply placing cords and cables in a box or securing them under a table! In addition to the fact that you will put order on your computer desk in this way, the disguise also allows you to protect the cords from dogs and cats that like to chew on chargers, headphones, etc.
1
Capital measures - hidden wiring in the wall
Many people try to resolve such issues even at the stage of initial renovation of the premises.
After all, it is necessary to hide the wires from the TV on the wall in such a way that they not only do not attract attention, but are also reliably protected. Neither a cat nor a small child will then be able to reach and damage the cord
For this reason, hidden wiring is one of the most popular solutions to the problem, although this method is very complex in terms of execution and costly in terms of finances.
To achieve the maximum level of security for the location of wires, it is recommended to hide them in specially made grooves
This method is the most technologically advanced and accurate; all work is carried out at the repair stage, so in the future all that remains is to carefully place the cord from the receiver into the drilled holes. Another important advantage is the fact that there is no need to chisel the entire wall
The TV is usually installed at a height of a maximum of two meters, so you will need to cut a segment of approximately this length.
Actions to implement the plan can be carried out in the following order:
First, you need to accurately determine the location of the TV and, as a result, the bracket on which this device will be located. An important point is the bracket itself. There are quite a few different options for this mounting device, although the world standard is the VESA type bracket. This equipment includes the necessary mounting points
Much attention should be paid to the size and shape of the fasteners. Otherwise, the bracket may turn out to be too large for your TV or even interfere with the routing of connections. It is recommended to buy the TV in advance in order to be able to measure everything clearly and without errors. Next, you should mark with dots on the wall the places where the electrical sockets will be located. Now you can proceed directly for drilling walls
Using an angle grinder, better known as an angle grinder, we make two strips from the bracket to the future sockets. The distance between the strips is in the range of 2 to 3 centimeters. To obtain a groove, you should use an impact drill or hammer drill to knock out the inner part between the strips made. Now all that remains is to make a few holes using diamond bits for the television socket. If other household appliances will be connected to this output, it is recommended to immediately install the required number of power points.
The gating process is not the most difficult, but you still have to spend a little time. At the end of all the work, all that remains is to hide the wires from the TV on the wall
To do this, carefully place them in the hole made and secure them with brackets so that they do not fall out and interfere with the finishing of the walls. The grooves are treated with gypsum plaster, after which further finishing of the walls can begin.
We recommend
How to hide TV wires on the wall - original solutions. Part 2Fireplace in the interior: interesting solutions for your homeFireplace in the interior: interesting solutions for your home
Construction of “blacksmiths”: diagrams and procedures
Creating a “product” for the mass user, the author took care of the practical application of his research, creating a huge set of diagrams and drawings. For the precise construction of a great variety of modifications of bell-type furnaces, orders are used - step-by-step diagrams with images of each row of bricks.
Unlike Russian stoves, “blacksmiths” are smaller in size and, accordingly, take up minimal space. The amount of brick is also reduced, due to the large amount of free internal space. Thanks to the optimal thickness of the walls, they heat up quickly, and what is especially valuable, they cool down quite slowly. If you carefully analyze the dome arrangements, you will see how much unfilled space there is inside the structure.
Part of the free space is occupied by caps, fixed in a horizontal or vertical order, not necessarily symmetrical. The size of the domes can be the same or different. The vertical arrangement is often used to save space in the room, especially if an oven or dryer is planned. Thanks to the variability of the installation of domes, it is possible to erect a structure of any shape, designed for a specific room or special conditions.
The space under the second hood is often used for mounting heat exchangers, hobs, bread ovens, etc. In projects designed for a bathhouse, a hot water tank or heater is installed in it.
If you correctly “read” the order drawn up by an experienced master, you can achieve amazing results. For example, to maintain room temperature in a house made of rounded logs in winter, you will need 2 fireboxes (morning and evening) with only 5-6 logs each; in the off-season, one firebox is enough.
Preparatory work
Before starting construction, select a location and determine the design and location of the chimney (both indoors and on the roof). After this, you can begin work on arranging the base of the furnace. If the heating unit is being built together with the house, then a common foundation is poured. In the case when the stove is placed in a living room, it is necessary to remove the part of the floor that falls on the “blacksmithing”. In this case, the outer contour of the stove base should be 10–15 cm larger than its dimensions.
To arrange the foundation, make a depression of 20–25 cm, at the bottom of which a sand cushion 10 cm thick is poured, which is spilled with water and compacted. After this, a reinforcing mesh is laid at a height of 5 cm, formwork is installed along the outer perimeter and the structure is filled with concrete. You can start laying immediately after it has completely set, which, depending on the temperature, occurs in about 2–3 days.
In addition to pouring the base, you will need to prepare a solution before starting masonry. To do this, take clean clay and sifted river sand. The clay is poured into a large metal container, kneaded and soaked in a small amount of water. After it has liquefied well, add sand and bring the consistency of the solution to the state of very thick sour cream. Most often, stove makers use a proportion of 3 parts clay to 1 part sand, but the correct ratio of components depends on the type of clay - the higher its fat content, the more sand will need to be added (up to a 2:1 ratio).
When starting work, it is better to print out the orders on paper, crossing out each laid row during the construction process
Particular attention is paid to the installation locations of the lining layer - on the diagrams they are highlighted with a dotted line or a different color. Please note that if ordinary brick is used instead of refractory material, then such a stove will not only be short-lived, but also ineffective
Operating principle
Such heating is effective for rooms with a total area of up to 60 m2, so the design of the stove itself is compact, does not require a high chimney and works according to the “automatic view” scheme.
Gases in such a chimney move according to the laws of natural convection, freely and not limited by the walls of the channels and valves. In this case, the unheated air flow simply flows around the hot air, rather than blowing it out of the oven.
The heat output of a given stove depends on the type of construction and the type of fuel used.
As an example, we can consider a stove with an outer wall of half a brick with a water-heating box, an oven and a cast-iron hob with two burners.
- To increase heat transfer, the firebox is covered with a cast iron plate. Heat transfer depends on the thickness of the slab, so it is advisable to take the slab as thick as possible. Above it is a cooking chamber in a niche with steel doors. The oven is located on the side of the firebox;
- The installation of a heating and cooking stove is carried out with the expectation of dual operating modes: summer and winter. When operating in summer mode, the stove is used as a stove. During operation, hot gas goes under the hob, oven, and then into the chimney;
- In winter operating mode, hot gas passes through the stove and oven, and then enters the upper chamber through the heating ducts, heating the room, and only then is removed into the chimney.