It turns out that any window can be turned into a pearl that attracts admiring glances. And it doesn’t matter whether it is large or small, regular in shape or asymmetrical - a little imagination and courage to implement it will do the trick.
Curtains for roof windows are a complex and unique design option for an unusual window.
Design of dormer windows with sloping ceilings, features, design options
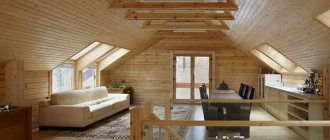
Until relatively recently, a room under a roof was considered suitable exclusively for technical needs. But over time, it became clear that the attic is a unique place, especially for creative individuals, because a unique atmosphere reigns there. This means that this room also needs creative decoration.
If you show some creativity and imagination, then such decoration will become real and exciting.
Curtains for attic rooms must meet the following requirements.
- If the attic “looks” towards the south, then you should give preference to curtains lined with reflective properties.
- It is better to choose a material that does not accumulate dust and dirt between the fibers.
- If the attic room is of modest size, then the curtain should be extremely laconic.
- If the window in the attic room has a slope, then the canvas should be dense, because in this case the flow of sunlight is more intense.
For windows facing south, use curtains with a special reflective lining.
Small rooms are not friendly with elaborate design elements; there is simply no room for them. Therefore, the optimal stylistic solution would be hi-tech or minimalism. Country style and Scandinavian interior design will also take root.
It is important to choose a fabric that does not accumulate dirt and dust particles.
To be fair, it is worth noting that there are no strict rules for designing an attic, so your comfort is a priority.
Types of windows in the attic of a house
Dormer windows (MO) are classified according to several criteria.
By installation method
Vertical type
It is characterized by a vertical frame arrangement, and for this purpose a special structure (“birdhouse”) is mounted on the slope. Such MOs give the roof a special, decorative look, but limit the access of sunlight to the attic.
Inclined
The windows are located in the plane of the roof slope. They provide better natural light, but look much more modest, and the glass is not protected from vertically directed influences (for example, hail).
By shape and design features
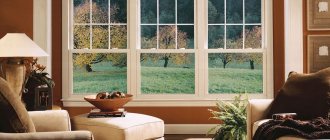
Classic
These are rectangular frames made of different materials with double-glazed windows, which can belong to both types of MO.
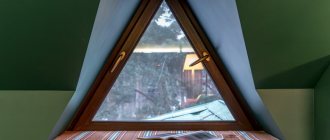
With extensions
The upper part of the opening has an original shape to give originality (triangle, arc, etc.).
Window-balcony
The window is combined with balcony elements, allowing access to fresh air. This could be an additional horizontal platform or a rising canopy in a design with a vertical MO.
Combined
The design includes an opening (pivot) and a stationary part.
Combination of vertical and horizontal types
This option provides good lighting and allows you to look outside.
Light tunnel
A rather rare design designed to direct natural light into the living space of the house. A tunnel is formed through the entire attic, and a diffuser lamp is placed at the exit. This design is needed when a room in the house does not have windows.
By opening method
Rotary with central axis
The sash can be rotated in any direction.
Raised axle
It is located at the top of the opening. The sash opens by lifting upward (inward or outward).
From the side
The sash tilts to the right or left.
From the bottom
The sash swings outwards.
Combined option
The window is divided into 2 parts. There is a raised axis at the top with the door opening only outwards. A side axis is mounted in the lower part, which makes it possible to clean the window.
By material
In addition to the specified criteria, MOs differ in frame material:
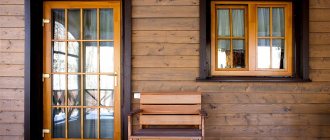
- wooden;
- plastic;
- aluminum.
Modern cottages have begun to use “smart” MOs. They have a drive, and the valves are adjusted using a remote control.
How to decorate sloping windows with curtains and curtains, description
The material chosen varies depending on the style of the interior, the color scheme and personal preferences.
For small attic spaces, it is advisable to use laconic curtains with a simple design.
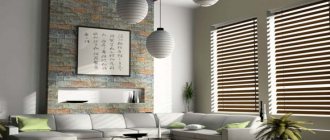
Pleated paper curtains look good. This is a great idea for lovers of original solutions. In a minimalist interior, such “curtains” are very appropriate.
Another way of interesting and convenient design is bamboo blinds. Such “curtains” are combined with wooden walls and floors. And most importantly, thanks to their environmental friendliness, curtains make the atmosphere in the room more comfortable and cozy.
For sloping windows, it is better to choose curtains made of denser fabrics, since a powerful stream of sunlight falls on them.
Plastic blinds are durable and easy to maintain. And the variety of colors allows you to choose the ideal option for any interior.
If preference is given to fabric curtains, then it is better to choose natural materials, for example, cotton, linen, silk. Or practical synthetics (such as organza).
There are many designs to choose from.
An interesting interpretation of Roman blinds on an inclined surface allows you to make the interior creative. Suitable colors and natural materials make a small room feel spacious. This design is also very functional, as it allows you to regulate the flow of sunlight.
Among them you can always find something suitable to your taste.
Another find for non-standard options is blackout curtains. If the attic “looks” to the east, then the sun will be in the room from the very early morning and in large quantities. And thanks to modern fabrics that do not allow light to pass through, you can make your morning sleep undisturbed.
Types of attic window blocks
For the manufacture of attic windows, in the same way as in the production of traditional models, various materials are used, so you have the opportunity to choose wooden, metal and plastic products to suit your taste. Each of them has its own positive and negative characteristics.
Characteristics of aluminum roof windows
The assembly of structures is carried out on the basis of aluminum profiles, which provide the products with long-term operation, ease of repair, as well as resistance to corrosive changes and deformations.
Such a window will last for more than half a century without requiring special care, while perfectly protecting it from negative atmospheric influences. The peculiarity of the material is that only from it can the largest window frames be made.
Aluminum roof windows can be warm or cold
Aluminum roof windows are:
- Cold - used for glazing balcony blocks and non-residential premises.
- Warm - suitable for installation in attics of houses and dachas.
The profiles of warm structures consist of three parts with a thermally insulating polyamide insert between the profiles. The main function of such a thermal bridge or thermal break is to prevent warm air from escaping outside and cold air from entering inside. Filling extruded polystyrene or polyurethane foam between thermostats helps to achieve high quality; The space from the glass unit to the frame or sash is foamed with a sealant.
An aluminum window system is assembled from several parts, which includes:
- profile frame;
- set of doors;
- impost;
- shtulpa;
- glazing bead
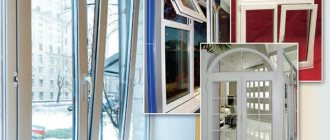
The method of opening such a window can be chosen by the master and is implemented without additional spare parts.
The roof window can open in different ways
You can get an answer to the question of why the demand for aluminum windows is much higher based on their technical characteristics:
- no problems arise during operation;
- unpretentious in care;
- manufactured at the customer's request in any size and with a suitable opening mechanism;
- Available in a wide range of colors according to the RAL scale;
- are not affected by different temperatures, cope with their tasks for many years;
- have protection against acid precipitation and UV rays.
The versatility of wooden roof windows
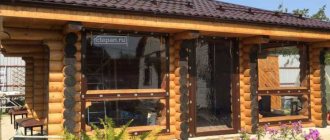
When building a roof, the frame is laid from wooden beams, and the sheathing is made from boards, so it is advisable to make roof windows from a similar material. Due to the similar reaction of wooden products when exposed to climatic conditions or loads, the expansion of the material structure occurs evenly across all roofing structures, including windows.
With a high density of laminated wood, there is sufficient flexibility of the products in the event of any movement, which significantly reduces the number of necessary fasteners. The advantage of wood is the ability to manufacture any decorative elements - arched transoms, window-balconies.
Wooden blocks can have different shapes
Indoors, roof windows are protected from moisture, and on the outside they are covered with special linings, which allows them to extend their service life. For prevention, it will be enough to paint the frames with water-based varnish every 2-3 years.
Impeccable moisture resistance of plastic products
In damp rooms, for example, in the bathroom or kitchen, the best option would be to install plastic windows. Such products, unlike ordinary wooden frames, do not require special care (just wipe with a damp cloth) and do not corrode as a result of exposure to water, dirt, or wind.
Currently, moisture-resistant roof windows are very popular due to their resistance to aggressive environments; without them it is impossible to imagine the functioning of swimming pools, saunas, greenhouses, and conservatories. The only factor that should be taken into account when choosing a plastic frame is the angle of inclination of the roof slope - within 15–90 degrees.
A plastic window can also be used in the bathroom
Any window, regardless of the material used and design features, provides the ability to ventilate the room. Thus, all models of roof windows are equipped with special valves that will help you take care of ventilation in a timely manner.
How to hang curtains and curtains on non-standard windows
To decorate a window of a non-standard format, you need a special cornice. If you do not have the skills to fasten such structures, then it is better to contact specialists. Otherwise, if you attach the structure incorrectly, you will not be able to use it to its maximum functionality.
Such curtains make the interior elegant and give it some zest.
If you want a non-standard window opening to attract attention, follow simple rules.
- Choose a cornice that will follow the shape of the top frame.
- The shape of the curtains should duplicate the shape of the window.
This design solution will make a modest-sized room visually larger and the interior more interesting.
They are complemented with holders, decorative tiebacks or other accessories that add even more originality to the curtains.
An arched curved cornice is an ideal solution for a semicircular shape. Tiebacks appropriately complement the composition.
What is the best way to organize attic cornices?
Special cornices are purchased to properly decorate sloping windows resulting from the features of the facade. And to create a truly harmonious and stylish design, you should follow some of the designers’ tips. Here are the main ones:
- If you need to adjust the proportions of a room, use point cornices. They can be raised to any height. It is worth paying special attention to the design of the brackets, because they will be visible.
- If the distance between the ceiling and the window opening and the shape of the facade itself allow, it is possible to level the existing bevel with cornices and curtains.
- In a room with high ceilings, baguettes, a wooden rod or a tubular metal cornice would look most appropriate. For a small room, it is better to place the frame directly under the ceiling, not in the opening, but along the contour of the ceiling. This will visually expand the room, creating the illusion of great height.
- An interesting and useful element is a flexible cornice. It will very organically frame attic window openings of absolutely any shape, because it bends to any radius.
- To design an attic that looks more like an arch with a steep slope, it is recommended to select mini-eaves. Forged ones, made as a beautiful pattern, look most harmonious. If these don’t suit your style, choose wooden semicircular rods with interesting tips.
- Rolled and Roman cornices are perfect for skylights with a sloping top, because the canvas will follow the slope of the opening and will not take up extra space without overloading the room.
In general, the installation of a cornice completely depends on the shape of the window opening. If the window has one bevel, then the frame is most often installed parallel to this bevel on the wall or ceiling. If there are two slopes that intersect at the top at one point, then the fasteners should be hung on the slopes and connected at the top through some interesting decorative element or using two brackets. If the attic consists of two slopes and one straight section between them, then it is recommended to install a cornice parallel to this straight area so that the height visually increases as much as possible. The last option is a straight opening with a slope, and here the curtain is installed along a straight section.
By the way, if the interior design of your room states that the attic window should be decorated with curtains with drapery or light fabric, straight frames are attached between the ceiling and the opening or directly to the ceiling, and the fabric chosen for the curtain is grabbed along the fold line.
Curtains for sloping windows
For beveled structures, not only the cornices, but also the curtains must be special. The color scheme should harmonize or duplicate the color of the wall decoration. If you doubt that you can solve this problem correctly, give preference to white curtains - this color is always in fashion and can be combined with almost any color scheme.
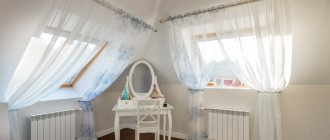
Bedroom interior and skylights with light curtains.
Just tulle of a classic shape and cut is not a very suitable solution for a sloping window. Look at the photo of curtains for attic windows. The curtain is as laconic as possible and is appropriately complemented by light curtains with colorful prints.
Curtains will create a warm and cozy atmosphere and are an ideal option for decorating an attic space.
Another design option for a beveled window opening. Thanks to the non-standard fastening, an ordinary curtain perfectly complemented the triangular-shaped window. And a regular pick-up completes the overall picture.
Materials for making cornices
Standard cornices for sloping roof windows are made of wood, metal and plastic, like many other interior elements. Let's look at how different material options can be useful:
- Metal - mainly stainless steel, bronze or copper, less often - brass and aluminum. These curtain rods will hold stronger than others, but by themselves they look ugly. It would be better suited as the main frame with subsequent decoration.
- Wooden – different types of trees, most often the common birch, walnut or pine. Quite massive and also durable, perfect for a classic or business design of a room, for example, an office.
- Plastic – they often choose environmentally friendly types of plastic such as reliable PVC. This option is universal in terms of style, inexpensive and can become the basis for any designer’s idea, because it is highly malleable.
Obviously, there are also models of cornices that combine various materials. They fit into the interior better than others and are suitable for some individual occasion. Such frames are made to order to suit the design of the room. When choosing material for the cornice, think about the conditions in which the window opening is located, for which curtains are needed.
If you are decorating an area on the street, for example, on an open porch or balcony, you should choose plastic that is not afraid of rain, frost and sunlight, and besides, it is the most cost-effective to replace it in case of breakdown. If you need to decorate the opening with massive curtains of heavy fabric with additional draperies, then only a metal cornice can withstand this, which also will not draw attention from the curtains to itself.
Cornices used on non-standard shaped windows
Cornices of regular shape are not suitable for decorating dormer or sloping windows. And the right choice of cornice is half of successful interior design.
Option 1. Choose a regular cornice, but attach it at an angle. This option is only possible if the location of the window allows the installation of a cornice. Curtains are securely fixed using rings or brackets, since the curtains must be stationary.
You can regulate the degree of light entering the room by using grabbers.
The curtain fabric chosen is light and drapery.
Option 2. Point suspensions. They can be used to create any form. Hangers can be attached to the wall in any order and at different distances from each other, depending on personal wishes.
They can follow the contour of the frame, or, conversely, “argue” with it.
Option 3. Ceiling baguettes. One of the most elementary methods of fastening. Thanks to baguettes, you can hide numerous elements of fixing the canvases that are used in the design of such premises.
Traditional curtains go well with other types of curtains.
Option 4. Pleated blinds and curtains. Truly, there is nothing simpler. The material from which such “curtains” are made can be very different: from paper to bamboo.
For attics, choose pleated curtains with a special coating to create a reflective effect.
Do-it-yourself mansard roof: installation procedure
The design of the Mauerlat on mansard roofs is no different from the standard version. If the house is made of timber or logs, the upper crown can be used as a mauerlat. It is only pre-treated with impregnation with high protective properties.
If the wall is made of foam blocks, a reinforced monolithic belt is placed on top of it. On a brick wall or made of shell rock or other similar materials, the installation of such a belt is not necessary. Waterproofing is laid in two layers on the wall, and on top is a timber treated with an antiseptic - 150 * 150 mm or a log. It is secured with embedded studs.
How to attach the mauerlat and rafter legs to it
When assembling all elements, long nails are used - at least 150 mm long. In the most critical places, it is better to connect three or more elements using bolts or studs with double-sided threads. It is advisable to strengthen all joints with steel plates or corners.
You can read about building a house from aerated concrete in this article.
First way
Installation of attic roof rafters is done in two ways. First: they assemble the parts on the ground, then lift them up in finished form. There, the outer structures, which will become pediments, are put up first. They are placed vertically and secured. It is often more convenient to secure them with long bars nailed to the wall (temporary). The following assembled structures are inserted into the prepared recesses in the Mauerlat (they are made at the required pitch). They are positioned strictly vertically and carefully secured. If necessary, additional temporary spacers are installed to fix them in the desired position. Side beams are installed.
How to build a sloping roof in this way and assemble the nodes, see the video below.
Second way
The second method - the construction of a sloping roof is carried out sequentially by assembling elements directly on site. This method is more convenient if the structure is large and when assembled it can only be lifted using special equipment (crane).
First, the floor beams are laid. Stands and ties are attached to them, and temporary spacers are installed to hold them in the vertical direction. Next, the upper and side rafter legs are assembled, and the tie rods and jibs are installed.
During installation, the following sequence of actions is observed: first, the outermost elements are installed and adjusted to the desired position, and securely fastened. If necessary, use temporary spacers. A fishing line, rope, and cord are stretched between them, which will serve as a guide for the installation of all subsequent elements. This simple move allows you to get the ideal geometry (don’t forget to check the slope angle, verticality or horizontality).
On top of the racks, tie-downs are attached - bars, to which the side rafters are then fixed and onto which the tie-down of the upper triangle is installed. The ties are secured using metal corners. Since the beams are long, they sag. This is later eliminated - after installing the upper rafter legs - with the help of vertical beams of fixed or adjustable height. And temporarily they can be supported with racks (so as not to pull the entire system).
One of the stages of building a mansard roof with your own hands
To make it easier to maintain the desired angle when installing the side rafter legs, templates are made according to which cuts are made. But since the geometry of buildings built with your own hands is rarely ideal, adjustments may be necessary. To check the resulting angle of inclination, another template is knocked down from several boards, which is used to check the correct installation.
If the standard length of lumber - 6 meters - is not enough, either order the required length (expensive) or increase it. When building up, two boards measuring at least 0.6 meters (30 cm on each side of the joint) are nailed to the joint. They are nailed on both sides or bolts are used.
A reliable way to build rafters. The length of the “patch” is at least 60 cm
After installing the side rafters, all that remains is to install the top ones. A template is also made for them, pre-cut on the ground, and installed on top.
Almost finished frame
The top part can be made in different ways. Its structure depends on the width of the base. How to make it, look at the photo below.
How to make an upper triangle on a sloping roof
Since the structure of the attic sloping roof does not provide for the presence of a ridge, a beam is placed in the middle to tighten it, to which the slopes are attached, fixing the triangle in the required position.
The upper part is fixed with bevels nailed to a beam laid in the middle
In this case, we can consider that the attic roof was assembled with our own hands. All that remains is to install the roofing material and do the insulation (you can do it in that order, you can do it at the same time). Features of insulation of attic roofs are described here.
Nodes and their drawings
When installing a rafter system, questions may arise regarding the assembly of nodes—the intersections and connections of several structural elements. In the photo you see drawings of key connections.
How to connect elements of a sloping roof rafter system
The second option for connecting the side layered rafters and the upper triangle. Bolts are used for more secure fastening.
How to make a do-it-yourself fastening of the upper tee and rafter leg on an attic roof
Methods for attaching rafter legs to the mauerlat or, as in this case, to the side beam are shown in the figure below. To make it easier to mount a heavy element, a thrust board (bar) is nailed to the bottom of the rafter, which limits its movement: the board rests against the edge and does not allow it to sink lower.
Several options for attaching rafters to the Mauerlat
Curtains with a lambrequin for a sloping window: examples of asymmetrical lambrequins
It turns out that a sloping window is not a reason to give up your favorite lambrequins. With a competent approach to solving the problem, multi-layering is quite appropriate and beautiful.
To regulate lighting, tiebacks in the form of ribbons, tassels or fabric strips are used.
Model of curtains for a dormer window with a lambrequin. As you can see, the lambrequin does not weigh down the structure at all, but on the contrary, it looks interesting and visually makes the room larger. Small lamps mounted into the ceiling along the line of the cornice will add luxury.
This curtain composition will especially emphasize the unusual shape of the slanting window.
Decorating irregularly shaped windows is the most difficult task. The photo shows asymmetrical curtains in a classic attic window. The lambrequin is attached to a cornice that is parallel to the side of the window.
If the curtain model is made of light fabrics, multi-layering and lambrequin look creative.
Different colors of canvases are in harmony with the decoration of the walls.
Advice from the experts
At the time of installation, a gap of at least 3 cm is left between the window and the rafters. This is done to ensure the correct placement of the insulation. Only at the finishing stage is the structure pressed tightly to the base.
At each stage of work, all cracks are checked. If they cannot be eliminated by changing the position of the material, the resulting space is sealed with a waterproof sealant.
It is not recommended to use polyurethane foam when sealing joints, as it is washed out with water over time.
A high-quality do-it-yourself roof window will last for a long period. At the same time, do not forget about maintenance, which involves periodically applying a new paint coating.
Roman blinds for attic windows
Still, Roman or roller blinds are considered the most suitable for roof windows. Functionality, ease of installation and operation make them undisputed leaders.
They can be made of thick or translucent fabrics, plain or decorated with a wide variety of prints.
Sloping windows with roller blinds make it easy to adjust the level of illumination and ventilate the room. The design is mobile, closes and opens with one movement of the hand.
Laconic and compact Roman blinds.
Steam and waterproofing
At the junction points of the MO, it is important to ensure reliable vapor and waterproofing. An insulating apron with such capabilities is installed around the entire perimeter of the window. It reliably covers the gap between the roof and the frame. A strip of vapor-waterproofing material can be secured with a stapler, but an adhesive connection is most reliable.
Gluing is carried out from the bottom edge and moves from bottom to top. Modern materials are produced immediately with an adhesive layer, which is covered with a protective film during storage.
The upper edge of the apron is located under the drainage gutter. To prevent moisture from getting under the roof waterproofing, cut when preparing the opening, the edges are sealed with butyl-based sealant.
Design of trapezoidal windows: basic rules, design options
For trapezoid-shaped windows, you can either use special cornices, or attach standard structures parallel to the contour of the window. As a rule, such models do not differ in functionality, and the illumination is regulated by grabs.
Fabric panels placed on sloping windows will create a very cozy and romantic atmosphere in the room.
The best solution would be to choose lightweight curtain fabrics.
When using fabric curtains, the main thing is to choose the right cornice.
A large dormer window in the shape of an irregular trapezoid is decorated with light tulle and curtains of the same color. The ceiling decoration hides the fastening elements and creates the impression that the panels are descending from above.
Curtains made of translucent, airy materials, such as organza or veil, look elegant and harmoniously complement the interior.
A window of any shape can be decorated stylishly and practically. Moreover, both beveled and asymmetrical window openings can be maximally functional. Don't be afraid to experiment.
Bring your wildest ideas to life.
Choosing a location on the attic roof
The reliability of the entire roof and the illumination of the attic depend on the correct choice of installation location. To implement it, the following recommendations must be taken into account:
- When installing the MO, you should not disturb the rafter system. The opening must be made between the rafters, and the width of the opening should be at least 6–8 cm less than the pitch of the rafter legs. If the step is small, then it is better to make 2 small windows.
- The MO should not be located in places where there is a risk of condensation and moisture accumulation - a valley, a ventilation or chimney outlet, any abutment of the roof to elevated structures.
- The installation location should be open to natural light, i.e. there should be no high vertical walls nearby.
- The height of the opening depends on the slope of the slope. On a steep roof, it is recommended to lower the MO lower to the ceiling. The optimal height is 90–110 cm from the attic floor.
- It is better to position the opening so that you do not have to cut the roofing elements (tiles, corrugated sheets, slate) once again.
To ensure normal lighting in the attic, the window opening area is selected to be about 8–10% of the room area.
Window waterproofing device
An insulating apron is included in the package. A piece of sheathing is cut off from above the window being installed on both sides, which is equal to the width of the drainage gutter, and in the middle of this place the material for waterproofing is cut. A gutter is placed under it and placed in the gap between the sheathing. As a result, water will begin to flow from the film into it, rather than onto the window.
Next, the apron is unrolled and placed around the window so that it prevents leaks. It is attached to the frame, top sheathing, rafters and beams with a stapler, after which the edges are placed under the sheathing, while the upper part is placed under the gutter. Now the roofing material under the window can be returned to its original place.
Installation of thermal insulation
The area where the roof adjoins the building can become a cold bridge if it is not insulated. The optimal way to place thermal insulation is directly in the gap between the roof and the window frame. The insulation is placed on the edge of the flashing along the entire perimeter of the window, and only after that the frame is inserted. The material is secured using a stapler.
You should not fill the gap with foam. It does not provide good insulation and creates a force that can lead to distortions in the wooden structure. It is best to use a strip of stone wool, which, with reliable waterproofing, copes with the task perfectly.
How to install a salary
They begin to install it from the bottom up. First of all, the lower apron is installed, then the side parts and the upper edge, and finally the lining.
The installation of flashings from each manufacturer has its own peculiarities, so you must use the instructions. So, Roto products have a rubber seal on the frame, and the frame is placed under it. Fakro window products do not have a sealing element, and the frame is attached directly to the frame, and covered with additional parts on top.
All elements of the flashing are joined and then attached to the frame and sheathing. The lower apron is fixed to the roof covering from above. To install roofing material, a special element must be attached to the flashing. At the end of the work, the sash is hung and the protective coating is removed.
In order to seal the joints between the frame and the opening, you should not use polyurethane foam; you should use only special sealants.
Preparing a place for a window
There is a certain procedure for how to make a roof window in a house correctly. In the case when the roof is ready, but there is no interior finishing, the location of the opening is marked from the inside of the room on the waterproofing material. The distance from it to the elements of the rafter system should not exceed 2-3 centimeters.
In this situation, the window is mounted on the rafters and lower beam. Next, its lower location is outlined; for profiled materials, 9 centimeters are indented, and for flat materials – 4-6 centimeters. Then mark the top point of the window structure and set aside 9-15 centimeters upward.
When cutting out the waterproofing film, a 20-centimeter margin is left around the perimeter. The remains of the canvas are wrapped inside the attic, the roofing is removed or a hole is cut in it. The sheathing elements are cut off at a distance of 2 centimeters from the rafters.
At the bottom of the window, a mounting beam with a thickness of at least 50 millimeters is placed at a distance of 8–10 centimeters from the sheathing. It is mounted horizontally according to the level. The lower end of the waterproofing is fixed to the timber with a stapler, and the upper end to the sheathing. In this case, the side edges are pulled out.