Most often, individual water supply systems are installed in dachas and private houses. For this purpose, wells or wells are installed. Their production is entrusted to specialists, since the service life and purity of the extracted water depend on the quality of the arrangement. In most cases, installation and installation of downhole equipment is carried out independently.
The pump power must correspond to the productivity of the well. In addition, the immersion depth for which a particular pump is designed should be taken into account.
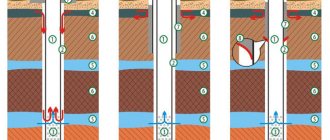
Types of submersible pumps for wells
Most often, owners of private houses give preference to submersible pumps for pumping drinking water from a well. Compared to their surface counterparts, they make less noise, are more durable, more compact and are not as susceptible to fluctuations in outside air temperatures. Plus, a unit on the surface is not always able to lift water from great depths.
All models of submersible well pumps are divided into two categories:
- Vibrating.
- Centrifugal.
In the first case, water is pumped due to vibrations of a special membrane, and in the second, thanks to a rotating disk with blades.
Vibrating
When choosing a vibrating pump, it is important to understand that they all have a negative impact on the integrity of the well. The vibration created by such units slowly but inexorably destroys it. Plus, the soil at the bottom and around the lower end of the well structure also gradually changes its structure when the deep-well pump is operating.
As a result, the siltation process in many cases accelerates sharply
Plus, the soil at the bottom and around the lower end of the well structure also gradually changes its structure when the deep-well pump operates. As a result, the siltation process in many cases accelerates sharply.
Examples of vibration models
However, vibration pumps have many advantages, including:
Vibration pump installation diagram
A vibration pump is the ideal choice when you need to pump or clean a well. Along with the water, it also lifts all the silt from the bottom. This is both a plus and a disadvantage of these models. This liquid is not suitable for drinking without additional filtration. However, to flush the strainer at the end of the casing, a vibrating well pump is ideal.
Centrifugal
A centrifugal pump for a well has higher productivity. One or more impellers with blades rotate inside it, which create a vacuum in the center of the unit, into which water is drawn from below. Centrifugal borehole pumps are practically silent and are capable of lifting liquid from very great depths.
Centrifugal models
Their only significant drawback is sensitivity to impurities. The purity of the water flow entering them must be high. Otherwise, the working elements of the hydraulic pump will begin to wear out and fail. Before choosing a pump of this class for your home, it is necessary to analyze the water in the well. If the mechanical impurities are more than 100 g/cubic meter, then you will have to install a vibration analogue.
Operating principle of centrifugal pumps
Screw
One type of deep-well pump uses a broaching screw or auger as a working mechanism. The elongated shape of the device is optimal for narrow wells. The unit can pump water mixed with sand. It creates a powerful and even pressure.
Design features of the equipment
Before you begin installing the pump, you should pay attention to the design features. All models can be divided into two main groups:
- Submersible.
- Superficial.
The connection features also depend on the installation method. So the submersible is under the surface of the water, the electrical cable and connections are also under water. The surface type of equipment is easier to connect, since the main part is located above the water.
The minimum kit for supplying water from a well is as follows:
- The pump itself
- A float with a sensor or other mechanism for measuring water level.
- Non-return valve to prevent the effect when water flows back. Note that some pumps have a check valve inside the structure. In this case, there is no need to install it.
- Pressure switch.
- A hydraulic accumulator that allows you to maintain pressure in the water supply system for a certain period after the pump is turned off.
- Electrical control unit.
There are other system options, it all depends on the established requirements. An important element of the pump design is the electric motor, which drives the moving element. Only if the device is connected correctly will it work efficiently and last a long time.
What should a good pump be like?
First you need to select and purchase a suitable pump, as well as a number of materials necessary for its successful installation. The pump is usually submersible, but it is highly desirable that it be centrifugal.
Unlike centrifugal models, vibrating pumps cause dangerous vibrations in the well, which can lead to destruction of the soil and casing. Such models are especially dangerous for sand wells, which are less stable than their artesian counterparts.
The pump power must correspond to the productivity of the well. In addition, the immersion depth for which a particular pump is designed should be taken into account. A model designed to operate at a depth of 50 m can supply water from a depth of 60 m, but the pump will soon break down.
A submersible centrifugal pump is the optimal choice for a well. Its performance, size and other indicators should be correlated with the characteristics of your own water source
Another risk factor is the level of quality of drilling work. If an experienced team drilled, the well will better withstand the destructive effects. And for wells created with your own hands or through the efforts of “shabashniks”, it is recommended to use not just a centrifugal pump, but special models for wells.
Such devices better withstand the loads associated with pumping water heavily contaminated with sand, silt, clay particles, etc. Another important point is the diameter of the pump. It must match the dimensions of the casing pipe
It is also important to take into account the power supply features of the pump. For wells, both single-phase and three-phase devices are used. It is easier to find equipment for four-inch pipes than for three-inch pipes
It would be good if this point was taken into account at the well planning stage. The greater the distance from the pipe walls to the pump housing, the better. If the pump fits into the pipe with difficulty rather than freely, you need to look for a model with a smaller diameter
It is easier to find equipment for four-inch pipes than for three-inch pipes. It would be good if this point was taken into account at the well planning stage. The greater the distance from the pipe walls to the pump housing, the better. If the pump fits into the pipe with difficulty rather than freely, you need to look for a model with a smaller diameter.
This is interesting: Russian-made ceramic tiles
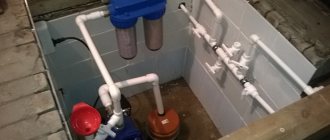
Installation of plumbing system components
Second step
Install the pump. Deep-type equipment is lowered into a water supply source. Surface pumps are mounted next to a well or well. The pump is installed in a heated room or in a caisson.
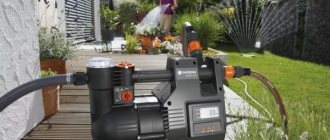
Pumping station
Third step
Connect the water pipe to the installed pump. Attach the free end of the connected pipe to a fitting with five terminals.
Fourth step
Installation of a water supply system
Connect a storage tank, a pressure gauge, and a pressure switch to the free outlets of the fitting. The volume of the storage tank can reach 400-500 liters or even more. Thanks to this device, optimal pressure in the water supply system will be ensured. In addition, you can store water in the storage tank in case of unforeseen situations.
Fifth step
Connect a pipe to the remaining free fitting outlet, and then run the line along the pre-leveled bottom of the dug trench straight into the house. You also need to lay a protected cable along the bottom of the pit to connect the pump and accumulator.
It is important that the outlet intended to power the above-mentioned units is properly grounded
Sixth step
Installation of water supply at the dacha
Install a shut-off valve before the pipe enters the building. It will allow you to shut off the water supply if the need arises.
Seventh step
After making sure that the external pipeline is working correctly, fill the hole and begin installing the internal wiring.
Regardless of the chosen source of water supply, it is strongly recommended that the water supply system be equipped with cleaning devices
Perform internal wiring in accordance with the previously prepared diagram. At this point, be guided by your preferences. Do everything so that in the future it will be convenient for you to use the connected water supply.
Installation of internal water supply at the dacha
Finally, all you have to do is arrange water intake points by connecting faucets, appliances, etc.
Sequence of installing a submersible pump in a well
Assembling a water supply system on a well pump is performed as follows:
Connecting the runway cable. The power cable is connected to the water pump wiring using heat-shrinkable sleeves, the wires are connected by soldering. If the pumping unit is standardly equipped with a submersible electric cable and the length of the latter is sufficient to remove it from the well, then there is no need to replace the cable wiring; Installation of a check valve. It is attached to the nozzle of the upper end of the pump unit through a nipple adapter and will ensure the safety of the volume of water in the working chamber of the device when it is turned off. In some models of submersible pumps, the check valve is part of the overall design of the unit and there is no need to install another valve on them; Installation of the discharge pipe. Its connection is made by a coupling through a brass fitting to a previously installed check valve. The HDPE pipe must be straightened as much as possible; there should be no bent sections. The power cable must be carefully aligned and laid along the length of the discharge pipe; Connecting the cable. A multi-core cable made of stainless steel or polyamide fibers is passed through special eyes on the pump body, folded into a loop and secured with two metal clamps. The clamps and the tip of the steel cord are wrapped with waterproof electrical tape on top to minimize the likelihood of the metal rubbing against the wall of the discharge pipe under vibration from a running pump; Tightening with plastic clamps. With an approximate pitch of 700-1000 mm, the pipe column and pumping electrical cable are carefully crimped with plastic clamps - tightly, but not completely tight. The safety cable is not crimped with clamps, only the cable and pipe! You cannot squeeze communications too much, this will damage them. Do not use metal or wire clamps, as they will damage the structures removed from the submersible pump; Installing a pump in a well. For additional protection of the walls of the casing pipe, it is more rational to put a special rubber ring on the body of the pumping device
It is necessary to lower the column with the pump to a given depth using a cable slowly and carefully, with smooth movements (at least two workers will be required); Fastening the cable to the head. After bringing the submersible pump to the calculated depth, the cable should be fixed to a special bracket installed outside the casing head
Fastening is carried out with a loop passed through the bracket and crimped with metal clamps of a special profile.
All the time while the column is being lowered, hold its weight at the neck of the well strictly by the safety rope! It is forbidden to pull on the pipe or power cable if you sense some obstacle in the well - you should stop lowering, then slowly and carefully rotate the column left and right. If the obstacle to the pump installation persists, you need to carefully remove the entire column and check with a video camera the condition of the casing pipe walls (here it is better to call specialists)
When the dynamic water level in a well occurs at a depth of less than 10 meters, it is better to fasten the submersible pump with a polyamide cable, especially when using a vibration pump unit. Polyamide cable fastening can soften vibrations and reduce the load on the cable support bracket on the casing head.
The removal of the HDPE pipe from the wellbore should be done using a coupling with a preliminary insertion of a driven brass fitting between the ends of the pipes, which compensates for high tensile loads. It is more rational to install a coarse filter closer to home consumers of well water, and not near a submersible pump - it will be easier to clean it periodically.
If a water well is made near a house or inside the technical room of a cottage (before the construction of a building) and the depth of the wellbore exceeds 40 m, then it is more convenient to equip it with a well adapter. If the well is shallow, or far enough from the house, or passes mostly through light soils (for example, sandstone), then it would be correct to equip it with a caisson, as the most reliable protective structure.
Description of the harness
For the summer version, you can leave the top outlet on the surface. It will be used only during the warm season by connecting a temporary water supply. If water is needed throughout the year, then the system must be constant. To do this, the pipeline must be laid below the freezing level. On average, the depth should be 1 meter (depending on the region). In addition to freezing, it is worth taking care that no debris gets into the system.
You should also think about free access. It is necessary to periodically audit the system and equipment. Most often, the water well piping scheme includes the following work (if it is not an industrial well):
- Making a pit, installing an adapter or caisson.
- Creating a project and laying a pipeline.
- Installation of a hydraulic accumulator, deep-well pump and filtration system.
The operation of the well will depend on the quality of the work and the equipment itself. At this stage, it is necessary to take into account all the nuances of water consumption.
Pros and cons of surface pumps
Surface pumps have many advantages:
- Compact overall dimensions;
- Light weight;
- Affordability;
- Easy to install, operate and maintain. Installing a surface pump does not require special knowledge, skills and experience;
- Ability to work with a water layer of less than 80 cm. In such conditions, submersible pumps can no longer operate;
- Cooling by air, and not by water, like submersible ones;
- High water pressure;
- High efficiency;
- No need to supply electricity to the water intake;
- High reliability and durability;
- Stable operation even in the presence of air pockets in the system.
Also, surface pumps (as a class of equipment) have a number of disadvantages:
- Sensitivity to the presence of sand, impurities and other water contaminants;
- The maximum depth from which water can be raised is about nine meters;
- When using an ejector, the reliability and performance of the system are significantly reduced;
- Noise. It is better to allocate a separate room for the operation of the surface pump;
- The need to fill the suction line with water.
Connection diagram and piping of the hydraulic accumulator
For reliable operation of the pump, it is connected to an automatic control system, consisting of a relay, a pressure gauge and a hydraulic accumulator. The hydraulic accumulator is the most massive element and performs the following functions in the system:
- Prevents water hammer from occurring during pump on/off cycles.
- Reduces the turn-on time of the electric pump, thereby increasing its service life.
- Maintains constant pressure in the system.
- Creates a certain supply of water in the absence of water supply.
The choice of equipment for water intake involves the use of a hydraulic tank of the required volume, which is calculated taking into account water consumption; when purchasing, they often give preference to balloon-type devices.
During installation, the hydraulic accumulator must be located next to the main automation devices, which are connected directly to the inlet fitting of the hydraulic tank or for its connection, an outlet is made in the form of a flexible reinforced pressure hose of the required cross-section.
Fig.10 Installation of a submersible pump
Well piping is a prerequisite for optimal functioning of the water supply system. The most popular type is the use of a caisson - such a system protects the water main from freezing in winter and pumping equipment from a volumetric hydraulic tank and automatic control system devices can be installed in it.
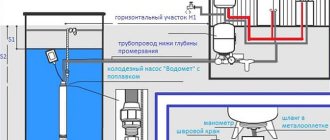
To what depth should the pump be lowered into the well - methods for determining
The easiest way to determine how deep the electric pump should be immersed is to measure the distance from the top of the soil to the bottom of the well. You can first measure it by lowering a heavy object into the channel on the cable until it touches the bottom surface, and then measuring the length of the cable with a tape measure.
A simpler option is to immerse yourself in a source already tied to a cable and connected to a pressure pipeline and a pump power supply line. When lowered until it touches the bottom, the electric pump is then raised by 1 meter, thus determining the choice of position of the device in the well source for further operation.
Fig.4 Dimensional parameters for the location of a submersible electric pump in the well channel
This method has a number of disadvantages, which will be discussed below; another methodology based on measurements of static and dynamic thresholds is more rational and effective. Typically, data on the static and dynamic level, as well as the flow rate of a well, is contained in its passport and is designed for the use of a pump with certain pressure and volumetric characteristics.
The static level can be determined by measuring the distance from the earth's surface to the water surface when there is no electric pump in the well; for this it is easier to use a long tape measure or a nylon cord with a light object attached - after sagging, it is removed and the length of the lowered section is measured.
To determine the dynamic threshold, the pump is lowered into the well and turned on at full power for 1 hour; if the water supply stops, the immersion depth is increased by several meters. At the end of the allotted time, the lowered electric pump is removed to the surface, the level is determined by the distance from the water mark on the pipeline to the point of its contact with the surface of the earth.
Rice. 5 Deep pump for water supply in a caisson well - connection examples
Knowing the dynamic level, it is not difficult to determine the depth of the pump descent - it drops below the found mark by 1 - 3 m. After this, it is finally fixed in the well head, cutting off the excess section of the plastic pipe and connecting the water main to it. The method of placing a deep-well pump taking into account the dynamic water level has the following advantages:
- The water absorbed from the surface layers, in contrast to the bottom region, has a minimal amount of suspended particles of sand and clay.
- A higher location allows you to save a certain amount of materials (rope, cable, HDPE pipes), reduce the overall weight of the structure and make it easier to maintain.
- Industrially produced submersible pumping equipment is installed at various depths from the water surface, the maximum values of which are indicated in the passport data. The cost of the unit is directly related to the depth of its immersion under water (a column of water presses on the electric pump with a height from the point of its location to the static level), therefore, the higher the model is located in the well shaft, the more budget option you can choose. The use of inexpensive Russian and Chinese models becomes safer at shallow depths, because there are often cases when the body of a domestic or Chinese device cannot withstand the pressure of the water column, and oil from its internal bath enters the well source.
Rice. 6 Downhole heads and adapters - appearance
Plumbing installation technology
After the daily water consumption has been calculated, a water supply diagram for a private house from a well has been drawn up, the cross-section of pipes and the characteristics of the pumping station have been selected, and installation is carried out. The technology looks like:
- making a source - drilling a sand or artesian well inside a house or on a site, installing a casing pipe;
- construction of a caisson - a well at the mouth with a depth below the freezing mark, with a diameter sufficient for placement and maintenance of equipment, the upper part is covered with a hatch, decorated in landscape design;
- installation of equipment - pumping station, filters;
Installation of equipment in a caisson
- production of a pressure main - the water supply from the source to the cottage is constructed from a polyethylene or steel pipe, lying below the freezing mark or heated by cable, polystyrene shells, laid inside a sewer pipeline with a diameter of 11 cm to ensure the maintainability of the pipeline;
Installation of a pipeline from the caisson to the house
- water supply connection - the wellhead is sealed with a head inside the caisson, insertion is carried out with fittings.
Head installation
If necessary, pumping and filtering equipment can be placed inside the house. If a tower scheme is chosen, an expansion tank is mounted in the attic. Then distribution manifolds are installed, water is distributed along the hot water supply, cold water circuits, and for irrigation.
Location of the pumping station and distribution manifold in the house
Taking into account the above, the water supply to the cottage can be organized independently according to any convenient scheme, taking into account the operational requirements and characteristics of the water intake source.
Some useful and important tips
A specially designed fitting made of brass is used to connect the check valve to the water main. For effective fixation at the fastening point, it is recommended to use a driving sleeve. In this way, a reduction in the cross-section of the pipe is prevented and the excess pressure created by the compression fitting is leveled.
The pump can only be connected to a special electrical cable for submersible models. The pump wire is attached to the power cable by soldering; twisting should not be used. Additional reliability of fixation is provided by heat-shrinkable sleeves.
The cable for immersing equipment into the casing must be made of stainless steel. Other metals are not resistant to moisture, and corrosion can destroy the suspension.
Required materials and tools
In order to quickly install a submersible or surface apparatus in a well, install a water pipeline into the house and install automation for starting and monitoring the water supply, it is necessary to carry out preparatory work.
Purchase materials and equipment that will be needed to install the system:
- submersible or surface pump;
- set of automation equipment with hydraulic accumulator;
- pressure hose;
- distribution tee for submersible version;
- check valve;
- coarse filter for surface version;
- fitting;
- insulation;
- geotextiles;
- stainless steel cable;
- cable for supplying electricity to the pump;
- auxiliary materials for fastening and waterproofing.
To carry out installation work you will need the following tools and equipment:
- Shovels, crowbar.
- Bulgarian.
- welder.
- Electric drill.
- Screwdriver.
- Roulette.
- Set of open end and socket wrenches.
Connecting the pump to the control panel
- hydraulic accumulator;
- pressure gauge;
- dry run blocker;
- start protection relay.
The hydraulic accumulator accumulates water through a built-in membrane.
The dry run blocker stops the operation of the unit and prevents overheating when the supply stops.
The functions of the blocker are supplemented by a start-protection relay, the contacts of which start and stop the process of pumping liquid.
The chain pressure gauge records the pressure inside the water supply. The regulator smoothly sets the current indicators.
Purpose and device
In order to maintain constant pressure in the water supply system of a private house, two devices are needed - a hydraulic accumulator and a pressure switch. Both of these devices are connected to the pump through a pipeline - the pressure switch is located in the middle between the pump and the accumulator. Most often it is located in close proximity to this tank, but some models can be installed on the pump body (even submersible). Let's understand the purpose of these devices and how the system works.
One of the pump connection diagrams
A hydraulic accumulator is a container divided into two halves by an elastic bulb or membrane. In one there is air under some pressure, in the second water is pumped. The water pressure in the accumulator and the amount of water that can be pumped into it are regulated by the amount of pumped air. The more air there is, the higher the pressure is maintained in the system. But at the same time, less water can be pumped into the container. Usually it is possible to pump no more than half the volume into the container. That is, no more than 40-50 liters can be pumped into a hydraulic accumulator with a volume of 100 liters.
For normal operation of household appliances, a range of 1.4 atm - 2.8 atm is required. To maintain such a framework, a pressure switch is required. It has two response limits - upper and lower. When the lower limit is reached, the relay starts the pump, it pumps water into the accumulator, and the pressure in it (and in the system) increases. When the system pressure reaches the upper limit, the relay turns off the pump.
In a scheme with a hydraulic accumulator, water is consumed from the tank for some time. When enough has flowed out for the pressure to drop to the lower response threshold, the pump will turn on. This is how this system works.
Pressure switch device
This device consists of two parts - electric and hydraulic. The electrical part is a group of contacts that closes and opens turning the pump on/off. The hydraulic part is a membrane that exerts pressure on the metal base and springs (large and small) with the help of which the pump on/off pressure can be changed.
Water pressure switch device
The hydraulic outlet is located on the back of the relay. This can be an outlet with an external thread or with an American-type nut. The second option is more convenient during installation - in the first case, you either need to look for an adapter with a union nut of a suitable size or twist the device itself, screwing it onto the thread, but this is not always possible.
The electrical inputs are also located on the back of the case, and the terminal block itself, where the wires are connected, is hidden under the cover.
Types and varieties
There are two types of water pressure switches: mechanical and electronic. Mechanical ones are much cheaper and are usually preferred, while electronic ones are mainly delivered to order.
| Name | Pressure adjustment limit | Factory settings | Manufacturer/country | Device protection class | Price |
| RDM-5 Gilex | 1- 4.6 atm | 1.4 – 2.8 atm | Gilex/Russia | IP 44 | 13-15$ |
| Italtecnica РМ/5G (m) 1/4″ | 1 – 5 atm | 1.4 – 2.8 atm | Italy | IP 44 | 27-30$ |
| Italtecnica RT/12 (m) | 1 – 12 atm | 5 – 7 atm | Italy | IP 44 | 27-30$ |
| Grundfos (Condor) MDR 5-5 | 1.5 – 5 atm | 2.8 – 4.1 atm | Germany | IP 54 | 55-75$ |
| Italtecnica PM53W 1″ | 1.5 – 5 atm | Italy | 7-11 $ | ||
| Genebre 3781 1/4″ | 1 – 4 atm | 0.4 – 2.8 atm | Spain | 7-13$ |
The difference in prices in different stores can be more than significant. Although, as usual, when buying cheap copies, there is a risk of running into a fake.
What is a surface pump
There are two types of pumps – submersible and surface pumps. You can guess their differences from the name, but to better understand the difference between these devices, you need to know their important characteristics. We will not understand the design, but will only discuss the most important differences.
8 meters is, of course, not enough to extract high-quality water suitable for drinking, so this equipment is supplemented with remote ejectors - devices that help increase the lifting depth to 40 meters.
The average productivity of a surface pump is not at a very high level - from 1 to 4 cubic meters per hour, but this is absolutely enough to meet all the household needs of even a large family.
The operating pressure that the equipment creates also varies greatly from model to model. Simple devices have a reading of about 2 Bar, while more powerful ones can reach up to 5, which is equal to 20 and 50 meters of water column, respectively.
Submersible pumps are lowered directly to the bottom of the well and controlled by a remote unit. They do not draw in water, but push it into the pipeline system, which makes it possible to use such equipment even in very deep wells. 200 meters is not the limit for them, but this applies to industrial equipment. For domestic use, you simply select a model of the required power for the depth of your well.
Such equipment can provide very high water consumption - an average productivity of about 10-15 cubic meters.
Rules for installing the surface version
Installation of a central heating unit on the surface is limited by the suction height, which in most cases is 6-8 m. However, this option is acceptable for lifting water from a well or shallow wells. The surface pumping station is installed in a pit (caisson) 2-3 m deep. The walls are laid with brick or concrete and insulated. The station is installed on a foundation to reduce vibration. The suction pipeline is equipped with a filter with a check valve, which should be located no closer than 0.8 -1 m from the bottom of the source.
The rules for choosing a surface pump are identical to a deep pump. In some cases, a separate arrangement of the central heating unit and the battery is used. Then the CN is lowered into the well and suspended on a rope. The inlet pipe with check valve and filter is shorter, which simplifies the start-up and operation of the unit. With this installation, the likelihood of cavitation and dry start-up is reduced. The hydraulic accumulator is placed in a pit and is equipped with a pressure switch and an additional check valve.
Well pump assembly
Installation of all elements is carried out in the following order:
1. If the well pump does not have a check valve, it must be purchased and additionally installed first.
2. Next, the transition fitting and fitting are installed. Their purpose is to ensure a tight connection between the HDPE pipe and the well pump.
When installing these elements, care must be taken to ensure the tightness of all connections. Otherwise, subsequently, under pressure, a leak will form in these places and some of the water will return back into the well.
You also need to pay attention to the required dimensions of the connections. Otherwise, the connecting elements will have to be changed again, going back to the store
3. The well pump is fastened to the safety cable. The diameter of the cable is selected based on the depth of the well. The larger it is, the greater the mass of the water supply structure, but with the water in the pipe it will be pulled down.
For fastening, the pump has 2 ears symmetrically located opposite each other. It is recommended to pass the cable through both ears. In this case, the pump will hang straight and, if necessary, it can be easily pulled out of the well.
When the pump is tied by only one ear, when it is pulled out, it begins to warp inside the well, and difficulties arise.
4. To fix the end of the cable, special clamps are used, which will prevent the cable from being disconnected from the pump. Don't try to tie a knot that will eventually loosen and cause the cable to slip out.
5. A sleeve is inserted into the HDPE pipe and the fitting is assembled. The fitting consists of a nut, a ferrule, a pressure ring and a rubber sealing ring.
When installing the crimp ring, you need to pay attention to the direction of the teeth on the inside of it. If this element is not installed correctly, the pipe will not be tightly fixed.
6. HDPE pipe is inserted into the pump. Fitting connections are pulled. When installing, you must carefully handle the rubber sealing ring, which must not be damaged.
When tightening all threaded connections, special wrenches are used.
7. The cable is being connected to the pump cable. Here it is necessary to take into account that the connection point must be absolutely sealed.
Otherwise, moisture entering the loose connection will oxidize all contacts, and then close. As a result, the pump may fail. In order to avoid this, you need to use heat-shrinkable sleeves or filler sleeves.
8. The safety rope and extension cable are fastened to the HDPE pipe.
It is strictly forbidden to tightly fix the cable and cable to the pipe itself. Otherwise, for example, a cable may break as a result of the pipe itself being stretched by water pressure.
For fixation, plastic clamps are used at intervals of 1 meter.
9. An HDPE fitting is also installed, which will be necessary when installing the downhole adapter.
Or if a borehole caisson head is installed. You should not immediately fix the head on the pipe, so that after immersing the pump in the well, you can select the place where the pipe will be cut off and tighten the fasteners of the head there.
10. Be sure to secure the opposite end of the cable to any large and immovable object for safety purposes.
Connecting the water pressure switch
The water pressure switch for the pump is connected to two systems at once: electricity and water supply. It is installed permanently, since there is no need to move the device.
Electrical part
To connect a pressure switch, a dedicated line is not required, but is desirable - there is a greater chance that the device will work longer. A cable with a solid copper core with a cross-section of at least 2.5 square meters must run from the shield. mm. It is advisable to install a combination of automatic + RCD or difavtomat. The parameters are selected based on current and depend more on the characteristics of the pump, since the water pressure switch consumes very little current. The circuit must have grounding - the combination of water and electricity creates a zone of increased danger.
Connection diagram of the water pressure switch to the electrical panel
The cables are inserted into special inputs on the back of the case. Under the cover there is a terminal block. It has three pairs of contacts:
- grounding - the corresponding conductors coming from the panel and from the pump are connected;
- line or “line” terminals - for connecting the phase and neutral wires from the panel;
- terminals for similar wires from the pump (usually on the block located above).
Location of terminals on the body of the water pressure switch
The connection is standard - the conductors are stripped of insulation, inserted into the connector, and tightened with a clamping bolt. By pulling the conductor, check whether it is securely clamped. After 30-60 minutes, the bolts can be tightened, since copper is a soft material and the contact may weaken.
Pipeline connection
There are different ways to connect a water pressure switch to the plumbing system. The most convenient option is to install a special adapter with all the required outputs - a five-pin fitting. The same system can be assembled from other fittings, it’s just that it’s always easier to use a ready-made version.
It is screwed onto the pipe on the back of the housing; a hydraulic accumulator, a supply hose from the pump and a line that goes into the house are connected to the other outputs. You can also install a mud pan and a pressure gauge.
An example of tying a pressure switch for a pump
A pressure gauge is a necessary thing - to monitor the pressure in the system, monitor the relay settings. A mud trap is also a necessary device, but it can be installed separately on the pipeline from the pump. In general, a whole system of filters for water purification is desirable.
With this scheme, at high flow rates, water is supplied directly to the system - bypassing the hydraulic accumulator. It begins to fill after all the taps in the house are closed.
How to properly lower a submersible pump
Do-it-yourself installation of a pump in a well is carried out after studying the instructions with drawings for installing the pump and gaining practical experience using the videos below.
In accordance with the passport data for the excavation and the immersion depth, the downhole unit and materials are selected. When assembling the structure and installation work, two or three people are involved, sequentially, step by step, performing the following operations:
- We check the project package and lay out the submersible pump, pressure hose, control cable, cable and fasteners for assembly.
- We begin assembly by installing the check valve into the outlet on the pump using an adapter fitting. In this case, we take into account the direction of movement of the liquid, indicated by the arrow on the body.
- We cut the end of the pressure pipe at an angle of 90 degrees to the axis, put a plastic coupling with an O-ring on the hose and insert it into the body of the adapter fitting screwed into the valve. Tighten the coupling nut to secure the connection.
- Using a heat-shrinkable sleeve, we connect the control cable to the engine, and fill the entry point of the wires into the unit body with waterproofing glue.
- We insert a safety rope into the eyes on the device body, bend the threaded end into a loop and, using a special lock and a pressure washer, connect it to the main part of the rope.
- To prevent the cable and cable from touching the column when lowered into the shaft, we connect it together with the hose into a single strand using plastic clamps. A meter from the pump, we fix the ties every 20 cm, and then every meter to the top of the casing.
- Using a grinder, we cut off the casing pipe to the bottom of the caisson and install the head on the end. The cover serves to protect the well from debris, and it has holes for a pressure hose, cable and safety rope.
- We thread the hose, cable and cable into the holes on the head. We cut off the pressure pipe at the level of the lid and insert an angle fitting into it to connect to the water main laid in the trench to the house. We attach the safety cable to the casing carabiner. We lay the cable in a trench and lead it into the technical room.
- If the well is drilled no further than 5–7 meters from the house, the connection is simplified and a caisson is not installed. The pressure pipe is cut off at ground level and, together with the cable, is led through the head into the technical room in an insulated tray. To prevent the water from freezing in winter, a heating wire is inserted into the main hose, and a check valve is not installed on the pump. After injection, the liquid flows back, and the HDPE pipe remains dry.
When installing a water pipeline into a house below the freezing point of the ground, a trench is dug to this level. A hole is drilled in the casing pipe, at the bottom of the ditch, into which the adapter is fixed. Through an adapter, a pressure hose and control cable are inserted into the house through the trench.
Determining the pump operating point
Correct installation of a deep-well pump requires clarification of its characteristics during operation in standard mode. To do this, you will need to determine the water consumption for a single period of time.
After measurements are taken, the indicators are compared with information from the technical documentation. If the actual data exceeds those recommended by the manufacturer, the unit valve should be slightly moved. Due to additional resistance, the parameters are normalized.
Laying pipes when carrying water to a private house from a well
If your cottage permanently houses no more than 15 residents, water pipes with a diameter of 2 cm are suitable. They must be laid at a depth of at least 150 cm, that is, below the freezing point of the soil. To prevent water from freezing even at -35 degrees Celsius, it is important to use insulation, such as mineral wool. When the pipeline is on the surface, it will have to be insulated.
To install water supply in the local area, the pipes should be buried and an electric cable should be laid for heating.
When installing pipes, they are joined using a hair dryer or soldering iron. Such welded joints are strong and reliable. To cut pipes you will need a hacksaw. The best option is to use a lever cutter; it is usually included with the soldering iron. The pipes are placed in trenches and then brought into the residential building through openings.
Pipeline equipment is the final stage of external work. First of all, you need to drill a hole in the walls of the house, the diameter of which is 5 cm. Then it needs to be sealed with a sleeve, into which you then insert a pipe. After this, the hole is closed with construction foam, and finishing work is carried out on the surface.
;
Water
Did you find this article helpful? Share it with your friends:
Choosing a pump for a well
- choose exclusively from downhole-type centrifugal units, since other types, in particular vibration, are intended for other operating conditions. The price of such devices is the lowest on the market, and the quality is correspondingly the same;
- One of the most important characteristics is the performance of the pump, which, first of all, must meet your needs. By performance we mean the number of liters of water that the device can pump in one hour. You need to rely on a level of productivity that will ensure an uninterrupted supply of water to the target locations;
- Also, the diameter of the pump housing is considered important. This value must correspond to the internal diameter of the casing pipes, which are the walls of the well. Here it is necessary to take into account that the closer to the bottom of the well, the smaller its diameter.
Installation of a water purification system
To choose the right water treatment system, you need to submit water from the well to your home for analysis in a laboratory. After the research, you can find out what impurities and mineral salts are contained in the water and in what quantities. Based on these results, filter elements can be selected. A distance of about 1 meter must be maintained between the cleaning system and the hydraulic accumulator. The water must flow in two directions: the first pipeline is the cold water supply, the second is the hot water supply system. Shut-off valves are installed at the cold water inlet.
With the correct solution to the problem of how to supply water from a well to a house, the finished water supply system in the house should ensure an uninterrupted supply of cold and hot water to each water supply point. For hot water supply, a drain tap is installed on the pipe under the heating element, and the water supply pipe leaving the heater is equipped with a similar element. In addition, you need to consider installing an expansion tank and a safety valve.
What do you need to know about the well?
Each aquifer is individual according to its main characteristics. This means not only the diameter of the casing pipe and the total depth (distance from the mouth to the bottom), but also the following indicators:
- static water level;
- dynamic water level;
- well flow rate (inflow).
This data is always available in the passport of the aquifer, and it directly affects not only the immersion depth of the well pump, but also the choice of its optimal power and performance. Let's figure out what each of these characteristics means and how it affects the installation depth of the water pump.
If water is not taken from the well for a certain period, a constant level will be established in the cavity of the casing pipe. The resulting water column balances the pressure in the aquifers, which is stable there. For this reason, the level is static, that is, constant. It may vary slightly throughout the year depending on the hydrological situation and the intensity of water withdrawal from a given aquifer by neighboring wells. As a rule, the deeper the well, the more stable this well indicator is.
This indicator depends on two factors:
- pump performance;
- water flow into the well.
That is, the dynamic level is not a constant value, because it is possible to replace the pump with another one with different characteristics; the flow rate of the well can also undergo changes during the siltation process. But it is precisely this characteristic of the water-bearing structure that is of most interest when choosing the correct immersion depth of the water pump. After all, in order to ensure that the submersible pump does not turn out to be dry during water intake, it must be placed at least a meter below the minimum dynamic level in the casing pipe. This is due to the characteristics of well pumps, which you will learn about below.
How to hang and secure with your own hands
To prevent the device from ending up at the bottom during operation, it is necessary to securely fasten it with a hose to the wall of the shaft on a metal structure.
- A square-shaped frame with brackets at the corners for fixing to the wall is made from a steel corner using a welding unit.
- Two channels are welded along the diagonals of the square, and a hole is made at their intersection.
- The frame is rigidly fixed on top of the mine casing using brackets.
- A steel cable is passed through the hole in the channel, and a loop is crimped at its end to hold it on the structure.
- The pump is suspended from the safety rope and is used to remove it from the well.
Care and maintenance
Inexpensive ovens do not have a self-cleaning system or a special protective coating. Such models will have to be cleaned manually using cleaning products. The main thing is to use gentle sprays, powders, gels
It is important to remember that pre-soaked stains are easiest to remove.
Cleaning the oven will be faster if all dirt is pre-soaked.
Mid-price slabs are covered with enamel, which can be easily cleaned with a damp cloth. To remove dried dirt, you will need to use mild cleaning agents.
Expensive models are equipped with a self-cleaning system, without requiring any mechanical action to remove contaminants. Simply wipe the surface with a damp cloth.
Expensive models of ovens are equipped with a self-cleaning system that is very convenient for housewives.