When using rigid roofing materials such as asbestos cement, metal tiles, etc., the problem of sealing the joints of planes and transitions naturally arises.
Any joint option creates a gap that must be securely covered, otherwise it will form an area of active leaks.
Since the roofing material itself is sheet, to solve the problems of joining planes, special elements are produced - extensions.
They are developed in such a way as to provide the necessary protection against water entering the under-roof space, and also to ensure that the appearance corresponds in all respects to the original type of material, creating a set of similar elements. One of them is the roof ridge.
Roof ridge
The ridge of the roof of a house is a useful element necessary to create the upper part of the roof. It unifies the roofing material and completes the entire “composition”.
The roof ridge serves several basic functions :
- Protection from water after rain or melting snow.
- Creating the necessary gap for ventilation of the space under the roof - so that the covering can dry out after rain.
These two problems can be solved at once if you choose the material wisely. Particular attention should be paid to the shape of the skate.
Purpose
- Protection of thermal insulation and rafter system from the effects of precipitation, wind and direct sunlight.
- Protecting the attic from the entry of animals, birds and various debris.
- Fastening chimneys and vents.
The ridge is located from the back of the house to the front. Its length is almost always equal to one run. The rafter system rests on it.
Types of skates
Since there is a wide variety of roofing and how to install it on the market, it is obvious that the ridge models also differ.
Variety of roof ridges Source azh.kz
types of roof ridges are available for sale :
- Semicircular . This variety does not have ribs. After installation on the roof, an air cushion is formed from the inside of the dome, which provides high-quality ventilation of the space under the roof. The ends are equipped with plugs, which create a finished look and also prevent moisture from entering through the cut of the ridge.
- Straight is the simplest type, which does not require end caps. The ridge is suitable for different types of roof coverings.
- Narrow . This skate plays the role of not only protection. It is often purchased as a decorative element that can be placed on a gazebo, the roof of a private house and similar structures.
- Curly or curved . This is the most difficult type of skate. The unique profile provides increased ventilation properties.
It is important to know that to connect straight skates, it is necessary to use T or Y-shaped elements, with the help of which the strength and tightness of the transitions are achieved.
Additional elements ensure the tightness of the transitions Source kabel-house.ru
All types of skates have only the two tasks described above, and the difference between them is solely in the installation methods, which are due to differences in shapes.
Advantages of a geodesic dome project
Although the author's architectural design of a geodesic dome has not become widespread, it still has a number of significant advantages given to it by its spherical shape:
- Although rectangular and round structures are equal in area, the internal volume of the latter is much larger. Thanks to this, significantly more air and light enter the room. In addition, the round design saves up to 30% of material.
- The rounded shape of the roof reduces heat loss in winter, as well as minimizes heat absorption in summer. Consequently, the cost of heating or cooling the space is reduced by approximately 30%.
- The small mass of the geodesic dome frame allows you to do without a reinforced foundation under the house.
- In a building with a round dome-shaped roof, you can arrange any number of windows, up to full glazing of the dome structure. At the same time, there is no need to worry about the strength of the roof - it will retain all its characteristics.
- The ball-shaped roof allows you to distribute the load as evenly as possible, so it is not afraid of even very heavy winter snowfalls.
- Thanks to its aerodynamic properties, the dome will not be damaged by a strong gust of wind.
- A rounded roof transmits significantly less external noise inside the building, that is, it provides sound insulation.
- A symmetrical spherical roof is best suited for housing solar panels and modules.
- This roof design is simply very beautiful in appearance and looks very original.
Basic elements of a skate
A roof ridge is a system of several parts. The composition may include waterproofing, bars for installation, or sealing parts.
The number of components depends on several factors :
- Dimensions of the roof where the equipment will be installed.
- Absence or presence of a ventilation system under the roof space.
- The roofing material itself , as well as design features.
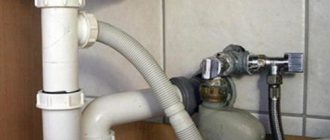
The main element (in addition to the body), which is installed on all skates, includes a waterproofing layer that protects the roof from water ingress. If the house is located in a windy area, then manufacturers install sealing elements on the material that will prevent wind from entering the under-roof space.
Details that will help solve the problem with sealing roof joints Source chastnyjdom.ru
See also: Catalog of companies that specialize in roofing materials.
Installation work: features
Before installing the ridge, the sheathing in the under-ridge space must be ready. It is made from several boards, which are nailed without gaps. You should start installing the ridge on the opposite side to the wind on the terrain.
Note! The ridge needs to be installed in dry weather without wind. Safety devices should be used. Before starting work, you should not consume strong medications or alcoholic beverages. .
Installation of a straight ridge
Installation work should be carried out with high-quality tools, assistants, and insurance. The ladder must reach the installation site with a margin.
Roof ridge, installation procedure:
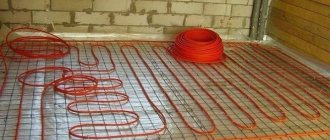
- The roof sheathing is covered with a polyethylene film for waterproofing. The film thickness should not be less than 200 microns.
- A sealant is installed on the waterproofing to ensure high-quality ventilation of the ridge space. The type of material depends on the roofing material.
- Installation of the ridge strip is carried out using self-tapping screws or slate nails. Be sure to use elastic pads. It is better to buy them, since homemade gaskets made from conveyor belts may not always match the color of the roof.
Special attention should be paid to the quality of screws. They must be sharp so as not to warp the material. When screwing, the head of the screw should fit snugly against the roofing material, but not deform it.
Round ridge strip
This type of ridge construction is used on metal roofing. In order to reliably cover the space between the slopes, they should not be separated from each other by a distance of more than 20 centimeters. Installation procedure:
- Install a seal made of fiberglass or mineral wool. The ventilated space should be covered with a counter-lattice.
- Secure the ridge parts using self-tapping screws with seals.
- Close the ends of the ridge with plugs.
The roof covering can be additionally fixed. To do this, use a block of 50 by 100 millimeters. Lay a metal tape 0.5 millimeters thick on top of it. The tape is secured to the edges of the ridge with self-tapping screws. This guarantees reliable fastening of the structure and no damage even in hurricane winds.
Note! The closer the two slopes are located to each other, the easier it will be to close the gap between them .
Skate length calculation
In order to correctly select the length of the roof ridge, it is necessary to determine the number of additional elements as well as all components - waterproofing system, sealing materials, fasteners. The basis of calculations is a construction plan, which indicates the entire projected length of the story, as well as the materials that will be used.
It is important to understand that all calculation data is an individual project, which depends on the supplier’s recommendations after studying a specific roof. Calculating materials is very simple - you need to start from the length of the entire roof, the number of ridge strips with a 5-centimeter overlap (this nuance is required).
Much more problems arise with the organization of substrates - ridge bars. They are necessary for correct and even fastening of the planks. When a stable system is ready for installation, it is necessary to accurately select the roofing material in order to then select substrates according to specific profile dimensions.
Ridge bars Source steelcap.ru
The problem may arise due to the varieties of pipit. It is also problematic to determine any general system for placing support strips. The fact is that the type of fastening and sealing of elements requires an individual approach, so in order to accurately calculate all the necessary nuances, it is advisable to carry out installation on a test strip. This will allow you to make some changes or adjustments to the substrate. This is exactly how roofing and ridge installation professionals work.
In order for the roof ridge to be installed without defects, it is necessary to choose the right construction company to install the equipment.
Making your own comb
A factory-made skate can be expensive. With the correct calculation of the parameters and the availability of material, you can make the structure yourself. The material should be galvanized iron or stainless steel sheet.
It is advisable to make the roof ridge yourself if the above material is not available. In addition, tinsmith skills, tools and equipment are required.
Materials:
- Steel – galvanized or stainless steel.
- Copper.
- Aluminum.
The thickness of the material can vary between 0.4 - 1.5 millimeters. The master’s task is to make a product of a suitable shape from the blank. In this case, the following rules must be observed:
- The painted material must not be damaged. Otherwise, the anti-corrosion properties will disappear.
- Bends should be made parallel to the axis.
- The tool must not leave any dents.
- The individual ridge strips must be the same size.
Calculation for self-production
For the correct design you will need to calculate:
- Corner.
- Height.
The parameters are interrelated - the angle depends on the height and material of the roof. When calculating the angle, you should follow the recommendations:
- For a roof covered with roofing felt or ondulin, the ridge angle can vary from 12 to 85 degrees. Personal preferences and wind intensity play more of a role here.
- For slate roofing, the angle required is from 15 to 60 degrees.
- It is imperative to take into account the aesthetic side of the structure. With a flat roof, the view of a private house will be spoiled. A high roof will seem excessive. However, in this case, minor defects in manufacturing and installation are not critical.
Ridge installation steps
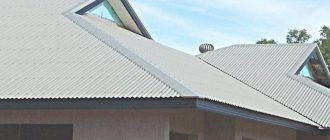
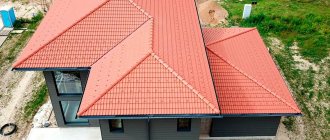
The ridge must be installed at the moment when the roofing covering is completely placed and secured to the roof. The last row should be completed in such a way that the ventilation gap between the slopes is not very large. And a ridge is needed to block it.
The ridge is placed on a fixed roof covering Source ar.decorexpro.com
Construction of houses
0 votes
+
Vote for!
—
Vote against!
Do you want your home to look like a medieval castle or palace? Design a conical roof. This option makes the building fabulous and solemn. Learn about the secrets of installing a conical roof truss system and get valuable advice from specialists in its repair.
Table of contents:
- Advantages of constructing a conical roof
- Types and design of conical roof
- Conical roof construction technology
- General recommendations for installing roofs with conical lathing
Advantages of constructing a conical roof
A conical roof is installed in round buildings. Among the advantages we note:
- unusual and attractive appearance;
- ease of maintenance of the structure;
- long service life.
Disadvantages of roofing with circular sheathing:
- complex calculations for its construction;
- problems with repairs;
- high price;
- difficulty of installation;
- a large number of materials for roofing.
A conical roof is installed over a structure of a round or multifaceted shape. The rafter system is installed in such a way as to ensure a uniform slope of the rafters. Additional elements in the form of purlins serve as supporting elements. The upper, annular part of the purlin is fixed on the central pillars and takes on the load from the tower. The second support point is a ring Mauerlat installed on the wall of the tower. Ceiling beams are designed in such a way as to distribute the load evenly at the location where the central support element is installed.
The ring girder is fixed with braces. High-quality circular roofing requires careful calculations of each component of the system. If you do not have experience in carrying out this type of work, we recommend that you contact specialists in the preparation of project documentation.
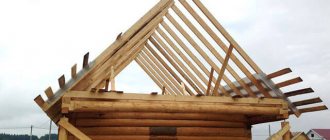
If the rafter system is made of wood, then use laminated veneer lumber for these purposes. Especially if the roofing is finished with natural tiles. The lathing under it must be highly durable and powerful.
The conical roof is finished with bituminous shingles, wood shingles or metal. The use of wavy materials on a round roof is impractical. Joining the material will take a long time and will require increased costs. In addition, the aesthetic appeal of the roof is reduced and water flows between the joints.
Types and design of conical roof
We offer you to familiarize yourself with two options for round roofing:
- dome;
- church-onion.
A dome roof, unlike a cone roof, does not have layered rafter elements. The rafter system in a domed roof is suspended. The hanging parts form a three-hinged arch, which is connected on one side to the Mauerlat, and on the other to the support ring installed on top.
To design a domed roof, you must have enormous experience and technical knowledge of “Theory of Mechanics” and “Sopromat”. Otherwise, we recommend contacting construction companies dealing with similar issues; they will help you correctly draw up drawings of the circular roof sheathing.
To calculate a domed roof made of wood, follow these steps:
- loads acting on the rafter system;
- fixation of arches on the central support and ventilation lantern;
- top of the dome part;
- locking hinge, at the top of the dome;
- appearance of ventilation holes.
A semicircular design can be achieved by making a ring sheathing. It is installed on additional racks resting on hanging rafter arches.
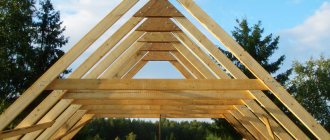
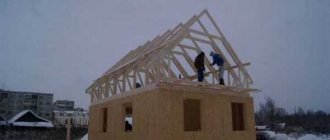
Another method of installing a dome roof was proposed by R. B. Fuller, an architect from America. The design is formed using triangles. This dome is called “geodesic”. The complexity of calculations in organizing such a roof and its unusual appearance have not made it popular in architecture.
There are two ways to fix the dome using the “geodesic” system:
- connector - to connect triangles, pieces of timber and special fasteners are used;
- connectorless - all the triangles are assembled in advance, and the overall structure is assembled on the roof.
Among the advantages of such a roof we note:
- the possibility of its full glazing;
- ease of snow removal;
- excellent resistance to wind threats;
- originality of appearance;
- the possibility of organizing your own greenhouse on the roof of the house.
The maximum internal volume of a geodesic roof allows you to make identical rectangular structures and increases the amount of light and air in the room. In summer, heat is absorbed by the roof, and in winter, on the contrary, it is dissipated. This reduces space heating and cooling costs. A geodesic dome does not require an expensive foundation due to its lightness. The dome structure is highly resistant to wind and weather conditions. Also, we note the excellent soundproofing characteristics of the structure, due to its extraordinary shape.
The onion roof is most often installed on Orthodox temples and churches. In private housing construction, this roofing option is less popular. If the dome diameter is less than 300 cm, its frame part is made of wood.
The specific shape of this roof is called “crane”. This version of the rafter system is called layered. To give additional rigidity to the roof, elements are installed in the form of braces and struts. They take on the maximum load. To cut out the crane, special patterns and boards are made, the minimum thickness of which is 40 mm. The central pillar serves as a support for the “cranes” and as a place for mounting the cross on the dome.
If metal is used for further finishing of the dome, then the crate is mounted on the cranes in increments of 30 cm. It is possible to finish the dome using a scaly roof. In this case, an additional element for fastening it is installed under each scale.
When restoring a church dome, it is covered with an aspen ploughshare. They are mounted in such a way as to prevent moisture from entering between the rows. Domes of this type are characterized by the complexity of design and installation. Only professionals can perform high-quality work. If the diameter of the dome is more than 300 cm, then steel is used for its frame. To fix the cranes in this case, metal spacers are used. The sheathing is made of steel strips installed in increments of 40-50 cm. Seam metal is used to finish the roof.
Conical roof construction technology
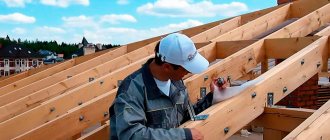
We offer the option of creating small cone-shaped towers adjacent to the house. Such a roof is not the main one, but its design requires special knowledge. The rafter system in small towers is installed in a fan-shape. The common central post is where the rafter legs diverge. An additional supporting function is performed by purlins; laminated wood is used for their manufacture. There are two options for purlins - upper and lower. Each of them performs the function of uniformly distributing the load. After developing the conical roof design, the wheels are made. The ends of the rafters are fixed on a semicircle, thus increasing the strength of all connections.
For additional stability of the roof, the lower plane of the rafters is sawn at a certain angle. Use steel angles to secure wooden parts.
When calculating the number of rafter legs for a cone-shaped roof, take into account such points as the cross-section of the material from which they are made and the interval of their installation. On the underside of the roof, the spacing between rafters should be minimal. Thus, the lathing for further finishing of the roof will be made with the smoothest possible bend. To do this, an additional spacer with a smaller cross-section is placed in the lower part between the main beam; it will make the surface more durable and neat.
Next, install the drainage gutter. Their semicircular versions are made exclusively to order. To assemble the system yourself, it is enough to use small sections of ordinary straight gutters, connecting them at the desired angle. All connections must be tight and neat.
Take care of the sheathing, which is most often created using wooden beams, flexible plastic parts or ordinary water pipes. The load-bearing capacity of the latter elements is only suitable for supporting a small-sized roof used as decoration, but not for the main domed roof. For additional strength, fold the pipes or beams in half. To fix them on the rafter system, use self-tapping screws.
The cone-shaped roof is finished using the seam method. The tiles are laid on the surface of shingles or reeds. When finishing the roof with tiles, take into account the fact that the width of the tiles increases from top to bottom. Therefore, choose special versions of conical tiles to avoid sloppy joints. Calculate the length of the rafter elements, the total area of the roof, and based on this, purchase the required amount of finishing materials.
Install trim from bottom to top. Each tile is installed with a slight overlap in relation to the side and underlying ones. At the junction of the roof and the outer wall, install waterproofing.
General recommendations for installing roofs with conical lathing
Check out the features of constructing a conical roof:
1. The slopes are brought to the roof surface at least thirty centimeters.
2. A standard beam is installed on a regular concrete floor, and the rafter system is fixed on it.
3. For a tighter connection of the end sections of the rafters, we recommend sharpening them.
4. The upper parts of the rafters are installed on a semicircular support and connected to each other using steel corners.
5. The sheathing is made of semicircular bars: long and short elements.
6. For roof waterproofing, we recommend using rolled materials laid overlapping, with mandatory gluing of all joints.
7. Before tiling, secure the drainage systems.
8. The installation interval of the sheathing is determined by the type of roofing finishing material.
9. Using tapered tiles, pre-label the elements of each row. Reduce the amount of material for each individual row.
Flexible or bituminous shingles are installed on a solid base. For these purposes, thin-sheet plywood is most often used. To create a thermal roof, additional insulation, vapor barrier and waterproofing are installed.
The plywood is cut into a trapezoidal shape and laid from bottom to top. The thickness of the layers of plywood covering should be at least 12 cm. That is, using 4 mm plywood, lay it on the base in 4 layers. Next, moisture protection and bitumen shingles are installed.
A steel ridge is installed on the top of the cone-shaped roof. For its manufacture, steel, copper, aluminum, and stainless steel are used. Additionally, if necessary, install a weather vane.
When choosing a tool for constructing a conical roof, you need to take into account the materials used for the sheathing and roof finishing. At the same time, if the sheathing is mounted from wood, then you will definitely need a jigsaw, a hammer drill, and a screwdriver. When using steel materials, stock up on a grinder with cutting discs, metal drills and an electric drill.
Video on installing a conical roof: