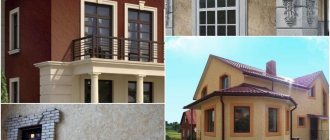
Clinker tiles are a fairly popular material for finishing facades today. The walls of a house can be made of completely different materials. The building turns out to be aesthetically attractive, insulated if necessary, and the walls do not lose their ability to breathe. Products can be mounted in one of several ways, which differ in the need for additional layers. The cladding of external walls can be carried out according to the principle of a ventilated facade. There is no need to unstitch the seams after completion of the work.
What are clinker tiles for facades?
Facade clinker tiles are a material for exterior finishing that withstands frost and temperature changes well. It is based on environmentally friendly raw materials. The products are wear-resistant and durable. They have low water absorption and low operational requirements.
Traditionally, this type of finish contains clay, and you can recognize the product by its sound—by tapping the surface a little. The tiles are made by firing raw materials, which allows the material to obtain its unique properties.
The thermal conductivity of the products is quite insignificant and amounts to 0.021 W/(m K), and the density reaches 55 kg/m3. Finishing the facade of a private house with clinker tiles can be done using different materials, including:
- wood;
- brick;
- concrete.
Properties of clinker
The advantage of the material comes from the peculiarities of its production - firing at high temperatures. Thanks to it, clinker is the most durable compared to other types of brick. It is not negatively affected by moisture and temperature changes.
If you compare clinker with ordinary bricks or tiles, it has the highest mechanical strength. It is characterized by excellent compressive and flexural strength, and the tile surface is much more resistant to abrasion. An equally important property is low water absorption (from 1 to 6% by weight), which is explained by the density of the structure. Thanks to this, the material is frost-resistant. It is better to choose products with compositions based on shale clay, without harmful additives.
Let us highlight one more positive property - a high level of vapor permeability, which makes the material optimal for arranging a multi-layer facade.
Main types of clinker tiles
The described brick tiles can be classified according to several criteria. Among the main varieties are:
- heat resistant;
- facing;
- technical;
- moisture resistant.
One of the most popular is technical clinker. It is based on clay and a minimal amount of additives. A special requirement is placed on facing products, as they must have the most attractive appearance. If you need to finish an area that is exposed to increased moisture, you can use clinker tiles for the base. It has moisture-resistant characteristics and is characterized by reduced water permeability. The structure has small pores, the tile retains its original geometric parameters even with constant contact with water, in addition, it is frost-resistant.
Clinker sills for windows
Clinker brick, for the production of which refractory clay is used, is distinguished not only by its high strength, but also by its richness of color shades. Bricks are available in colors ranging from beige to dark brown. Therefore, clinker is often used for exterior decoration of buildings.
In such cases, it is advisable to use it as a material for drainage. Clinker drainage systems are beautiful and durable.
Characteristics of clinker drains
Depending on the production technology, clinker drains may have different surfaces:
- rough;
- smooth - glossy or semi-glossy.
The latter options provide better drainage.
Clinker drains are characterized by different surface shapes. For example, those parts that rest on window sills should have a steep elevation. It will prevent raindrops from splashing and protect the wooden window frame from getting wet. The outer part of clinker drainage systems (drip pan) is made with some hanging down - this allows water to pour out in a direction parallel to the facade of the building.
Clinker drains are made solid and hollow. For installation, solid elements are usually installed along the edges of the window niche, and hollow elements are installed in the middle. Therefore, before you buy window sills, you need to measure the windows and window sills.
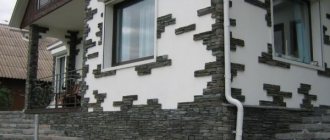
What is the difference between clinker facade tiles and other types?
When finishing a façade with clinker tiles, a material is used that does not imitate brick, but in fact is brick. This is the main difference between such products and other varieties. The decor has only a less impressive thickness; it is also distinguished by the method of installation, because the installation is carried out on a frame.
Additional distinguishing features are durability and strength. Since the raw material is exposed to high temperatures during the production process, it acquires the qualities of strength and ability to withstand the effects of water that are characteristic of natural stone. Clinker tiles for facades cope well with mechanical impacts; dents and scratches do not appear on its surface.
Another distinctive feature of the described finish is its wide range of applications. The products are used not only for the facade, but also for paving paths, lining pools, stairs and steps. The material does not mold, and its operating conditions can be the most difficult. All this makes this material one of the only possible solutions in some cases.
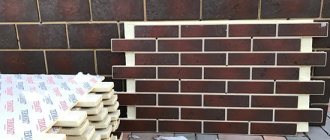
Facade thermal panels new clinker technologies
Facade thermal panels with clinker tiles are an excellent option for those who want to provide home insulation and get an attractive facade. The quick installation and good thermal insulation properties of such finishing have led to the popularity of thermal panels for finishing both private and public buildings.
Clinker thermal panels have a huge range of colors
There is a wide range of such materials on sale, but they are all quite expensive. At the same time, they demonstrate an optimal price-quality ratio, since they do not require special care, do not absorb moisture and ensure installation in the shortest possible time.
Using clinker for the facade, the homeowner is guaranteed to receive a spectacular, solid, respectable exterior decor, and at the same time protection of the walls from mechanical influences and natural factors. With significant costs for such finishing, you can count on a long service life , which makes it profitable in the long term.
Advantages and disadvantages
Clinker brick tiles have many advantages, but are not without their disadvantages. In addition to the above positive properties, it can be noted that the finish has a uniform tone, copes well with chemical influences and is wear-resistant.
Clinker tiles for facades can be selected from a wide variety of colors, textures and shades. Products can have completely different formats, which makes the appearance of the house unique.
An important factor when choosing a finish for a facade is the ease of maintenance of the material. Brick-like facing tiles are also good because they do not attract dirt and are easy to clean. External walls do not fade over time, as the decor is UV resistant. Laying is quite simple, and you can do it yourself without spending money on the services of professionals.
Facade clinker slabs seem to be good in everything, but, of course, they also have their drawbacks. One of the main disadvantages is the high cost, but the high cost is quickly justified by the excellent performance characteristics. The consumer may also be frightened by the impressive cost of adhesives and grouts, the first of which, however, may not be used during the installation process.
Features of aerated concrete walls
External walls made of aerated concrete are located on the border of different environments - warm and humid indoor air and cold, dry outdoor air. They perform the functions of enclosing structures, although they do not have any special mechanical qualities. At the same time, experience in using the material in European countries (for example, there are houses about 80 years old in Riga and some cities in Germany) has shown that the material, if kept in acceptable conditions, can serve for a long time and without loss of performance qualities. Moreover, there is no exterior decoration on these houses.
In more severe climate conditions, which are typical for most regions of our country, one cannot count on such a long service life. Moreover, they used to build from non-autoclaved aerated concrete, which gains strength over time. Today, autoclave material predominates, which does not change its properties and only gradually loses strength (albeit very slowly).
Finishing cannot be done immediately after construction. Aerated concrete must dry out - this is what is commonly believed. However, it’s not a matter of humidity - after all, aerated concrete is not wood, its structure does not allow it to change dimensions when drying. Otherwise, o would increase when water is absorbed, but this does not happen. The reason for shrinkage is the accumulation and redistribution of loads, the sealing of seams from the weight of walls and other structural elements.
Vapor permeability
Another feature is the high vapor permeability of the material. Walls made of aerated concrete facilitate the unhindered release of steam from the inside, which allows you to provide an optimal microclimate in the house and eliminate the appearance of wet spots, mold and other undesirable manifestations. However, when choosing finishing materials, it is necessary to follow the rule of increasing the permeability of the wall pie (SP 23-101-2004 Design of thermal protection of buildings, clause 8.8). According to it, the interior decoration should have minimal, and the exterior - maximum vapor permeability. This is an important point that many either do not know or forget about. At the same time, breaking the rule leads to disastrous results. If the exterior finish is not capable of allowing steam to pass through, or simply has less permeability than aerated concrete, moisture will be trapped inside the walls. It will accumulate, the walls will get wet, and the house will be damp and uncomfortable. This is the price for violating construction technologies for finishing and arranging a wall pie. And yet, many developers neglect them and use incompatible materials. There are a lot of videos online showing walls made of aerated concrete insulated with impermeable foam. The owners claim that there are no consequences, although the work has just been carried out and they simply cannot happen. Problems will begin later, but for now moisture is accumulating inside the walls. Moreover, if no one lives in the house, there is no excess humidity inside. Unprepared people watch such videos, then repeat the mistakes of others, ending up with unbearable living conditions after a few years.
If mistakes have already been made, or the house was already purchased with the wrong choice of wall layers, there is nothing fatal. There is a way to fix the situation. It is necessary to cover the inside of the walls with compounds that completely cut off the flow of moisture and steam. Then apply wallpaper made of impermeable materials (vinyl or non-woven) to enhance the cut-off. In parallel with this, it is necessary to install high-quality ventilation with a powerful exhaust hood to remove moist air mechanically. You cannot rely on natural air exchange, only powerful and well-designed ventilation.
Specifications
One of the main characteristics of clinker tile decor is the almost complete absence of pores, which prevents moisture from penetrating inside. The room is waterproofed, and bacteria and mold do not form in the materials. Clinker tiles can endure up to 80 freezing and thawing cycles. In practice, this figure may be higher. Quite often, on this basis, comparisons are made with traditional brickwork. Although it is ready to serve for a long time, after two winters it is often covered with efflorescence.
The thickness of the clinker facade slab can reach 19 mm. The load per square centimeter can be one ton. If a finish is required to cover the stove, clinker decor is ideal, because it can have heat-resistant characteristics. The ability for steam penetration is limited to 0.05 mg/(m*hour*Pa). The number of closed pores in the material reaches 95%. One of the important characteristics is thermal conductivity. For a façade clinker slab, this figure is 0.021 W/(m K).
Calculation of the required amount of material
In order not to spend extra money, you will need to determine exactly how much finishing material will be required for cladding the external walls of a particular building. It’s easy to calculate the actual volume of finishing material yourself if you know the size of two types of clinker tiles:
- main - measurements are carried out in square meters;
- angular - in this case, the unit of measurement is a linear meter.
Next, you need to measure the length and height of the residential building using a measuring tape, and then multiply these values together. This way you will get the total area of the residential building, from which it is worth subtracting the area of unnecessary elements: windows, doorways, because they are not covered with clinker finishing, which means less finishing will be required.
To determine the amount of material, it is necessary to measure the area of the finishing surface
Experienced manufacturers often indicate the actual amount of material per square meter, taking into account the dimensions of the tile joint. If you want to reduce the seam, you will need to perform the calculations yourself. However, manufacturers do not recommend following this route.
Main manufacturing companies
Tiles for cladding a house should be selected not only according to their properties and technical characteristics, as well as appearance, but also by the manufacturer. Companies that have established themselves in the market supply products of guaranteed high quality. One of the companies is Feldhaus Klinker, which offers unglazed products with a rough surface. Clinker tiles under this brand have a texture that imitates facing brick.
The decor can also have an unusual look - like a stone. This one is manufactured and supplied by the Cerrad brand. Clinker tiles from this plant have not only traditional products, but also corner elements that make the laying process easier.
German quality has recently been especially appreciated by Russian consumers. This is confirmed by Stroeher products, for which the manufacturer provides a 25-year guarantee. Products of an unusual pearl shade are supplied to the market by Roben. The manufacturer managed to achieve this effect thanks to the use of white clay in the production process.
Clinker window sills and ebbs
Clinker window sills and flashings today can be bought in a wide range of colors, as well as different shapes. But window sills and ebbs, in addition to materials such as clinker, can also be made from other materials. So, for example, it can be either artificial stone or natural. With such a large selection, before you buy a window sill or ebb, you need to know all its properties. Window sills and ebbs presented in the ALT Klinker online store are real clinker, which is distinguished by its durability.
Clinker has been known to everyone as a building material for many centuries. Today it still plays no less important role in construction than it did before. It is used outdoors because it has not changed over the centuries. But it is especially relevant for regions with harsh climates. Clinker window sills and ebbs are durable, frost-resistant, acid-resistant, do not fade in the sun, and also look beautiful. And it is a fact that due to its characteristics, clinker (Klinker) is a durable and reliable material.
What is a window sill?
An external window sill, if you want to know, is also called a window shelf or window cornice. In short, it is needed to close the lower part of the window in the window niche from moisture. Choosing the right window sill is, after all, very important for your home. It's definitely not just about aesthetic aspects, but also about practical solutions. In fact, window sills perform many important functions and, on top of that, decorate the windows.
What are window sills and fence sills, as well as plinth sills?
Window sill, also known as external window sill, is usually an integral part of the window. But it should be noted that the so-called window sill is a separate element on the street side of the window. It is located at the bottom of the window and serves to cover the installation seam from water. In addition to the lower part of the window, sills, if necessary, are also installed on its upper part.
In some cases, ebb tides are used both for the fence and for the base. The ebb on the fence is needed to protect the brickwork between the pillars from moisture. The fence posts are covered with caps. Similarly, as in all other cases, the ebb for the base is also installed for protection from precipitation, but only if necessary. In addition, ebb tides are mounted on any part of the building, if necessary.
Clinker window sills - an ideal protective coating
Of course, clinker window sills and ebbs guarantee protection from moisture and mold for many years. For example, they are installed both inside and outside the house. Internal clinker window sills prevent heat loss, are practical, and also create coziness. Plus, a clinker window sill in the interior makes your home more beautiful and prestigious.
External clinker window sills and ebbs have an elegant appearance and also look original on the facade. Moreover, a clinker window sill or ebb will still perform its function even after a hundred years. This is because this type of window sill is frost-resistant and absolutely waterproof. In addition, they do not burn and do not change their color even over the years.
Due to their different lengths, clinker window sills and flashings in ALT Klinker can be selected for almost any window, fence or plinth. They are easy to install and provide excellent rain protection for the walls and windows of your home. But if you are not a specialist, then you need to invite a specialist for installation to avoid mistakes. Believe me that overall this will be the best option for you.
External clinker window sills and drip sills
External clinker window sills and drip sills have a so-called drainage edge. Essentially, the drainage edge prevents water from the bottom of the window sill from reaching the wall. As a rule, this avoids the formation of wet spots on the facade and also prevents water from flowing along the wall.
A clinker window sill, also known as a window sill with a drip or drainage edge for water, is very practical and effective. Let's just say that it will last a very long time and without hassle. Well, in addition to everything, this is a real clinker. You can buy a window sill or a clinker window sill with a drip in the ALT Klinker online store.
Clinker window sills and external flashings. Quality assurance
Essentially, all external clinker window sills and flashings in the ALT Klinker online store are made from refractory clay. This type of clay has, by definition, been used to produce clinker for centuries. This is due to the fact that it is resistant to high temperatures, while other types of clay are not. For example, when firing clinker, the temperature in the kiln is about ± 1200 °C. Therefore, clinker is produced only from refractory clay.
When fired in a kiln at a temperature of ± 1200 °C, refractory clay is sintered and a product such as clinker is formed. Without a doubt, clinker is a guarantee of the highest quality, regardless of shape and size. Clinker is durable and frost-resistant, does not absorb water, does not burn, does not lose its color, is resistant to fungus, etc. Of course, external window sills and clinker flashings are an excellent choice for your facade. Your facade with such decor as clinker will only be transformed and become more beautiful.
Tips for choosing clinker tiles
Clinker facade tiles are selected based on several factors. You should pay attention to the color. It is divided into categories:
- dark colors;
- bright hues;
- yellow tones;
- brick color.
Color and design are usually the main selection criteria. Therefore, you should pay attention to the texture. She may be:
- shiny;
- rough;
- smooth.
As for the type of clinker, it can be represented by a traditional coating or in the form of a heat-insulating product.
Clinker window sills and ebbs
4 products presented
Clinker window sill Lode Janka
Clinker window sill Janka Lode
Clinker window sill Lode Brunis
Clinker window sill Brunis Lode
4 products presented
Tile laying technology
Finishing the base with clinker tiles follows the same principle as in the case of cladding external walls. The direction of laying can be any, but you need to start from the bottom. In order to obtain seams between products, plastic crosses should be used. The traditional pitch is 10 mm.
The same technology is used to cover the stove or walls in the kitchen. It involves applying glue to both surfaces. The composition is distributed using a notched trowel. The directions of the strips should be transverse. As soon as the tile is on the surface, it is lightly pressed and begin to move from side to side. The position of the cladding should be checked using a building level.
Ceramic sills and window sills King klinker (Poland)
Ceramic sills and window sills for King Klinker Ruby red 01
On request
Ceramic sills and window sills for King Klinker Natural brown 03
On request
Ceramic sills and window sills for King Klinker Glaged brown 02
On request
Ceramic sills and window sills for King Klinker Note of cinnamon 06
On request
Ceramic sills and window sills for King Klinker The crimson island 07
On request
Ceramic sills and window sills for King Klinker Polar night 08
On request
Ceramic sills and window sills for King Klinker Desert rose 10
On request
Ceramic sills and window sills for King Klinker Cherry orchard 16
On request
Ceramic sills and window sills for King Klinker Onyx black 17
Features of cutting clinker tiles
In order for the lined surface of a stove or facade to look attractive, it is necessary not only to correctly install the finishing, but also to cut it. For this we use:
- manual tile cutters;
- Bulgarians;
- roller glass cutters;
- tile cutters;
- hole saws for special purposes;
- hacksaws for metal with a diamond wire.
Since tiles, although highly durable, may exhibit characteristics of fragility. If the material is purchased in limited quantities, it should be cut with extreme caution. If cutting technology is not followed, products may break and crumble, and the edges may end up with chips and cracks.
The easiest way to cut clinker tiles is with a manual tile cutter. With its help, the edge turns out to be aesthetic and smooth. But the process is quite labor-intensive, and large amounts of work will be difficult.
Attention! In order to facilitate the cutting process, you need to apply a few drops of machine oil to the cutting wheels, then it will be easier to cut and the cutting line will be cleaner. To carry out work, markings must be applied to the surface of the product with a marker or pencil.
The tile is adjusted so that the wheel matches the markings. Using the handle, you need to move the wheel along the surface. In this case, the product must be fixed, and after a light blow on the handle of the tool, you can get the desired fragment of the tile.
Flexible clinker: types and installation
Various design styles have become a part of everyday life. The variety of finishing materials can shock an inexperienced beginner. Flexible clinker is an imitation of brickwork, widely used for decoration. A number of advantages distinguish it from others, and this material is also called bendable brick.
Advantages of flexible clinker
Subject to basic installation requirements, better protection against aggressive environmental influences is unlikely to be found. In addition, according to reviews, flexible brick exhibits remarkable qualities:
- Resistance to high mechanical loads;
- Vapor tightness;
- Fire resistance;
- Fire safety;
- Does not fade, does not collapse under the influence of ultraviolet rays;
- Not afraid of sudden temperature changes;
- Durability;
- Environmental Safety;
- Aesthetically attractive appearance;
- During installation, you can do without additional curved elements;
- The tiles can be cut well with ordinary scissors or a knife;
- Easy and simple to install.
In the production of flexible Euroclicker, high-quality material is used - quartz sand with various polymers. This is not only reliable protection, but also aesthetic appeal, reliability and durability.
Flexible clinker: types
Modern manufacturers produce flexible bricks in three types:
- Modules on fiberglass mesh (1000x500);
- Tiles (240x52, 240x71, 360x52, 360x71);
- Two-layer sheet (1000x500).
For installation, use adhesive for ceramic tiles or a special composition ElastoBrick type PS350, A18.
The material is most often sold in the form of:
- Tiles in 2 sizes: NF – 240x71, WF – 210x52 mm;
- 4 mm thick;
- Weighing about 5 kg/sq.m.
Scope of application
Flexible clinker is an elastic material that is successfully used for finishing almost any surface for stylish brickwork:
- Sten;
- Columns;
- Arch;
- Chimneys;
- Fences;
- Staircase openings;
- Slopes;
- Bases;
- Cellars.
The finishing material can be used wherever there is a desire to see brickwork. The ease of installation allows you to do it yourself, without involving specialists.
The price of flexible clinker is more than affordable. It is quite possible to buy the material for 800-1500 rubles/sq.m.
Flexible clinker: installation details
It is important to follow the installation technology and do everything correctly and consistently. Do not use cheap glue that is not suitable for the job. As a result, the coating will last much longer.
Before using the material directly, you need to prepare the surface:
- Clean from dirt, dust, old paint, whitewash;
- Align;
- Plaster;
- Putty;
- Prime;
- Insulate;
- Create a background.
When a façade is decorated with Euroclicker, it must be insulated with mineral wool. The material is laid on a substrate. For this purpose, you can use glass fiber fixed on top of the insulation or marble chips. The sheet or mesh of the flexible clicker itself is coated with glue on the inside and fixed to the surface.
The material bends easily in any direction and emphasizes corners and arched elements well. If necessary, you can:
- Use various other decorative elements;
- Emphasize the chosen interior style with something bright;
- Create visual zoning of space due to the contrast of the material used.
Thus, if brickwork is an expensive pleasure, then you can get by with its imitation. Flexible clinker can successfully fulfill this role. The reviews about it are amazing. The material is really worth paying attention to, to take a closer look at it and decide what surface to decorate with it. Simplicity and ease of installation will allow you to carry out all the work yourself, delight the eye for many years, and evoke the envious gaze of neighbors and guests.
Features of the furnace lining
If you have stove equipment in your home, you can decorate it using clinker tiles. Its installation is carried out using a special adhesive solution with heat-resistant characteristics. The composition is distributed using spatulas, including flat ones. It is this one that is used first, then its toothed counterpart is used.
The glue layer can be anything, but the optimal value is about 6 mm. The mixture is applied not only to the reverse side of the finish, but also to the surface of the stove. This will allow you to achieve more impressive adhesion of materials. If you use clinker tiles in interior design, this will make the room colorful and the finished surface durable.
Correction of the position of the tile is carried out within a few minutes after gluing it. Excess composition coming out of the seams is immediately removed. Installation work must begin from the corners. You should retreat 1 cm from the floor surface. This gap is necessary for thermal expansion of the finish.
Attention! The furnace lining can be carried out using different laying schemes. If this is a diagonal arrangement, you should be prepared for the fact that there will be more scraps, therefore, the material consumption will be higher.
After 2 days, you can begin grouting the seams between the products on the surface of the oven. To do this, you should use exclusively heat-resistant grout, which is selected according to the shade of the tile. The composition is applied with a rubber spatula.
Laying facing bricks
The technology of façade cladding is practically no different from laying ordinary ordinary bricks. Almost the same requirements are imposed on the process and quality of work. The difference is in the type of masonry and the type of binder used.
But finishing the facade with facing bricks is not an easy task. It requires masonry skills and knowledge of the nuances of working with each type of facing material. In addition, the performer of the work must be extremely careful and have a perfect command of all the tools necessary for masonry.
Most often in the process of cladding facades they use:
- trowel (the most convenient blade length is 18-19 cm);
- hammer-pick;
- mortar spatula (for applying and distributing the binder over relatively large areas);
- jointing (necessary to give masonry joints a beautiful shape);
- control devices (orders, mooring lines, rules).
Types of facing masonry
For finishing facades, the most spectacular types of brickwork are chosen.
- Track. In this type of masonry, each row consists of bricks laid in a “spoon” and is offset from the previous one by ½ or ¼ brick.
- Block. It is carried out by alternating rows, in one of which the brick is laid with a “spoon”, and in the next - with a “poke”.
- Cross. It is a type of block masonry, but is carried out with an offset of ½ brick in every 2nd row. The result is a cross-shaped pattern, in which each “spoon” is surrounded by one “poke” at the top and bottom.
- Gothic. One of the complex types of facing masonry, which requires precise displacement of bricks. Consists of alternating rows of “spoons” and “pokes”. In each next row, the “spoon” is shifted by ¼ of the length, and the “poke” by ½.
Brick façade cladding scheme
Facing masonry technology
Step 1. Preparation for laying on the mortar. Before laying bricks on the mortar, they always perform “dry” masonry.
It is necessary in order to:
- determine the required number of building stones;
- choose them by size and color;
- determine the required number of brick halves;
- determine the location of stones when designing corners and openings.
When placing the stones on the base, marks are made that will serve as a guide when laying on the mortar. At this stage of the work, the brick is cut using a grinder equipped with a stone disc.
Connection between brick cladding and wall
Step 2. Preparation of the solution. The mortar for facing brickwork differs from the standard one in that only sifted, preferably river, sand must be added to its composition. The proportions for cement-sand mortar are standard: 1 part Portland cement of a grade not lower than M400, 3 parts sand, water, plasticizer, coloring pigment (if necessary). The consistency of the binder should be creamy. A properly prepared solution can be rolled into a soft ball.
Step 3. To lay the first row, perform the following steps:
- determine the highest point of the base;
- a reinforcing mesh is laid on the waterproofing coating;
- install, focusing on the marks made during the “dry” masonry, two corner bricks;
- stretch a thread between them so that it indicates the height of the row;
- lay intermediate bricks, making sure that the seam between them is the same width (optimally 8-10 mm);
- in order for the brick to fall into place, it is knocked down with a pick;
- jointing is used to align and decorate seams.
Brick façade cladding
Step 4. Laying according to the drawing. To connect the facing masonry to the load-bearing wall, metal anchors are used, which are buried into the wall by at least 10 mm. Additional reinforcement of corners and openings is performed with reinforcement rods. The anchors are installed in increments of 2-2.5 bricks. The bricks are laid in accordance with the masonry pattern.
Minimum number and diameter of wire anchors per square meter of wall
When performing facing work, it is necessary to ensure that the cement-sand mortar does not stain the front surface of the building stones. If cement gets on it, it must be removed immediately with a dry rag. Every 4-5 rows of facing masonry, wipe the wall with a damp cloth.