For many owners of private houses, cottages and summer cottages, the issue of water supply is very acute. In some places it is possible to use a central water supply, but in others it is not, so the problem is solved by drilling a well and installing pumping equipment that will pump water into the house’s pipeline system. Some build wells on their property simply to avoid paying large sums of money for what is already under their feet. Today we will tell you what is good or bad about a surface pump for a well, compare it with a submersible one and consider different solutions.
Surface pump for well
Concept and typology of wells
A well is a excavation of soil on the surface of the earth, shaped like a cylinder and directed inward until the desired water layer is reached. Its drilling is carried out using heavy drilling equipment. The depth of the structure significantly exceeds its diameter.
The shaft can be drilled at right angles to the surface of the earth and with the necessary deviation in the desired direction. Thus, it is possible to obtain a curved profile and achieve better water quality. Drilling technology makes it possible to achieve the desired result in a short time.
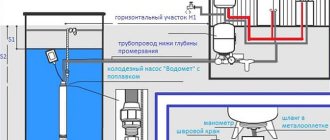
Pumping station
To ensure that the pump lasts as long as possible, a pumping station is created. The installation pumps water as needed into the storage tank. This allows you to significantly save equipment resources, since the pump will only turn on when the hydraulic accumulator is empty. In addition, frequent switching on of the pumping unit entails high energy consumption. And thanks to the arrangement of a pumping station, it is possible to save resources, money and provide the house with a certain supply of water.
Water supply pumping station
A hydraulic accumulator as part of a pumping unit is a volumetric tank that has a membrane or bulb inside, around which there is a certain level of pressure. That is, the water entering this container is under pressure. The design of the pumping station also includes a pressure switch, which will force the equipment to start and stop on time. And the pressure gauge installed in the system will help you keep track of the pressure level. Connects all the parts into a single organism “five-outlet” - a special fitting with five outlets.
Pumping station with built-in ejector
Prices for a pumping station
pumping station
Types of wells by profile
The mine may cross several layers of soil before reaching the mineral deposit. It is important to choose the right method for drilling a well. Depending on the number of planes where the shaft is curved, there may be the following types of wells:
- curved in a plane;
- curved in space.
It depends on the bend of the shaft. In this regard, curvature in the plane can have the following varieties:
- a flat column ending in a slope at the bottom;
- S - shaped bend;
- J - shaped design.
These bends are formed as a result of different densities of soil layers. In turn, curvature in space can manifest itself in more complex geometric forms when drilling oil and gas wells. Water shafts are mostly made straight; bends can be used to bypass rocks.
How to connect
These installations are always located in a dry place - it is not permissible for moisture to get into the housing. Ideally, it should be installed as close to the water supply as possible. You need to choose a dry room with a positive temperature, which should be well ventilated. It is permissible to place the pumping station in the basement, but with such an installation you will have to constantly endure a little noise.
Near the well or well, in the place where the surface vortex pump or the installation of another system will be located, small buildings are erected or installed in underground caissons - welded from metal, plastic, poured from concrete mortar.
The caissons must also be ventilated; their bottom is lowered below the soil freezing level. The water supply pipes are laid to the house by deepening it into a trench, also lowering it into non-freezing layers of soil.
Types of wells by depth
To produce your own water intake, an important factor is reaching a certain aquifer. In turn, each of them is located at a different depth:
- The first is the “overwater”, which consists of precipitation and groundwater. Depending on the terrain, their depth can reach 25 meters. This water is not suitable for drinking; it can be used for caring for a personal plot and watering a vegetable garden. To reach a depth of up to 10 meters, a driving well is used, which is a thick-walled pipe with a conical tip, immersed in the ground by impact.
- The second water is located at a depth of 40-90 meters between the first and second layers of loamy soil. This aquifer is the most popular in the domestic sector. The average productivity of such a mine is 0.8-1.2 cubic meters. m/hour, which is quite enough to meet the needs of a family living in a country house. This water can be used as drinking water after additional filtration. Drilling such a well does not require a permit, and you will not have to pay a quarterly tax for the water consumed.
- The purest artesian water is found at a depth of up to 200 meters, located in a layer of limestone. Natural pressure at such a depth spontaneously pushes water to the surface. The productivity of such water intake can be 3-10 cubic meters. m/hour, which will be enough for a full life for several families. The water is potable and may contain dissolved minerals.
Despite the declared quality of water, before drinking it it is necessary to check it at the SES.
Abyssinian well
Abyssinian well for water.
The tube well got its name from the area in Africa where the technology for extracting groundwater from the depths of the earth without the use of special equipment was first used.
Self-drilling of wells is done in this ancient way. Water intake is carried out from a depth of 8-13 m.
Sequence of work:
- A drill string is assembled from 1-2 m sections of Ø2″ pipes, which will also serve as a casing. The filter drill is made by flattening the downhole end of the first pipe or by attaching a cone to the rod for better penetration into the soil. 6-8 mm holes are drilled into the walls of the drill so that water can flow into them, and they are wrapped in a metal filter mesh.
- The impact head is made from a Ø100 mm guide pipe, 1 m long, weighted with metal weighing 10 kg, and handles are welded on both sides.
- The drill-filter is driven entirely into the ground, after which the next section of the column is attached to it by welding or a threaded connection. Having hammered the pipe after the drill, the operation is repeated until the filter penetrates into the aquifer.
- A manual or electric vacuum pump is connected.
The tube well is pumped until clean water appears. The quality of the liquid is checked in the laboratory of the sanitary and epidemiological station.
Advantages and disadvantages
The advantage of the Abyssinian water intake is the ability to build it yourself with minimal investment. The needle well is completely isolated from the influx of perched water. A tube well can be driven into the ground from the basement of your house.
There are few disadvantages:
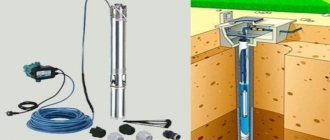
- impossibility of using a submersible pump due to the small diameter of the column;
- the need to clean the well from sand and silt;
- restrictions on soil properties: the method is used on soft rocks and coarse sands.
The service life of the water intake is ≥30 years. A prerequisite for long-term performance is the periodic removal of silt and sand from the casing. This is done using a bailer - a cylindrical vessel with a valve seal.
Existing well categories
According to the purpose of the well, there are the following categories:
- Parametric - allowing you to determine the section of the vertical layer.
- Exploration - have a small diameter, determine the prospects of drilling.
- Exploration - determine the potential of minerals.
- Exploitation - capable of extracting minerals from the bowels of the earth.
Wells for water extraction are operational and are divided into additional types:
- producing or injection;
- specialized for industrial and drinking water, including absorbing water;
- for monitoring and surveillance of reservoir pressure;
- backups for production;
- estimated during operation.
Each of them has its own characteristics during drilling and during use.
Structural types of wells
The designs used divide wells into types:
- with one column;
- with two columns.
The above types of wells imply the number of pipes during drilling and operation of the mine.
The simultaneous use of casing and production pipe is considered a more expensive option, but allows for longer service life. In this case, even an artesian well can have an internal PVC pipe.
Types of gravel filters that are placed:
- between the rock and the water intake pipe with a bottom plug;
- between the casing and water intake columns with a bottom plug;
- in the bottomhole zone, taking into account the flow of water through the bottom of the water intake pipe.
Each of the above filters has its own characteristics and advantages.
Drilling equipment
There are two types of drilling rigs: conventional and small-sized. A conventional installation based on URAL is a standard option. It is transported on a truck, so in order to carry out the work it is necessary to provide access to the site. Drilling will also have a slight impact on the appearance of the site. But with the help of such equipment it is possible to drill an artesian water intake of any depth in a few days.
Small-sized installation is a universal option. It can be used for drilling in any, even limited, place. There are other advantages of using:
- has compact dimensions;
- easy to assemble, disassemble and transport;
- does not interfere with the general appearance of the site;
- allows you to drill a well in places where drilling equipment cannot enter, even inside the house.
There is another advantage - this option will be cheaper. Even due to lower energy consumption. But it is better not to drill an artesian water intake point with small-sized equipment. This is acceptable, but the process will be long, labor-intensive and impractical.
Specific types of water wells
There are different types of wells:
- Constructed on quicksand, it can have a recess of 40 meters. Parallel drilling with installation of casing pipes is used. This design allows you to obtain a larger volume of water, unlike the standard design.
- A geothermal well is drilled to extract water from an underground hot spring. It is used for autonomous heating when heating homes. Hot water rises to the heat pump on its own. The idea is to use hot water to heat a room and drain it back to the source. Thus, the room receives free heating.
As you can see, the main types of wells differ not only in their design and depth, but also in their application.
Pump connection procedure
Although it is believed that installing surface pumps is less hassle than installing submersible models, you should not take this matter lightly. A number of important points taken into account when installing the pump will help improve its efficiency and prevent possible breakdowns.
The nuances of installing a surface-type pumping station Gilex Jumbo 70/50. Such equipment should be located in heated or insulated non-residential boxes
Step 1. Preparation of materials and tools
To connect a surface pump, you first need to stock up on the appropriate materials.
Here is a sample list of required elements:
- connecting fitting, which is installed between the pump and the hose;
- hose for collecting water from a source;
- hose or pipes for connecting the pump to the storage tank;
- watering hose;
- check valve with strainer;
- special adapter for the second output;
- connecting fittings;
- fasteners, etc.
If a system with a hydraulic accumulator is installed, you will also need a pressure switch and a pressure gauge. If you decide to use only a storage tank, you should purchase or make a float sensor.
Tools may require various keys, as well as devices for working with fasteners. A tape measure, a building level, materials for insulating threaded connections, a soldering iron for polypropylene water pipes, etc. will come in handy.
Step #2. Installing the device on the base
Before connecting any elements to the pump, you must install it on a solid and level base. This is an important point.
Even slight instability or tilt can cause a significant reduction in instrument performance. The base can be made of concrete, brick or even solid wood.
To install a surface pump, you first need to find a solid and level base. It can be made of brick, wood, concrete or, as in this case, use metal brackets
The main thing is that it is strong and even. Anchor bolts are usually used to secure the pump in a stable position.
There are special holes in the device body for fastening. Sometimes a large rubber gasket is installed under the pump housing. It acts as a shock absorber and dampens vibration when the engine is running.
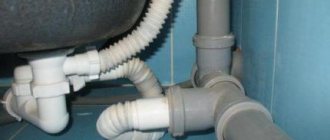
Step #3. Installation of the supply hose
After this, the supply hose should be installed. A check valve is attached to its lower part, onto which a mesh filter is placed. A coupling with an external threaded connection is used as fastening.
Pumps equipped with a check valve and a coarse filter are produced at industrial enterprises. In order not to bother with this part of the system installation, you can buy a ready-made hose.
Experts strongly recommend installing protective elements such as a check valve and a coarse filter when connecting a surface pump.
But, according to reviews from experienced craftsmen, making a hose with a valve yourself will cost much less. If the installation technology for all elements is followed, such a device will be no less reliable than an industrial production model. Sometimes two check valves are installed: one at the end of the hose, the other next to the hydraulic accumulator.
The upper part of the hose is connected to the pump using a fitting. Instead of a hose, you can use a polypropylene water pipe with a diameter of 32 mm. After this, the hose is lowered into the water so that the check valve is immersed in it by at least 30 cm.
To connect a check valve to a system with a surface pump, you must use special fittings and adapters, for example, such as shown in the photo (+)
The check valve, as well as the filter protecting it, are necessary elements. The valve protects the pump from idling because it prevents water from flowing back after the pump is turned off. The filter is necessary to protect the device from contamination.
Step #4. Connection to the water supply system
Then connect the pump to a hydraulic accumulator or storage tank. It should be remembered that the horizontal part of the hose should have a slight slope. Often, a flexible connection to the tank and an adapter, as well as other elements of the system, are mounted on threaded connections. In this case, it is necessary to ensure proper sealing using FUM tape or other suitable sealants.
After this, the storage tank or station is connected to the water supply system of the house. When laying pipes, you should also remember the correct slope. An important point is the insulation of pipes laid in the ground. Today there is a wide selection of suitable insulation materials; all that remains is to choose and use the right one.
To install the part of the water supply system that is connected to the pumping station, you will need a set of fittings, PVC pipes, as well as a special device for soldering these pipes
Only after all devices have been assembled into a common pipeline and connected to the internal part of the house water supply can the operation of the system be tested.
Improper starting of the surface pump can lead to its rapid failure. The details of this process are outlined in the manufacturer's instructions, which should be carefully studied.
Step #5. Checking the system operation
Usually, before starting, surface pumps are filled with water through a special hole. Water must fill not only the pump, but also parts of the line before and after the pump. Then the filler hole should be closed. It is recommended to immediately record pressure readings in the accumulator and in the system.
Before installation, the surface pump must be filled with water through a special filler hole. This pump should not be turned on in dry running mode.
This information may be useful when further configuring the system. You may need to pump some air into the hydraulic tank or bleed it.
After this, the pump is connected to the electrical network and turned on so that the storage tank or accumulator is filled with water. Immediately check all connections for leaks and repair faults if necessary.
If you are using a homemade tank, it would not hurt to check its integrity. Water may begin to leak through previously undetected cracks. This problem should also be resolved immediately. If the system is assembled correctly and nothing is leaking anywhere, all that remains is to configure the control equipment.
After this, you need to check the operation of the automatic systems. To do this, you need to open the water and observe the process. When the tank is empty, the pump should turn on automatically and turn off again when the tank is filled to the set level.
Typically, the pump automatically turns off when the pressure in the system approaches three atmospheres. After this, the water is drained until the pump starts working again.
At this point, you should record the actual pressure in the system and compare it with the manufacturer's recommendations. If significant differences are found, the performance of all devices must be adjusted to an acceptable level. After setting, the check is repeated.