Construction of a frame for a roof with four slopes is a complex process with characteristic technological features. During construction, our own structural components are used, the sequence of work is different. But the result will amaze with its spectacular shape and durability when repelling atmospheric attacks. And the home master will be able to be proud of his personal achievements in the field of roofing.
However, before deciding to install such a design, it is worth familiarizing yourself with the algorithm according to which the rafter system of a hipped roof is constructed and with the specifics of its design.
Features of a hipped roof
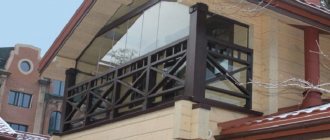
The roof of a house with four slopes has many advantages over others. It gives a solid, sophisticated look to any building. Due to the high mechanical strength under a hipped roof, any house will be reliably protected from heavy snowfalls and powerful wind storms.
Anyone who decides to assemble a hipped roof with their own hands will be able to install eaves canopies along the length of the entire building, protecting the façade parts from the adverse influences of the atmosphere and temperature changes. The photos of hipped roofs below show their main types.
How to assemble: construction methods
Hip roofs are erected in two ways. The fastest and most expensive construction method is to assemble a support frame from pre-fabricated wooden rafter sections.
A specialized enterprise, under an agreement with the developer, takes measurements on site, then, based on them, prepares sections of the frame in its workshop.
The company delivers structures to the construction site and assembles the roof as a constructor .
This installation method is certainly effective and time-saving. Its only drawback is its high cost. For a construction site owner who has experience in construction and owns tools, it will be much more profitable to do this work with his own hands.
Practice shows that self-assembly of the rafter frame allows you to save significant financial resources , although it will take much longer than with the first installation method.
For small buildings, for example garden gazebos with a square plan, the rafter frame is assembled on the ground. Then, using a simple winch (pulley hoist) and a leash, the roof is lifted and pushed onto the top of the building.
Half-hip
The half-hip variety is distinguished by the ability to add more complex structures instead of triangular slopes. For example, a triangle slope is placed on top, and the bottom ends in the shape of a trapezoid. This makes it possible to create a comfortable entrance to the attic compartment or attic window. The trapezoidal bottom can also be made in the form of a slope.
Drawings and calculations
On the eve of purchasing the required materials and tools, it is necessary to find out the leading parameters of the roof and perform the correct calculation. Hip roofs are represented by the connection of two trapezoidal and triangular wooden trusses. They interlock with each other with their upper sides, and the borders of the triangles are covered with ridge slopes.
To make it easier for you to calculate the required amount of building material and subsequent installation, you should make a drawing of the hipped roof and its rafter system.
It is imperative to determine what the slope of the slopes will be, this will directly affect the consumption of wood. According to the fastening method, the hip roof sling system is divided into hanging and layered types. The rafter structure of the layered subtype is cheaper in cost and is easy to install.
When calculating the required number of rafters, their installation pitch and the desired roof height (angle of inclination) are taken into account. The final calculation of the rafter structure of a hipped roof is quite complicated. It involves measuring the load during operation, the length of the rafters, the size of the installation step, the angle of inclination of the slope and other nuances.
In an effort to make calculations easier, it is advisable to use construction standards and create a 3D model in a computer program.
Preparatory stage
After developing the project and drawing up drawings (models) of the hipped roof, preparations for the construction of the roof begin. At this stage, it is important to choose the right material, control its quality and prepare the necessary tools.
Before purchasing basic and consumable materials, it is necessary to calculate their need , because... they must be purchased immediately for the entire volume of construction, but without excessive reserves.
Particular attention is paid to wooden elements for the rafter system. A board, timber or log of coniferous species is most suitable for it. Larch stands out especially for its strength and resistance to decay. If you have financial resources, you can use oak.
The calculation of the need for rafters is made taking into account the installation pitch and the height of the roof (the angle of inclination of the slope). The length of each rafter is determined as L=h/sinA. The lumber of the ale rafter system must be of high quality and have a residual moisture content of no more than 20%.
Roofing material is selected based on financial capabilities, size of the house and overall design. It could be:
- rolled material (including ondulin),
- slate,
- tiles,
- corrugated sheets,
- metal tiles,
- asbestos-cement or metal sheets.
For waterproofing, bitumen mastic, roofing felt or polymer films are usually chosen . Mineral wool and expanded polystyrene (foam plastic) are most often used as insulation.
The need for these materials is selected based on the roof area, taking into account the overlap of elements or strips, as well as inevitable waste.
Required Tools
Before starting the main work, you need to prepare the following tool:
- Bulgarian,
- hacksaw,
- electric drill,
- screwdriver,
- plane,
- axe,
- hammer,
- pliers,
- screwdriver,
- chisel,
- construction knife,
- scissors,
- construction or furniture stapler,
- paint brush and roller,
- building level,
- plumb line,
- roulette,
- metal ruler,
- square
For large amounts of work, it is advisable to have a circular saw.
Materials
Recommended material: timber, wooden plate or log made of coniferous trees, larch, oak. The material must be of good quality, dried, with an optimal humidity of up to 22%. For rafters, boards with a cross section of 50x100 mm are used; for a very large roof area, it is advisable to use boards of 50x200 mm.
Under the Mauerlat, the best option would be a solid beam with a cross-section of at least 150x150 mm. To strengthen the Mauerlat, you will also need threaded metal studs, planks for sheathing and overhead metal plates connecting the wooden parts.
It is advisable to impregnate wooden parts with antiseptic and fire retardant substances ahead of time. When producing a large number of racks, purlins and crossbars at once with the same cut angle, a previously made sample is used.
Average prices for turnkey work
Typically, specialized companies offer their services for the construction of 4-pitch roofs based on the installation cost of 1 sq.m. roof area. By analyzing advertisements of this nature on the Internet, you can present the average price with an element-by-element installation layout in the following table.
| Type of work | Price, rub./sq.m. |
| Rafter system | 350 |
| Insulation | 150 |
| Waterproofing | 100 |
| Countergrid | 100 |
| Lathing | 150 |
| Seam roofing | 300 |
| Additional elements | 350 |
| Total | 1500 |
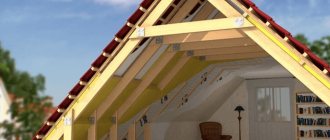
Arrangement of the sling system
This seemingly complex configuration at first glance is actually assembled no heavier than a children's construction set. The rafter system of a hipped roof is a skeleton made up of different rafters: ordinary, sloping, diagonal, spigots, tie-rods, struts. The use of a sprengel increases the strength of the mowing slings. Other design details that provide the required strength and reliability are also extremely important. It is recommended to consider them in more detail:
- Mauerlat. Strong adhesion of the rafters to the load-bearing walls is ensured by the Mauerlat. It is a powerful beam attached to the upper edges of the walls, which forms a supporting frame that is not interrupted anywhere.
- Sloping legs. These are rafter pairs; they are installed obliquely at the point of contact of the slopes from both types of walls. Their rafters will be longer than those from which the slopes themselves will be made.
- Horse. The rafter legs of the hip ones are articulated at the top with a bar called a ridge purlin or ridge. It creates rigidity of the rafter skeleton; the racks will rest against it with their upper ends. The ridge is usually a block measuring 10x10 centimeters.
In order to clearly imagine how to properly make a hipped roof, it is proposed to construct it according to the following steps:
Mauerlat gasket. Load-bearing walls are reinforced with concrete screed and reinforcement. When pouring, steel rods are immersed in it with a projection of up to 10 cm to the surface. The Mauerlat “sits” on them. The ends of the mauerlat bars are fastened by splicing using the “half-tree” method.
Laying the beds. Next, prepare supports for the racks; assemble the beds from horizontal bars measuring 10x10 cm or double boards.
Arrangement of racks and ridge. First, the supports are strengthened under the tops of the sloped legs, then the racks are secured under the rafter pairs. The installation step is identical to the step of the rafter configuration.
Construction of rafters. The assembly of rafters begins with the head pairs with a known pitch. The top of the beam is cut at the required angle and connected to the ridge. The lower section forms an overhang and is attached to the Mauerlat. At the end, external rafters are formed.
Lathing. It is needed to create a base for attaching the roof covering and to give the rafter structure perfect rigidity. The sheathing is obtained by installing edged boards 2.5 cm thick and 10 cm wide between the rafters.
Insulation. The top of the sheathing is covered with a layer of thermal insulation. Foam slabs or basalt slabs are the recommended material for this.
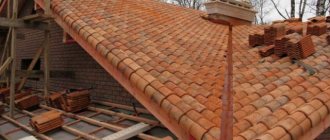
Roofing covering. Its installation begins from the bottom up, using fasteners designed specifically for the selected material. The worthy result of considerable work will last a long time, living under such a roof will be cozy, warm and safe.
Plan for laying supports on the Mauerlat
Depending on the material used to construct the walls of the building, the mauerlat can be laid in various ways.
General recommendations are:
- In the upper part of the walls made of gas silicate or foam concrete blocks, you need to pour a reinforced concrete belt in which to place anchors for subsequent fixation of the Mauerlat.
- When constructing brick walls, a side of 1-2 bricks is made in their upper part so that a recess is formed in the center of the wall for a wooden frame. As the bricks are laid, wooden plugs are placed between the bricks, to which the Mauerlat will be fixed with brackets.
For the Mauerlat you will need a beam with a cross section of 100×150 or 150×150 mm. When planning the use of space under the roof, thicker beams should be used. The frame elements are joined with oblique notches, followed by reinforcement with nails, screws or screws, and in the corners with staples.
Next, you need to place the ceiling elements on the Mauerlat. They are made from bars with a cross section of 100×200 mm. The central beam is laid first. If the length of the lumber is not enough, it is made from two pieces of timber. Moreover, the connection point should be on a supporting element, for example, a load-bearing wall.
In this case, the beams are laid in 60 cm increments. As a rule, the box has non-ideal dimensions, so the spacing between the beams can be slightly adjusted to smooth out imperfections. The distance from the walls of the house to the outer beams located on both sides should be 90 cm. This is required for the installation of outriggers.
Extensions are attached to the end parts of the floor beams. For convenience, they are first placed only in those places where the rafters will be installed later. They are fastened to the surface of the outrigger mauerlat with nails, and to the beams with dowels, large-section nails, and self-tapping screws, after which the fastening is reinforced with corners.