Homemade products from a washing machine engine:
1. How to connect a motor from an old washing machine through a capacitor or without it 2. Homemade emery from a washing machine engine 3. Homemade generator from a washing machine engine 4. Connecting and adjusting the speed of a commutator motor from an automatic washing machine 5. Potter's wheel from a washing machine machines 6. Lathe from an automatic washing machine 7. Wood splitter with an engine from a washing machine 8. Homemade concrete mixer
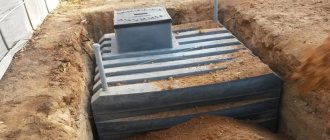
Making a creative cover for a viewing hole in the garage
Conceptually, the design is a kind of roller shutter that can be opened and closed in various ways, without spending much effort on removing many individual boards and without straining yourself by turning heavy panels.
The design is shown schematically in the figure:
Individual boards of the same size are connected by a cable that is passed through them along the entire structure. In order for the roller shutter to be foldable, small gaps are left between the boards, for which springs or rubber cambrics are placed on the cable between the individual boards. The ends of the cable are attached to one of the outer boards and voila. For convenience, you can screw a door handle to the end board so that you have something to grab onto when opening/closing the hole.
I will not bore you with a detailed description of the procedure for preparing the boards themselves, I will only say that to implement the project you need boards of the same width. Ideal - 100mm. Thickness can vary from 35 to 50 mm - depending on your personal preferences. As long as it can support your weight. Personally, I collected all the scraps of 50-mm boards that remained with me after the Great Dacha Construction and, using hand-held electric circular saws, a plane and a sander, turned a motley collection of lumber into 33 boards of the 900x95x45 format. The finished boards were drilled (5mm holes for the passage of the cable), covered with 2 layers of Pinotex (I had some left over from the VDS, but you can use a much cheaper impregnation from OliBel) and 2 layers of nitrocellulose varnish NTs-218.
At this point I want to make a small lyrical digression.
In principle, to protect wood from dampness, simply protective impregnation may be enough, BUT!
1. As my personal experience shows, impregnation (especially the cheap OliBelovskaya) tends to be washed out with water over time, so in practice, I consider it insufficient for using a wooden structure in a damp room, and especially in a garage, with its chemically aggressive environment. Something else is required.
2. In all honesty, the use of limped wood for the production of building materials is not entirely . m. complies with GOST, but the situation on the lumber market now is such that domestic manufacturers are ready to cut boards even from dead wood. Dried wood (pine, spruce, from which resin was drained before felling) is a sponge with many micro cavities (initially filled with viscous resin), which are instantly filled with water, bacteria and mold spores. A 100x100 beam made of such wood, left in dampness, rots to a completely unusable state in 3 years. Board – 20ka – per year. It was tested repeatedly on grandmothers’ fences - in Soviet times, on “our” state farm they made a picket fence from such wood, which, being unpainted on all sides (where can you get so much paint), in one season turned into dust that could be crushed by hand. So I had a class every summer.
So, based on the above considerations, I protected my boards “to the maximum.” Initially, it was planned to use floor paint as the “top” coating, but when I saw the boards treated with Pinotex, I realized that such beauty could not be hidden. And varnish is cheaper.
The picture shows fully processed boards, ready for assembly.
To connect the boards, I used a 3.5mm metal-polymer cable (a steel cable in a polyethylene jacket that protects the threads from corrosion and prevents damage and “fraying” of the cable by sharp objects). The breaking force, according to the passport, is 400 kg. For our purposes - more than enough. The interval between the boards is maintained with 15 mm rubber cambrics. I just went to the market and bought a 8/12mm water hose (RUB 2,000/linear meter) (the kind we have on the return lines of the engine cooling system) and chopped it up.
The recesses at the end of the outer board are places for installing cable anchors.
By the way, pay attention that the outer board is made from sapped wood. It is light, has a grayish tint (this is so you know how to distinguish the right building materials from bullshit). It has been lying in the garage at the dacha since the spring of this year. This turned out to be enough: the grayish spots on the board are not dirt, but mold, the so-called. “wood blue” - neither a plane nor a sander could remove it completely.
For a long time I could not come up with a method for attaching the ends of the cable. The classic technique with a loop at one end of the board and three clamps at the other did not suit me at all. The loop will stick out outside the structure and will get in the way, and there is absolutely no room for clamps in the space between the boards. 15 mm - perhaps for one. But one clamp will not hold the cable; it will constantly slip out. And in general, any hard object between the boards will interfere with the folding of the structure. The solution came suddenly: we need to use a friction stopper. After 5 minutes, the idea took shape in a specific piece of hardware. A non-insulated electrical terminal block with 14 inputs was purchased (the kind used in electrical panels), from which flax was sawed off into two pieces with 6 holes in each. 4 holes for passing the cable, 2 outer ones for fixing the anchor in the niche of the board. Additionally, the cable is pressed with screws, so that the anchor combines both a friction stopper (due to the fact that the cable is threaded like a “snake”) and a clamping clamp. True, experience has shown that it is not at all necessary to tighten the screws. The “snake” bites the cable so that it can easily support my weight. But I didn't save money.
Later the niche was filled with acrylic sealant. The thing is as sticky as silicone, but after hardening it turns into a fairly hard monolith, which allows it to be used as wood putty. I recommend.
On the reverse side, the cable simply runs along the edge of the board. To protect it from rubbing and biting, I simply covered it with an aluminum threshold (the kind used to cover linoleum joints). In the end, it turned out quite neat and reliable.
And here is the finished product. Door handles are installed along the edges for ease of manipulation of the structure. At the end of the nearest board you can see anchor niches - already filled with acrylic.
Every car owner sooner or later faces minor repairs to his vehicle. A routine check of a car's technical condition can turn into hours of waiting. Having your own inspection hole in the garage, which you can make yourself, will save money and time.
Planning the construction of an inspection pit
There are two situations when building a pit in a garage:
- in a building just under construction;
- in an already exploited.
The first option is simpler, because nothing prevents you from digging up the soil to the size of the intended structure. To do this, you can even use the services of an excavator, thereby speeding up the process itself and avoiding labor-intensive excavation work.
But both situations happen often, so let's deal with them separately. But first, let’s talk about the size of the pit in the garage for a car.
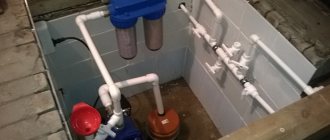
Automatic pumping system
Is water not leaving the basement, for example from a water drainage hole? The easiest way to combat it is with an automatic pumping system. How to pump out water with a pump? The pumping system, operating in automatic mode, includes:
- a hole designed to collect water;
- drainage or fecal sediment, equipped with sensors that respond to rising water levels;
- a system of pipes through which water will be pumped to a sewer system or other safe place.
Automatic water pumping system
The water collection pit can be:
- made from any sealed container (tank, barrel, etc.);
- lined with brick;
- concreted.
The collection pit must be completely sealed. Otherwise, the effect of the constructed system will be minimal.
The advantages of the automatic system are:
- low cost;
- ease of installation, including on your own;
- reliability.
Among the disadvantages are:
- possibility of short-circuiting when there is an abundant flow of water;
- energy dependence.
Dimensions of inspection hole
The dimensional indicators are based on the vehicle base, or more precisely, the distance between the wheels of your car, both in width and length. But there are also minimum width parameters, which are often taken as a basis. This is 80-85 cm. As for the length, 1 m is added to the length of the car. Although we must pay tribute that for the convenience of using the inspection pit, many do not stop at this size, so in garages you can find pits up to 6 m long.
Sketch showing the minimum width of the inspection hole Source windsc.ru
Now with depth. It is clear that the height of the garage owner should become this size. At the same time, he must reach with his hands any part or assembly on the machine. But experts recommend deepening the inspection hole to 2 m. And even if the person is small, you can always install a stand or flooring at the bottom. True, this is not always possible to do. Much will depend on the level of groundwater. If it is tall, for example, 1.2-1.5 m, then you can forget about the hole.
These were the overall dimensions. Now about the construction sizes. For obvious reasons, the foundation pit itself is dug larger. This is due to the fact that in order to form the structure itself, it is necessary to equip the structure. And to do this, you need to lay a cushion with waterproofing on the bottom and fill it with screed. The walls are assembled from blocks or bricks or poured into formwork as a monolithic structure. All these materials require space without taking into account the selected dimensions of the viewing structure.
Therefore, a pit is dug with a width equal to the width of the inspection hole, plus the thickness of the walls, plus 30 cm. The length is calculated in exactly the same way. Depth is the thickness of the pillow, the thickness of the screed and the waterproofing layer, plus 1.8-2.0 m.
Sketch of an inspection pit with all dimensions Source stroyfora.ru
See also: Catalog of garage projects presented at the Low-Rise Country exhibition.
Advantages of polymers over other materials
The use of polymers as a material for the manufacture of manhole boxes is becoming increasingly common due to the fact that this material has the following characteristics:
- Light weight. This feature allows you to install the manufactured box manually, without the use of special equipment.
- Moisture resistance. Unlike other materials, plastic does not suffer from moisture, so no additional waterproofing operations are required.
- Durability. The service life of plastic is 50 years or more.
- Mechanical strength. With all the above positive characteristics, plastic has good resistance to mechanical stress.
- Low material cost.
- No additional maintenance required. Unlike other materials, plastic does not require maintenance during operation.
Despite the advantages, there is also a disadvantage. Unlike steel boxes, plastic boxes are less resistant to mechanical shock loads. If the plastic is damaged, it is not difficult to repair. For repairs, special glue or soldering can be used.
Technology for constructing an inspection pit
We won’t tell you how to build a garage with a pit that is being built. It's not that difficult. Let's talk about how to make an inspection hole in an already used garage.
Digging a pit
We will assume that you have decided on the sizes. They are applied to the floor in the garage, for example, marked with chalk. The main requirement is that the pit should be located in the middle of the garage building.
Marking the pit inside the garage Source parki48.ru
Typically, the floor in a garage is a thick concrete screed, into which a reinforcing frame is laid in the form of a lattice of steel reinforcement. Therefore, according to the markings, it is necessary to gouge the concrete and cut off the reinforcement along the perimeter of the pit.
The sand and gravel cushion and soil are removed from the resulting opening with shovels. The walls and bottom of the pit are leveled to the maximum with shovels. This is labor-intensive work that can take two days. Although much will depend on the composition of the soil under the building and the activity of the craftsmen. There is one advantage when building an inspection pit in a used garage. The construction site is under a canopy, so rain is not a problem in this case.
Digging a pit (excavation) Source ok-berta.ru
Ventilation of inspection pit
The mistake is made by those who do not think about the ventilation system. But its purpose is not only to remove humid air. Musty odors from oily rags and gasoline will quickly fill a small space, gradually moving into the garage itself. So it’s better to spend a little time and money, but build ventilation.
Essentially, this is a plastic pipe with a diameter of 100 mm, which is taken outside the building. To do this, dig a horizontal trench, which is brought out either under the foundation or through the wall. Sand is poured into it and a pipe is laid with an outlet above the garage roof. The lower end should be located at the bottom of the pit.
Ventilation pipe inside the inspection hole Source drive2.ru
Construction of an inspection pit
So, let's move on to the main work related to the construction of the pit itself. First of all, prepare the bottom :
- A layer of sand 15-20 cm thick is poured , which is compacted with water.
- Fill in crushed stone of medium or small fraction with a thickness of 10 cm, which is also compacted.
- The entire pit is : floor and walls.
See also: Catalog of companies that specialize in the design and construction of small architectural forms.
Waterproofing
Waterproofing the inspection pit in the garage is an important step. So understand the process.
To carry out waterproofing work, roll material is used. This can be a polyethylene film with a thickness of at least 0.2 mm, laid in a sleeve. For this, roofing felt or modern bitumen-based waterproofing materials are used.
Waterproofing strips are laid in strips from wall to wall, overlapping each other with an offset of 10-15 cm. Bitumen products in the overlap areas are secured with bitumen mastic. The polyethylene film is secured with self-adhesive tapes. The photo below just shows the option with polyethylene. Please note that the edges of the waterproofing are brought outside the hole and pressed with a weight.
Waterproofing an inspection hole in a garage using plastic film Source martand.ru
Formation of floor and walls
The prepared bottom is filled with a screed 3-7 cm thick. There is no need to put any reinforcing frame into it, because the structure is not subject to loads other than the weight of a person. Therefore, the main focus is on the construction of walls.
As mentioned above, there are two options:
- use bricks or blocks;
- build a monolithic structure.
In the first case, block wall material is laid around the perimeter of the prepared pit, laying masonry elements with a band. That is, with an offset of half a block or brick. For bonding, a regular masonry mortar with a 1:2 recipe (cement-sand) is used.
Pit made of blocks or bricks Source drive2.ru
If a monolithic structure is being built, then formwork is assembled for this. It is made from boards, slabs or sheets of smooth and durable materials. For example, from metal sheet or corrugated board, plywood or OSB boards.
The main task is to assemble the formwork so that it does not move apart under the influence of a sufficiently large weight of the poured concrete. If the soil under the garage is clayey, then the formwork is installed as one layer of fencing from the outside. The wall of the pit covered with waterproofing can easily withstand any load. If the soil is sandy, loose and fragile, then the formwork is installed in two layers, leaving space between them for pouring concrete mortar.
Concrete is poured at one time, without leaving it for the next day. There may be a break between fillings, but no more than 4 hours. Look at the photo, this is what the formwork looks like with concrete mortar poured into it.
Inspection pit as a monolithic concrete structure Source azowo.ru
Peculiarities
If you have a small plot of land next to your house, you can do a lot of interesting things with it. The main thing is to make full use of every free square meter. In a small area, you can create with your own hands a place where you will have a pleasant time both alone and in a noisy company of friends. Even a small square of land can be arranged in such a way that there will be something to do on it for both small children and experienced gardeners.
True, before you start designing a summer cottage, you need to take into account all its features. If you have never gardened and know nothing about working with the soil, then it is best to immediately seek help from professionals.
Plastic models
Today, manufacturers of products made from polymer and plastic materials offer ready-made plastic pits for the garage. We must pay tribute to this type of product, which simplified the construction of inspection pits. There are more and more offers on the market every year. There is not only a wide range of sizes, but also a variety of raw materials, and prices vary significantly.
There is no need to waterproof the finished pit. The main thing is to lay a good sand cushion and fill the space between the walls of the dug hole and the plastic product with sand.
Option for car repair
There are various options for inspection pits. You can find seated, standing, combined with a cellar. In the first case, work is carried out standing. In the second, they move using a seat equipped with rollers and running along guides. This saves the cost of arranging walls.
Before carrying out work, the following features must be taken into account:
Waterproofing is a mandatory design element that affects the entire room. If you refuse it, there is a possibility of turning a dry and warm garage into a damp room. In this case, the car standing above the pit will become damp and corroded. Installation of a power circuit around the perimeter of the structure. The reinforcement or table frame holds the trench walls, preventing collapse under static pressure. Additional reinforcements are installed in the wheel area. For ease of work, special niches are made in the structure
Standard dimensions are 300 x 200 x 450, respectively height, depth, length. The structure must be equipped with ventilation to eliminate the accumulation of oil and gasoline vapors. Attention should be paid to lighting. Power supply should not exceed 36 volts
If the voltage is high, there is a risk of fire. The cover for the structure is made of wood and serves to ensure safety.
Typically, such pits are slightly shifted towards one wall, leaving the other for storing auto parts and tools.
Safety precautions
Repair work related to lifting passenger vehicles to a height is carried out in compliance with safety regulations. Lifting the car using a jack is carried out with a preliminary inspection of the device for the absence of mechanical damage and the ability to withstand the weight of the car.
When using non-standard methods of lifting a passenger vehicle, observe the following conditions:
- carry out work on a flat surface when placing the machine for long-term repairs;
- choose places with dense, motionless soil;
- use stands and racks made of durable material - metal, stone, thick wood;
- lift the car using reliable devices or with the involvement of at least 4 people;
- lift the underbody in the area of the side members so as not to cause deformation of the structure;
- when installing the bottom on the racks, fix the elements together to eliminate the risk of the car sliding off;
- ensure a stable position of the vehicle. Hang the body on 2 or 4 racks to achieve balance;
- install homemade shoes or wheel chocks under the wheel elements;
- After fixing the machine, apply the handbrake;
- Use several jacks to lift the vehicle. Lend devices for temporary use to ensure a safe position of the body on the racks;
- keep your mobile phone handy. During repairs, you should be able to call your family or emergency services if the car suddenly falls off the makeshift rack;
- Place the supports on a flat, solid surface. Place a metal sheet, wide board or thick plywood under the structure;
- Place a blanket under the workplace, use special clothing and protective equipment when carrying out repair work.
Important! Distribute the weight of the machine evenly on the supports. Skewing the mass to one side can upset the balance. A thoughtful arrangement of the car on 2 or 4 racks will eliminate the occurrence of traumatic situations or mechanical damage.
There are many ways to lift a car easily and safely without a jack. The passenger car is lifted by a crane, driven onto a mini-overpass, placed on supports made of rims, boards, bricks, or placed on a curb stone. It is important to follow safety precautions when lifting heavy loads to heights.
Cellar drying methods
Removing liquid from the basement and drying it out is carried out in the warm season. Before this, you need to get rid of all the items that are in the cellar. Then the cellar with the garage is opened and dried for 3-4 days.
To speed up the process, you can place a bucket of wood in the center of the basement and light a fire. Using this method, drying will take 8-10 hours.
Kitchen design 12 sq. m. with access to the balcony
Any housewife will be pleased with the additional space. The balcony is used as an extension of the kitchen. There is a dining table in it. If you can’t turn your idea into reality, you need to take care of decorating the exit using draperies and glass doors.
Kitchen design 12 sq. m. with a balcony are chosen after studying photos of projects. If you expand the useful space, then there will be more sunlight. To develop an original version, the partition is removed. This is not always feasible for technical reasons, so property owners require official permission for such redevelopment.