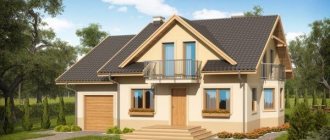
Topics devoted to the construction of garages, greenhouses and outbuildings traditionally arouse increased interest among FORUMHOUSE users. This is reflected in the demand for such objects on the site and the possibility of their independent construction at a reasonable price. Many people start building a large house with small architectural forms - you can improve your skills and test your strength.
Our portal has already told you how to build a budget and functional shed. In today’s material we will tell you how to build a frame garage on wooden poles with your own hands using the example of a step-by-step description of the story of a portal participant with the nickname Alano.
Types of frame garages
Like houses, garage buildings are divided into those built of stone, built of wall panels and lightweight, panel or frame.
The latter do not require a strong foundation and are cheaper to build. A frame house does not mean a card house: it is a serious, long-term structure intended for long-term use. Depending on the type of frame, garages can be made of metal or wood. By functional purpose - combined with a workshop, for one or 2 cars. In such a garage you can, without fear, park a car or motorcycle, and use it as if it were a “real” one. Thanks to the strong supporting frame, the building can withstand significant loads and is designed for a long service life.
Cost calculation
The cost estimate will be affected by the cost of materials - wood, fasteners, fittings. It's unavoidable. It is possible that transport services will be added for the delivery of wood or the ordering of a concrete mixture for pouring the foundation, or the supply of crushed stone.
In general, the construction will cost much less than a capital garage, and the labor will be free, thanks to the construction of the building with your own hands. In order to save money, construction can be extended over time (within reasonable limits), gradually accumulating materials and constructing such a necessary, inexpensive and extremely attractive external garage.
Blueprints
Many people have problems with building a garage at the design stage. This is not surprising, since this process is the most complex
The fact is that its importance lies in the need to think through the design as much as possible, because the parameters of a structure for 2 cars will differ significantly from the characteristics of a garage structure for one car
Its height will be about three meters. But a garage of 6x4 m is a standard figure. It won't fit two cars, but there will be more than enough space for one. But it all depends on the characteristics of the car itself.
If you need to calculate the parameters yourself, then when taking into account the dimensions of the car, you need to add 50 centimeters on the sides for opening the doors, one meter on the trunk side and about 60 centimeters on the other side. The height is determined by the height of the owner and an additional 1 meter is added to it.
Garage Doors
Installing a gate is practically the last stage of construction work, but the comfort of using a motorhome depends on the quality of its implementation.
Which type of gate to prefer will be determined by the car owner himself. But you should make a choice taking into account your own experience in such matters. If you have one, you can take on complex options such as sectional, roller shutter, lift-and-turn or swing options.
If experience is minimal, prefer swing double-leaf models. They can be purchased ready-made or made yourself.
To create a frame frame, use a profile pipe or timber. The frame is sheathed with metal sheets or corrugated sheets. Beforehand, clearly take measurements from the doorway so that the gate fits it.
In addition to covering the frame of the future gate, you need to have four hinges for two leaves, as well as two more for a small door in one of the leaves of the structure. A reliable lock that fits completely behind the front door will help protect the internal contents of the building from strangers, leaving only a tiny key hole.
Do-it-yourself garage made of planks - step-by-step guide with photos
We begin construction by purchasing or collecting all the necessary materials. First of all, stock up on 5-6 cubes of 40 mm boards. It will go to the frame of the building. If you are thinking about how to make a warm garage out of boards with your own hands, then buy 5-6 packs of insulation. It is best to take Penoplex or Isover slabs with a thickness of at least 50 mm. For vapor barrier, you can use regular film or take a roll of glass insulation.
20-25 mm boards are suitable for roofing and wall cladding
If you are going to make a concrete mixture for the foundation yourself, then prepare 5-6 bags of cement and quartz sand, fraction 0.25-0.5 mm. Once all the materials are on the site, you can begin to build the foundation.
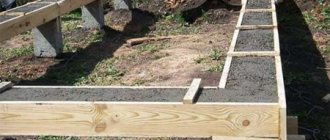
Foundation for a garage made of boards
Foundation for a garage made of boards
First, you need to remove construction waste from the location of the future structure. Then the fertile layer of soil is removed to clay or sand, depending on the soils that predominate in your summer cottage. The next step is to fill it with sand to a depth of 3-4 cm. Thoroughly compact the resulting cushion and secure the formwork along the contour of the site.
Formwork for garage foundation
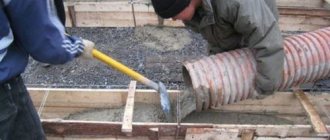
For wooden garages, either a slab foundation or a shallow concrete foundation is installed. In our case, you can quickly make a slab base, for pouring which you will need a frame of 30-40 mm reinforcement and concrete. The reinforcement frame is laid directly on the sand, the connection of the rods in the corners is made using bent elements. Fill gradually until the slab thickness is within 30-40 cm.
Pouring concrete foundation
Garage frame made of boards
Having decided on the height dimensions of the garage, you must first, before assembling the frame, cut the boards to the required dimensions and lay them out in packs on each side. In addition, experts advise treating with an antiseptic and any type of fire-prevention impregnation. They mainly use 50x100 mm boards for the garage frame, and to install vertical posts in the corners they buy 100x100 mm profiled timber.
Jib beams in a garage made of boardsTo build a garage frame from boards with your own hands, you need to start by forming the bottom trim. To do this, attach cut boards to the bolts in increments of 1.5 meters. To ensure the stability of the future structure, we insert struts, which we secure with metal corners. Next, we nail 50x50 mm timber in the form of longitudinal ribs. We place vertical supports at a distance of 2-3 cm from the corners of the harness. We fasten them along the top with boards with 150 mm nails. If the frame turns out to be unstable, additionally fasten the sides of the garage with boards diagonally. The garage frame made of planks is ready.
Covering the frame of a garage box
Garage top frame made of boards
Before covering, you need to solve the issue of insulation. If you will not use the garage as a workshop or a place for car repairs, you don’t have to additionally insulate the walls. Otherwise, fill all seams and voids with polyurethane foam. Then you nail the boards along the entire perimeter of the garage box, leaving only space for the gates and windows.
Garage sheathing from boards inside
On the inside of the garage, use screws or foam to attach sheets of thermal insulation material, having previously laid a vapor barrier. For exterior decoration, you can use siding or block house. If you want to save money, then before building a garage from boards with your own hands, prepare a planed board and cover it with drying oil or varnish. In this case, external finishing for the walls will not be required. The inside of the garage is most often lined with plasterboard or clapboard.
Construction of a garage roof from planks
Garage roof made of planks
First, the rafters are laid on the vertical posts. For a gable roof, you will need to make grooves in the timber, since you need to connect the rafters at an angle of 35-45 degrees. Then the gables and cross boards of the roof are sheathed. Roofing felt is laid on top of the boards as the first layer, and the second layer is laid out with corrugated sheets or flat iron. It all depends on your budget and desire. You can see a photo of the finished garage made of boards with your own hands below.
Installation of timber walls
Before starting installation, it is necessary to carry out a number of preparatory operations: according to the project, cut the timber to length, number each element, make the necessary technological notches for corner joints, treat the wood with an antiseptic and fire retardant. It is also necessary to level the surface of the plinth or slab (along the perimeter) with cement-sand mortar.
The technology for constructing a log house has the following sequence:
- The base is coated with bitumen mastic and the first layer of roll waterproofing is laid. Bituminous mastic is applied again and a second layer of waterproofing material is laid.
- According to the pitch of the anchors, through holes are drilled in the timber of the first crown.
- In the holes, a larger diameter drill is used to make recesses for the nut.
- The first crown with a corner connection is laid according to the design. Check the level and, if necessary, adjust the position of the timber using roofing felt pads. Use nuts to tighten the harness to the base.
- Roll out the tape insulation and lay the second crown. The remaining crowns are mounted in the same way. For additional structural rigidity, in addition to corner joints, wooden dowels or metal pins are used.
To connect a beam along its length within one crown, a tongue-and-groove joint with additional reinforcement with a dowel is used.
The internal partition for a garage combined with another utility room is usually made from a smaller section of timber or boards. Therefore, it is installed after assembling the common box.
Step-by-step instructions for building a garage
Building a frame garage with your own hands is very easy if you follow the detailed instructions.
Technology for constructing columnar and pile foundations
The foundation for a frame garage can be made of concrete blocks or screw piles. The process of creating a concrete block foundation consists of the following steps:
- You can buy ready-made concrete blocks or cast them yourself. For this you will need forms and fittings. To prepare the solution, use cement, river sand, crushed stone, and water. Forms can be made from boards or plywood. They are boxes without a bottom with an aspect ratio of 2:1. The forms are placed on a table covered with polyethylene.
- Filling of forms occurs in two stages. First, they are filled halfway, then cut reinforcement mesh is laid, and the molds are filled to the end. After removing from the molds, the blocks need to be dried for several weeks.
- Now you need to prepare the site for the garage. It is cleaned of debris and roots, slightly buried and leveled. After this, it is recommended to fill the site with sand and make markings along the perimeter of the future garage.
- Concrete blocks are laid in two rows, tied together with cement mortar and masonry mesh. The first row is buried in the ground, the second is placed on top of it. Then you need to let the solution dry for several days.
- The outer side of the foundation must be waterproofed with bitumen mastic, which is applied in 2-3 layers (each of them must be given time to dry).
- After this, you can backfill the sand to the level of the soil surface.
You can make concrete blocks for the foundation for a frame garage yourself
It’s also easy to build a foundation on screw piles with your own hands:
- In the places where the piles are installed, shallow holes need to be dug.
- The piles must be inserted into them and screwed into the ground using levers. In this case, you need to align them vertically.
- After installing all the supports, the tops need to be trimmed horizontally.
- Fill the cavities inside the piles with concrete.
- Install the headbands to which the grillage is attached.
Detailed instructions for assembling a wooden frame
To do this you need:
- Waterproof the foundation surface with roofing felt in 1–2 layers. This is done to prevent wood rotting.
- Lay the bottom trim beam around the perimeter of the structure on the roofing felt. In the corners, connect it with notches and dowels.
- Install corner and side posts. The minimum distance between them is 2 m. The racks are attached to the bottom trim on metal corners with dowels and self-tapping screws. After installing the racks, the upper frame beam is placed on them and secured.
- Install intermediate racks made of boards at a distance of 0.5 m from each other. Attach horizontal jumpers between them using corners and self-tapping screws. It is convenient to select the distance between the racks and the height of the fastening of horizontal ties according to the size of the insulation, so that later you do not have to install additional sheathing for it.
Since the garage will have a pitched roof, one of the walls should be higher. This is taken into account when installing vertical posts, which need to be made of different heights.
Installing a roof on a wooden building
Installation of a pitched roof for a frame garage is carried out in the following sequence:
- The floor beams are attached to the top frame beam using dowels or nails.
- A vapor barrier film is laid on the beams. It does not need to be pulled tightly, it should sag slightly - no more than 0.5 cm.
- A sheathing of boards is attached on top of the film in increments of 0.5 m.
- The roof you have chosen for the garage is being laid - slate, metal profile, etc.
Most often, a pitched roof is chosen for a garage.
What type of cladding is needed?
Garage lining can be made from:
- metal profiles;
- OSB sheets.
For a wooden frame, the second option is more often used.
The sheets are fastened on the outside with self-tapping screws. You need to leave a small gap between them (2–3 mm). Over time, the sheets can change sizes due to temperature changes and high humidity, and the gaps will not allow them to push each other out.
Stone wool can be used as insulation. It must be laid between the racks, not forgetting to fix it with the inner lining. Before laying the wool, you can attach a windproof film to the walls.
If desired, the frame garage can be insulated from the inside
Finishing
External and internal decoration of the walls of a frame garage can be any:
- plaster;
- painting;
- facing with siding.
This is done to protect the wall from atmospheric influences. Before applying plaster, OSB sheets must be treated with a special primer.
How to choose the right place to build
When choosing a place to install a collapsible structure, several circumstances should be taken into account:
- the place must be dry (not flooded by precipitation);
- the building should not block the windows of neighboring buildings;
- the garage is installed at a sufficient distance from neighboring buildings so that it is possible to install water drainage systems from the roof.
In addition, it is recommended to install the garage so that nothing blocks the passage for the car.
Garage finishing and insulation
Next, work is carried out on cladding, insulation and waterproofing of the garage. Various materials can be used for cladding:
For insulation, you can use any material offered on the construction market. But it is advisable to give preference to non-flammable mineral wool.
When constructing a “pie” of garage walls, you can use many of the options found on the Internet. After all, this is a non-residential premises. But there are two basic rules that will save you a lot of time when comparing all designs.
- The vapor barrier is installed indoors (on the warm side).
- Wind protection and waterproofing - outside. It will save the garage frame during bad weather.
The rules apply to both the structure of the walls and the roof of the building. In general, garage insulation layers usually look like this (from the outside):
- external finishing;
- wind protection;
- OSB type board;
- insulation;
- vapor barrier;
- layer for interior decoration, for example, plasterboard.
This option is shown in the photo. There may be other assembly methods. For example, a “pie” without OSB, which is needed to prevent the insulation from becoming damp. Or without wind protection.
Finishing work
The final stages of the work consist of arranging the roof, and for its cladding you can use corrugated sheets or metal tiles. Additionally, the garage is insulated, for which mineral wool or other suitable insulation is laid between the parts of the frame.
After this, various utilities are connected to the structure, which include heating and electricity. Next, gates, windows and doors are installed, for which appropriate openings must be provided in the frame.
Examples of building a frame garage step by step
We will describe methods for building an insulated garage and an option without insulation.
Insulated garage with gable roof
Assembling the frame timber.
Do you want to build a second frame garage for 2 cars with your own hands? There is nothing easier if you read this article to the end. A gable roof is characterized by uniform heating, high thermal insulation parameters, and is well ventilated, which is why the popularity of such structures is high.
And additional insulation of the garage structure will create an optimal microclimate for humans inside it.
We will briefly describe the current work during the construction and insulation of a pox garage with a gable roof. The drawings have been created, we are moving on to the phased implementation of the work.
The first stage is preparatory:
- clearing the site of debris and topsoil;
- marking is carried out, right angles of the perimeter and blind area are determined.
The second stage is installation of the base:
- planning the marking of the location of foundation pillars along the perimeter of the building inside a fenced area of soil;
- installation of two supports with equal spacing on each long side, one on the short back and one in the center;
- installation of an additional post in place of the vertical posts of the future gate opening;
- installation of slats on top of the box so as to leave a square hole in the center of the building for a cement-asbestos pipe;
- pouring crushed stone into the finished foundation pit, compacting it, installing a wooden formwork box on top of the crushed stone layer;
- filling the formwork with a solution of concrete, sand and cement (proportions 3:1), leveling the surface with a rule, trowel, spatula;
- installation of a pipe with a diameter of 150 mm in the central part of the box;
- filling the space around the pipe with crushed stone after the concrete has set, compacting the crushed stone;
- filling the pipe with concrete solution, installing long metal embedded elements with two pre-arranged holes in height;
- waiting until the concrete hardens.
The third stage is assembling the frame:
- waterproofing the base;
- assembly of a frame from metal structures - metal frame, from wooden bars, from combinations of metal and wood - wood-metal.
Type of connection of frame elements.
The fourth stage - roofing work:
- arrangement of the roof frame;
- installation of lower and upper trim made of timber;
- arrangement of a water drainage system;
- covering the roof with roofing (it is excellent to choose materials that are characterized by modularity: modular panels, siding, etc.);
- installation of gutters, under roof overhangs, in holders;
- Insulation work will allow you to build a warm garage.
The fifth stage is the final one:
- internal wall cladding in a built garage: we use decorative slabs, wooden boards, rolled metal sheets;
- external wall decoration using siding and decorative panels with your own hands.
Wooden frame garage without insulation with a pitched roof
A 6 by 6 frame garage with a pitched wooden roof can be left without insulation, which will save significant material resources.
A wooden frame garage is ideal for temporary storage of cars.
Assembling the roof of a frame garage.
It is built similarly to the previous design, but with some features:
- Preparatory work: marking the site, clearing it of soil, choosing the location of the posts.
- Organization of the pit, installation of supports for the foundation, laying timber on the foundation pillars for the bottom frame of the structure, installation of the board on the foundation pillars on the edge, front corner vertical posts made of timber, two more blocks according to the markings.
- Forming the base of the frame. The rear wall consists of four racks spaced at equal intervals, but of different heights to form a slope for the pitched roof; the vertical bars are fixed to the frame using powerful metal corners.
- The top trim has its own peculiarities: you need to tie the front and rear posts separately with a horizontal beam to form a base for mounting the rafter legs. Next, the location of the rafters is marked, their installation is carried out, floors are created from boards, vertical posts are mounted in the middle of the sides of the building and connected by a crossbar to which the rafters are attached. Next, the side posts are connected in the middle part with boards, and sheathing boards are installed across the rafters. And only then the roof is sheathed.
- After covering the roof, they move on to finishing the walls of the garage, for which it is worth using wooden beams or wooden lining.
Frame covering
Next, the completed frame is sheathed with suitable materials. To do this, you can use corrugated sheets, sandwich panels or other similar panels. You need to select a specific material before creating the frame, so that the optimal distance is left between the individual wooden elements.
Suitable fasteners are selected for fastening the sheets. Usually, holes for fasteners are made in different panels at the factory, which greatly simplifies the procedure for covering the frame.
Suitable materials: wood, metal, sheets, panels
Unlike residential buildings, the garage has several features:
- It is not necessary to maintain a constant temperature at 18...25 degrees Celsius. According to SNiP 02/21/99, for heated garages 5 degrees Celsius is taken as the norm; for unheated garages this parameter is not standardized. At the same time, in case of frequent need for urgent departure, the use of heating is recommended;
- constant supply and exhaust ventilation is required. In fact, this requirement is only met for sealed rooms, since there is no possibility of natural ventilation;
- No sound insulation is acceptable. It is required only if the garage is adjacent to residential premises or there are recreation areas nearby.
There is a requirement that is just as important for a garage as for a regular home: high-quality waterproofing. Moreover, unlike residential buildings, here the requirements for a certain level of humidity are especially stringent, since even high-quality cars and other equipment (as well as materials and equipment traditionally stored in the garage) quickly corrode at high humidity and can fail
It is impossible to meet fire safety requirements in garages made of wood and wood-based panels and slabs: even impregnation with fire retardants does not provide a complete guarantee of non-flammability.
As a conclusion, we can recommend the following materials for the construction of frame garages:
- timber, board, lining. Impregnation with an antiseptic and, if possible, a fire retardant is necessary; surface protection in the form of several layers of paint or varnish is desirable;
- wooden frame (timber, board) covered with OSB, chipboard, fibreboard, MDF, siding;
- rolled metal (profile pipe, angle, channel, strip) covered with slab materials or siding;
- rolled metal covered with corrugated sheets;
- mineral (stone, basalt) wool, glass wool as insulation or expanded polystyrene/foam for cladding.
For roofing, roll materials with mandatory overlap and additional waterproofing, as well as metal tiles, are often used.
Drawing up a project and cost estimate
Wood frame garage project
Before starting to design a frame garage, they study the features of the materials used in its construction. The length of standard boards and timber is 6 m. You can order products of other sizes, but you will have to pay extra for this.
In order to maximize cost savings, the geometric parameters of facing and roofing materials are also taken into account when designing.
For a 3x6 garage with a wall height of 3 m you will need:
- timber 150x150 mm – 1.6 m3;
- boards 50x150 mm – 2.1 m3;
- boards 25x150 mm – 1.9 m3;
- boards 50x100 mm - 0.7 m3 (for the floor, if it is wooden).
The advantage of frame construction is that you can save on lumber for formwork. It is constructed from what is available, but to protect it, the shields are covered with thick plastic film. After dismantling the formwork, the boards are used for their intended purpose: to erect a frame.
Mandatory budget items
| Purpose | Materials |
| Foundation made of monolithic reinforced concrete slab | — hydroglass insulation or roofing felt for waterproofing; - sand for filling the “pillow” with a thickness of 20-30 cm; — concrete M-300; - metal rods for reinforcement. |
| Frame of walls and ceilings, rafter system | — timber 150x150 mm; — boards 50x150 mm; - boards 50x100 mm. |
| Cladding of internal and external walls | OSB-3 (thickness 9 mm) |
| Roof sheathing | Boards 25x150 mm |
| Roof cladding | Ondulin, corrugated sheets, flat or wave-shaped slate, flexible tiles, metal tiles. Board 25x150 mm for filing eaves overhangs. |
| Insulation of walls and ceilings | Basalt slabs Rockwool “Light Butts” 150 mm thick. |
| Fire protection of wood | "Senezh Ognebio" |
| Fasteners | Metal corners, wood screws, nails. |
On average, the cost of materials for the construction of a 4x6 m garage with a wall height of 2.7 m is 278 thousand rubles. (data current as of early 2021). The work of specialists in the construction of a building costs 180-200 thousand rubles.
To find out the exact amount of materials needed for the construction of a frame garage, you can use an online calculator that performs calculations in accordance with SP 31-105-2002.
To do this, you need to specify the structure parameters:
- length;
- width;
- height;
- step between floor beams (recommended 400 mm);
- pitch between row frame posts (recommended 600 mm);
- insulation thickness (100-200 mm).
Preparatory activities
Self-construction of a cinder block garage begins with a number of important preparatory activities. Follow the given sequence.
Selecting a location
First of all, we choose a suitable place to build our motorhome. It’s convenient when the garage is located next to the house - in bad weather you won’t have to get wet in the rain and wade through snowdrifts.
Selecting and preparing a garage location
It is better that the garage is located at a minimum distance from the exit from the site. The number of turns should be minimal. It is not recommended to build a cinder block garage in a low-lying area, because... this threatens flooding with atmospheric and groundwater.
Be sure to make sure that there are no communication lines at the planned construction site, such as:
- water pipes;
- power lines;
- sewerage and heating pipes.
If the listed communications break down in the future, the presence of a garage will significantly complicate their repair.
Layout of a garage made of foam blocks Layout of a garage made of foam blocks
Make sure that when constructing a garage in the chosen location there will be enough space for opening the gate. It would be useful to have a free space to park your car during washing and other work.
Construction site marking
Marking the area for the foundation
Having chosen a suitable place to build a garage from cinder blocks, we proceed to marking the site. At this stage you will need a small set of auxiliary tools, namely:
- reinforcing bars or other similar devices;
- hammer for driving rods;
- dense thread for pulling between pegs;
- tape measure for measurements.
Before starting marking work, you need to accurately determine the dimensions of the future structure. At this point, focus on the following factors:
- available free space on the site;
- financial opportunities;
- individual preferences and needs.
If a cinder block garage will be used as a place to store a standard-sized car, a structure measuring 6x4 m and a height of 2.5-3 m will be enough for you.
The six-meter length is due to the dimensions of the car (on average 4-5 m) with a half-meter margin for unhindered passage. The width of the car is on average 200-250 cm. Approximately 70 cm should be left for passage, installation of shelving and storage of various types of materials used in the garage.
Approximate garage dimensions
If you wish, you can adjust the dimensions of the building at your discretion. There are no strict restrictions or standard dimensions for cinder block garages.
Marking the site for the foundation
Construction site preparation
Preparatory work before the construction of a frame garage is extremely important, because the final result of the work largely depends on the quality of its implementation. We begin work by selecting a site for construction, clearing it, creating a drawing of the future structure with a selected description of all its details and features of the site itself.
The better the area is cleared of existing outbuildings, dilapidated buildings, garbage, dry branches, grass, etc., the more strong and durable the foundation for the future motorhome will be created. And without a good foundation, a frame for a garage is unlikely to be truly reliable.
Important! After cleaning work, it is important to thoroughly level the area and apply markings along the entire perimeter. Leave 0.5 m on each side of the future building cleared; this area will be required to create revenge.
In the marked area, you need to remove the top fertile layer of soil 15-20 cm thick. The use of special equipment will significantly speed up the process of completing the work, but to save money, this operation can be performed using a bayonet and shovel.
The first will allow you to easily mark the border, the depth of the soil layer, and trim it, the second will allow you to remove excess soil. Among the tools in the process of preparing a site, you may also need a rule, a plumb line, a broom, a dustpan, a wheelbarrow, or a roller.