“A car is not a luxury, but a means of transportation.” According to sociological surveys, 83% of Russians think so. 57% answered that they treat the car as a member of the family, that is, they want it to have housing - a garage. Finishing the inside of a garage is a task similar to finishing residential premises. At the same time, there are also specific features. Let's look at them.
What does finishing work in garages include?
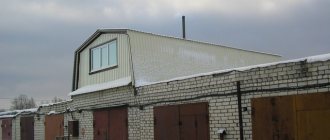
Architecturally, garages are designed as:
- detached houses;
- “tape” type, characteristic of garage cooperatives;
- premises built into private houses.
Collective underground garages or windswept 4-5-story structures that have appeared in the last decade in new areas of Moscow are covered parking lots; they cannot be considered full-fledged garages; they do not require finishing and are not considered here.
External
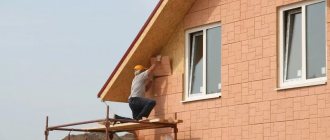
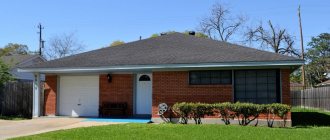
External finishing work performed for detached garages that are part of households must fit into the style of the buildings on the site. The material of the walls is secondary, since modern construction technologies imitate any. Built-in garages receive external finishing as part of the exterior of a residential building. Cooperative garages do not suffer from the word “generally” in their exterior decoration.
Domestic
The interior decoration of the garage shows the taste and skills of its owner. When thinking through the upcoming finishing work, you need to be able to harmoniously fit the functional areas into the garage space:
- parking space, i.e. the area directly occupied by the car;
- repair area - workbench, tool cabinet;
- storage area for replaceable (“winter” - “summer”) tires;
- a place for the garage owner to relax - a sofa, a billiard table, a domino table - depending on preferences.
A garage in Russia is more than a garage! Therefore, in addition to the inspection pit, there are basements for food supplies, storage rooms for irrelevant things and full-fledged rest rooms. These components are also taken into account in the project.
Bottom line
Cladding a garage is a complex multi-step procedure that requires consistency in actions. When planning the decoration of the interior of a room, it is necessary to take into account the properties of the materials and correlate them with the requirements of the room, as well as with the allocated budget.
It is recommended to start cladding from the ceiling, since good waterproofing affects the condition of other types of finishing and materials. It is important to remember that vehicles are stored in the garage, so the finish should provide optimal conditions for their storage.
Which finishing method would you prefer? Share in the comments!
How to decorate the inside walls and ceiling
The interior decoration of the garage is carried out using proven construction technologies.
Important! The garage finishing material should:
- be resistant to mechanical damage;
- easy to clean if dirty;
- do not absorb odors of exhaust gases, fuel, lubricants;
- have fire resistance.
Let's look at nine garage finishing options:
Plaster
A finishing method that has been used for centuries. Suitable for decorating the inside of a garage with your own hands. Requires skills. If they are not there, the garage is a suitable place for self-education. Plaster is applied to brick and concrete walls. Good luck if the brick wall was laid without sealing the vertical seams between the bricks. The remaining voids will hold the plaster after application.
Walls made of other materials can also be plastered. For adhesion, shingles are stuffed onto a wooden surface - thin narrow slats, nailed crosswise, forming squares with a side of 12 - 15 cm. The slats are traditionally attached to the wall at an angle of 45° to the floor or ceiling. Today, plastic or metal meshes are more often used. The effect is the same, but the labor intensity is less. Surfaces made of other smooth materials are prepared in the same way.
After the described surface preparation, “beacons” are mounted on the wall. They are made from thin, even bars or purchased special galvanized metal profiles. The latter is preferable because it is simpler. Beacons are mounted vertically at a distance of 1 m from each other. The mounting method is determined by the wall material.
For plastering, prepare a solution based on cement or lime. For a garage, a cement base is preferable, since such plaster withstands moisture better. The composition used is as follows:
- cement grade 400 or higher;
- sifted sand;
- water, added during mixing, until the consistency of thick sour cream is obtained.
Important! The initial mixing of cement and sand is done manually to avoid dust formation. Since cement mortars take a long time to dry, you can prepare a large portion at a time, periodically stirring the composition to maintain homogeneity.
The finished plaster mixture is “thrown” onto the wall, starting from the floor, using a trowel or plaster ladle. The latter is more difficult. The “sketching” motion is vigorous, such that the mixture sticks to the wall. After completing the sketch, the plaster is leveled using the rule.
PVC panels
PVC panels are made from polyvinyl chloride, which contains 57% chlorine and 43% ethylene. The binder is lead. Despite the toxic ingredients, the “cocktail” turns out to be harmless to health. Such panels are used in public, residential and commercial premises. Also suitable for the garage. Decorating walls in a garage with PVC panels is a process that does not require production skills. They are glued to a flat surface.
In case of large unevenness, they arrange lathing. In this case, the panels are secured with a stapler. The staples are placed on the edges of the panel, which are invisible after installation. The corners, bottom and top, edges are decorated with appropriate corner and plinth elements. The space between the sheathing elements is filled with insulation.
Important! The quality and price of PVC panels are values that correlate with each other. You shouldn't be too keen on being cheap. It is more appropriate to ask the seller whether the purchased panels will change color over time, and whether they will become excessively fragile at low temperatures.
Since PVC panels are not highly resistant to mechanical stress, it is advisable to use them not on all surfaces of the garage, but where the likelihood of accidental damage is minimal: on the ceiling or in the recreation area. The entire garage is also finished with durable panels.
Tile
This finishing material in relation to the garage has both positive and negative qualities. The first include:
- hygienic, dirt can be easily washed off the tiles;
- tolerates high humidity;
- allows the creation of artistic panels.
The disadvantage of tiles is their fragility and roughness under random mechanical influences.
The technique of laying tiles is traditional. Uneven walls are leveled with plaster. Next, mark the first row from the floor. The correct installation is controlled by level. To obtain the same distance between the tiles horizontally and vertically, use plastic crosses. After the adhesive has dried, the crosses are removed and the seams are sealed with a color-matched grout.
Plywood sheathing
The interior of the garage can be decorated with sheets of plywood. To do this, sheathing is installed on the walls and ceiling. The distance between the bars is set within 50 - 60 cm. If associated insulation is assumed, then the size between the bars is chosen according to the size of the insulation sheet.
Before installation, plywood is impregnated with a fire-retardant composition on both sides at least twice. Impregnation is carried out with a brush, roller or spray gun. Upon completion of installation, a paint coating is applied to improve the appearance and facilitate the removal of possible contaminants from the wall surface.
Important! Impregnation with a fire-retardant compound does not make plywood non-flammable!
Wood finishing
Decorating a garage with wood, i.e. imitation blockhouse timber or planed edged boards, is done using the same technology as sheets of plywood. The flammability of the material, even with the correct use of appropriate impregnations, remains the main weak point of this choice.
As with plywood, it is possible to place a layer of insulation under the wood sheathing. The imitation timber and blockhouse are placed horizontally. The edged board can be placed vertically by closing the gaps between the boards with slats. After finishing, the surface of the walls and ceiling is covered with paints and varnishes.
Walls and ceiling with installed sheathing.
Installed wood paneling.
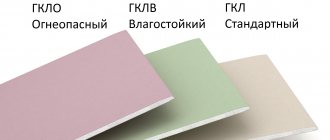
Drywall
The technology for installing drywall on the walls and ceiling of a garage is no different from a similar process in other rooms. Metal profiles are installed. Verticality is controlled by the building level. The drywall is attached to the sheathing with self-tapping screws. The joints of the sheets are glued with a plastic mesh and puttied with starting putty. The heads of the screws are covered with it. After complete drying, the putty is sanded and a layer of finishing putty is applied, which, after drying, is also treated with sandpaper.
Lining
About finishing with clapboard, you can repeat what was said about wood. Among the features, we note the fastening to the sheathing not directly with nails or self-tapping screws, but with clamps, which are a cleverly curved bracket. It is put on the lining itself like this:
And it is attached to the frame with two nails. The installation step of the clamps corresponds to the step of the sheathing. For 1 m2 it takes 20 pieces. The first, starting, lining board is attached to the sheathing with nails or screws closer to the bottom edge. Next, clamps are installed on the groove located on top. One for each vertical beam of the sheathing. We attach the clamps to the sheathing with nails or self-tapping screws. We insert the ridge of the second into the groove of the first clapboard board. We settle it using a mallet and a tamping board. Then we repeat the process.
Important! We choose galvanized clamps and the size corresponding to the lining used.
Made of metal
The option is, in principle, possible, preferably with the availability of free sheet metal, and stainless steel. It cannot be recommended due to the susceptibility of “ferrous” metal to corrosion in conditions of high humidity and unjustified costs when using stainless steel.
Corrugated sheet
Can be used for garage interior decoration. The sheets are attached with self-tapping screws to a sheathing similar to the sheathing for plasterboard. At the same time, in conditions of high humidity, each hole for a self-tapping screw will become the center of corrosion damage.
Where is it better to insulate - inside or outside?
Some garage owners argue that it is better to insulate the room from the outside, as this will significantly save interior space. We really have to agree with this. Some thermal insulation materials begin to release substances harmful to humans into the air when interacting with the environment. They are dangerous to install indoors, but they are perfect for external thermal insulation.
But there is also the other side of the coin - the insulation materials used will be constantly affected by precipitation: snow, rain, hail, strong gusts of wind, etc. Therefore, the service life of materials is reduced to 2-3 years, while indoors they can last 10 years, or even more.
You can insulate the garage both outside and inside at the same time. At least the roof. This will help get rid of condensation that may collect on the roof and drip through cracks.
Floor finishing
Tree
Wooden flooring is sometimes used in garages. This is usually done in places where wood is abundant. By going this route, they take into account the weight of the car and increase the thickness of the floorboard. Instead of 35 mm, use 70 mm, or lay the floor in two layers. Lags are also placed more often. 400-450 mm instead of the traditional 500-600 mm. Before use, wooden floor materials are impregnated twice with an antiseptic. The heads of the nails or heads of the screws used to fasten the floorboards are recessed deep to prevent damage to car tires.
Concrete
Concrete is a material often used to create garage floors. Has obvious advantages:
- durable;
- durable;
- moisture resistant;
- is not afraid of temperature changes in the winter-summer cycle.
The strength of a concrete floor is increased by laying metal reinforcement in the form of a lattice. For a passenger car, the fittings are chosen with a diameter of 14 mm. The main disadvantages: firstly, the complexity of the device. Secondly, “dusting” during operation. Over time, the concrete surface loses strength and is swept away with a broom. In industrial conditions, the surfaces of concrete products are subjected to steam treatment, which increases the strength characteristics. This technology is not used in construction site conditions. An alternative to a poured concrete garage floor is pre-fabricated concrete slabs. Their use should be considered at the design stage.
Asphalt and ceramic tiles
Asphalt absorbs oil spills that happen in the garage. During the hot season, harmful fumes may be released from it. Therefore, its use in a garage is undesirable. An exception may be made for detached garages located in cool climate areas.
Durable ceramic tiles, such as clinker, are used to finish garage floors over a concrete (reinforced concrete) base.
Self-leveling floor
One of the latest technologies to emerge is self-leveling floor technology. The basis for it is a smooth, strong, clean concrete base, covered with a special self-leveling compound 4-6 mm thick. Work in continuous mode to finish within 24 hours to avoid the formation of joints. The composition prepared according to the instructions is leveled using a wide notched spatula and a needle roller. Existing recipes for self-leveling floors based on epoxy resins or polyurethane make it possible to obtain high-quality floor coverings that do not require further processing.
To increase the decorative effect of the self-leveling floor, dyes can be added to the composition, including those that create a “porridge” effect.
Step-by-step instructions for insulating a metal garage
In order to reliably insulate a room, it is necessary to protect not only the walls, but also the floor, ceiling and gates.
Ceiling insulation
It is better to insulate the ceiling with foam plastic.
- If the ceiling is wooden, then the material can be secured with nails. If the top is concrete, then it is necessary to make a preliminary frame in which the foam is fixed. In this case, the material can be secured with electrical tape and then covered with plywood or clapboard.
- All joints and gaps must be sealed using polyurethane foam.
- The surface must be impregnated with antiseptics, cleaned and painted.
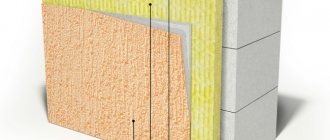
Wall insulation
Instructions for insulation with mineral wool
- Make a frame.
- Mineral wool is placed in it and fixed with special clamps.
- The top of the insulation is covered with a vapor barrier material.
- They do decorative finishing.
Mineral wool
Preparation of the base for insulation is carried out similarly to the previous option, but insulation of the garage walls from the inside in this case will differ in technology. First, you should assemble the sheathing from wood or metal parts. Usually, these are familiar profiles intended for installation of gypsum plasterboard structures. The installation step of the elements almost corresponds to the width of a roll of mineral wool or a hard mat made of the same material, but slightly smaller. This way the insulation will be securely fixed in the cells of the frame.
Next, you should take care to protect the insulator from moisture and lay a layer of waterproofing. Rigid mats of cotton wool insulation are placed inside the cells or pieces of rolled wool cut to size are inserted. The resulting structure is covered with a layer of vapor barrier and decorated to your liking. It should be taken into account that mineral wool will completely lose its properties when it gets wet and protect it as best as possible from water.
How does installation work?
Finishing garage walls with corrugated sheets will not create any special problems. Installing sheathing is very similar to working with drywall or other sheet materials. Everything happens approximately according to this scheme:
- First you need to clean and prepare for further work the wall that is to be sheathed. The preparation will include a primer - so that mold does not bother you, sealing cracks and other defects if necessary, as well as applying markings.
- Next, according to the markings, the frame is assembled. It can be mounted from metal parts or wooden parts - at your discretion. Metal is preferable, since the overall service life of the structure in this case will be comparable for internal and external parts. In the case of wood, the sheathing may become unusable before the sheathing.
- Next, the sheathing parts are attached, to which the outer sheathing will be directly attached. The frame turns out to be two-tiered - the outer parts must be fixed perpendicular to the sheathing sheets.
- Next, waterproofing is attached and, if necessary, insulation is installed. Typically, this role is played by mineral wool or polystyrene.
- At the last stage, the sheathing sheets themselves are attached. They should be attached with an overlap of one or two waves. Fixation is carried out with special self-tapping screws into the profile deflection. In some cases, fastening is done at the top point of the profile, but this installation method is not used too often.
The parts are easily cut to the desired size using ordinary metal scissors. This is necessary for extreme elements or in places where various utilities or load-bearing structures pass through the wall.
No. 2. Ceramic tile
Ceramic tiles are another material that almost completely meets all the requirements put forward, which is why this type of cladding is often found in garages. Its main advantages include:
- resistance to moisture and frost resistance, so harsh garage operating conditions will not particularly damage the coating;
- fire resistance;
- hygiene. Dirt does not stick to the surface, and if something happens, almost any dirt can be washed off the wall with minimal effort;
- sufficient strength;
- durability;
- wide choice and aesthetics. Ceramic tiles are produced in almost all colors, shapes and sizes, and manufacturers’ collections are replenished every season, so it will not be difficult to find a suitable material in this variety. Even the simplest plain tile will look great. From an operational point of view, it is best to go with clinker - it is stronger than ordinary tiles, although it does not have such a wide variety of colors.
There were some downsides :
- the cost of the material, as well as the need to pay for its proper installation if you can’t do it yourself;
- weight. Tile is a heavy material, so the optimal base for it would be brick walls;
- relatively long installation.
Since the main deterrent to the widespread use of tiles in garages is their price, you can use a trick by combining materials . The lower part of the walls is the most vulnerable, so clinker can be used here, and the rest can be made from cheaper tiles. You can make the bottom of tiles and finish the top with plaster. In this case, we get all the benefits inherent in tiled flooring, but we can save a lot.
Entrance trim
Insulating walls will not be beneficial if cold air enters through the cracks of the entrance gate or wicket. The situation is easily solved by using rigid insulation such as polystyrene foam. First, the gates are insulated, then the small entrance door to them is insulated. The sequence is:
- The metal surface is treated with protective mastic. Expanded polystyrene is not afraid of moisture, however, when opening the gate, raindrops or snow can get into the cracks between the material and the iron sheet. This should not be allowed.
- Attach lathing profiles along the perimeter of the gate.
- Fix the polystyrene plates to the mounting adhesive; it is advisable to apply penofol (a foil-based material) on top of them.
- Make a wooden sheathing for installation of the cladding. Provide a distance of about 30 mm between the future lining/plasterboard/other cladding material and polystyrene foam, so that there is an air gap.
- Fix the cladding to the sheathing.
- Perform similar actions with the gate.
No. 5. Wooden lining
If the garage serves not only as a place to park your car and repair it, but also as a place for privacy and meeting with friends, you can choose an aesthetically pleasing finish made of wooden lining.
Advantages:
- excellent appearance, environmental friendliness;
- high heat and sound insulation qualities;
- relatively low cost, especially when it comes to softwood lining, which is what is used in garages;
- high strength, resistance to mechanical damage;
- easy installation on wooden sheathing. The panels themselves are tightly connected thanks to the tongue-and-groove system;
- the lining has a small coefficient of thermal expansion, so the coating does not deform when temperature changes occur.
Disadvantages expected for wood flooring:
- fear of high humidity;
- fear of fire;
- high possibility of damage by pests and mold;
- Difficult to maintain, since stains from household chemicals are difficult to clean.
If you use a number of protective agents, then some qualities of wood can be significantly improved. Fire retardants will increase fire resistance, antiseptics will protect against mold, and varnishing will simplify routine cleaning procedures, since oil and other liquids will not be absorbed into the porous, hygroscopic surface of the wood.
Preparatory stage
When lining metal structures, it is paramount to take care of anti-corrosion treatment. To do this, you need to clean off any rust that is present on the surfaces with a metal brush, carry out patch repairs (of a specific small area) if necessary, and then paint the surface with a special anti-corrosion solution.
Sometimes the right question arises - how to insulate a metal garage for a long time if the surface is treated? The second important factor in ensuring comfortable conditions inside the garage is the creation of ventilation. It should remove air from the garage, replacing it with fresh air. Otherwise, the accumulation of gases will cause condensation, which will negatively affect the supporting structure of the garage, car or stored food.
After waiting for 1-2 days for the applied anti-corrosion solution to completely dry, the insulation of the metal box from the inside begins. It is advisable to carry out the work in the following sequence - insulate the walls, then the ceiling, the gate with a wicket, and, if necessary, the floor.
Choosing the optimal plaster solution
Before cladding the walls, it is better to select the optimal solutions for external and internal work.
For interior work
Previously, plaster compositions were used only for cladding the facades of premises, but now they are used to treat the inner surface of the walls of garages and residential buildings. Not every type of mixture is suitable for interior work and therefore you will have to select the most suitable material in advance.
Experienced builders advise using polymer mixtures to treat the interior walls. In their manufacture, polyurethanes, butadienes and epoxy resin are used. Also, for cladding garage walls, compositions made from quartz sand, slaked lime and white cement are used.
External
It is more difficult to select compositions for work carried out outside, since the outer walls need reliable protection from low temperatures and high humidity. Therefore, the selected composition must be moisture-resistant and frost-resistant.
Exterior finishing work can be done with silicone plaster, to which special fillers are added before starting work. Silicate mixtures of mineral microelements are also used externally. The main advantage of this type of plaster is that it is slightly dirty and covered with dust.
Prices of materials and their consumption
The amount of materials is affected by both the square footage of the garage walls and the defects of the walls. Manufacturers of plaster mixtures indicate on the back of the packaging the material consumption per 1 sq.m. As a rule, this is 10 kg per 1 sq.m. The bags usually contain 30 kg, in theory, this is enough for 3 sq.m. This is if you plaster with a layer of 10 mm. But taking into account the unevenness of the walls, it turns out to be more.
When using plaster containing cement and sand, the consumption is usually 17 kg per 1 sq.m. with a plaster layer of 10 mm. Gypsum plaster consumes an average of 30 kg per 1 sq.m.
You can calculate the amount of plaster, even if you are not a repair specialist, using the program on the Internet - Rodband plaster calculation.
The price of a regular cement-sand mixture is 50 hryvnia. Considering that it is enough for about 3 sq.m., the total amount of material can be calculated by simply dividing the area of the walls by 3. It is better to purchase mixtures with a small margin.
The consumption of facade paint is usually 150-200 grams per 1 sq.m. Accordingly, 1 liter is enough for 5 sq.m. 10 liter can of facade paint, which
Advantages and disadvantages of corrugated sheets in garage construction
Profiled sheets are considered an ideal material used in the construction of small architectural forms. Because:
- Its installation is a quick process . A small garage from corrugated sheets can be assembled in one or two days .
- Easy to install and fasten roofing screws are mainly used .
- Low cost of garage construction. Firstly, the corrugated sheeting is relatively inexpensive . Secondly, the services of craftsmen who will line the garage with profiled panels are also inexpensive because it is a very simple job.
- A garage structure lined with profiled sheets will last a very long time . There are examples of thirty years of operation of such buildings.
- The garage of this type itself is a lightweight structure . It can be easily carried or moved .
A garage made of corrugated sheets is a small and light structure. Source shedstolast.co.uk
See also: Catalog of garage projects presented at the “Low-Rise Country” exhibition.
- Corrugated sheeting is a metal material , therefore small architectural forms erected from it are objects that fully comply with fire safety standards and .
- coated with paint or polymer compounds are not susceptible metal corrosion processes . In addition, the raw material is galvanized steel sheet. Hence, in principle, the long-term operation of garages.
- Corrugated sheeting can be used to cover frame-type garages . In this case, the frame can be made from metal profile pipes , angles , lumber or light steel frames .
As for the shortcomings, there are only two of them:
- High thermal conductivity of metal panels. If you need to build an insulated garage, you will have to carry out thermal insulation measures . This applies to both the walls of the structure and the roof .
- Regardless of the thickness of the sheets and the height of the profile, all brands of corrugated sheets lose their shape under strong impact loads . It is impossible to return the original appearance after this. But profiled panels easy to replace . So the problem is easily solved.
Corrugated sheets do not withstand impact loads well Source valenteshop.ru
See also: Catalog of companies that specialize in the design of small architectural forms.
Features of performing work using a robot plasterer
Some professional builders use a robotic plasterer to apply the compound. With the help of this modern invention, it is possible to significantly speed up the process of plastering a garage.
The advantages of the equipment include its simple operating principle. Before starting work, the robot is installed near the wall. Then the plaster mixture is poured into it, after which the robot is turned on. He will perform all subsequent actions independently.
The only thing that is required from a person is to timely fill the robot with the working mixture.