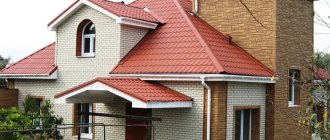
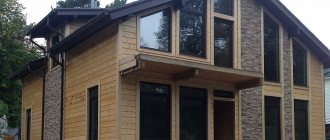
Many owners of private houses believe that insulation and facade cladding are incompatible with each other. In fact, convenient and economical options have already been invented to solve this problem. Facade thermal panels with clinker tiles are one of the most popular offers on the Russian market, combining these two indicators.
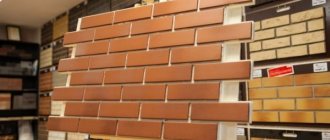
What are thermal panels with clinker tiles
Thermal panel is a building material that combines a slab with a hard surface and an insulating layer.
The most popular thermal panel with clinker tiles consists of 3 components.
- The first layer is insulation . It guarantees low thermal conductivity of the tiles, which reduces the heat transfer process and retains heat. consisting of polymer foam, a group of plastics. Its thickness varies from 20 to 100 mm. On average, it reduces heating costs by 50%.
- Next, lay clinker tiles. It consists of fatty clays. Externally similar to brickwork. The thickness of the tiles is from 7 to 15 mm. Can imitate bricks of different sizes and colors, stone surfaces.
- If desired, marble chips are added on top, which acts as the last reinforcing layer, giving the slab additional strength. It is not always used, but it is strongly recommended to be chosen by construction companies.
How to rub seams?
When choosing a grout, you need to take into account the material with which the seams of the panels are already filled. These can be either silicone sealants or cement mortars. Silicone can peel off after just a few years, while cement is much stronger. Therefore, it is better to give preference to cement grouts, especially if stone/brickwork is imitated.
The grout can be matched to the color of the thermal panels
The process of rubbing the seams itself looks something like this:
- A wide spatula or iron flat grout is prepared. This will be the stand.
- The mixture will be applied with a special device made from scrap materials or purchased in a store. The width of the device should be 1-2 mm smaller than the width of the existing seams; It is also advisable to bend it with the letter Z to make it more convenient to work.
- The portion is laid out on a stand, brought to the seam and little by little pressed into it. You should work carefully, making sure that the mixture adheres to the entire area; there is also no need to allow air pockets. The process of filling seams
- The tiles are cleaned before the grout mixture hardens, if the texture of the tiles is very uneven. To do this, use a wet rag or sponge (you need to periodically rinse it in water).
Joining seams
Temperature conditions when grouting joints
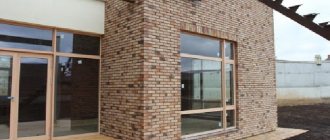
Near door/window openings, tiles must be cut especially carefully. When taking dimensions, slopes, platbands and other elements are also taken into account.
Installing a panel near the opening
Advantages of the material
Facade thermal panels have the following number of positive characteristics:
- The color does not fade as there are no dyes.
- Biostability – mold, mildew, and microorganisms do not form on the surface of the material.
- Chemically inert, does not rot.
- The properties of insulation and lined material are combined, which significantly reduces costs.
- The material has a long period of use - from 20 to 100 years, subject to operating standards.
- Variety of decorative elements.
- Environmentally friendly.
- Possibility to eliminate small defects of the wall surface.
- Minor soundproofing of the room.
- Possibility of laying material at any time of the year.
- Easy to install.
- The number of cold “bridges” is minimal, since the number of seams in this case is much smaller.
- Frost resistance.
- Immune to solar radiation.
- Insensitive to water.
- Resistance to temperature changes.
- Not interested in rodents.
- High fire safety rating.
- Moisture resistance, vapor permeability.
Stages of work
To install thermal panels correctly, adhere to the established technology. There are two ways to secure the panels to the plinth: on the wall or on the sheathing.
On a flat wall
If the wall can be leveled so that it does not need additional sheathing, then installation can be carried out on the surface without preliminary manipulations.
The following technologies are used for this:
- The surface is cleaned of debris and dirt.
- Where necessary, beacons are installed to hide small differences.
- It is best to install thermal panels with sealant; it will help avoid cold bridges.
- You can further strengthen the fastening using fasteners - self-tapping screws and bolts.
- When the panels are installed, the joints are grouted. To do this, choose a similar shade or a contrasting color option.
On the sheathing
If the wall has small irregularities, then you can save the situation by placing blocks or plywood. If the differences are too large, you will have to do additional sheathing.
To level the wall you need to create a good and durable frame made of dry wood. It is advisable to pre-treat the material used with antiseptic impregnation - this will avoid possible rotting and fungus formation in the future.
The technology looks like this:
- The lathing is done using a building level; it must be perfectly level.
- The base frame is deepened into the ground by 15-20 cm.
- The sheathing is done starting from the bottom corner and moving upward.
- Thermal panels are installed.
When installing panels, foam is used. It fills the space between the insulation and the wall. This move will avoid the cold, and will also additionally stop the air circulation, retaining heat. Thermal panels are attached to the sheathing using self-tapping screws.
Disadvantages of use
Despite the abundance of advantages, the material also has its disadvantages:
- The structure is heavy, so strengthening of the façade and foundation is required.
- Fragility during transportation and installation. If a tile falls from a small surface, there is a high probability of cracks.
- Difficult to prepare before installation.
- Despite the favorable cost in comparison with separate insulation and facade cladding, the material has a fairly high price. Production technology makes thermal panels practically inaccessible to the average developer.
Special solutions
When additional insulation of a house is required, it is no longer a simple wet masonry method that is used, but a special one, with the help of which a so-called ventilated façade is formed.
Features of the suspended ventilated facade White Hills - video
You can make such a ventilated facade from clinker tiles yourself, but given the complexity of the manufacturing process, craftsmen often resort to using ready-made factory frame structures. They are usually constructed from three types of profiles:
- Z-shaped;
- L-shaped;
- T-shaped.
They are connected to each other and the wall using brackets, clamps or screws.
The vertical posts of the structure are installed instead of the sheathing, and insulation must be laid between them.
Advice: To insulate the base, it is worth laying more convenient insulation in the form of slabs.
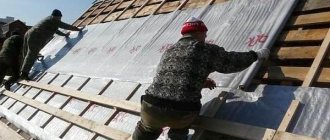
At the next stage, tiling the facade involves forming a layer of windproof material, and on top of it the supporting frame structures are mounted, onto which the finishing panel is subsequently fixed. In this case, laying the clinker panel on the facade can not be carried out immediately, but after a while.
Types of products
Based on the characteristics of the product, there are 4 classifications.
Based on the type of insulation, the following groups are distinguished:
- Mineral wool is an obsolete option, but still rarely found in Russia. It is a fiber of small thickness. It has excellent thermal insulation properties, but is afraid of moisture and does not meet fire safety standards.
- Polyurethane foam is the latest insulation material with a wide range of applications. Withstands temperatures up to 175 degrees Celsius. It is not afraid of moisture and does not shrink on the walls.
- Extruded polystyrene foam – has the best thermal insulation properties. A significant disadvantage is that it shrinks, which contributes to premature destruction of the finish. Its exact effect on thermal panels is unknown.
By location they are divided into 2 types:
- Base clinker thermal panels for the facade are fixed using plastic guides that go deep into the panels. Thanks to this technology, there is no stress on the frame. It is distinguished by its large size. They have small dimensions, but great thickness.
- Facade thermal panels are heavy and require caution during installation. They can last much longer - more than 100 years.
Based on their structure, there are 3 types of façade thermal panels:
- Two-layer - consisting of insulation and tiles. They can also add additional marble chips.
- Three-layer – OSB chipboards are adjusted. As a result, the structure is strengthened, becomes more moisture-resistant, tougher, and more durable.
- Four-layer - used to give the material the ability to self-extinguish. A refractory layer is added between the OSB board and the insulation.
Due to the differences in insulation, there is also a classification based on the method of attaching clinker tiles to the insulation. Use the following options:
- Dovetails are used for polystyrene foam. I make clinker with a trapezoidal groove into which the material is pressed. The method is reliable, but requires high costs.
- The adhesive is suitable for mineral wool and expanded polystyrene. A panel is made with special recesses. The clinker is placed in glue and left to dry under high pressure. The option is the cheapest and most accessible.
- Pressing is used for polyurethane foam. The clinker is placed in a mold, filled with material and kept under high pressure until the insulation hardens.
Finishing the base of a pile foundation
As you know, a pile foundation does not have a base. But if you don’t block off the space, there will be drafts under the house, the floor will always be cold, and all kinds of living creatures like to live under the house. Therefore, the base, although decorative, is necessary. It can be done in two ways.
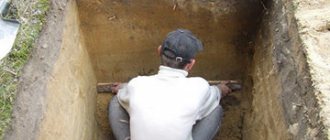
- A trench is dug along the perimeter between the supports, removing the fertile layer of soil and going 10 cm deep into the soil, the bottom of the trench is compacted, gravel is laid, and compacted again if possible. Then 2-3 rods of longitudinal reinforcement (10-12 mm) are placed and everything is filled with concrete. After 10-14 days, a half-brick wall is placed on the concrete base. You can use finishing bricks right away, or you can make them from used ones, and then finish them using any of the methods described above.
- This method is suitable for finishing the base with facade panels (basement siding) or corrugated sheeting. A frame made of impregnated timber is attached to the piles. The rest of the finishing process is no different from the standard. Except that it is very desirable to insulate this option.
There is one subtlety if the house is installed on screw piles or TISE piles. Such foundations are often placed on highly heaving soils. To prevent the finishing from being destroyed when the soil is raised, it is not brought to a certain distance to the ground. To prevent animals from crawling into the gap, a metal mesh is fixed at the bottom.
Dimensions and weight
1 sq.m of lined material weighs from 14 to 18 kg, depending on the thickness of the tiles, the type and thickness of the insulation, and the presence of additional layers.
To insulate buildings, a material thickness of 60 to 100 mm is used. In the case of reconstruction of buildings and structures, a thickness of 30-40 mm will be sufficient.
The length and width of the thermal panel depends on the scope of application:
| Purpose | Typical sizes |
| Corner panels | 24.5*26.5 cm, 26.5*65 cm, 24*67 cm |
| Additional elements | 64.5*67 cm |
| Basement dimensions | 95*65 cm, 30.2*14.8 cm |
| Row plantings | 114*69 cm, 114.5*67 cm, 159*59.8 cm |
Additional items
When purchasing thermal plates, the package includes corner elements, installation and hidden installation systems, special frames, corner and decorative elements for finishing window and door openings.
The use of elements for doors and windows is calculated immediately, but can be used after the main work on the walls, or simultaneously. Depends on the choice and technical features!
You can insulate a residential building or other structure with thermal panels yourself. The process is interesting and not so complicated
But it is important to initially decide on the price and characteristics of the material, perform the correct calculation and approach the process responsibly. This is the only way to get a successful result!
Characteristics and properties
The material interested people for its abundance of properties that make it durable and of high quality:
- Heat resistance.
- Noise insulation.
- Not susceptible to rodents or insects.
- Environmentally friendly.
- Biostability.
- Heavy weight.
- Frost resistance.
- Moisture resistance.
- Vapor permeability.
The properties of façade thermal panels with clinker tiles and polyurethane foam are determined by unique characteristic features:
- Service life more than 50 years.
- Withstands temperatures from -150 to +170 degrees Celsius.
- Low thermal conductivity - 0.029 W per m.
- In case of fire, releases large amounts of toxic gas.
- The internal pores of polyurethane foam are closed by 70% -75%.
- Density coefficient – 20 kg per m.
If we talk about thermal panels made of polystyrene foam, then they have a shorter service life (from 40 to 70 years) and a density indicator of 40 kg per cubic meter. m. It ignites well and has high thermal conductivity.
Mineral wool, which is rarely found as a thermal insulation material for facade thermal panels, has a thickness of 30 to 200 mm, its density is 25-200 kg/m3. This guarantees a high thermal insulation rate.
How to calculate the required amount of raw materials?
If the construction is carried out by a contractor, he will independently calculate the required amount of material. When finishing the base with your own hands, you need to calculate the volume of raw materials yourself.
To do this, you need to decide on the following indicators:
- type of sandwich panels;
- geometric dimensions of the base;
- amount of waste.
Typical dimensions of panels with metal sheathing are 1000x1200 mm with various lengths from 800 to 1800 mm. Since the sandwich panels will be mounted horizontally, this will allow them to be immediately placed along their entire length.
To calculate the required quantity, it is necessary to calculate the perimeter of each side of the plinth, then compare it with the panel size data. It is better to carry out calculations so that a minimum of waste remains.
If they still remain, they can be used on the gables and curves of the building. It is recommended to draw up a cutting map in advance - it will be easier to work. It makes no sense to start construction without a finished project.
Installation
Despite the heavy weight and difficulty of transportation, the shape and mechanism of the product ensures easy and accessible installation. Installation of façade thermal panels is simple and can be done independently. If the owner is not confident in his abilities or has never worked with insulation and lined materials, it is necessary to call a specialist.
Installation work can be carried out at any time of the year. The main condition is dry weather (no snow, no rain).
Let's look at the installation process from start to finish in detail.
What you will need
For installation, you need to prepare the following tools and building materials:
- Cladding material with insulation.
- Screwdriver.
- Bulgarian.
- Circular saw.
- Wooden beam.
- Level.
- Water level.
- Hammer.
- Trowel for grouting.
- Hand saw.
- Self-tapping screws, glue.
- Sealant or polyurethane foam.
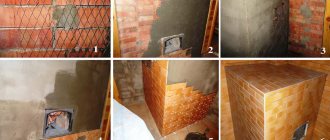
Preparing walls for installation
First you need to conduct a thorough diagnosis of the walls. It may be necessary to level the walls, which is most often done with plasterboard. Its sheets are fixed to the wall with glue.
In order for the panels to be securely fastened, there should be no cracks, loose areas, or peeling plaster on the walls. If the violations are minor, you can use drywall. The cardinal method would be to remove the damaged layer and apply a thinner one (no more than 2 mm).
Next, calculate the number of façade panels for the building. Calculate the area of the facade (multiply the length and width), as well as the sum of the areas of door and window openings. From 1 value the second is subtracted. The result obtained will be the area for cladding. All that remains is to find out the dimensions and calculate how much is needed for 1 m2 of house.
On the day of installation, the surface must be cleaned of dirt and old finishes.
Installation of a frame for thermal panels
Facade thermal panels are attached directly to the wall surface if they do not have any irregularities or irregularities.
If the wall has large differences and unevenness, small and large cracks, additional sheathing will be required. It is made of wood, zinc profile or plastic. First, a frame is built around the perimeter, and then intermediate elements to secure the elements.
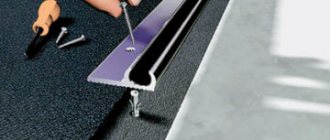
Installation instructions
In the case of cladding the basement floor, an aluminum profile is installed, which acts as a starting film. The second profile is attached parallel to the first at the height of the cladding.
The panels are fastened from the corners. Installation begins from the left corner, moving to the right. 1 panel is installed in an aluminum profile. Self-tapping screws are screwed into the mounting points. After fastening each panel, you must check that it is installed according to the level.
A sealant and polyurethane foam are applied to the tenon of the installed façade panel for tightness. Next, the panel is inserted into the starting strip, joining it as tightly as possible with the last laid one. This is how the cladding of the entire building is carried out in order.
The next row is laid only after the previous one is completely ready. This is very important to take into account, since if the rule is not followed, the tightness of the building will be compromised, which will lead to premature wear.
The seams between the clinker are rubbed with mixtures. The work is completed by installing corners and finishing slopes in door and window openings.
Preparing tools
To work you will need:
- level;
- roulette;
- construction pencil;
- drill or hammer drill;
- screwdriver;
- a grinder with a diamond blade or a hacksaw for concrete;
- mason's jointing for grouting.
Manufacturer ratings and material prices
Foreign-made thermal panels have become widespread on the Russian market. But due to the growth of foreign currency, their purchase will be very expensive. To spend crazy amounts of money, you can purchase Russian-made materials.
Let's look at the characteristics and prices of products in the leaderboards of our market.
Workshop of facade materials (MFM)
More than 18 years of product manufacturing experience. MFM offers thermal panels with artificial stone or clinker tiles. The thickness is forced from 0.03 cm to 1 cm.
The company's assortment includes 5 varieties of facing materials with insulation.
| Model | Dimensions , cm | Cost per m2, rub |
| Canyon | 120*60*11 | 2 800 |
| Terra brick | 104*60*6,5 | 1700 |
| One and a half brick | 125*60*7 | 1 600 |
| Beveled travertine | 125*60*7 | 2000 |
| Gretta | 121*60*6,5 | 1800 |
Unique Multi Block (UMB)
The products have been completely manufactured by the company for 16 years, which greatly distinguishes it from others. Polyurethane foam, less often polystyrene foam, is used as insulation. The panels are produced in thicknesses of 0.6, 0.8 and 1 cm. The price per m2 starts from 1700 rubles.
| Model | Dimensions , cm | Cost per m2, rub |
| BM NF 204V | 113,4*74,7 | 1 700 |
| UMB NF 501V | 113,4*74,7 | 2 150 |
| UMB NF 206V | 113,4*74,7 | 1 850 |
| UMB NF 103V | 113,4*74,7 | 2 100 |
| UMB NF 203V | 113,4*74,7 | 2 100 |
FTP Europe
The domestic manufacturer undertakes only the production of insulation. Clinker tiles are already of German origin.
| Model | Dimensions , cm | Cost per m2 , rub |
| 351-kalkbranda | 76*66 | 2 100 |
| 353-eisenrost | 76*66 | 3 600 |
| Laura | 100*65*6 | 2 540 |
| mix2 | 76*66 | 2 250 |
| Odra | 100*65*6 | 1 100 |
Termosit
Raw materials for thermal panels are imported from Germany. It is possible to create your own cladding design together with the company's designers. The company has its own product control service.
| Model | Dimensions , cm | Cost per m2 , rub |
| Brick panel | 113*64,5 | 1 100 |
| Light façade panel | 113*64,5 | 1 180 |
| Falcon SL-3 | 79,2*94,25 | 980 |
| ADW Kerch | 109*64,8 | 2 300 |
| Zebrina marengo | 75*60 | 2 000 |
Foreland
The company produces artificial stone panels. The coating is manufactured at the enterprise. Polyurethane foam is used as insulation.
| Model | Dimensions , cm | Cost per m2 , rub |
| 17th century | 75*65,6 | 2 500 |
| Elbrus | 75*65,6 | 3 500 |
| Euroc | 75*65,6 | 2 700 |
| Cliff | 75*65,6 | 3 500 |
Fried
The company uses only natural components for thermal panels. Polyurethane foam or polystyrene foam is used as insulation.
| Model | Dimensions , cm | Cost per m2 , rub |
| Novplit | 122*65 | 3 800 |
| Falcon FN03 | 150*52,8 | 2 400 |
| Opoczno Shadow Red | 153*60 | 2 800 |
| Nature | 149*52,5 | 2 060 |
| Estima AN01 | 156*624 | 2 600 |
Forska
Purchases materials for decorative finishing from foreign manufacturers. The company offers budget options with good quality.m
| Model | Dimensions , cm | Cost per m2 , rub |
| Rot bunt care | 149*52,5 | 1 600 |
| Brick Sand | 156*62,4 | 990 |
| Rimini gelb | 122*65 | 1 900 |
| Faro grau | 149*52,5 | 1 700 |
Regent
The company has developed its own production technology. Materials are purchased from leading foreign enterprises.
| Model | Dimensions , cm | Cost per m2 , rub |
| Feldhaus | 75*65,5 | 1 600 |
| Robin Victoria | 75*65,5 | 2 500 |
| Stroher | 75*65,5 | 1 200 |
| Westerwalder WK62 | 75*65,5 | 1 800 |
| Stroher Weis | 75*65,5 | 2 100 |
Ermak
Laser equipment is used to produce products, which allows for good joints and precise dimensions. The company offers the development of panels according to individual options.
| Model | Dimensions , cm | Cost per m2 , rub |
| Red Lion | 100*48 | 2 500 |
| Paradyz | 100*48,6 | 3 600 |
| KSK | 100*48 | 2 000 |
Plitprom
One of the first companies to begin producing thermal panels on the Russian market. High-quality European equipment is used in production.
| Model | Dimensions , cm | Cost per m2 , rub |
| FN4 | 75*65,6 | 1 750 |
| D 12 | 75*65,6 | 1 750 |
| SL4 | 75*65,6 | 1 750 |
Production
Clinker facade thermal panels are produced in one of two ways.
Polyurethane foam
Production of panels based on polyurethane foam.
Polyurethane foam is more familiar to our dear reader in the form of polyurethane foam. Its adhesive qualities are difficult to forget if you have ever stained any front surface of a window frame or door frame with foam: it is almost impossible to wipe off cured polyurethane foam.
It is this quality of the foamed polymer that is used in the manufacture of panels based on it: after laying out the tiles with the back surface up and laying the bushings, which ensure the rigidity of the panel at the fastening points, the form is simply filled with foam. Setting and complete drying take no more than a few hours.
Construction of clinker façade panels
Modern clinker panels are an excellent modern material that performs two functions at once.
- Firstly, it is an excellent decorative material that perfectly imitates various types of brick, stone and other finishing materials.
- Secondly, clinker perfectly insulates the house, protecting the facade from wind, moisture and other negative effects on its surface.
Panel design - what components are it made from?
These panels are made from three components - polyurethane foam, sand or wood chips and the clinker tile itself, which is the outer layer. Modern technologies make it possible to give the surface both matte and glossy. Shades and colors can also have different tones that convey the texture of the stone surface.
The outer layer is made from ordinary red clay.
Polyurethane is the second layer of these panels and performs the function of insulation. This is an excellent thermal insulation material that has excellent insulation properties and is durable enough for a long period of use.
The third layer must be both highly resistant to moisture and maintain its geometric shape. To do this, the sawdust composition is treated with special antiseptics and several types of adhesive solutions are used.
Peculiarities
Clinker thermal panels are a material that simultaneously performs the function of insulation and the function of a decorative facade material. Structurally, the thermal panel includes several layers.
- Clinker tiles containing natural clay of special fatty grades. The raw materials are subjected to high-temperature firing, due to which they acquire increased strength and moisture resistance. Externally, clinker is similar to the surface of brickwork. Depending on the type of material, it can imitate brick of different sizes and shades, aged brick, as well as stone surfaces made of wild or processed stone. The thickness of the clinker is in the range of 7–15 mm.
- Insulation, due to which low thermal conductivity of the tile is achieved. The most common due to its technical properties is polyurethane foam. When combined with clinker, it forms a non-flammable product, since both components do not ignite and do not emit toxic compounds when exposed to high temperatures. Polystyrene can be a substitute for polyurethane foam. The thickness of the thermal insulation layer ranges from 30 to 100 mm.
- A layer of marble chips or compressed wood chips, which acts as a reinforcing component, gives the slab additional rigidity. In addition, if we are talking about a layer of wood chips, it also helps to increase the thermal efficiency of the material. This is due to the fact that wood chips are made from coniferous wood, which is distinguished by its ability to retain heat well.
There are also two-layer options, which consist only of clinker and insulation, and four-layer options, similar to three-layer ones, but with an additional fire-resistant layer.
Fastening of products to the facade is carried out “dry”, using fasteners and systems, or “wet”, using adhesives and other mixtures, methods. Thermal panels of the type PK-1, PK-2, which have special locks that engage with the frame elements, are fixed using the “dry” method. Panels like PK-1F and PK-2F are more universal; they can be glued to the facade or attached to the sheathing. The choice of a specific installation method is determined primarily by the condition of the building’s foundation, the load-bearing capacity of its facade, as well as the thermal conductivity of the facade walls.
DIY making
Before starting work, you need to understand the structure from which the future material will be created.
Thermal panels are made of three layers: facing, metal profile and insulation:
- The facing layer is made of the highest quality concrete. For strength, add a small amount of water to the mixture.
This procedure will prevent the panel surface from chipping and cracking. This layer can be created in different colors.
The insulating layer is tightly attached to the facing layer. Its thickness is measured to the nearest millimeter. The layer itself is a polystyrene foam board.
Metallic profile. This layer allows you to attach the panel to the wall of the house.
The production of terpopanels is carried out as follows:
- Clinker tiles and fasteners are placed in a pre-prepared form. The surface is filled with foam granules from above.
- After filling, the mold is heated at high temperature.
When exposed to steam, the tiles increase significantly in size. When heated, the mold is completely filled. After this procedure, the tile is ready.
The resulting tile is cooled. After cooling, the resulting thermal panel is stored in a specially designated place and is not touched for 24 hours.
Necessary equipment for panel production
Equipment is the main part in making terpanels with your own hands.
This issue requires special attention.
A craftsman familiar with this type of equipment may notice that the manufacturing machines are similar to those that produce polystyrene foam.
This is not surprising, because both technologies use the technique of foaming over polystyrene granules.
Before purchasing special equipment for the production of such panels, it is important to know that before obtaining them, you must first create the material for them. Thus, in the home workshop there will be two directions at once: the first for the creation of foam plastic, and the second for the production of clinker tiles
Thus, in the home workshop there will be two directions at once: the first for the creation of foam plastic, and the second for the production of clinker tiles.
To make polystyrene foam you will need the following tools:
- special dispenser for raw materials;
- sediment to create foam;
- set of forms;
- Vacuum type installation;
- steam generator;
- pre-foaming device.
To carry out work on creating clinker tiles you will need:
- oven for firing products;
- Press forms.
If it is not possible to purchase a device and tools for creating polystyrene foam, then it can be purchased ready-made from other manufacturers. Such a purchase will significantly increase the financial costs of production.
You can purchase an expensive machine and produce more than three hundred parts per day. If we are talking about producing panels not for sale, but for your own site, you can buy small equipment capable of producing one hundred products per day.
Equipment can be purchased both from foreign manufacturers and from production facilities in large cities. It is possible to buy tools secondhand, but then the risk of receiving a low-quality product and incurring the costs of repairing it will increase.
Before making your own, you need to calculate how much such a solution will cost. To decorate your own home, most likely, it will be cheaper to buy ready-made, high-quality panels.
Watch the video to see how thermal panels of varying complexity are produced by professionals:
Advantages
What are the benefits of clinker thermal panels compared to competing solutions?
- Minimal hygroscopicity, characteristic of clinker. Due to the dense sintering of clay particles, ceramics have moisture absorption close to zero. It is the absorption of moisture that reduces the frost resistance of materials: crystallizing in the pores during freezing, water increases in volume and destroys concrete, plaster and other materials;
- Directly resulting from this property is a huge service life. More or less decent manufacturers provide a guarantee for their products for at least 25 years, but in reality the facade will last at least half a century;
- Durability and excellent anti-vandal qualities. The clinker lining can only be damaged with a sledgehammer. Contact with any objects softer than diamond will not leave the slightest trace on the surface of the thermal panel;
The facade will retain its appearance indefinitely.
Quick and easy installation using self-tapping screws and dowels. Of the “wet” processes when finishing a facade with your own hands, you will only have to deal with grouting the cracks. No preliminary preparation of the facade is required.
Facades without significant irregularities do not require preparation.
Your home deserves to be warm
Main office: WEEKEND: from December 31 to January 5 From January 5 to January 8 - BY CALL Moscow region, State Farm Village Ramenskoye, st. Proizvodstvennaya 31 +7, Olga (Tue-Sat 9.00 - 18.00) +7, Sergey (daily 9.00 - 19.00)
Additional office: WEEKEND: from January 1 to January 8, Moscow region, Balashikha st. Yuzhnaya, 9 Opening hours from 10-00 to 17-30 (Mon-Fri)
Saturday and Sunday by prior arrangement! +7, Larisa
Additional office: WEEKENDS: from December 31 to January 5 From January 5 to January 8 - BY CALL Moscow region, Odintsovo st. Govorova 24B office 12 Opening hours by prior arrangement
Call us: +7 +7