Such materials will help to correctly install plumbing products, calculate the correct slope of pipes and make an estimate of the materials needed for the work.
The system created according to the drawings will work without breakdowns, and if a blockage occurs, it can be quickly eliminated.
The article was written specifically for those involved in the construction and installation of sewerage systems. Builders will be able, based on the text below, to draw up a sewer laying diagram for an individual house. Examples of calculations of external and internal sewer pipe installation systems are given.
Craftsmen will be able to calculate to what depth to bury the sewer pipe. It will be possible to calculate the necessary consumables for the installation of an autonomous sewer system, laid independently both indoors and around the house.
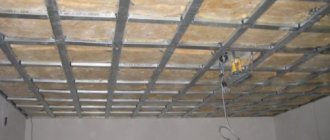
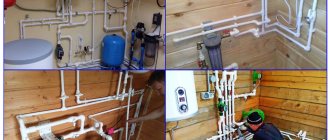
Internal circuit
The development of the scheme should begin with the most distant plumbing fixture installed on the top floor. The horizontal lines drawn must necessarily come to the riser. To save materials for work, plumbing fixtures are placed on different floors, but maintaining the same vertical.
The home sewer system includes:
- A water seal that protects the room from unpleasant odors;
- Pipes through which wastewater enters the external system;
- Knees;
- Tees;
- Clamps that support pipes and create a certain slope;
- Central riser
When installing a sewer system, it is very important to monitor the transition of pipes. It should not move from a larger diameter to a smaller one. To take this nuance into account, you need to install the toilet on the layout at the closest distance from the riser.
The drawing of the internal system includes several very important parameters:
- Number of floors;
- Basement;
- Number of plumbing fixtures;
- Number of apartments.
The diagram must be drawn to a certain scale. This will help you quickly understand the pipe layout when you need to identify problems in the event of an emergency.
Sewerage laying
Having selected suitable pipes and familiarized yourself with the installation method, proceed to installation work. For the highest quality installation, you should adhere to the established rules for installation technology.
Inside the house
Proper wiring inside the house means installing a pipe connection structure to form a smooth sewer flow of water.
It is recommended to start installation from the plumbing, and then continue to the connection area to the external pipe. In a building with two or more floors, on the first floor the pipes are installed under the floors, on the second and the rest - above them.
- water seals are connected to the plumbing;
- sewer pipes are connected to them;
- then 2 elbows of 45 degrees are used to connect the pipe to the horizontal one, but if the plumbing is installed next to the riser, then 1 elbow and an oblique tee from the riser are used for the connection;
- if the plumbing is located far from the riser, then for each meter of pipe length a slope of 30 mm is made to the pipe from another plumbing or riser;
- to maintain the slope, you will need clamps installed at a distance of 2 meters from each other and fixed in the floor or wall;
- in the case of installing a sewer network above the floor, after each turn, a tee with a cover for cleaning is mounted, and it is mounted on each floor;
- a 45° pipe or one with a lower degree is installed from the toilet, connecting to the sewer network with a perpendicular tee;
- if there is no riser in the house and the sewer system is installed above the floor, it is required from the horizontal pipe to make a drain that goes into the pipe using 2 elbows;
- pipes pass through the ceiling using a metal sleeve with a pipe wrapped in insulation placed in it. In the ceiling, the sleeve is installed using cement-sand mortar;
- if a pipe with a diameter of 5 cm is required to be connected to a pipe with a diameter of 10 cm, use the appropriate adapter;
- Next, one inner pipe is brought out, and if its height level differs significantly from the inner one, bends from 45o to 135o are used for a smooth joint.
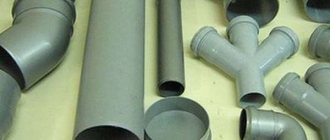
What pipes are used for the internal network:
- from the toilet, shower, swimming pool, bath – 100-110mm;
- from sinks – 50mm;
- for a riser - at least 110mm.
What else should be taken into account when laying internal network pipes:
- for effective connection, the joints are lubricated with pipe glue or sealant;
- after shortening the pipe, its edges should be smoothed so that it fits tightly into the receiving pipe;
- when connecting 2 complex systems, they use both a pipe and a clamp for structural rigidity;
- when installing a sewer system, before pouring the foundation, internal pipes are laid from the outer pipe in the area of the future foundation, pre-wrapped with insulation and installed in sleeves;
- Before installation, the floors are determined with the exact position of the plumbing in the house in order to know how to install pipes to it.
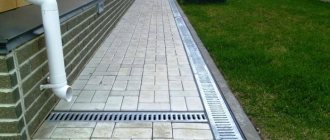
Outside
External sewerage installation technology:
- first, a pit is dug for the septic tank, its distance depends on the size of the land plot, but not less than 5 m;
- the frequency of use of plumbing and the number of people in the house are factors that should be taken into account for the size of the septic tank pit: for a family of 4 people, it is usually enough to purchase 3 rings with a diameter of 150 cm;
- a couple of days before installing the concrete rings, a sand cushion is made at the bottom and filled with a concrete layer, then the joints of the poured concrete are lubricated with bitumen or resin for sealing, and after installing the rings, a concrete circle with a hole for the hatch is laid;
- if you do not want to purchase concrete rings, after digging a pit at the bottom, you should make a 15-20 centimeter sand cushion, pour concrete of the same height on top, and as soon as the concrete sets (this will take no more than 2 days), lay out the walls of the septic tank;
- from the walls of the septic tank to the edges of the pit, a distance of 100-150 mm is maintained for filling with clay;
- pipe slope – 20-30mm per meter of pipe;
- after laying, the pipes are connected to the septic tank by drilling a hole;
- in the sewer system, elbows are used for smooth turning;
- connected to the house through a basement or foundation;
- then install a filtration well 200-300mm below the septic tank, the well should be either smaller in volume than the septic tank, or proportionate;
- The bottom of the filtration well should be covered with a 30-centimeter layer of crushed stone.
When all pipes are connected, you can perform a test run of water to check the tightness and correct connection of the system. The final stage of work will be the elimination of all defects in the connection.
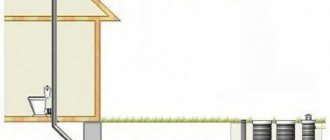
External line
To install a sewer system for an individual house, it is necessary to draw a diagram taking into account the surrounding landscape. Professionals recommend placing the septic tank as low as possible, and the pipes should have a slight slope.
To determine which treatment system needs to be taken as a basis and at what depth the pipes will lie, you need to pay attention to the following factors:
- Groundwater;
- Type of soil;
- Freezing depth.
The construction of external sewerage usually begins with laying a pipeline from the foundation. Drains should be discharged towards the constructed cesspool. Any turn of the pipe must be equipped with a special revision, in the form of an adapter equipped with a lid. Through it you can easily remove the blockage.
An inspection well is mounted on the outside and a ventilation hood is installed.
The ventilation pipes exit through a riser with an installed drain pipe. Since it will always have a very strong unpleasant odor, such a pipe should be installed as far as possible from the windows or next to the smoker.
It is prohibited to combine the fan pipe with an ordinary ventilation shaft. The umbrella can be replaced with a special vacuum valve installed at the top of the riser. Remember that it has nothing to do with the check valve.
Types of tanks, their positive and negative sides
The final part of the system is the tank where cleaning is carried out. If there is no central collector through which the drains are collected, then autonomous installations are used.
cesspool
This is perhaps the cheapest option. It is easy to dig a hole in the right place. However, it cannot always cope with large volumes of wastewater. Dirt can become a source of unpleasant odors in groundwater.
Septic tank
This structure can be made of brick and filled with concrete. You can also install standard reinforced concrete rings. If the septic tank is well made, it can be used for many years, as it is highly durable. The disadvantage of this design is long installation and large financial investments.
Self-contained installation, industrial type
Of course, such a design always costs much more, but all costs are fully covered thanks to the fast construction and very high quality. Such installations will work for a very long time with virtually no breakdowns.
Biological treatment system
We can safely say about such a system “the most expensive”. For its operation it is necessary to supply constant electrical power. However, it has high productivity and high-quality cleaning.
Why choose Septic Topas Plus products
Many companies offer the sale of equipment and installation of local sewage systems, and the company Septic Topas Plus is successfully engaged in this in the Moscow and Moscow region markets. We offer our clients exclusively high-quality waste disposal units - the best-selling and best models Topas, Unilos Astra, Eurolos, Termit, Tver, Diamant, Ergobox, Dochista, Terra, Biozon and Kolovesi. Each septic tank comes with a 3-year warranty, all devices are certified, and their price fully corresponds to the quality. A flexible system of discounts has been developed for regular customers, and there is an affiliate program.
How to choose a location for a wastewater receiver, how to calculate its parameters
Whatever the type of receiver, its volume must correspond to the three daily norms consumed by all residents of the house.
According to established standards, one person consumes 200 liters per day. Therefore, the volume of the receiver should be 600 liters. If the treatment plant has several connected tanks, the total volume will be equal to their sum.
The choice of receiver location depends on several requirements.
The standards also establish distances to particularly important objects; they must comply with accepted standards:
- 50 meters – to the drinking water pipe;
- 5 meters – to the road;
- 30 meters – to the reservoir;
- 5 meters - to the living space.
At what depth should sewer pipes be laid?
Technological standards (SNiP) establish a certain depth of sewerage in a private house.
To more accurately determine this value, you need to familiarize yourself with the zone map.
It shows the depth of soil freezing in various areas of our country. For example, in Moscow, the depth of laying a sewer pipe should be at least 1.4 m. For Sochi, this value is much less - 0.8 meters.
These parameters are taken taking into account the terrain when the soil freezes. If pipes are installed with a cross-section of less than 500 mm than indicated on the map, it is necessary to subtract 0.3 meters from this value. When it is necessary to lay large-diameter sewer pipes, the laying depth should be reduced by 0.5 meters.
Useful tips
The depth of sewer installation is an important, but not the only question that needs to be answered for proper installation of a septic tank. The treatment facility must be equipped in accordance with SNiP and meet certain requirements. Among them:
- the septic tank should not be located in a low-lying area, next to a well or pond;
- You should not install a disposal facility in places where the groundwater depth is less than 150 cm - they can fill with VOCs;
- if the soil freezes more than 140 cm, there is no way to do without insulating the sewer system;
- It is better to install a septic tank in soil where there is a minimum of clay.
It should be noted that in the case where the depth of the sewerage system and the placement of the septic tank is lower than the groundwater flow, the disposal unit must be sealed. This is a very important point that cannot be neglected. Otherwise, a situation may arise in which it becomes impossible to use the septic tank, and everything will have to be redone.
There is another non-obvious nuance - tall trees should not be planted next to the waste disposal unit. Their root system goes deep into the ground and has a large branching. Over time, plant roots can damage the septic tank, compromising its integrity.
At what depth is the sewer pipe laid near the house?
Standardized standards indicate that the pipe leaving the room must be positioned so that it rises above the average freezing depth by approximately 30 cm.
The depth of the trenches should exceed 70 cm. For the middle zone, the minimum depth of the sewerage should reach 50 cm. This is quite enough if there is no area nearby that needs to be cleared of snow and there is no roadway.
It is very important to comply with the last requirements described above. The fact is that the pressure of the machines can lead to pipeline breakdown, and if there is a large accumulation of snow, the pipe will simply freeze.
To create gravity flow of sewage drains, you need to know exactly what slope needs to be created for the sewer pipe, especially in a private building.
In principle, you can ask your neighbors. They know well what trench depth is needed. They have already laid such pipes and tested the system. Therefore, their data will be the most optimal, especially for winter.
If you have any doubts or difficulties when carrying out such plumbing work, you should contact a professional. Such companies employ highly qualified specialists with extensive experience and appropriate tools. If you do not have the skills for such work, then independent operations can lead to damage to the material and additional financial costs.
Bookmark depth and optimal tilt amount
For pipes with a diameter of up to 50 mm, SNiP recommends making the slope equal to 3 cm per one meter of installation.
If the pipe cross-section reaches 100 mm, then the slope can be reduced by one centimeter. To prevent the sewer system from becoming clogged and possible “greasing” to occur, it is advisable to increase the slope by about half a centimeter for each meter of wiring.
The same angle of inclination is maintained when laying pipes in the area near the house. A sleeve is installed in the foundation. Its diameter is 15 cm larger than the main pipe. Thanks to the sleeve, a transition to the external sewer occurs. It is mounted above the freezing level of the soil by 30 cm.
Then a trench is dug to provide access to the septic tank. Its approximate depth should be no more than one meter.
Do not bury sewer pipes below the existing freezing level. Its average value does not exceed 1.6 m. Such work will be very unprofitable, since it will be necessary to make the septic tank deeper. If a constant slope of approximately 4–5 m is maintained, groundwater may appear.
Such work requires additional financial investments, since it is necessary to install additional concrete rings and special high-strength corrugated pipes. They withstand the pressure of the drain perfectly, they do not deform with a large mass of soil.
The normal temperature of the drain is always higher than in the room, so the pipes do not freeze. Sometimes they are insulated with thermal insulation or a heating cable is laid.
Principles of sewer pipeline construction
Principles of sewer pipeline construction
If you decide to install a septic tank and a pipeline to it from the house, then SNiP provides the basic rules for creating a high-quality and efficient wastewater disposal system.
- Thus, it is recommended to install the collector solely based on the previously drawn up design documentation. At the same time, when creating a project, it is very important to take into account all the communications available on the site, such as water supply, electricity, etc., located in the ground.
- It is necessary to draw up a sewerage project for the site taking into account a possible increase in the load on the collector in the future.
Important: according to SNiP, the ideal sewerage project is considered to be one that requires a minimum investment and at the same time allows you to create an effective working system.
Method for calculating the depth of a pipe connected to a storage tank
The size of the pipe outlet in the room increases by the length of the external line, multiplied by a coefficient, the value of which is selected according to the diameter of the pipe:
- D 50 mm – 0.03;
- D 110 mm – 0.02;
- D 160 mm – 0.008;
- D 200 mm – 0.007;
The calculation is carried out according to the formula:
h2=h1+l*k+g,
h2 – depth of the point from where the exit and connection to the storage tank is made;
h1 – the value of the exit from the room. Take 1.4 m;
l – distance from the foundation to the storage well. Usually 10 meters.
k is the slope coefficient of the sewer pipe, always equal to 0.02;
g – natural slope of the surface. Usually does not exceed 0.3 m.
h2=1.4+10*0.02+0.3=1.9 m.
According to the calculation data, a sewer trench is created.
6.Design and calculation of rainwater drainage
The rainwater network receives rain and melt water. Typically, a rain network is designed to carry the maximum intensity of rain for a given area. The rain network consists of internal watercourses and a rain street network.
Internal watercourses collect rainwater from roofs, which then flows into the street network. Rainwater generated on the free surface of the earth enters the network through storm water inlets.
1. Determination of calculated rain parameters.
The canalized facility is located in the city of Glubokoe
. Let's define parameter A:
,
Where:
q20 – rain intensity for 20 minutes with a period of one-time network overflow equal to 1 year l/s ha. Determined from the table. A1 (q20=102); mr – the amount of rain per year, determined from the table. A3; mr = 164 Р – period of one-time overflow of the calculated rain intensity, year (P=1). Determined from the table. B1 depending on the value of q20 and the nature of the location of the collectors. n—climatic parameter (n=0.67). Determined according to Table A2. 2. The value of q20р is determined by the formula: We assumed that there is an intra-block network and tcon = 5, then: 3. We determine the average runoff coefficient for the canalized area. The value of the runoff coefficient Zmid for various coatings is determined depending on the value of parameter A according to table. AT 2 . It is more convenient to determine the average runoff coefficient in tabular form:
| Type of coverage | Drain area, % | Ztable | Z calc |
| Roof | 22 | 0,265 | 0,0583 |
| Asphalt | 25 | 0,265 | 0,0662 |
| Cobblestone pavements | 17 | 0,224 | 0,0381 |
| Crushed stone coverings | 21 | 0,125 | 0,0263 |
| Lawns | 15 | 0,038 | 0,0057 |
Zmid=0.194
4. Determine the runoff module q0, l/s ha:
q= β Zmid q20p ,
Where:
β is a coefficient that takes into account the filling of the free capacity of the network during the period when the pressure regime occurs (β = 0.65). Determined from the table. 6.2 depending on the indicator n. Then:
q0= β· Zmid·q20p=0.65·0.194·73.07=9.2 l/s ha.
At each section, the numerical flow rate is determined using the formula: Qnumber=q·F
Next, a hydraulic calculation of the rain collector is performed, which is summarized in table 6.1 “Hydraulic calculation of the rain collector.”
What problems may arise when installing a sewage disposal system, and how to solve them
In some cases, the depth of sewer installation during installation in a cottage depends on some external factors.
It happens that installation is simply impossible, or it requires huge financial costs. One of the reasons is considered to be rock located between the house and the well. In such a situation, it is impossible to make a standard trench, since the soil has a very complex structure.
The only way out of this situation is to insulate the pipes. Before you start installing the structure, you must wrap the pipeline with several thick layers of insulation, and then lay it to a depth of no more than 30 cm. It will be possible to create heating for the pipe, for which you will need to lay a heating cable under the pipe.