Despite the fact that cement and PVA have been combined for a long time, many people are interested in why they add PVA glue to cement mortar? The main goal of this procedure is to make the concrete solution as effective as possible. The fact is that the resulting adhesive composition gives the concrete plasticity, allowing it to set in a short period of time.
Why is it called that and what does it consist of?
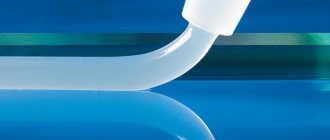
Polyvinyl acetate is the basis of the famous adhesive composition. It consists almost entirely of this compound, and also contains plasticizers and additional additives. Polyvinyl acetate is produced industrially. The resulting raw material is insoluble in water and oil solutions. It tolerates both low and high temperatures well, but does not like temperature changes. Neutral towards air. The main characteristic is the ability to increase adhesion between materials.
Bottles of stationery glueSource ratengoods.com
Additives vary depending on the type of product being manufactured. These can be tricresyl phosphate, EDOS, acetone and other types of esters. With the help of plasticizers it is possible to achieve the required thickness and increase adhesion between surfaces.
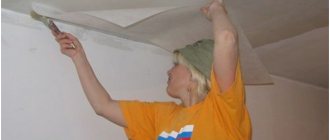
Finishing work
As soon as the walls covered with plaster mixture have completely dried, the final stage of repair begins - finishing. It is performed in several ways:
- using spraying, they form the original texture of the wall surface;
- the walls are painted with compositions of different color shades;
- The surface of the wall is made rough.
The required finishing option is determined taking into account the individual wishes of the developer.
Self-production of material
If desired, you can easily make the putty mixture yourself. All components for it are sold in construction and hardware stores. You will need:
- PVA (glue) - 1 part;
- chalk (talc, baby powder, sawdust dust, dry gypsum plaster - to choose from) - 2.5 parts;
- plasticizer (dry wallpaper glue or glycerin, drying oil) - 0.05 parts.
As a plasticizer, some introduce casein glue, liquid or grated laundry soap, but with drying oil the smoothness of the composition is the highest. The addition of this component cannot be ignored, otherwise working with putty will be labor-intensive. First, the dry ingredients are mixed together, then they are diluted with PVA, after which other liquid ingredients are added to the mass.
https://youtube.com/watch?v=9j9jQmA3nmo
You need to make sure that the homemade putty resembles thick sour cream, since a too liquid product will go on unevenly, with sagging. Sawdust is added if the mass is planned to be used to seal cracks, and for finishing puttying of walls it is better to add white components to the composition.
Do I need to putty the plaster?
Plaster serves primarily to level walls and eliminate large defects in the wall surface. The larger the fraction of sand used in the cement-sand mortar, the less suitable the wall is for wallpapering or painting. Therefore, it is recommended to putty plastered walls in order to eliminate the effect of sandpaper, seal small scratches, chips and cracks, as well as transitions of plaster layers.
In this case, the wall surface becomes most suitable for subsequent painting or wallpapering. You can putty with the plaster itself, but for this you need to prepare a solution with fine sand, preferably river sand.
You can putty the wall after plastering only after it has completely dried. Drying time depends on the thickness of the plaster layer.
Many professionals are inclined to believe that plaster dries at a rate of 1 millimeter per day, so rushing is not recommended.
Source
Share:
How to dilute PVA glue?
The opposite situations also happen when users do not know how to dilute PVA glue when it is thick. If this is an office or household type, then you can:
- Remove the top dried layer.
- Then dilute the PVA glue with clean water at room temperature in a ratio of 10:1 and mix everything thoroughly.
- Leave the composition until all elements are completely mixed for about 30 minutes.
- Solvents, alcohols and acetone cannot be used for these purposes. They can both change the properties of the composition itself and corrode the bonded surfaces.
- Other varieties are not suitable for breeding and must be disposed of or replaced.
Identifying uneven wood floors
Wooden putty should be applied to the prepared surface, which must first be examined and all irregularities identified. There are several ways to do this:
- We select rotten and rotten boards and replace them with new ones.
- To take measurements, before puttingtying wooden floors, the surface must be cleaned of dust, dirt and other elements.
- Using a building level that requires precision and care.
- A laser level that is installed at the highest point on the floor. Marks are placed where the rays appear, which are then used to determine the degree of unevenness.
- Mounting level, preferably long. You should start working from the corner. The level is placed against the wall, a mark is made, after which the tool moves further. After measuring the entire perimeter of the room, you can determine all the unevenness of the wooden floor.
How to make a PVA primer with your own hands
It is unacceptable to use PVA as a primer without dilution, since a too thick film is formed on the surface of the wall, which will quickly peel off. The glue consumption will also be high, and it is inconvenient to apply a thick composition on the surface. Therefore, dilution with water is required.
What you need for work
First you need to prepare all the necessary materials and tools:
- PVA glue. Construction compositions are sold in packages of 0.5-10 liters. The consumption of the finished primer is small, a liter is enough for about 10-15 square meters of area. If you plan to apply the product in 2 layers, the consumption will double. To prepare the soil, it is advisable to choose adhesives that were manufactured no later than 4 months ago.
- Water. A non-hard, warm liquid that does not contain foreign impurities is required.
- Capacity. You can take any bucket or pan, as long as it is clean and has a shape convenient for mixing.
- Wooden stick or construction mixer. Professionals mix any building compositions using a mixer, but in the absence of one, the glue will completely dissolve with manual stirring.
To apply the primer, you need to prepare a roller or brush. It is better to have both tools so that you can work on smooth areas with a roller and hard-to-reach areas with a brush. For the ceiling you will also need a roller extension or a wooden stick. To pour the glue, you need a paint bath, which helps to evenly distribute the composition over the roller.
Preparation of the solution
Making a primer is very easy. It is necessary to pour the glue into a container, add water at the rate of: 1 part PVA, 2 parts water. The composition must be mixed until it becomes homogeneous. Clots floating on the surface of the liquid must be removed immediately. You should prepare as much solution as can be used at one time; such soil cannot be stored for long periods of time.
Next, it is recommended to do a test application of the primer. A small area of the wall is treated with it, the quality is assessed: the composition should be well absorbed and be absolutely white. After drying, you should try to tear off the resulting film: if possible, add more water to the primer.
Applying PVA primer
Before starting work, the surface is carefully prepared. The walls must be smooth, not have large holes, chips, or defects - the latter must be repaired with putty and then sanded. The wood is sanded and, if necessary, the cracks are covered with a special wood putty.
The composition is applied with rollers and brushes, choosing the desired size of tools. Be sure to go well in corners, areas near baseboards, behind pipes and radiators. The first layer is left to dry for 2 hours. If wood has been processed, the surface must be inspected for the presence of “fringe” (water lifts some of the wood fibers). If the smoothness of the base is damaged, it is sanded with fine sandpaper and primer is reapplied. It is recommended to apply the second layer to all surfaces, regardless of the base material. Next, let the wall and other types of bases dry for 24 hours.
Necessary equipment
Before plastering the walls, it is recommended to prepare everything you need to complete the work. The kit looks like this:
- trowel or ladles;
- rule;
- grater and grater;
- construction level;
- lighthouses;
- a shovel and a container of a suitable size for making a batch (for large volumes of work, it is allowed to use a concrete mixer);
- buckets;
- spray bottle for moistening walls;
- fishing line or cord;
- hammer, chisel, brushes.
Features and installation method
To begin with, it is necessary to say that this type of material is used mainly for interior finishing work on the walls of premises. However, it cannot be used for leveling, since it cannot create a thick layer. This is why ready-made PVA-based putty is often sold, due to the fact that it is used in small quantities and it is quite problematic to dilute it yourself.
Quite often, such material is sold in special packaging that resembles a regular plastic bag.
Characteristics
First of all, you need to pay attention to the fact that this coating initially has a high level of adhesion and combines very well with wallpaper glue or paint. It should also be mentioned that this material is finely dispersed and thanks to this it is possible to create an almost perfectly smooth surface without sinks and potholes.
Due to its qualities, this material is excellent for making various crafts or art objects.
Special attention is paid to the fact that PVA putty is completely devoid of various odors characteristic of other similar coatings. Many customers really like this, which makes this composition especially popular. Due to its elastic properties, many professional craftsmen like this type of cladding material for interior wall decoration.
It is perfectly applied to the surface and is resistant to minor mechanical stress after hardening. That is why such a surface will almost never crack.
It is best to prime the surface using a paint roller, which allows you to cover the maximum available area in a short time
Installation
- If you do the work yourself, then first you should study in detail the technology for applying this material.
- First of all, you need to level the surface. In this case, the thickness of the difference permissible in this case should be minimal and is reduced mainly to a large dispersion of particles.
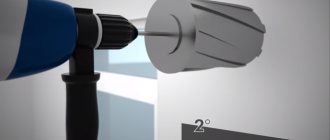
To obtain a uniform consistency of the solution, it is best to use a special attachment on a drill.
- At the next stage, the installation instructions recommend treating with a primer. It is best applied in two layers, so that one of them eliminates the high absorption of the surface, and the second increases the level of adhesion. If the need arises, you can apply another layer, but their number should not exceed four.
- After this, it is necessary to mix the putty very thoroughly to obtain a homogeneous mass without lumps. If you need to dilute the mixture, then use those substances that are recommended in the instructions. Their price is not very high, and in some cases even ordinary water is sufficient.
Applying the prepared solution to the surface
- The solution is applied to the surface with a metal spatula, creating a layer of no more than 0.5 mm. This is why the preliminary alignment must be done perfectly. If the layer is too thick, it will lose its elasticity and may collapse even with minor mechanical stress.
- After the surface begins to harden, it should be treated with a polyurethane float. This way the surface layer will be perfectly smooth and with prolonged polishing you can get an almost mirror-like surface.
- If you plan to apply paint or wallpaper in the future, then it is worth applying another layer of primer on the surface. This will serve to better bond all components and increase adhesion to the finish coat.
Beginners try to use PVA-based putty to make decorative surfaces. However, such a decision would be a big mistake, since you cannot exceed the minimum permissible layer level of 0.5 mm, and this is very little for creating patterns.
Professional craftsmen do not recommend making such materials yourself, since it is very difficult to maintain proportions without knowing the quality of manufacture of all components
Varieties of plaster compositions - not everything is so simple
A simple mixture is used in rooms located inside a heated building for:
- rough leveling before installing the reinforcing mesh, which must be applied to create a decorative type of material;
- sealing various defects: cracks, gaps, grooves and irregularities. Acts as a preliminary layer for finishing;
- creating an antibacterial surface, but special additives are added to the composition to protect against fungus.
A simple composition of sand-cement plaster is used for installation using a two-stage system: preliminary spraying of the surface and a primer layer.
The composition of the plaster changes if it is necessary to perform work in difficult conditions: high humidity, exposure to ultraviolet radiation, temperature changes. In the above conditions, a universal DSP is used. The characteristics of cement-sand plaster with additives differ due to increased resistance to negative influences. A universal type of product is used to increase waterproofing, including for reinforced concrete rings, septic tanks, etc.
The universal mixture used to plaster walls is applied in 3 stages (discussed earlier), but to improve quality, 4 steps can be used (a primer layer is performed 2 times).
A simple composition is used where the quality of the finish is not particularly important
If walls with high humidity are plastered, it is recommended to use high-quality compounds that require certain skills and tools. For high-quality plaster mortar it is necessary to install beacons; for other plasters they are optional. It is recommended to iron the covering layer for waterproofing and increasing the strength of the surface.
When to add
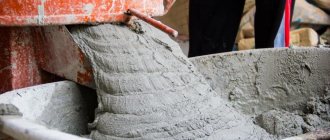
Ready-made cement-adhesive mixtures are sold in stores. You can mix them yourself. This is a durable, but at the same time inexpensive composition. The use of PVA in cement mortars is required if you need to prepare tile or plaster adhesive, adhesive compound for screed, etc.
Tile adhesive
When mixing the mixture for laying tiles, proceed according to the instructions. This composition perfectly holds tiles and ceramic products.
If you mix the solution yourself, adhere to the following rules:
- Take a large container, preferably one that you won’t mind throwing away after work.
- Pour dry ingredients into container and mix thoroughly.
- Add glue (about 20% of the total mass of the mixture). The adhesive mass is introduced into a mixture of 1 part cement and 5 parts sand. These proportions of cement and PVA result in a highly adhesive composition suitable for fixing objects on vertical planes.
- To prepare a liquid substance, cement, adhesive mass and water are mixed.
- The finished tile adhesive is applied to the walls with a notched trowel.
- If the tiles are small, the cement mixture is applied only to the walls. When working with heavy products, the solution is spread on the walls and additionally on each tile.
- It is not recommended to use tile adhesive at temperatures between +5°C and -30°C. Ideal conditions: temperature +20°C and air humidity not higher than 60%. With such indicators, the glue sets instantly.
- After application, allow the solution to dry for half a day.
- A composition containing PVA glue and cement holds the tiles for up to 20 years, provided that 1 part of cement, 4 parts of quarry sand and 1/20 of the total volume of glue are used.
- The quality of the mixture will improve if, before mixing in the glue, you first dilute it with water (one part water to two parts glue).
You can add PVA glue to the cement mortar for laying tiles in the following ratio:
- 1 liter of cement;
- 0.75 l of clean water;
- 0.25 l PVA;
All this is adjusted to the required consistency, depending on the specific situation.
Plaster
A plaster solution containing PVA glue is a popular means for high-quality finishing of ceilings and walls, as it slowly absorbs moisture. The cement composition dries slowly, which allows craftsmen to work more carefully with surfaces. In plaster glue, about 150 ml of PVA is enough for a volume of 10 liters.
Experts assure that even one tablespoon of PVA significantly increases the properties of plaster. The structure acquires increased plasticity, and the appearance of the composition also changes.
Screed
PVA cement is used not only for laying a new screed, but also for repairing the old coating. Craftsmen claim that fresh concrete does not adhere to old concrete, but when PVA glue is added, the fresh screed adheres to the old mixture without any hassle.
How to add:
- Mix 100 kg of Portland cement with 200 kg of quarry sand.
- Add 5-10 kg of alkali-resistant ingredients.
- Add 20 kg of glue and mix well.
- To prepare a thinner solution, add water.
We display beacons
How to properly plaster a wall with cement mortar? Masters recommend setting up beacons. This is done as follows:
- the wall is checked for vertical evenness;
- guides of appropriate length are prepared;
- at a distance of twenty to thirty centimeters from the corner area, a line is drawn from the ceiling to the floor, and mortar slats are thrown along it in increments of fifty centimeters;
- According to the applied markings, the rail is installed.
The remaining beacons are placed in a similar way, the distance between which should be slightly less than the length of the rule. As a rule, the pitch varies from 150 to 160 cm.
Features of PVA-based putty
PVA putty is produced in accordance with GOST 520-20 from 2003. This product is based on polyvinyl acetate, which acts as a binder and is part of the glue of the same name. PVA is environmentally friendly and provides a high degree of adhesion to various substrates. Since polyvinyl acetate is easily diluted with water and is suitable for many construction works, the putty is considered universal and multifunctional.
Composition and technical characteristics
In addition to PVA, the putty also contains other components. Chalk is used as a filler, and some manufacturers also add talc to the product, since it has the finest fraction and helps to give the mass evenness without bubbles and potholes. Other components of the putty are:
- carboxymethylcellulose (CMC) and other plasticizers - to increase softness and reduce the effort required to grind treated surfaces;
- latex - to prevent cracking of the putty layer after drying and during the entire service life;
- antiseptics and special additives - to protect surfaces from fungus, mold, and prevent insect infestation;
- drying oil - to give the solution elasticity and for more convenient application;
- emulsifiers and preservatives - to prevent deterioration of the composition and increase shelf life.
The product characteristics are:
- high adhesive force (up to 450 N/m);
- guaranteed adhesion to basic building materials;
- no shrinkage, detachment, cracking;
- ensuring a smooth surface;
- ease of application;
- non-toxic, completely safe for humans;
- high drying speed - up to a day.
What properties does adding PVA to the solution give to concrete?
PVA is often added to the concrete mass; this procedure can improve the characteristics of leveling solutions. In the concrete mass, PVA and a plasticizer that fills the voids eliminate the formation of cracks during the hardening time period, reduces the setting time with brick and concrete, making the surface more durable.
Thanks to the use of PVA, the solution acquires the following properties:
- Viscosity and elasticity;
- Becomes more durable when hardened;
- The strength of the surface as a whole increases;
- Adhesive qualities are enhanced;
- The application process is simplified.
The use of PVA in damp rooms is prohibited, especially in the presence of hot steam, for example, in a bathhouse, sauna, bathtub, swimming pool.
In the concrete mass, PVA and a plasticizer filling the voids prevent the formation of cracks during the hardening time period.
Making your own PVA primer
Before you make a primer with your own hands, you need to prepare the necessary components:
- 2 parts water;
- 1 part PVA;
- cement is added taking into account the thickness of the composition.
The method of mixing the solution does not cause any difficulties: add a little water to the PVA, stir well, and add the required amount of cement. The prepared composition should have a thick consistency and adhere well to the wall.
A self-made primer is an excellent and inexpensive product that precedes the treatment of surfaces with wallpaper glue, but this is not enough for reliable wall cladding. Professional builders recommend adding resin and chalk to primer solutions. Their total volume should be no more than 6% of the finished composition.
Rules for mixing the solution:
- The proportions of water to glue are 2:1.
- A convenient container for mixing is required: a basin, a bucket.
- All work must be done in a warm room.
Constant stirring of the solution will help to avoid the appearance of an upper water layer. To simplify the work and create maximum uniformity, it is best to use a construction mixer. After preparing the composition, the mixture is filtered.
PVA primer is characterized by the fact that it creates a film on the wall without penetrating into small cracks and cracks. But taking into account the inexpensive cost of all the components used, the result is excellent material.
You need to clearly define your finishing goals. A universal primer that does not require high water resistance is suitable for wallpapering. Facing with decorative plaster will require the use of more expensive primer.
Tips for diluting and using PVA primer
When priming the walls, it is necessary to apply the solution correctly; when using PVA glue compositions, there are certain subtleties of the work. Step-by-step surface treatment looks like this:
- Walls that need to be primed must first be thoroughly cleaned of the old finish. To do this, you can use various tools and materials: brushes, spatulas, sandpaper. If the household has a hair dryer, then it can also be used. This powerful unit can easily and quickly deal with small particles of old finish.
- The quality of the prepared solution is checked using a test application. This will make sure that the composition does not peel off from the wall. A test application is carried out on any place on the surface; if the solution is made correctly, it gives a transparent whitish tint.
- A very thick primer is diluted with water. Having decided on the proportions and consistency of the PVA primer, it is applied to the surface of the wall, the primer must be left until it dries, after which you must try to pry off the edge of the dried film with a spatula. If the soil layer comes off easily, add a small amount of water to the solution. A dense and firmly attached layer of film on the surface indicates that the priming process can be carried out.
- The PVA mixture is used as follows: using brushes of various sizes, you need to treat the corners of the walls and difficult areas, then cover the remaining area with a short-pile roller. Spray guns are not used when working with primer - the suspension is very thick even with a significant volume of added water.
- A homemade primer is applied in 2 layers, and the second layer must be applied after the first has completely dried.
In terms of their performance, homemade primer mixtures cannot be compared with professional compounds, but their use significantly reduces the cost of repairs and is advisable to use in cases where cosmetic finishing is performed with budget building materials. For expensive facing materials, it is necessary to initially replace the homemade primer with professional mixtures.
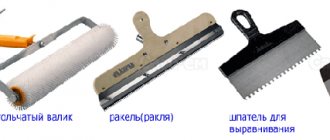
What plastering tools will you need?
To plaster walls you will need the following tool:
- Container for mixing the solution. This can be either a construction bucket or trough for small repair work, or a concrete mixer for large volumes of finishing work.
- The tool for mixing the solution is a shovel or a hammer drill with a mixing attachment.
- Trowel for applying plaster to the wall.
- Plumb line and building level for even application of plaster on the wall.
- Spatula and rule for leveling the surface of the plaster.
Main Ingredients
Decorative plaster differs slightly from conventional compositions, since in order to create some relief it must remain plastic for a long time. In addition, after the layer is completely dry, it should be durable and reliable.
It is very important that the exterior finish is easy to clean from dust. Before making decorative plaster with your own hands, you need to find out what are the main ingredients of the mixture and what are they used for?
The base can be putty, and PVA glue can be used as a binding ingredient. It allows the solution to remain plastic for a long time, which allows you to achieve the desired texture or pattern. The filler can simply be a pigment that will color the composition in the desired color. Solids:
- marble pieces,
- quartz sand,
- granite chips
- synthetic elements.
These ingredients are added in the smallest quantities.
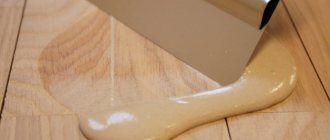
Putty is a highly malleable material, similar in texture to clay or dough, and is commonly used in home construction and renovation as a sealant or filler to fill holes and small cracks.
PVA glue is one of those few things that is difficult to replace - both on the construction site and during renovations. It improves the physicochemical properties of solutions and gives them better viscosity. Plasters made with this glue become more flexible. When added to dry mixes, the PVA construct acts as a modifier, improving their processing properties and improving adhesion to various surfaces.
Resulting effects
There are many reasons why PVA glue is added to cement mortar. The main purpose of adding glue is to impart plasticity to the solution, which increases resistance to tearing, provides better filling of cavities and reduces the risk of cracks. In addition, the composition guarantees a number of effects:
- Increased service life;
- Adhesion increases and strength equally increases;
- The work is simplified;
- The screed holds its shape better and does not spread;
- The risk of deformation during intense impact on the surface is reduced;
- Uniformity increases;
- Wear resistance increases significantly.
If you have experience working with PVA, you can make a standard mortar into tiles. It is only important to follow the addition technology and dosage, and the scope of application of the building mixture expands significantly.
How to enhance the properties of homemade primer
The addition of construction chalk seriously improves the strength of the connection and gives leveling properties to the primer. The resulting composition is not used for painting walls, since small irregularities are created on the surface. But such roughness improves the adhesion strength of wallpaper glue, tiles, decorative stone and other finishing materials to the base.
After adding chalk, the properties of the primer will be as close as possible to professional analogues, so the quality of the repair will increase. The amount of chalk should not exceed 10% of the volume of the finished soil. It is introduced in small portions and thoroughly mixed with a construction mixer.
Instead of chalk, you can use building gypsum, however, you need to work with it faster, because the mixture will set in a short time. To treat floors, it is recommended to add up to 10% cement to the primer, which imparts powerful strengthening properties. To prepare walls for painting, it is recommended to pour up to 5-10% of water-based paint into the prepared primer, which will make the surface uniform in color.
PVA soil does not have antiseptic properties, which is its serious disadvantage. It is quite possible to impart such qualities to the composition, for which purpose “Whiteness” and “Chloramine” are introduced into it in an amount of 50 g per liter. You need to be careful when working with such compounds, because chlorine fumes are harmful. The room will need to be well ventilated after priming.
To improve the penetration of the composition into the deep layers of wood, concrete, and plastered walls, the following technique is used. For 1 liter of soil, pour 30 g of liquid glass - an aqueous alkaline solution of potassium or sodium silicates. Also, liquid glass has strong antiseptic properties, so there is no need to add chlorine.
Application area
Possessing high adhesion to concrete bases of different ages, the PVA-based putty Starateli can be used as a leveling mixture for other surfaces made of:
- gypsum (plasterboard, GVLV sheets, tongue-and-groove panels);
- wood-based materials (laminated veneer lumber, chipboard and fibreboard);
- bricks;
- cement plaster.
The frozen layer of this putty is completely ready for the application of light decorative materials - varnishes, paints, decorative plaster, PVC tiles. However, its strength is not sufficient for treating floor surfaces, and the material is not used as a base for mineral tiles.
Putty
Putty
(special:
putty
[1] [2]; from German
Spachtel
-
spatula
) - a paste or powder material used to level surfaces before applying materials for interior decoration [3]. Putties are compounds used to level surfaces that are to be painted. Putties come in different types. To prepare them, laundry soap, chalk, flour glue, carpentry glue, animal glue, varnishes, sifted gypsum, and drying oils are used.
Content
- 1 Types of putties
- 2 Composition
- 3 Application
- 4 Notes
- 5 Literature
Types of putties [ edit | edit code]
- Oil putty
contains natural drying oil, driers, and chalk. This putty dries slowly, but has increased strength. It is used in the preparation of floors, window sills, window frames, external doors and other surfaces where moisture may be present. Oil putty is intended for surfaces that require leveling before painting with water-dispersion paints, oil paints and enamels. Has high adhesion rates. Used indoors in dry and damp areas. - The adhesive putty
contains a 10% glue solution, drying oil, and chalk. Thanks to drying oil, the putty is durable and easy to apply to the surface. - Oil-adhesive putty
contains acrylates, drying oil, water, plasticizers, and additives. It is used for leveling defects in ceilings and walls made of concrete, wood and plastered surfaces, which will then be painted or wallpapered. Oil-adhesive putty is intended for interior work. - Gypsum putty
- Epoxy putty
- Polyester putty
- Latex putty
contains calcite filler, acrylate, plasticizers, water, and additives. The application is similar to oil-adhesive putty. For interior work only. - Putty
is a putty used for sealing baseboards and leveling plastered surfaces. It can also be used for gluing ceramic tiles in dry rooms. When diluted with water, it is suitable for whitewashing walls and ceilings with a brush. - Universal acrylic putty
is made from chemical raw materials using modern technologies. Environmentally safe. Combines the properties of leveling compounds and at the same time has a dense, fine-grained structure. Easy to sand with sandpaper. After drying, it does not shrink or crack. High-quality material and excellent for use at home, especially when there is no time to select a separate putty for each material. Used for interior work. Levels plastered, plasterboard, concrete, wooden surfaces, and is also used to repair damaged plaster. Can be applied in either a thick or thin layer. - Facade acrylic putty
is resistant to moisture and atmosphere. It is used for external work on plaster, concrete, wood. Has excellent filling and leveling properties. It does not drag on the spatula, does not crack, and has increased strength. Dries quickly and sands easily. Characterized by high plasticity, facade putty is resistant to abrasion. Almost odorless. Environmentally friendly product. - PVA based putty
. It is used for leveling concrete, asbestos-cement, plastered and plasterboard surfaces, as well as for sealing cracks and joints, cracks and during preliminary work for painting and wallpapering. This putty contains a large number of antiseptic additives that prevent the appearance of mold and fungi. It has optimal viscosity and is conveniently applied to the surface. After drying it is easy to sand.
Composition [edit | edit code ]
Putties contain film-forming substances, fillers (chalk, talc, barite) and pigments (zinc white, ocher). The film-forming agent content is 5-12 times higher than the content of pigments and fillers. There are several different types of putty: varnish, oil, adhesive, gypsum putty, which are based on varnish, drying oil, natural adhesives, and gypsum, respectively.