If you are the happy owner of a summer house or a private house with a small plot, then you can set up a bathhouse in an old barn. It will give the whole family good health and wonderful relaxation after a hard day at work. Also, if the need and desire arise, you can make good money by setting an hourly wage and letting your neighbors, acquaintances and other people steam there.
We will equip an old barn, which we do not use, with a concrete floor as a steam room. The barn can be built from wood, brick, foam block or shell.
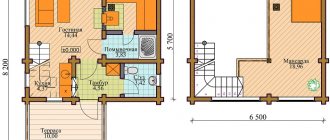
Are planning
We will allocate a considerable area of the barn for the steam room, approximately 6 square meters. m, this will be a small steam room; when calculating, take into account that there should be at least 2 sq. m per visitor. m. If you have a small family, then 6 sq. m will be enough for you, but if you plan to make money in the future using a steam room, then the area will accordingly be needed more.
Don’t forget to plan in advance the location and number of shelves, and determine the most advantageous place for the stove; the convenience of staying in your bathhouse from an old barn, which you will make with your own hands, depends on the layout.
Input data
In our particular case, at the time of reconstruction of the barn premises, it was used for its intended purpose for 10 years: for keeping poultry, storing equipment, tools, spare parts, handling bales of hay and straw, as a firewood shed, and so on.
The barn building is:
- A rectangular room with dimensions of 4000x3000mm, assembled from softwood logs with a diameter of 150-160mm. Inside, 2/3 of the building has a partition made using frame-fill technology and equipped with a doorway. Ceiling height 2520mm;
- There is one entrance door, 700x1800 mm in size, one window opening, 600x800 mm in size, oriented to the west.
- The floors are wooden, rough, supported by wooden logs with a cross-section of 200-220mm. Approximately 25% of the floors have local damage.
- The roof is gable, has rafter overhangs 550 mm long to divert atmospheric precipitation beyond the perimeter of the base, the attic space has an adobe floor.
- The foundation is strip, monolithic, unreinforced, the back of the foundation base has a waterproofing coating based on modified bitumen. The root crowns at the junction of the plinth and the frame are in satisfactory condition; no traces of damage by fungi and borers were found.
- There are no communications leading to the barn.
At the location of the building lies fertile soil with a thickness of 200 mm; below it lies loam, turning into red clay with local inclusions of sandstone stone and outcrops of clay shale, at a depth of more than 250 cm from the surface.
Bath floor
It is worth laying structural tiles on a concrete floor in a barn; the surface of such tiles is a little rough, as if a little abrasive. And it is almost impossible to slip on such tiles. It is also worth making grates from boards, which we will lay on top of the tiles for comfortable movement around the bathhouse, because wood does not heat up as much as tiles and will not burn your feet when walking.
Be sure to weigh the pros and cons and decide whether to install a water drain in the floor. If you want to take a steam bath with a park, then your DIY barn sauna will need to be thoroughly wiped with a dry cloth and ventilated.
Making a roof
The roof is made in the same way as the walls. Roof assembly:
- Frame made of pine boards 50x80.
- Filling with mineral wool.
- Thermal insulation layer made of aluminum foil.
The process of insulating the roof The second photo shows the outlet - air must circulate around the heat source (stove). Therefore, below under the stove I will also make a hole for air flow.
Flow hole in the furnace area
Steam room materials
We recommend making a bathhouse from aspen boards, the thickness of which is at least 6 cm, and spruce beams. You should choose a dry tree, because dry wood retains its shape better and is much more durable than raw wood.
We construct the frame of our bathhouse from beams, it is not a complicated work at all, and then it is difficult to attach the frame to the floor. But this can be done with a little effort. We will carry out fastening by drilling aligned holes in the floor and beams, into which we will insert long screws, and do not forget to lay waterproofing between the floor and beams.
It is very important to install steam and waterproofing boards on the walls, which should be sheathed with boards. For these works, it is better to use aspen boards, having previously made grooves along the boards, which will serve for better adhesion of the boards to each other.
When driving nails, you should drive them as deep as possible into the wood, because the temperature in the steam room is high, and you can get burned by touching the hot head of an iron nail.
The nuances of roof construction
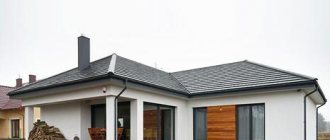
In case of combined construction, the roof must have a solid structure. Its separation can lead to a rapid breakdown of the integrity of the building. It is better to use a 2- or 4-slope roof, since it has a large area and high stability that can withstand such a complex structure
Before you start building the roof, it is important to decide whether an attic or attic is required, since this part of the house must be built immediately
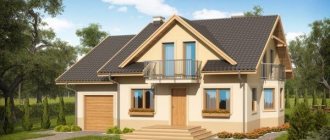
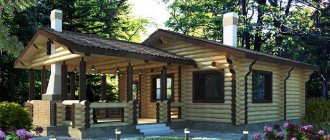
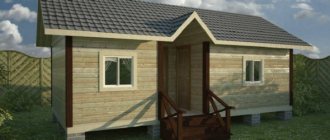
Example of an extension with a pitched roof
An example of a bathhouse extension with a pitched roof
What is important to remember when building a common roof:
it is important to accurately calculate the height of the roof of the bathhouse and residential building; be sure to make two chimneys - separately for the house and the future bathhouse; A system of ebb tides and reliable snow holders is immediately installed.
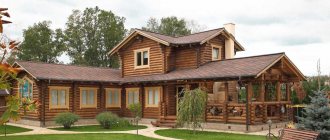
An example of a bathhouse under one roof
When constructing a bathhouse as an extension, the roof can be single-pitched or gable. When arranging a lean-to structure, the highest roof, exactly the bath roof, should be adjacent to the wall of the house and go under the main roof. Ceilings to strengthen the structure should be constructed from 10x10 cm timber or boards laid on edge with the same width. Then a sheathing is attached to the bottom and top of the beams, on which heat and vapor insulation is applied. Roof rafters should be installed so that the roof slope angle is 20%. Then the roofing material is laid, and the remaining gaps and cracks are sealed using polyurethane foam.
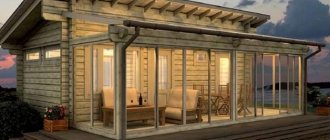
Example of an extension with a gable roof
The material for the roof can be anything, depending on the wishes of the owners. However, it is economically beneficial to use metal tiles or galvanized profiles. These materials require the creation of a simple frame with wooden joists. Bitumen or ondulin roofs will require not only professional installation, but also the creation of a special surface. But outwardly they look more respectable and impressive.
We provide electricity to the bathhouse
To illuminate your bath, you will need a special double-insulated cable and a lamp that is resistant to high temperatures. The switch should not be ordinary, but moisture-resistant, it should be located at the entrance to the steam room, as required by fire safety rules.
The wiring should be deepened into the walls so that the cable does not interfere, and then the bathhouse will look better and neater.
Additions:
- all boards used for lining the bathhouse must be made from deciduous trees;
- do not skimp on wiring materials, cables, lamps, switches and sockets. Buy high-quality and moisture-resistant ones, because the life and health of your family and guests who will visit your steam room depend on it;
- lamps must be made of heat-resistant glass, since the temperature in the bathhouse sometimes rises above 100 °C;
- Many people like to plunge into a cool pool after a hot bathhouse. But if you can’t afford such luxury, build a small pond in the yard, or place containers with cool water, for example, barrels, into which you can happily plunge after warm and pleasant bath procedures.
And in winter, water procedures can be replaced with snow rubdown:
- Be sure to ensure that the water in the barrels, pool or pond does not stagnate. Disinfect containers with water. Especially if other people are bothering you;
- Over time, you will be able to expand the bathhouse, add a relaxation room, and use it to earn money. After all, this is a good idea for business.
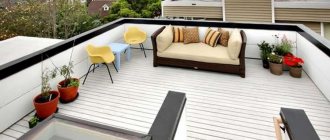
Examples of finished structures
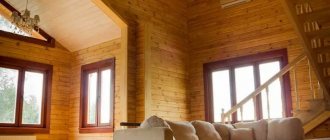
This is what a high-quality, solid bathhouse in a garage can look like. Almost all surfaces are made of smooth, light-colored wooden boards. A stone wall separates the steam room from the main part of the stove; only the container with the heating stones is brought outside. There is only one lamp - a diamond-shaped one, above the front door (which is lighter than the walls surrounding it).
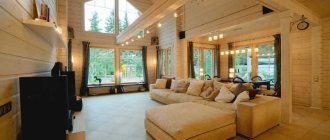
Here is another example - with a stove located in the steam room itself. The walls around it are decorated with stone, the substrate is also made of stone, and the rest of the room is decorated in a more familiar way - with boards. The main structure is made in the form of steps; an imitation of a log house is used around the entrance door.
A visual representation of the bathhouse project in the garage basement can be seen below.
conclusions
Now you know how to make a bathhouse from a barn with your own hands, it is not such a difficult task. By taking a steam bath, you get a lot of positive emotions, while seriously improving your health.
Yes, building a bathhouse is quite a labor-intensive process, and if you complete the job you started, you and your family will be happy, and if you approach this business with creativity, use your ingenuity and imagination, you can make good money.
We insulate the room
Of course, the main thing for a bathhouse is insulation. It is for this reason that it is necessary to initially carry out external insulation, after which, proceed to the internal arrangement. In order to create the ideal features of warmth and comfort, we will need:
- Mineral wool as insulation;
- Specialized sandwich panels for room insulation.
Instead of panels, other decorative materials can be used. Warming process:
- Clean the wall thoroughly;
- We use specialized profiles for subsequent finishing of walls with mineral wool;
- We fix the mineral wool;
- We fix the decorative material.
Cost calculation
The cost of a bathhouse with a utility unit consists of many factors, and it can fluctuate in different regions of Russia. If we average the price range, we can say that a standard structure with an area of 18–20 square meters will cost, depending on the materials used, the following amounts:
The building, erected using frame-panel technology, will cost about 800 thousand rubles. Arranging a strip foundation for a building will require additional financial investments of approximately 200 thousand rubles.
More details about two-story bathhouse projects can be found at this link.
Furnace and ventilation
I placed a stove-stove on fire bricks near the door. He also placed bricks between the stove and the wall. The pipe was taken outside. The stove was fenced with wooden railings so as not to accidentally touch the hot metal.
I drilled a small hole in the wall next to the stove to allow air flow into the stove. I also made a ventilation hole under the ceiling. Both openings were equipped with valves that allow you to regulate the inflow and outflow of air.
Link on topic: Do-it-yourself bathhouse - several options for building a bathhouse
Pouring the foundation
For a bathhouse with a garage, a strip foundation is usually poured. The exception is small, light and mobile baths that can be placed on a columnar foundation. A strip foundation is more difficult and expensive to build, but the result is worth it. Such a foundation can support both a stone building and a bathhouse with two floors.
The trench into which the foundation will be poured is dug along the entire contour of the building, as well as under load-bearing internal walls, if they are intended. The basis of the strip foundation is a carefully compacted sand cushion. Sometimes the foundation is reinforced to give it greater strength. If the building is being erected from stone materials, this will have to be done. Before pouring, pipes for the bathhouse sewage system are laid in the trenches, if this is provided for in the project, and other communications are installed.
The process of pouring a strip foundation for a utility block and a bathhouse
After pouring the concrete, the foundation should set and settle for several days. It is desirable that the strip foundation for the bathhouse rise above the ground by at least 25 cm. Waterproofing of the foundation is required; this can be thick construction cellophane or two layers of overlapping roofing felt; sometimes for even greater insulation it is coated with bitumen along the entire length.
FAQ
Conduct an internal inspection. Seal all visible cracks and defects. Additionally, insulate the walls using 5 x 5 cm bars. The step between the bars is 2 cm. Place the insulation in the sheathing and cover it with a vapor barrier film. After this, you will level the walls and be able to lay the finishing material or secure the old one.
It is not necessary to buy new roofing material. If the holes are small, they can be sealed using a special solution. To do this, mix asbestos, water, cement and add PVA glue. Apply the composition in 2 layers, first waiting for the first one to dry.
Try to make the shelves wide. The optimal width is 65-70 cm, of course, if the size of the room allows. Be sure to treat the surface of each shelf to avoid splinters.
Source
Video description
You can make a pouring floor like this:
Drains from the bathhouse cannot be poured into reservoirs - they contain detergents, this kills river inhabitants.
If the sauna is located inside the house, the wash room can be replaced with a regular bathroom.
Locker room and dressing room
If the sauna is located separately, then these rooms perform a vital function. They serve as an additional buffer that prevents cold air from the street from entering the steam room and washing room.
The design of the dressing room depends solely on the preferences of the owners. You can make this room strictly functional so that you can leave outdoor clothes in it and wait for the sauna to warm up. Or you can install a TV, sofas, tables and everything that comes to mind.
The dressing room can be decorated in any way you like Source pimpmyhouse.ru
If you make a sauna with your own hands in a private house, then a dressing room is not necessary. However, its presence is convenient - you can store bath accessories there and undress before the sauna.
If desired, the sauna can be equipped with a swimming pool, a home training room, or a relaxation room.
How to redo walls
The walls in the room must retain heat. The formation of so-called “cold bridges” is not allowed. That is why pay attention to the cracks that must be sealed. To seal cracks in timber houses, use tow, polyurethane foam or moss.
If there are no visible defects, insulate the walls not only inside, but also outside the house. The stages of work to remodel the walls inside the bathhouse are as follows:
The exterior walls of the bathhouse are finished in a similar manner. But the difference is that the insulation needs to be laid overlapping, and not end-to-end. Due to this, it will be possible to avoid the appearance of cracks.
Related articles: how to measure noise in an apartment
As for windows and doors, it is also advisable to redo them, or better yet replace them with new ones.