When choosing an electric pump for autonomous water supply, you need to take into account quite a lot of factors: the type of source and the distance from it to the consumer, the quality and consumption of water, supply and much more. submersible vibration pump can be used to water a small area or supply water to a home . The characteristics of this device, combined with a low price, have made it one of the most popular on the market.
Pump modifications and characteristic differences
Vibrating submersible pumps were invented a long time ago. Back in 1891, Russian engineer V. G. Shukhov used the principle of vibration for a pump. By the way, approximately the same system is used in a car fuel pump.
Later, the Argentinean T. Belloc modified the scheme - it is used without any changes today.
There are a great variety of vibration submersible pumps. But they all have approximately the same structure and the principle of their repair is the same
The Italians were the first to produce such devices for domestic needs. In the USSR, their development was undertaken in the late 1960s by Moscow designers under the leadership of M.E. Breitor. And since 1971, household vibration pumps began to be produced at enterprises in the USSR - the passion for unification had an impact.
Approximate composition of a repair kit for the Malysh pump and similar modifications
Pumps were produced in Yerevan, Livny, Moscow, Bavleni and many other enterprises. We can name only the most famous brands: “Malysh”, “Neptune”, “Strunok”, “Sega”, “Rucheek”, “Urozhay”, “Bosna”, “Kashtan”.
All of them, in fact, differed in name and body shape. And that's not always the case. This also includes Italian and Chinese designs. For example, “Dzhereltse”.
Even a specialist cannot always distinguish the “Strunok” pump from the “Malysh” - only by marking
All these are variations of the same scheme. Sometimes the names changed, but the essence remained the same. For example, the now famous “Malysh - M” was a little earlier “Sega” and “Rucheyok”. Therefore, the breakdowns of “Rucheyok” and the methods for eliminating them are very similar to its closest competitor, “Malysh”.
If you ignore the confusion with different names, then briefly all the variations come down to three or four types of submersible pumps:
- “Baby” is a model of a submersible vibration electric pump with a bottom water intake. The most powerful modification of all, but poorly suited for bottom work - it can pick up dirt or silt from the bottom and fail.
- “Malysh - M” option with upper water intake. A little weaker, but it doesn’t pick up dirt from the bottom. It rarely fails due to overheating - simply, even if the water level drops and the intake runs out, the body still cools - it remains submerged.
- “Malysh - K” is a model with a lower water intake, but is equipped with a thermal relay and a three-wire grounding wire. The presence of a thermal relay has a positive effect on service life and reliability, but increases its cost. Previously, this modification was exclusively for export.
- “Malysh - 3” is a compact model with a diameter of 80 mm for narrow wells.
In any case, vibration pumps are valued for their compactness, cheapness and simplicity. In addition, they are quite resistant to water hammer, which occurs when a water main is blocked, for example. Although you shouldn’t get carried away here either - such frequent practice still damages the pump.
Pumps of even the same model may differ slightly: polishing or powder coating of the body, for example. But their parts are usually interchangeable
Pump device Baby
In the event of a breakdown, it is impossible to carry out high-quality repairs if the owner does not know what the principle of operation of the device is and what elements it consists of.
Information can be studied in the instructions if it is not lost.
Let's look at the design of the vibration pump Malysh.
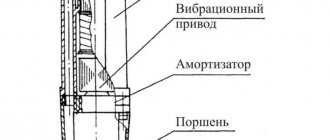
- The main and largest element is the metal body. It must be as reliable as possible so that the pump can be immersed in deep water.
- Electromagnet.
- Vibration wire.
- Valve.
- Piston.
- Shock absorbers.
Device diagram Source belamos-expert.ru
Baby pump designs can have several different variations. For example, water intake can be bottom or top.
With top fence
The specificity of the device is that the valve responsible for water suction will be located at the very top of the housing. At the same time, the manufacturer placed the electric drive in the lower part.
This pump has several clear advantages.
- The electrics of the pump are under the water column during operation. This means that it will not get very hot.
- Sediments in the form of silt and debris are too heavy. They will not rise to the top where the suction pipe is located.
With lower fence
The design of the Baby pump with a lower water intake has exactly the same design. However, the elements and mechanisms are located exactly the opposite. The electric drive is located on the top of the housing, and the suction valve is located on the bottom.
For a model with a lower intake, the valve is located at the bottom Source ai911.ru
In this case, the owners of the Baby must constantly monitor the normal water level. If the pump operates “dry”, that is, it is not completely immersed in water, overheating is possible.
Functions: operating principle of a pressure switch
Pumping stations are usually not equipped with automation to monitor and control work. At the same time, turning on and off the pumping equipment in autonomous mode is extremely necessary, because performing these operations manually will require constant attention to the system and will not allow the inhabitants of the house to go about their business, work and rest.
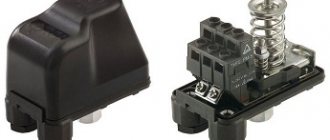
A sufficient level of control is provided by the pressure switch. It is a block with a plastic casing. Inside the housing there are two springs, each of which is “responsible” for setting the value of the extreme position (parameters for turning the pump on and off).
Diagram of a water pressure switch for a pump
The relay is functionally connected to a hydraulic accumulator, which contains water and compressed air; the media come into contact through a flexible elastic membrane. In the working position, the water in the tank presses on the air through the dividing partition, creating a certain pressure. As water is consumed, its volume decreases and the pressure decreases. When a certain value (set on the relay) is reached, the pump turns on and water is pumped into the tank until the value set on the second spring is reached.
The connection diagram for a water pressure switch for a pump provides for connecting the equipment to a water supply system, a pump and an electrical power supply network.
Design and principle of operation of the unit
The principle of operation is simple. The mechanism for drawing and lifting water using a piston and valve has been known since the ancient times of Heron of Alexandria. The whole difference is that the circuit has been redesigned for an electric motor.
Electrical alternating current changes its direction several times per second. In Russia, the standard is 50 Hz. This means that the current changes polarity 50 times per second.
Accordingly, an iron core placed in a magnetic field created by a current with such a frequency will vibrate with a frequency of polarity reversal. If a piston with a valve is added to such a core, a pump will appear.
These are all variations of the same working scheme. There is not much difference in the principles of their repair
The pump housing consists of two halves. One of them contains an electric coil that creates an electromagnetic field, and the other contains all the mechanics with a steel core.
The coil has a U-shaped core. When assembled, this part is called a yoke. It is pressed into the body and filled with a compound for tightness and insulation - plasticized bakelite resin with an admixture of quartz sand for reasons of better thermal conductivity.
The other half of the housing houses the hydraulic chamber. It contains a core on a rubber shock absorber. The movement of the core is corrected by a rubber membrane. There is a piston on the core. And to direct the flow of pumped out liquid, a check valve is installed on the intake pipe.
Simply put: the coil is magnetic, the core vibrates, the shock absorber acts as a seal on the housing and returns the core to a neutral position, the membrane prevents the core from swinging, the piston pushes the water, the valve ensures that it moves in one direction.
That's the whole design - simple and effective.
Malysh pumps and modifications are produced with lower and upper water intake. Units with a lower intake break down more often, since their competitors have better engine cooling
Main types of breakdowns
Vibration pumps of the “Malysh” type were developed more than half a century ago by Soviet designers. But, despite this, they are still very popular among our compatriots. The reason for this is the affordable price and high reliability. But, despite this, submersible pumps “suffer” from a number of characteristic malfunctions that are also characteristic of the “Malysh”. The main types of “Malysh” malfunctions include:
- Detachment of the electromagnet.
- The gap between the piston and magnet coils does not meet the standards.
- When plugged in, the pump hums, but does not supply water.
Frequent problems
- The Malysh pump does not pump water well - the problem is an incorrectly configured check valve.
- When the pump is turned on, the plugs in the electrical network are turned off urgently (the cable has melted) - the reason is the burnt-out armature winding. The cable needs to be replaced.
- The pump is running, but no water flows - the check valve has failed or the threaded connections of the rod have become loose. If the rod breaks, all that is required is its replacement.
- The Baby pump is heating up and shaking violently - the vibration dampening compound is peeling off. This layer will need to be replaced.
To disassemble the Baby pump, you need to unscrew all the screws that connect the housing together. It is recommended to apply small notches to the body; this will make the process easier during subsequent assembly.
Expert advice: when disassembling the pump, you need to unscrew not one screw at a time, but loosen each one a couple of turns.
When assembling the pump, pay attention to the position of the gasket and the upper part of the housing - they must match. Or if you made notches, use them as a guide. Advice from experienced people: after assembly and repair, check the functionality in a container with water so as not to remove the pump from the well again
Advice from experienced: after assembly and repair, check the operation in a container with water so as not to remove the pump from the well again.
What are the possible malfunctions of vibration pumps?
The disadvantage of vibrating equipment is that they are more susceptible to breakdowns than centrifugal ones. Their price is much lower, and replacement parts can always be found freely available. Such devices are very often used in dachas, as they are capable of pumping not very clean water.
Like any equipment, vibration equipment is subject to breakdowns. Even more frequent than centrifugal ones. You can easily repair the vibration pump yourself if it is a minor breakdown.
An example of pump repair Baby https://i.ytimg.com
Before starting repair work, find out the cause of the breakdown. The peculiarity is that after replacing some attributes, you need to configure them correctly.
There are several most common hydraulic equipment breakdowns:
- The device hums, but does not pump liquid out of the source.
- Mains faults.
- The device overheats, while emitting minimal vibration.
- The pump operates under very low pressure.
What to do if the device does not work well
If the pump is not functioning well, its power has decreased and there is no pressure, you should try to rinse it with clean water; perhaps the reason is that it is clogged with debris. Disassembly of the “Baby” is required if the causes of the breakdown were not established during an external inspection.
The repair includes the following stages:
- It is necessary to unscrew the bolts on the body connecting the two parts of the device. If they are rusty and cannot be twisted by hand, you can cut them off with a grinder.
- The piston and other internal parts should be cleaned of dirt. The pump coil is treated with a compound; it must be removed from the housing.
- The reel needs to be inspected, repaired and rewinded. If the rewind is burned out, you should replace it with a new one.
- An ohmmeter is used to check the functionality of the power cord. If it malfunctions, it can be shortened or a new one installed.
- Assembly of the device. Be sure to properly align the holes through which the water flows.
Check the functionality of the pump. If there is additional noise, the bolts need to be tightened better.
Do-it-yourself repair of the Baby pump: advice from professionals
The “Malysh” pump, produced since Soviet times, is very popular among homeowners and summer residents
At a budget price, it has good performance characteristics that allow it to pump out water at a fairly significant depth. But, like all equipment, it breaks. Many owners do their own baby pump repairs. If you have an engineering mindset and technical skills, this is quite simple and can be done yourself.
Main types of malfunctions and their causes
All faults can be reduced to two types:
- electrical part;
- mechanical part.
In turn, each of them can be divided into two subgroups. This is a complete inoperability and partial disruption of work.
Partial loss of pump functionality does not necessarily mean a violation of regulation. Sometimes the reason lies in the failure of its individual parts. But let's start in order.
Type #1 - electrical faults
The most common malfunction is coil failure. Complete burnout or breakdown of insulation on the housing. Detachment from the compound body occurs less frequently. There is only one reason for the malfunctions - dry operation, without water, which causes the coil to overheat.
Then the insulation burns, the compound burns out and, due to the difference in thermal expansion of different materials, the filling delaminates and the yoke falls out of the body.
Sometimes the pump stops pumping altogether, but the housing may break. This is the most unpleasant breakdown, which can only be avoided by following the operating rules.
When troubleshooting, you will have to disassemble it. Thanks to its simple design, you can independently disassemble it into its component elements
Type #2 - mechanical failure
There is a complete variety of causes and consequences:
- Liming of parts. Occurs from pumping hard water. This is a white limescale deposit similar to limescale in a kettle. This is not particularly noticeable during operation, but after long-term storage, for example in winter, the lime may jam the piston. The malfunction is rare; as a rule, it only makes disassembly more difficult and slightly reduces the pump’s performance.
- Violation of the integrity of the body. The impression is that it was precisely cut with a file or router. Usually the top edge of the body. The reason is simple - contact with the concrete surface of the well during operation.
- Pump working cavity clogged . For example, sand. Sand and pebbles, branches, algae - all this disrupts the tightness of the valve to the bed. Not critical, but unpleasant - the pump does not develop the required power.
- Loosening of threaded connections. Occurs from vibration, occurs infrequently. For example, the nuts securing the piston are loosened. The consequences can be the most dire - up to the destruction of the hull.
- Violation of rubber properties . Leads to a decrease in pump power. In rare cases, complete cessation of performance occurs.
The most capricious part and sensitive to the weakening of rubber properties is, oddly enough, a massive shock absorber. Too elastic rubber contributes to the core breaking, too hard - a decrease in vibration amplitude and loss of power.
In addition, when the core is rotated in the shock absorber, the projection of the base of the rod (a part called an anchor is pressed onto the rod) does not completely coincide with the yoke and is less attracted to it. A hard piston moves water worse. A broken piston does not pump at all.
When the valve loses elasticity, it works worse, but the pump does not fail completely. We also observe when the valve adjustment is violated.
Sometimes there is simply a loss of power. Often the reason is to turn on the pump again without immersing it in water. Most often this happens due to neglect of operating rules.
For example, hanging a pump on a steel cable and without a shock absorber - the pump mount must be shock absorbent! Therefore, the kit includes a fishing line or nylon cord and a shock-absorbing ring for fastening.
Knowing the design of the Malysh series pumps, you can handle the repair of the units yourself without any problems.
Recommendations for use
A change in the supply voltage has a negative impact on the operation of the vibration pump. The problem can be solved by installing a voltage stabilizer , but its price is several times higher than the cost of the pump itself. In order to do without expensive equipment, we can recommend the following:
- When the voltage drops to two hundred volts, the power of the Malysh pump drops sharply, and consequently, the flow also decreases. If the voltage in your network is low, then in order to compensate for these fluctuations, you should choose a pump with a rated flow 25-30% greater than the calculated value. This way the device will remain operational at low voltage.
- If the supply voltage is higher than 240 V, the heating of the electric pump becomes critical and the electromagnet winding burns out. This happens due to a sharp increase in current in the electromagnet coils. A current relay will help protect the device - this is a device that switches its contacts at a certain amount of electric current. It must be connected in series with the electromagnet winding. It works in the same way as a circuit breaker in a power supply panel, but has a smoother setting of the operating current. When adjusting the relay, the operating current is set to 0.5 A more than the rated current of the electric pump.
To use these units in a pumping station, it is important to know what pressure the Malysh pump creates. The operating pressure value is 0.4 MPa. This is enough to supply a small home with only one water distribution point at a time.
How the “Malysh” pump is repaired
The low price of the “Baby” pump makes broken elements a source of spare parts for the next similar pump. It is often cheaper and faster for the user to buy a new “Baby” than to take a broken one for repairs. And if you have two broken pumps, you can assemble one that works.
For example, the core winding of one pump burned out, and the thrust of the second one broke. With a simple pump design, anyone with even a little experience in disassembling and repairing simple mechanisms can independently “transfer” serviceable parts from one pump to the body of another.
pump disassembly
Disassembling the water pumping unit can create difficulty. The two halves of this assembly are fastened with four bolts. During the time spent in water, the fastener parts oxidized and “grew” to each other. If you cannot disassemble this unit, do not use excessive force. Moisten the contact points between metal parts with kerosene and wait about 30 minutes. In the most severe cases, if kerosene does not help to unscrew the fasteners, the bolts will have to be cut off. To make disassembling the pump easier, its body can be secured in a holder in a vertical position.
What is the pump used for?
Summer residents and farmers use “Malysh” for several purposes, these are:
- Water supply to the garden and summer cottages.
- Providing water to private houses and cottages.
- Entering an automatic watering system.
- Pumping out water.
- Spraying of garden and vegetable crops.
The undoubted advantages of this pump are:
- Ease of use.
- Sufficient reliability and lightness of design.
- Unpretentiousness in care and work.
- Can work in wells.
- No need for fastening.
- Budget price.
Note. In order to repair the Malysh pump, you need to know its technical characteristics. They can be studied by reading the instructions for the Baby pump, which is included in the kit sold.
Below are the main parameters:
Setting up the pressure switch
To configure the pressure switch, it is necessary to set the operating pressure in the system. To do this, after assembling the circuit, the equipment should be turned on and wait for automatic shutdown when the relay is activated. After this, the roof is removed and the settings are performed in the following sequence:
- Loosen the nut that presses the smaller spring.
- Set the required minimum pressure value (pump activation parameter). Rotating the large spring nut clockwise increases the set pressure value, and in the opposite direction decreases it.
- Having opened the tap, they empty the system, monitoring the automatic response threshold using a pressure gauge. If the result is unsatisfactory, adjust the setting.
- The pump shutdown parameter can be adjusted in the same way by rotating the nut on the second (smaller) spring.
Inspection of the position of the pump components
If you have disassembled the pump, check the correct position of its components.
- Make sure that the gap between the piston and the coil electromagnets is about 5 millimeters.
- Check the condition of the valve. It should flow freely in both directions. There should be no visible damage to the valve. To secure the valve more securely, lock its nut with an additional one.
- Make sure there is no mechanical damage to the piston assembly. Despite its firm hold, it should retain some flexibility. To ensure it is firmly attached to the hub assembly, unfasten the nut at the end. For reliability, the nut can be secured with an additional lock.
- You can also disassemble the bushing block. Remove the piston assembly, remove the washer that regulates the distance between the sleeve and the membrane (there may be several of these washers). Then remove the stop ring and remove the durable rubber membrane from the piston assembly side. You will see a cylinder made of aluminum. Press the bushing assembly against the spring and remove the cylinder. When reassembling, you can adjust the gap to 0.5 cm. The gap is changed by adding or removing washers on both sides.
- Disconnect the hose from the device and hang it in a bucket filled with water. We turn on the power supply and check the voltage in the network - it should be fixed in the range of 220-240 volts.
- Turn off the equipment and drain the water from the pumping device.
- We check the patency of the valve. We just blow it through our mouth. Air from the mouth should flow freely into the valve, but as the pressure increases, the hole should close, and you should feel that the piston assembly has moved. When blowing in the opposite direction, the air flow should pass without visible obstacles.
Hydraulic characteristics of pumping stations of the AQUAROBOT M series
| Model | P, (kW) | Q, m3/hour | PERFORMANCE | |||||
| 0 | 0.4 | 0.55 | 0.67 | 0.9 | 1.2 | |||
| AQUAROBOT M | 0.225 | Head, N (m) | 75 | 50 | 40 | 30 | 20 | 0 |
How to replace the compound
- Let's disassemble the device.
- We determine the place where the compound has peeled off from the submersible pump housing. This can be done by lightly tapping the body with a small hammer. In normal areas the sound will be dull, in damaged areas it will be ringing.
- We remove the assembly with the compound from the vibration pump housing.
- Using a grinder, we carefully apply a mesh of notches, up to 2 millimeters deep, to the inside of the body. We make the same mesh on the unit with epoxy compound.
- Cover both areas with notches with glue for glass surfaces (any sealant can be used)
- We return the assembly with the compound to its original position - fix it and wait until the sealant hardens.
- Putting the body back together.
Troubleshooting algorithm
If the pump refuses to work or does it somehow unconvincingly, then first of all disconnect it from the network and remove it to the surface.
Stage #1 - careful external inspection
This is followed by disconnecting the supply hose and visual inspection. Are there any visible damages?
Unfortunately, cracks in the case can only be cured by completely replacing the case. But even here it is worth remembering that they will not simply appear in injection moldings - there is another reason hidden somewhere.
If the housing is intact, use a tester to check the resistance of the coils and the presence of a short circuit to the housing. A working yoke will show a resistance of about 10 ohms. Any of the contacts (except grounding) should not provide a short to the pump body.
If it exists, it’s bad. Replacing the coil yourself is very difficult and the attempt gives poor results. However, recommendations on this issue will be a little later.
If everything is fine with the housing and electrics, you need to bleed the pump. That is, just blow into its intake and supply holes. Air should flow freely in both directions.
But if you blow sharply into the supply pipe, the valve should close and block the air supply.
If this does not happen, then it eloquently indicates a violation in the pump adjustment. Then we’ll just shake the pump. Nothing should rattle inside it. The cause of extraneous sounds is peeling of the compound or destruction of the mechanical part.
If there are doubts about the need for disassembly, and the pump has simply lost power, then you can try to do without disassembly. First of all, rinse the pump with a stream of water. The task is to wash away sand and debris from the inside.
Then you can try putting it in a bucket of water. Add 9% vinegar (about 100 g per bucket) or a bag of citric acid to the water. We leave it for six hours. Then rinse again with running water. The purpose of the procedure is simple - to remove liming.
Next we check the valve adjustment. It should lie loosely and have a gap of 0.5 - 0.8 mm. Simply loosen the locknut and clamp nut on the pump intake and adjust. As soon as we get it right, we fasten it with a locknut. The process is easy to control.
We lower the pump without a hose into a bucket of water. So that only the hose pipe is visible. And turn it on. In a working and adjusted pump, the water column rises by about a meter.
It is by this fountain that we judge the adjustment. As soon as we get the maximum value, we fix the result.
We have listed the simplest ones. The rest requires disassembly.
Image gallery
Photo from
Components of a vibration pump
Disassembling the valve for preventative cleaning
Vibration pump assembly
Stage #2 - a closer look from the inside
The first step is to disassemble the pump. It is advisable to first make marks on the body. So that you can assemble it correctly later.
Unfortunately, it is easy to unscrew the mounting screws only on a new pump - during operation, the threaded connection becomes so oxidized that disassembling it is still a task. The best help is patience and WD40.
By the way, in the past, at the factory, the connecting studs were generally cored to prevent loosening. Today they act a little more humanely and use nuts with a plastic lock. These are exactly what should be used during assembly.
If disassembly is unsuccessful, you need to resort to a hacksaw or angle grinder (grinder). Only very carefully, without damaging the case. It is better to replace the standard screws with internal hex bolts - they are then easier to unscrew.
By the way, you should disassemble and reassemble according to the same principle as car wheels or an engine block - we tighten or loosen the fastenings gradually, crosswise.
After repairs, it’s a good idea to replace the standard slotted screws with bolts with an internal hexagon head - they are easier to disassemble
The pump splits into two halves - the yoke is filled with compound in the upper one, and all the mechanics are held in the lower one.
Step #3 - Troubleshooting the Electrical Problem
In the electrical half we look at the compound. If it has peeled off, then by gently tapping the body with a hammer, we identify the area. If it is small, then you can try to cure the problem by filling it with epoxy resin.
If the unit falls out of the body, then apply a shallow notch to the compound (with a grinder) no deeper than 1 mm.
And we secure the assembly in place using sealant, which is used when repairing car glass. Epoxy resin is not suitable - it is not flexible enough and will simply burst later from vibration.
It is difficult to press the coil into place - you may need a press with a force of about 300 kg. You can try and rewind the coil if it is burned out. But this is more complicated.
First, the body is heated to remove it. Up to approximately 120 degrees. Until the compound peels off. It is better to do this in the fresh air - burning compound is not very good for health.
Carefully chipping, free the coil housings (there are two of them) from the remnants of the compound. Unwind the old wire from them. Then new windings are wound. Wire with a diameter of 0.65 mm, PETV brand. Turn to turn, approximately eight layers each coil.
The coil terminals are connected by soldering to a moisture-resistant wire with a cross-section of 0.75 in double insulation. And then the coil is poured into the housing with epoxy resin with the addition of calcined quartz sand.
But in general, this repair method is not very reliable - at the factory, equipment and materials allow it to be done more efficiently. And electrical repairs can only be recommended as a last resort. In other cases, it is better to contact the manufacturer.
Electrical problems can be fixed on your own only if you have experience in performing such work. Otherwise, it will be cheaper to buy a new part.
However, if you have a lot of free time and a winding machine and skills in working with electrical devices, then you can try. But most often it turns out to be cheaper to completely replace the coil along with half the housing. By the way, this is what they do in factories. This can be considered a unit repair.
Stage #4 - correction of mechanical problems
It's easier with mechanics. Carefully remove the assembly from the pump housing. First of all, we visually determine the problems: destruction, ruptures, broken washers, and so on. If there is blackness and burning, we check the electrics again.
If there are traces of mechanical wear on metal parts, we check the gaps and shock absorber and once again double-check the electrical half for peeling of the compound. This can be done by tapping with a hammer - the sound will be dull at the place of delamination.
It’s just that sometimes the yoke and armature wear out because the coil moves and falls out of the housing. This is not always noticeable on an old pump due to contamination.
During disassembly, tears of the membrane and shock absorber sometimes occur. The membrane does not particularly affect the performance of the pump and, if it can be glued with rubber glue, then this can be enough. But in this case it is better to replace the shock absorber.
We wash the insides of the pump to remove sand, if there is any. We remove limescale using the same principle as descaling a kettle - citric acid, vinegar, descaling agent. Just do not use strong alkali or other powerful products - you need to clean the case, not dissolve it.
Most often, Malysh pumps require disassembly and assembly after cleaning wells. They must be regularly cleaned of sand and silt.
Next, look at how the rod armature is oriented in relation to the coil. Their projections must match. No - we turn it by loosening the fastening nuts. The distance from the anchor to the yoke should be 5 - 8 mm.
This clearance is adjusted using washers and locknuts on the base of the rod. A greater distance will not allow the pump to develop power. Anything less leads to the breaking of the yoke and anchor, and sometimes the hull.
If the anchor on the rod becomes loose - which is extremely rare - it is secured by core punching. Sometimes the rod itself ruptures in the area of the piston mounting thread or the thread becomes loose - this is just a replacement.
If the piston is worn out or has lost elasticity, then everything is simple. We replace it with a new one from the repair kit and adjust the gap between it and the bed in the body. This distance should be within 4 - 5 mm.
It is easy to adjust - by adding or removing spacer washers 0.5 mm thick. You will find them on the rod itself above and below the piston.
When changing the piston, be aware of the steel bushing pressed into the center. It's easy to take it out of the old one and press it into the new one. You don't even need special tools. As a rule, it enters by pressing with your hand.
Sometimes a vice or just a bolt with a couple of washers and a nut helps out - we simply put the piston and bushing on the bolt in sequence and tighten it with a nut - the bushing snaps into place as it should. You can even try to do this directly on the stem.
The membrane is changed extremely rarely - only if it has completely crumbled. And so, if it is intact and the rubber has not lost its elasticity, then do not pay much attention to it. The main thing is that it exists.
A caliper with a depth gauge will be a good help in your work. We use this to measure the distance from the seating edge of the body to the valve bed, and then from the valve to the shock absorber. And we bring them into line.
The pump valve is also easy to change - a screw and two nuts. The distance between it and the intake hole is adjusted by simply tightening the screw. As already mentioned, the gap should be in the range of 0.6 - 0.8 mm.
The rod on the shock absorber, check valve and piston are secured with locknuts. We take this seriously.
If this fastening later comes loose due to vibration, it can lead to serious damage - this is precisely one of the main reasons for the destruction of the case or the failure of rubber parts.
An important element of the pump design is the rubber valve, which is located in the housing. It blocks the holes for water outlet, and in the absence of pressure in the device ensures its free flow
We collect carefully. On pumps with top water intake, pay attention to the coincidence of the holes in the housing and the shock absorber - this is why we made marks before disassembling the pump. In appearance, both sides are the same and can be easily confused. If this happens, the pump will simply refuse to work.
As stated, we pull the housing screws crosswise, gradually. And very tight. The nuts must be new, with a plastic retainer. Grover's washers won't hurt at all. We remember that the pump vibrates strongly during operation, which threaded connections do not like.
We check everything again. We measure the resistance of the yoke winding and blow the pump back and forth. If everything is fine, we move on to testing it in a bucket of water. We lower the pump into the water, leaving the hose connection outside. Or we use a piece of short hose for such purposes. And we look at how our water is pumping. Everything is fine - good. Weak - adjust the valve.
After restoration of functionality, the pump is installed in a well or well.
Connecting a pressure switch
There are two commonly used schemes for connecting the pump automation and pressure switch. The method recommended by the manufacturer is always indicated in the accompanying documentation, but it will be useful to familiarize yourself with the possible schemes.
Important: When working, you must follow the sequence: first, the relay is connected to the water supply, and then to the electrical network.
On the pipeline
The relay is mounted on the pipeline (the choice of location is made taking into account the above rules and recommendations). Installation is carried out using a tee connected to a transition fitting (it can be replaced by a drain hose).
Through the fitting
The hydraulic accumulator is equipped with a fitting having five outputs, to which they connect:
- pipeline from the source of water intake,
- relay,
- pressure gauge,
- pipeline supplying water to the house,
- the hydraulic accumulator itself.
The relay, in turn, is connected to a submersible or external pump and a 220 V power supply.
Connection diagram of the water pressure switch to the submersible pump
The following recommendations apply to both options:
- The need to seal threaded connections using hemp and sealant or using FUM tape,
- In order to make the connection, you will need to rotate the device on the fitting, but an alternative would be to use an “American” connection.
- The electrical connection must be made using a cable, the cross-section of which is selected in accordance with the power of the pumping unit (usually equipment no more than 2 kW is used, for which a conductor with a cross-section of 2.5 sq. mm is sufficient).
- Connection terminals are usually marked for easier installation, however, if such markings are missing, this will not be a big problem - the purpose of each terminal is not difficult to determine from the diagram.
- The presence of a grounding terminal makes grounding of the equipment mandatory.
All the nuances are determined by the connection diagram for a submersible pump with a pressure switch or a similar connection for an external pumping unit supplied with the equipment.
Assembly
Reassembly must be done as carefully as possible.
- It is necessary that all holes in the housing coincide with each other and are installed in the same way as before disassembly. If the assembly is incorrect, and at least one of the devices inside is out of place, the pump will not function.
- The screws need to be pulled crosswise one by one, gradually. The twist should be very tight.
The process of assembling the Baby pump must be carried out in stages Source oboiman.ru
- When the pump body is assembled, the tightness is checked by immersing it in a bucket of water.
- Be sure to measure the resistance.
- If everything is fine, then you can release the pump to depth. You have checked.
Experts recommend performing a preventive inspection and cleaning of the pump once a year. In this case, the device will function for a long time without losing power or breaking down.
Assembled pump Source sm-news.ru
Review of popular models
There are two types of pressure switches: mechanical and electronic, the latter are much more expensive and are rarely used. The market offers a wide range of devices from domestic and foreign manufacturers, making it easier to select the required model.
RDM-5 Gilex (15 USD) is the most popular high-quality model from a domestic manufacturer.
RDM-5
Characteristics
- range: 1.0 - 4.6 atm.;
- minimum difference: 1 atm.;
- operating current: maximum 10 A;
- protection class: IP 44;
- factory settings: 1.4 atm. and 2.8 atm.
Genebre 3781 1/4″ (10 cu) is a budget model made in Spain.
Genebre 3781 1/4″
Characteristics
- body material: plastic;
- pressure: upper 10 atm;
- connection: threaded 1.4 inches;
- weight: 0.4 kg.
Italtecnica PM/5-3W (13 cu) is an inexpensive device from an Italian manufacturer with a built-in pressure gauge.
Italtecnica PM/5-3W
Characteristics
- maximum current: 12A;
- working pressure: maximum 5 atm;
- lower: adjustment range 1 - 2.5 atm.;
- upper: range 1.8 - 4.5 atm.
The pressure switch is the most important element in the water intake system, providing automatic individual water supply to the house. It is located next to the hydraulic accumulator, the operating mode is set using adjusting screws inside the housing.
Briefly about the main thing
The small, compact hydraulic unit “Malysh” is quite reliable and powerful equipment, which is most often used in rural areas and in summer cottages. Unfortunately, they, like all other pumps, are prone to breakdowns. Most often, these are minor breakdowns that you can easily fix yourself, without the help of a professional technician. But there are also serious faults that can only be repaired by a specialist. Pay attention to the correct disassembly and assembly of hydraulic equipment.
Have you already repaired the Malysh hydraulic unit on your own? Or do you still prefer to seek the help of professionals?