Review author: Terra Design School
Decorative figures are often used in landscape design. These small architectural forms can reflect the direction of design art and become a decoration of the garden area. Thanks to these details, it is possible to create a comfortable atmosphere and add bright notes. They are able to make the landscape of the territory unique.
How to make figurines for the garden? We present several options for DIY crafts. The only requirement when choosing available means and production methods is that the decorative element matches the appearance of the garden and the residential building.
Features of decorating a site with garden figures
The main purpose of garden figurines is decorative, but they can perform a practical function and serve:
- flashlights;
- stands for hanging and climbing plants and flowers;
- bird feeders and drinkers;
- decoration of artificial reservoirs;
- seats - these can be all kinds of original stones or stumps on which you can rest, etc.
The decor should be in harmony with the landscape design and buildings on the site - a country house or a permanent house.
In a good, solid yard with a house made of modern materials, products made from car tires or bottles will look out of place - more noble materials are needed: stone, wood, metal. And on a modest summer cottage, all kinds of “handicrafts” from whatever comes to hand will be quite appropriate.
The main thing is to feel the style and not create bad taste. It’s enough to love your site, feel its beauty, use detailed instructions, and you won’t need a landscape designer.
How to properly decorate a site with figures?
When decorating a site, follow these important rules:
- Compliance with landscape style . Choosing a rustic design means forgetting about plastic and giving preference to natural materials.
- Amount of decor. Don’t overdo it and use the golden rule – it’s better not quantity, but quality. It’s better to have one large, well-executed element than a dozen small, botched items.
- Choosing a location. If you are not sure whether a garden figure will look good in a certain place, use cardboard models that can be made, for example, from boxes of household appliances. It’s a good idea to draw up a diagram of the site on paper with an accurate drawing of future elements.
- Size. This plays a role in landscape design. Place miniature figurines on a low, trimmed lawn, and place larger elements next to bushes or in areas with tall grass.
- Create compositions . It’s not a good idea to place decorations alone around the area. Use it to decorate and create a flower bed, garden path, fountain or pond.
When is decorating with shapes a bad idea?
Homemade products do not always look organic. The worst thing is when the decor is made of poor quality, from the cheapest materials and according to the most “ancient” instructions. If your grandmother decorated her dacha or yard with rubber tires, simply laying (digging) them around the area, it is not necessary to repeat the experience of generations - it is better to take a modern approach to the issue.
If there is already purchased decor on the territory, but you are “pushed” for creativity, remember that homemade and purchased figures will be different, therefore, it is better not to mix them in one composition.
If you bought gnomes in a store and decided to build them a house, “brothers”, Snow White or precious stones, it will go together beautifully.
Choosing a landscape design style (photo examples)
When choosing figures, it is worth remembering the design and following the overall theme, which will be in harmony with the style of the site. If the garden area is decorated in a country style, feel free to place gnomes and figures of domestic animals - roosters and hens, goats, cows, geese, ducks, etc.
The oriental style dictates a limitation in figures, so one large statue of Buddha, a stone lantern, a crane or a dragon will be enough. It can also be almost any creature frozen in meditation. Japanese gardens are designed in the spirit of minimalism, and stones rather than figures should predominate in them.
Provence is similar to a rustic theme, but sculptural elements should not be painted in all the colors of the rainbow; choose white, sand and gray shades. Lavender colors would also be appropriate.
, the high-tech style is the most difficult for the home craftsman. But a couple of concrete balls (cubes, rhombuses, pyramids - other geometric shapes) will successfully emphasize the taste of the owner of the site. Modernism is not very common in Russian regions, but European practice is gradually winning over our owners of private houses. Laconicism, whimsical forms and asymmetry are the main points of this style.
Today there are many fans of the Greek style - to recreate it, sculptures of ancient Greek goddesses, amphoras and fragments of columns are placed on the territory. It is difficult to create such products with your own hands, but it is possible - even a wine bottle can be turned into an amphora.
In English design, garden figurines are practically not used. Lovers of everything British can decorate a flowerbed or lawn with their favorite characters from English fairy tales such as “Alice’s Adventures in Wonderland,” “Harry Potter,” “Winnie the Pooh and All-All-All.”
ECO style does not accept rubber or plastic. Wooden, metal or stone products would be appropriate here. Figurines and garden items with a rustic theme will fit perfectly into the eco-landscape.
Choosing a location
When purchasing or making original figurines, you must first select a place to place them. They must fit as harmoniously as possible into the overall style of the building, otherwise the expected effect will be reduced to zero.
Where are these figures installed? It depends on the preferences of the inhabitants of the house. Some install them in flower beds, around ponds, in wooden gazebos, sometimes they decorate stairs and verandas, garden trees and bushes.
Which topic should I choose?
But with the theme there is a huge scope for flights of fancy. The most popular topic is fairy-tale heroes . Russian folk tales, foreign or your own - you choose.
We recommend watching a master class that shows how to make 4 types of cartoon garden figurines:
An easy-to-execute option is a magic forest . “Living” stumps, water stumps or goblin stumps - all this can be made literally from old snags.
Another option for making figurines in the “living forest” style is painting stones. Large smooth boulders easily turn into Cheshire cats, turtles, and gnomes. Pebbles also make very beautiful houses.
Do you dream of organizing a garden in a marine style , but the climate does not allow you to grow palm trees? You can simply place marine attributes around the site: barrels and chests, a steering wheel and an anchor, a lighthouse and a mooring rope, seagulls and albatrosses, corals and other details of the seabed.
And lighthouses are built from old flower pots. If you put a lantern on top, it will also be a functional design. How to make a garden beacon with your own hands is shown in the master class below:
Build the “Secret” from the book “Scarlet Sails” by Alexander Greene or the pirate schooner “Black Pearl”, like Jack Sparrow.
There are other improvised options using improvised means.
Stylistics
In order to look harmonious, everything must be kept within a single style concept or at least echo it. Such a composition will delight everyone who can admire it.
If preference is given to wood in the exterior, it is best to decorate it with animals, birds and even fairy-tale characters.
Various gnomes look great in country music. Figurines for the garden and vegetable garden should add attractiveness to the image of the site, making it mysterious.
Do-it-yourself gardening sculptures (ideas in pictures)
It’s a simple matter to buy any sculpture or figure you like; another thing is to build it yourself. Your own implementation of ideas is a great reason for pride. And the admiring glances of the guests are worth it! So to the question: “Is it worth making garden decor yourself?”, the answer is clear: it’s worth it. The main thing is to decide on the materials, choose a design and theme, and strictly (or not so strictly) follow the instructions.
What materials are best to use?
If earlier designers understood the word “sculpture” strictly as a person or animal in a certain pose, today the vision of this term has no boundaries. In European parks, sculptures are made from any materials, so we will put the maximum of available information and ideas into this broad concept. Let's look at the most popular materials for making garden installations.
Plastic and rubber . If there is no recycling center nearby, you should not throw away, much less burn, obsolete items. Turn them into interesting products. Rubber tires, old flower pots, dishes, plastic bottles and eggplants are popular options. Pros - easy to process, low cost, resistance to sun and precipitation.
Garden figurines made from plastic bottles and flower pots
Plastic bottles can be cut into pieces to create plastic birds and animals for garden decoration. Here are examples of the wonderful works of Oksana Abramova (row of pictures above) and Alena Zinovieva (row of pictures below) from the Country of Masters:
As for rubber garden figurines, they are mainly made from old tires.
How to make a goldfish from tires is shown in the master class below:
Gypsum . Products made from sculptural, building plaster or alabaster look very artistic. But there are disadvantages - plaster is difficult to work with, and finished figures are short-lived. But small products are easily obtained using molds. You can even take silicone baking molds to make small flowers or other elements.
How you can make plaster flowers using silicone molds is shown in the video below:
Once dry, paint the flowers at your discretion with any available exterior paint.
Concrete/cement . Quite strong things come out of a concrete base. Working with concrete is even more difficult than working with gypsum - it is heterogeneous and takes a long time to dry. But concrete is not afraid of frost and precipitation. It is easy to paint, and even without painting, concrete sculptures look stylish.
You can make these cute gnomes from cement, sand and water:
Polyurethane foam . A new movement among craftsmen is foam products. The composition can be applied to a finished base, or you can imagine yourself as a sculptor and cut out a figure from a ready-made solid piece of hardened foam.
The downside is the fragility of the foam - it dries out and deteriorates under the sun, so it is recommended to reinforce it with a plaster bandage and cover it with construction paint.
The craftsman shows how to make a sheep from polyurethane foam in the video below:
Tree . The most noble material. Cutting down old trees or trees that have fallen after a strong wind is a constant concern for the owner of a personal plot. Firewood is not the only product into which stumps and snags are turned. Even the most seemingly unsuitable sticks for decoration sometimes turn into a masterpiece.
Almost untreated logs come to life. And from small logs and boards a fairy-tale hut on chicken legs grows. And if there are slats or small boards left after construction, harness the donkey or horse to a homemade cart.
How to make a small windmill yourself to decorate your garden is shown in the master class below:
Vine. Not only baskets are woven from vines, but also garden and park sculptures. They look especially relevant in country (rustic) style.
An easy way to have your own mythical animal for fans of the movie “How to Train Your Dragon” is to order a sculpture made of wicker at the Crafts Fair or a similar site for hand-made craftsmen. And a wicker ball on a smoothly cut lawn will look just perfect. And even in winter, figures made of wicker look fascinating.
Straw. Short-lived, but so cute, straw dolls are a quick and easy option that can be made with children. A straw goby from a fairy tale will become an interesting garden decoration. Well, you can’t do without seals, which are made from everything, and even from straw, giving it the desired shape and wrapping it with thread. And the men in the family will appreciate the idea of creating a motorcycle from straw in just a couple of hours.
How to make a teddy bear from dry grass is shown in the following video:
Papier mache . Not the most popular, outdated, but still used option. Pros: availability of materials, variability (you can make anything you want). Disadvantages - does not tolerate frost and moisture, large products require time to manufacture. Externally, the finished painted figurines are practically no different from the plaster or concrete versions.
Street bas-reliefs made of paper will decorate a hunting estate or forest house. But fashionable ducks made from newspapers, which according to the designer’s idea were not even completely painted, but simply varnished, can be placed at the entrance from the garden to the house.
Laying hens, which are made on the basis of an inflatable ball and paper, are no worse. Paint the chickens, place them in the nests and the impromptu chicken coop is ready!
Install paper products in gazebos and protected areas so they will last longer.
Craftswoman Svetlana will show you how to make a matryoshka doll from papier-mâché:
The matryoshka doll can be made to any size. It all depends on your abilities and patience. Cover the finished product with varnish, and you can display the figurine in the garden.
Metal. If you have metal working skills, get out your tools, welding machine and create real works of art. In this matter, it is important to find an interesting idea and build something really worthwhile, and not funny and gloomy, because rusty iron skeletons that look like people and animals are just a “masterpiece.”
In some cases, even rust looks perfect, especially in combination with stone. And a kangaroo in steampunk style looks truly stylish, modern, technologically advanced and does not “smell” of bad taste at all, as is often the case. Also, with the proper experience, you can create something elegant and unique from wire, the main thing is to fill the void.
Those who master artistic forging have more opportunities - then the metal can take almost any shape.
Various rubbish . As a separate material, we will consider all sorts of rubbish - unnecessary things. There is definitely room for your imagination to run wild here!
An old bicycle turns into a garden figure with a flowerpot. A leaky pan and an old kettle are used for the same purposes. Worn out clothes will get a second life as cute stuffed animals. Shoes that have been trampled and lost their appearance become extraordinary flowerpot figurines. Old chairs and unnecessary washbasins are an interesting element of decor and a non-standard flower bed.
Old suitcases can also be used. Don’t throw your plumbing fixtures into a landfill – they can be used in original ways for decoration. A leather sofa also has no place in a landfill - make it the hero of your landscape design. A mini-garden in an old basin or boiler looks interesting, unusual and stylish. In general, you can put together your grandmother’s entire attic into an interesting composition: a vintage typewriter, cans, kitchen utensils and much more. Your imagination plus a little free time, and you can turn anything into a garden sculpture.
Preparing tools
The set of tools depends on what you will be making the figurine from. This is an approximate list of tools, because ultimately the type of product plays a role:
- Rubber - chalk, sharp knife (stationery), jigsaw, drill, bolts and nuts, screws, wire, brushes and paints for external work.
- Plastic - sharp scissors, fasteners (bolts, stapler with staples, glue gun, electrical tape), tubes and wires for the frame, paints for external work.
- Gypsum and concrete - gloves, pomudina and spatula for thinning the mass, various molds and auxiliary items for creating certain shapes for the figure, hand sanding or for grouting the product, brush and paint.
- Wood - jigsaw, hammer and nails, screwdriver and screws, paintwork.
- Vine and straw - secateurs/scissors, rope or twine.
- Papier-mâché - old newspapers, toilet paper/egg tray cardboard (for making paper pulp), PVA glue, paints or varnish, etc.
- Metal - welding inverter and electrodes, hammer, pliers, metal scissors, etc.
Decide in advance what you will need to make the figure and stock up on all the necessary tools so that you don’t have to run to the store at the most crucial moment.
Scales in the wind
The wind can be a “composer” if you create an instrument for it. Find plastic flower pots at home, larger ones in the center, smaller ones around.
Paint it with bright colors, and wrap at least one with food foil - the sun will shimmer on it, and the thief birds of your harvest are afraid of this. Hang it all on a hook at a height of up to 2 meters. The wind itself will create music, shaking the pots and rattling them.
Favorable price for apartment renovation from a reliable Odessa company Stroy HouseHow to insulate a balcony?
Vertical gardening of an apartment: how to do it right
Figures made of concrete and plaster
From the most popular materials you can create a huge number of diverse, interesting and stylish figures that will become a wonderful decoration for your garden plot. Detailed step-by-step instructions for making several figures will also come in handy.
Concrete leaves
The easiest option for creating a figurine for the garden is concrete leaves, which even an inexperienced craftsman can make from cement mortar and burdock leaves.
From such leaves, in turn, you can build anything, even a waterfall. A garden path made of leaves looks no less impressive. Concrete leaves make a great base for water from a downspout. The original “stone flower” and at the same time a birdbath are made from the same leaves. Cute giant “leaf mushrooms” are another fun idea.
Everything you need for work:
- large burdock leaves;
- Portland cement;
- sand;
- water.
Proceed like this:
- Pick the most beautiful large leaves without cracks or damage, wash them from dirt, and dry them.
- Mix cement and sand in a ratio of 1/3, adding water. The consistency of the curd mass should be obtained.
- To create a depression in the finished sculpture, place the sheet on a bag of sand.
- Fill the top of the sheet with cement.
- Wait for the solution to dry completely. Then peel off the sheet.
- Transform finished leaves into tall or short sculptures, birdbaths, planters, and more.
How to make a large sheet of cement is shown in the video below:
Garden mushrooms made of gypsum
You will need for work:
- gypsum (can be diluted with PVA glue);
- cap container;
- a log (or a “pipe” from a plastic bottle) as a leg.
Manufacturing instructions:
- Coat the log with plaster and send it to dry.
- Take a deep plate of suitable size and cover it with polyethylene. If there is no suitable container, you can make a depression in the sand and cover it with burdock.
- Fill the container with plaster.
- When the product is dry, sand it with sandpaper.
- Paint and glue the two parts of the figurine, and “plant” it in the flowerbed.
How to make a mushroom from plaster is shown in the following master class:
Decor
For this, a sketch is created. On the mushroom, a pencil marks the places where the decoration elements will be located. The sketch is given a convexity using a needle (cutter).
Priming the surface will improve the quality of painting. PVA plus water – 1 to 2 – is an excellent solution for a primer. The figurine is painted, decorated and varnished. One mushroom is ready. You can make as many of them as you like.
Wooden figures
The most natural and organic material for garden figurines is wood. Before you start work, collect tools, materials and think through the future product in detail.
Tools
To work with wood, you will need the simplest tools that any homeowner or summer resident usually has in their arsenal - an ax, saw or jigsaw, sandpaper, nails and a hammer or a screwdriver with self-tapping screws. For some products you need to stock up on varnish or paints.
"Deer": step-by-step instructions
We offer several simple master classes on making wooden decor.
The advantage of the log deer is that it is relevant in both summer and winter. In summer - a forest dweller, in winter - a New Year's character.
You will need for work:
- several chocks;
- saw;
- plane;
- a pair of branching branches.
Instructions:
- We make the body from the largest log - saw off the log to the required length and make even cuts on both sides.
- From a smaller and shorter log we make a blank for the head. Using a plane (or knife) we cut off the bark where the muzzle will be.
- Another thin area is the neck.
- Then we make 4 identical legs from even straight branches.
- We make a tail and ears from thin sticks - it is important to cut off the excess on one side straight and on the other at an angle.
- It is advisable to sand all cuts. If there are knots on the branches, cut them down and process them too.
- We prepare the horns - from beautiful branches. The main thing is to choose suitable branches that look like deer antlers.
- We assemble the structure. There are several options for fastening - knocking down with nails, using glue and furniture dowels.
For the second option, you need dowels and wood glue, as well as a drill to drill holes in the workpieces.
All that remains is to make the eyes and nose - from a piece of rubber, plastic, or simply draw. The deer is ready! In the spring, make a wreath for the deer, in the summer, weave a beautiful wreath around the neck, in the fall, put mushrooms on the horns or hang an apple, and in the winter, hang a bell or Christmas tree decorations. This “pet” will delight you all year long.
If you make removable antlers, then on New Year’s Eve replace them with spruce branches, it will be very festive.
Decorating the garden with tires
Do you think that decorating a garden with car tires is bad manners? But no! Take a look at these works of art and you will change your mind. True, not everyone can do this, but creative people are capable of this, if only they had patience and inspiration.
We will teach you how to make simpler figures, but anyone can make such products.
What will you need?
First of all, you will need to take car tires (tires) that have already served their purpose. Winter, summer, studded, universal tires, from a car or truck - it doesn’t matter.
You can even make a swimming pool out of a large tractor wheel. And small but very interesting designs are made from old bicycle tires. Tires from wheels from a car or a children's bicycle will also find their use.
You can cut tires with a grinder (the thickest ones), with a sharp knife, but best of all, with a jigsaw. Fasten with self-tapping screws, bolts, staples - it all depends on your tools, experience and the type of figure chosen.
"Swan": step-by-step instructions
A tire swan is one of the easiest figures to make yourself.
You will need for work:
- tire (one tire per swan);
- electric jigsaw or other sawing tool;
- wire for frame;
- chalk;
- colors - red for the beak and black/white for the eyes and plumage.
Manufacturing scheme:
Procedure:
- Using chalk or a white rubber marker, draw a sketch on the tire. You can work even without a stencil - apply the pattern directly to the tire.
- Cut along the contour with a jigsaw to get the outline of the swan's body in a spread, as shown in the picture above.
- Turn the tenderloin wings side up.
- Insert a wire frame into the body to help the swan hold its shape.
- The swan's beak should be red. If desired, paint the body white. Choose paint for exterior use. Dry the product.
- You can also use a tire as a stand.
The process of creating a swan from a tire with your own hands is shown in the video below:
Decorative figures made of polyurethane foam
Construction foam does not make the most presentable work, but you can still please children with figures, especially if after construction there are several foam cylinders left and there is nowhere to use them.
Inventory
You will need foam, a knife (preferably a stationery knife) and paint. Everything else depends on your imagination. Maybe it will be a figure that needs to be dressed or decorated with something extra.
“Snail”: step-by-step instructions
We offer a master class on making a large snail from foam. Prepare a can of foam, a liter plastic bottle, a utility knife, a plastic bucket and paints for external work. Cover the work surface with oilcloth. Next, proceed according to the scheme:
- Make the base of the snail into an oval shape with foam. After 10 minutes, apply a second coat. Insert an empty vial or bottle as a neck.
- Cover the “neck” with foam and create the outline of the head. Wait for it to dry.
- Use a utility knife to give the base of the snail a smooth outline. Decorate the horns and muzzle.
- Now let's move on to creating our snail's house. Place the foam in a mound and place a bucket in it, which is also covered with foam around the edges. Wait for it to dry.
- Use a utility knife to form shell curls.
- The foam sculpture is almost ready!
After drying, cover the figure with paint and furniture varnish. Fill the bucket with substrate and plant flowers.
Mushroom installation site
The base for the figurine is also plaster. It is made as follows. The diluted solution is poured into a cup of appropriate size, covered with a film or a special lubricating emulsion.
You can also immerse the “leg” there. You can leave it removable, that is, pre-wrap it in cellophane before immersion. About forty minutes and you can take it out. Ready. Before painting, dry thoroughly for a day or two in a warm place.
Master class on creating decor from plastic bottles
It's hard to make something beautiful out of bottles. Therefore, if you have a good-quality house and a thoughtful landscape design, you should not spoil it with such raw materials. But for a small dacha, such creativity is suitable, especially if you are relaxing there with children.
Tools and materials
To work with plastic, you need scissors and a utility knife. You can fasten the parts with a glue gun or superglue; it is best to paint the product with glass paint or at least nail polish.
"Butterflies": step-by-step instructions
We suggest making an interesting craft that is usually used to decorate a room, but for some reason is reluctant to use in the garden - butterflies. They will decorate any flower bed, fence, trees, country house, sculpture made of other materials, etc.
You will need:
- any plastic bottles;
- scissors;
- permanent marker;
- nail polishes, acrylic paints or other paint coatings that can withstand any weather;
- dry glitter, beads, rhinestones and other similar materials for decoration;
- wire for attaching or creating the body and antennae of the butterfly;
- butterfly stencil.
If you want to make translucent butterfly wings, then use acrylic paints for stained glass. And to create relief and clear outlines of lines, it is better to use a contour on the glass.
Butterfly stencils (without antennae) of different shapes and types:
Instructions for creating butterflies from plastic bottles:
- Cut off the bottom and neck of the bottle, and cut the remaining roll - you get a solid twisted sheet of plastic.
- Place the stencil on the back side and attach it to the plastic with binders or paper clips.
- Trace the stencil with a marker.
- Remove the stencil and cut out the blank.
- Bend the wings along the body of the future insect.
- Set the outlines with a black marker. Paint the empty areas between the outline from the inside out with varnish in several layers, allowing each layer to dry thoroughly.
- Draw lines on the front side along the glass. Let dry completely.
- Apply clear polish and sprinkle with dry glitter. You can glue beads or rhinestones.
- Secure the butterfly to a wire and stick it into the flowerbed.
Other interesting ideas from scrap materials
Let's look at a few more ideas for making figurines for garden decoration from simple scrap materials.
Pebble figurines
All you need is pebbles and paints. Select stones of different sizes, degrease them and coat them with paint, following the color scheme of the ladybug - in a black and red palette. The designs can be anything from cats to entire paintings: such stones always look stylish and appropriate.
Vegetable sculptures for Halloween
The most short-lived, but such a bright and seasonal option for decorating your own garden.
It’s a good idea to spend part of the pumpkin harvest preparing for Halloween and carving fancy creatures out of them. The most popular figure is the Jack-O-Lantern. What you need: pumpkin, knife, candle.
Instructions:
- Wash the pumpkin thoroughly and rub with a soft cloth until shiny.
- Cut off the top and remove the seeds with pulp. Don't throw away the hat with the ponytail - it will come in handy.
- Using a marker, draw holes - mouth, nose, eyes.
- Use a knife to cut holes along the outline.
- Place the candle inside the pumpkin, set it on fire and cover the melon with a “lid”. Jack Lantern is ready!
You can create absolutely any face from a pumpkin.
Ice sculptures
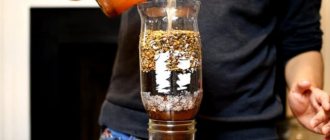
During the cold season, it’s easy to decorate your yard with more than just a snowman! Make spectacular ice balls.
You need balloons, empty bottles, water, a funnel, food coloring (experienced craftsmen suggest gouache) ... well, you need frost. If you have a freezer, freeze in it, and when there are severe frosts outside the window, about -20, feel free to use natural temperatures.
It is better to make balls with a diameter of 10-15 cm per 1.5 liters, because large 3-liter balls may not withstand frost and burst (although then you will get hemispheres, which are also useful).
Manufacturing process:
- Dissolve a standard jar of gouache from a regular children's paint set in 0.5 liters of water. This way you will get a bright concentrate.
- Pour the solution through the funnel into the ball “to the brim.”
- Place the ball on the water tap and get the required amount of water if there is not enough water.
- Tie the ball and freeze it. If there are a lot of balls, it is better to freeze them in their natural environment - by spreading the balls in the snow.
- Leave it overnight. In the morning, remove the “wrapper” and decorate the area with balloons!
If there are no paints, then inside the balls you can put glitter, New Year's tinsel, dried flower petals, berries and fruit slices, spruce branches and small cones, and grain. Fill the balloons with water and freeze. You can also use medical gloves, silicone muffin tins, plastic cups, etc. instead of balls.