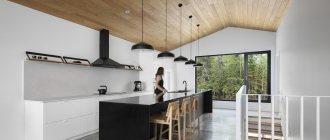
There are probably few sorrows in the world that cannot be cured with a good old bath. Especially if this bathhouse is private property and is logically integrated into a single living space. In this case, the highest comfort is guaranteed. But only if you took care of it ahead of time. And to do this, you need to take into account all the nuances at the stage of creating the project and fit the bathhouse into the project in such a way that after, already enjoying this sweet hundred-degree torture, you can praise yourself in your thoughts for a successfully implemented idea. Of course, not every person can boast of engineering vision and consider all the advantages of building a bathhouse with an attic at the planning stage. In this case, our material will definitely help you.
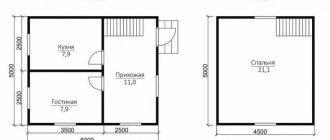
Wooden house project D58
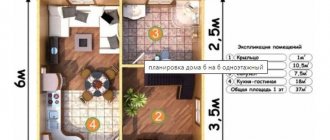
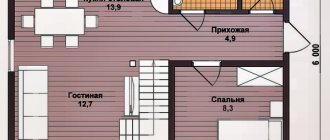
Country housing provides its owner with a chance to escape the embrace of noisy crowded streets and settle in a beautiful and cozy building, which is a 6 by 6 house with a gable roof covered with metal tiles. This structure made of wooden beams will become for a city dweller and his family not just a roof over their heads, but a quiet family nest in the middle of the magnificent Russian nature. Thanks to ready-made timber and screw piles, builders do not have to spend a lot of time and effort building wooden houses. In recent years, these suburban properties have been growing like mushrooms on the edge of the forest. In addition, there is a garden plot next to the house, so the buyer receives a dacha in addition to housing. On this landscaped piece of land he will be able to grow fresh vegetables and fruits for the family table. In front of the entrance to the house there is a wonderful terrace of 12.3 square meters. This is followed by a metal door leading into the building itself.
On the ground floor there is a living room of 10.5 sq. m. m, kitchen 10.3 sq. m and bedroom 8.1 sq. m. The second floor of the house is an attic, equipped with a spacious bedroom of 23.8 square meters. This layout allows a small family to live in comfort. At least, the cost of such suburban housing is much lower than the price of an apartment in the city
- Project: D-58
- Dimensions: 6x6 m + porch 3.5x3.5 m.
- Number of storeys: one floor + attic
- Area: 65 sq.m.
- Price timber 100x150 mm: 429,000 rub.
- Price timber 150x150 mm: 466,000 rub.
- Price timber 150x200 mm : 518,000 rub.
- Price of a log house “for shrinkage” 150x150 mm: RUB 000,000
Construction materials
On the modern market there are many types of building materials that can be used for any bathhouse. For example, they are built from:
- timber;
- logs;
- foam blocks;
- wood and wooden blocks;
- aerated concrete;
- rounded logs;
- frame blocks;
- glued timber;
- finished log house;
- bricks
If the project contains brick, foam concrete and aerated concrete, the walls require cladding, both inside and outside. This feature is interconnected with the technical qualities of the materials. For example, a brick bath without insulation will be cold. The qualities of aerated concrete and foam concrete are almost similar. The structural pores of these materials can collapse under the influence of high humidity and temperature changes. In this case, it is important to perform the cladding of the foundations with the construction of the structure.
The most suitable material for building a bathhouse is wood. Wood is environmentally friendly, reliable and durable, practical and durable. Frame technologies are also used in such construction. In this case, both wooden and metal frames are allowed. The cladding is installed on top of the frame. Be sure to choose high-quality insulation for such a structure, which will serve as insulation for the entire structure.
The finishing of a frame building can be made of:
- wood;
- block panels;
- linings.
The interior decoration can be made of plastic. The most economical and profitable technology for constructing baths is frame. The frame does not require a massive foundation. In this case, building materials are not the most expensive. And the weight of the building will not have any additional effect on the soil.
Determining the material for building a bathhouse is an important step. In construction stores you can find standard construction kits made from ready-made elements. An assembly kit is purchased based on standard developments. You can make the parts of the construction set yourself. Wooden materials (for example, timber, logs, rounded wood) are often used for the construction of bathhouses; block panels are often considered. Having dealt with the raw materials of construction, they move on to design.
Wood (log, timber)
A timber bathhouse will be inexpensive, but it will turn out beautiful and neat. You need to buy well-dried, sanded and antiseptic-treated material. The assembled frame is sheathed on the outside with timber. It is recommended to heat and waterproof the walls inside. The insulation should be chosen that will be resistant to moisture (mineral wool). Expanded polystyrene and its types are not suitable.
Bathhouses built from timber and foam concrete or brick look great.
Unlike logs, timber exhibits minimal shrinkage, which increases the service life of the structure.
A log bathhouse is considered a Russian classic. It does not need interior finishing. The interior is decorated in a rustic, country style. It is much more difficult to build such a structure due to the large weight of the logs.
The round timber must be sanded and impregnated with a moisture-resistant compound. Delivery is made in cubes, so you need to calculate in advance how much raw material you will need for the job.
When using high-quality and well-dried wood, the sauna will last for decades.
A strong foundation will have to be poured under the log building. In areas with low groundwater levels, it is recommended to make a strip foundation.
Brick
Brick baths are not built very often due to the large expenditure of time and money on materials. But as a result, it will serve all year round and become a cozy guest house.
Construction requires pouring a monolithic or strip foundation. The walls are waterproofed and insulated from the inside. External finishing of the facade is carried out at the discretion of the owners.
The roof is made of a simple single-pitched or multi-pitched roof. The masonry process is labor-intensive. Therefore, it is better to invite an experienced builder to help. It will take more than one hour to heat such a bathhouse, unlike a wooden one. But the heat in the room will last longer.
Blocks (foam, gas, expanded clay concrete)
Foam block, gas block are a real budget alternative to brick. The material is light in weight and larger in size. This significantly simplifies and speeds up the laying process. A sauna made of aerated concrete heats up quickly, but also cools down quickly.
One significant disadvantage of the blocks is their instability to moisture due to their porous structure. To extend the service life and protection, the building needs exterior finishing.
Log house
One of the most popular materials for building baths is wood, in particular a log house made of round logs. And this is not an accident, because it has a large number of advantages.
- First of all, it is an environmentally friendly and safe material.
- The log house differs from other materials in its high thermal insulation, as well as good sound insulation.
- A log bathhouse almost never shrinks and is quickly installed. If necessary, it can be moved to another place.
- Thanks to the light weight of the structure, owners can save on the foundation.
- This structure looks very beautiful not only inside, but also outside.
- When the sauna heats up, the wood begins to smell pleasant.
Among the disadvantages it is worth noting the following:
- there is a risk of fire;
- Over time, the log house releases moisture;
- since fumes are poorly evaporated from wood, fungus or mold may appear over time;
- Additional work will be required to seal the gaps between the logs.
How to build a mansard roof - step by step guide
An attic, which makes it possible to effectively use the floor space of a private house, is a rather complex design. As a rule, homeowners entrust its construction to experienced roofers. But if you are skilled in carpentry and are not afraid of difficulties, then you can certainly cope with the task yourself. The first step is to obtain theoretical knowledge of how an attic roof is calculated and built with your own hands according to individual drawings. You will find this information, presented in the form of a step-by-step guide, in this article.
Choosing a roof design
To construct an attic floor instead of a conventional attic, the following types of roofs are suitable (shown in the diagram below):
- regular gable with a slope of 45° or more (steep);
- broken roof;
- four-slope, half-hip.
Note. As can be seen from the diagram, various half-hip roofings are complicated gable roofs, so there is no point in considering them separately. In terms of design, the multi-gable structure shown in the photo is of interest, but its construction requires considerable experience.
The gable mansard roof is the simplest to implement and is economical in terms of material consumption. But you will have to pay for this with a smaller usable area and sloping walls of the attached floor, which do not allow the placement of tall furniture. This will not be a problem if you plan to set up a bedroom in the attic - the beds will easily stand near the longitudinal walls. Another way to solve the issue is to raise the rafter system to the required height, as shown in the drawing below.
Roofing with broken shapes is the most popular option, since it allows you to create full-fledged living rooms upstairs. If you do not provide protruding windows on its slopes, then in terms of installation technology such a roof is not much more complicated than a gable roof, although the consumption of building materials will increase. To make your choice easier, we suggest considering and comparing the 3 most common options for an attic superstructure for a private house with standard dimensions of 6 x 6 m:
- Steep roof with two slopes inclined at an angle of 45°.
- A broken structure, where the lower rafters are inclined at an angle of 60°, and the upper ones - 30°.
- The same as option 1, only the trusses are raised to a height of 60 cm, and the rafter legs are at an angle of 37.5°.
For convenience, we depicted all three structures on one drawing, which can be taken as a basis for future construction.
Note. A board with a cross section of 50 x 150 mm was taken as the main building material for the manufacture of rafters and other frame elements.
To choose the best of the three options, we suggest studying the comparison table, which presents the parameters of attic rooms per 1 linear meter of building length.
Knowing the length of the roof slopes indicated in the plate, you can approximately estimate the consumption of building materials for the frame, covering and insulation. The following table makes it possible to estimate the total area of the rooms on the second floor when implementing all 3 solutions in private houses with different sizes.
Calculation of the rafter system
The rafters of a do-it-yourself attic must withstand the following loads throughout its entire service life:
- own weight;
- weight of roofing and insulation;
- maximum gusts of wind for a given area;
- snow cover pressure.
Reference. When the roof slope is more than 45°, snow practically does not stay on it, and at 60° it is not taken into account at all in the calculations. But wind pressure increases due to the height of the structure and its position, which is close to vertical.
The result of the calculations should be 2 parameters - the cross-section of the rafters with beams (otherwise known as tie rods) and the pitch of their installation. It is a mistake to think that the size of the wooden beams of the roof grows along with the loads on it. Maximum structural rigidity is achieved through the use of trusses made of logs with a diameter of 120-200 mm or lumber with a thickness of 40 to 200 mm, installed in increments of 50-120 cm. If you are not a civil engineer, you will not be able to determine these values more precisely, since the methodology quite complicated.
Online calculators posted on the Internet do not solve the issue, because their calculations still need to be checked. The solution is this: use ready-made data that has been calculated a long time ago. To do this, you will need table No. 1, which shows the cross-sections of rafter legs at different lengths and loads:
We will explain the calculation method with an example. Let’s assume that the snow load on a flat surface (projection of a pitched roof) in your area is 100 kg/m², the slope is 60°, the span length is 4.5 m (before the strut), the pitch of the rafters is 120 cm. The roofing is slate. We count:
- Real weight of snow cover: 100 x 0.32 = 32 kg/m². The slope coefficient of 0.32 is taken from Table 2 below.
- The specific gravity of a slate covering with a regular profile is 25 kg/m².
- Total specific gravity – 32 + 25 = 60 kg/m².
- We calculate the specific gravity per 1 linear meter of rafters, multiplying 60 kg/m² by an installation step of 1.2 m. We get 72 kg.
- We return to table No. 1 and select the cross-section of the beam according to the span length. We accept a load of 100 kg per 1 line of rafters (with a margin). A log with a diameter of 140 mm, a board 40 x 200 mm and other materials whose dimensions are in the same horizontal line are suitable.
Reference. When installing a sloping mansard roof, 2 types of rafters are used - layered and hanging. On a gable roof, only hanging roofs are used; the difference between them is shown in the diagram.
The last table No. 3 will help you correctly determine the installation interval of roof trusses:
The proposed method is suitable for small rectangular houses measuring 6 x 6 m. To build a mansard roof on a large cottage, it is strongly recommended to contact specialist designers for calculations.
Frame making
The simplified method presented below involves the installation of an attic sloping roof in 2 stages: assembly of roof trusses on the ground and subsequent installation on the finished walls of a timber or log house. The structural material is boards with a section of 15 x 5 and 10 x 5 cm with a standard length of 6 m.
Start of assembly - formation of the upper chord of the rafter system
The technology looks like this step by step:
- Prepare the beams of the lower chord of the truss, taking into account roof overhangs of 25-27 cm on each side. If the length of the beam is not enough, it needs to be increased using an overlay of the same section, nailed.
- Lay the beam on the ground and attach vertical posts to it with corners, forming the walls of the attic room. Install the ceiling beam and the ridge support (headstock), then attach two hanging rafter boards to it and the corners of the frame for marking, as done in the photo.
- Cut the elements into place and secure them. From the remaining parts of the boards, make layered (lower) rafter legs in the same way and nail them to the frame. The farm is ready.
- Make the remaining trusses using the same method.
Advice. As a rule, windows or doors to the balcony are provided on the front gables. It is also convenient to make racks and belts for their installation on the ground, as well as to cover the openings with clapboard.
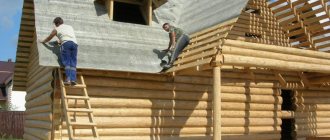
The finished frames are lifted onto the walls and fixed in place one by one, starting from the first gable. To prevent it from falling, install spacers and nail them to the walls of the log house. The second and subsequent trusses are placed in the design position and connected to each other with boards.
After placing the rafters, they must be secured to the walls in the following ways:
- staples to the second top crown of logs or beams;
- on steel corners and galvanized screws, as shown in the photo.
Note. Installation on brick and other solid walls is carried out using a mauerlat - a wooden beam laid on load-bearing structures along the entire perimeter of the building. In turn, the Mauerlat is mounted on studs or anchor bolts, and a waterproofing layer of roofing felt is placed between it and the stone wall. The mounting assembly looks like this:
The roofing covering is laid on top of the sheathing - slate, metal tiles, and so on. The technology of installation and fastening depends on the selected material.
Attic insulation
Since the attic space is planned as a residential space, it should be well insulated. Of the thermal insulation materials, mineral wool works best with wood because it allows moisture to pass through and allows it to “breathe.” The layer thickness is at least 150 mm, and in the northern regions - up to 300 mm. Insulation is carried out in the following order:
- Cut the mineral wool slabs and insert them spaced between the rafters.
- To insulate the gables, nail additional posts and lay insulation between them in the same way.
- If the width of the rafter legs is not enough to create thermal insulation of the required thickness, after laying the first layer, nail horizontal counter-lattice bars to them. Insert the second layer slabs between them.
- Cover the insulation from the inside with a vapor barrier film, laying it with an overlap of 15 cm and gluing the joints with aluminum tape.
- Nail the sheathing strips on top for cladding with plasterboard or other finishing material.
Important point. When laying the insulation, make sure that there is a 3-5 cm ventilation duct between it and the windproof membrane. Moisture formed in the mineral wool due to the dew point will be removed through it.
Frame house 6 by 6: photo examples and layout
No construction technology can be called ideal in all respects. Each has disadvantages and advantages, and when choosing a method of building a house, it is necessary to pay attention to precisely those parameters that are the most important. But frame technology can be called one of the best options for the construction of low-rise buildings in terms of price and quality.
Using frame technology, you can quickly and inexpensively build a cozy and comfortable warm house, avoiding difficulties during the construction process and its subsequent operation. Many people prefer small houses, so professional designers and architects are ready to offer you a 6x6 frame house project with a layout. But you can achieve the correct and convenient location of the premises in another way - specialists will help you create a special house project according to your wishes. This will make it possible to maximize the usable area of the building in relation to its total area exactly as you want.
Frame house 6x6 with attic
8x8
- large scope for integration of auxiliary premises;
- the need for zoning of located objects;
- possibility of arranging a spacious terrace;
- separate placement of steam room and sink;
- 3-4 sleeping places in the attic;
- If desired, you can also design a compact pool.
This is where you can really have a blast! The design of an 8 by 8 bathhouse with an attic can include literally everything your heart desires: from a comfortable dressing room and a spacious entrance to a spacious billiard room upstairs next to the bedroom. The square base of the building allows you to use literally every centimeter of free space for business benefit. You can even arrange access to the balcony. Isn't it great to get out and get some fresh air while enjoying a wonderful holiday?
Of course, in order to ensure comfort not only on paper, but also in practice, it makes sense to take care of reliable waterproofing of the floor base. In this case, you will significantly extend the service life of the materials used and achieve almost ideal safety in using the building.
The layout of bathhouses with an attic in the case of using the 8x8 format becomes more complicated due to greater variation in the placement of entrances and the integration of additional modules like the same balcony, but the end result is amazing. And this is the best option for planning a plot of 10 acres with a house, a bathhouse and a garage. In fact, this is a guest house with a bathhouse function. All that remains is to visit it more often and enjoy a perfect vacation.
Features and Benefits
A 6 by 6 frame house is ideal for accommodating a family of 4-5 people. Moreover, if the house is one-story, then in terms of content and layout it is very similar to an ordinary one-room apartment. In this case, the area of the premises is quite limited and allows two or three people to comfortably stay in them at the same time, but no more.
But since construction does not end with the construction of the foundation and walls, in most cases such structures are equipped with an attic that combines an additional floor and a roofing system. This allows you to significantly increase the usable area of the house.
Frame house 6x6 with attic, porch and balcony
Also, an increase in the total area is facilitated by the organization of a spacious veranda, the cost of construction of which is significantly lower than the price of the building itself. This can be explained by the fact that the veranda is usually an unheated room, used in the warm season, which does not require the use of heavy building materials and additional insulation.
Two-story frame house 6x6, covered with siding
A significant advantage of any 6x6 frame-panel house made of timber is the use of only solid elements in its construction. This will reduce the number of gaps between the beams, and hence the need to insulate them. Such a house will be warm and comfortable to live in at any time of the year.
The dimensions of the 6x6 house are quite compact when placed on the site, which will provide the opportunity to use the remaining space for organizing recreation areas or for any other purposes.
6x8
- an excellent option for a fairly spacious area;
- you can place not only a separate sink and steam room, but also a relaxation room and a terrace;
- placement of several functional areas at once;
- For the foundation, you should choose a strip type of foundation.
Surely every owner dreams of such a bathhouse. In total, such a building gives almost 50 square meters, which can be used to realize all your ideas. A 6x8 bathhouse project with an attic may include placing not a guest room upstairs, but also a billiard room, a games room, and even a storage room. However, you should ensure reliable waterproofing of the attic and take the ventilation system equipment seriously. Still, there can be no talk of any comfort in the same billiard room if the air is characterized by high humidity, and the floor smells of rot and other not very pleasant aromas, indicating deformation of the base.
You will also need to think about air conditioning in the summer season, since the steam room will in any case transfer some of its heat to the attic. If all these issues can be resolved, then you can safely envy you, since a successfully implemented project for a 6x8 bathhouse with an attic is a unique opportunity for a pleasant holiday at any time of the year.
Frame house 6x6 one-story
A one-story 6x6 frame house is a square building that contains all the necessary premises for people to live. The area of each room will allow you to arrange all the furniture required for everyday life. A 6 by 6 one-story house can be equipped with rooms with the following dimensions (example in the photo below):
3 m² – vestibule or hallway;
13.5 m² – kitchen combined with living room;
9 m² – each of the bedrooms.
An example of the layout of a 6 by 6 frame one-story house
The small but sufficient area of each room, the absence of corridors and various unused nooks, allows you to use all the space available in the house to your advantage.
Disadvantages and features of space distribution in a one-story 6x6 frame house
The limitation of indoor space is the most significant disadvantage of a one-story frame house. To ensure that each resident has their own room, if there are more than four, the area of the premises must be reduced to a minimum. That is why such houses are more often chosen by families of two or three people; living for this number of people in such an area still remains comfortable. If there are already four people in the family, then living in a 6x6 house will be cramped, and given the visits of guests and relatives, it will periodically cause increased discomfort.
Considering the fact that people will spend more time in the living room, its space needs to be made as large as possible. Individual rooms are usually used only for sleeping, so it is not necessary to make them too spacious.
One-story frame house 6x6 with a pitched roof
Regardless of the size of the room, the presence of a window opening in it is a prerequisite; only in this case will sunlight and fresh air be able to enter the room, which has a positive effect on people’s well-being and mood.
It is better to make the sanitary unit in 6x6 one-story houses combined, that is, the bathtub or shower should be located in the same room as the toilet. In order to reduce the area required for plumbing fixtures and increase free space, the best option would be to use a compact shower cabin instead of a bulky bathtub. At the same time, it is better not to install household appliances (a washing machine, for example), which many are accustomed to placing in bathrooms, as this will cause even greater cramping when you are in it.
One-story frame house 6x6 On our website you can find contacts of construction companies that offer house design services. You can communicate directly with representatives by visiting the “Low-Rise Country” exhibition of houses.
Layout No. 4: with bathroom
This project of a country house made of aerated concrete or wood does not imply the presence of a bathroom, so most likely it is a garden house. It has a spacious hallway, a comfortable and large kitchen and oven. If you go up the stairs, you can find yourself in the attic. In this case, each owner deals with its design at his own discretion. It can be a bedroom for children, a relaxation area or a room for guests. For lovers of beautiful house designs, you should pay attention to a two-story house with a bay window.
No toilet
Two-story houses 6x6: layout features
When choosing a two-story frame house 6 by 6, projects can be reviewed for a long time, because such a design gives more opportunities regarding housing layout. Projects of houses with two floors differ from each other in the number of rooms, their location and many other parameters. Two-story houses measuring 6x6 are the most optimal option for living a family of four or more people, compared to a one-story structure.
An example of the layout of a two-story frame house 6x6
The cost of a two-story frame house will be higher than a one-story one, because, in fact, you will have to build two 6x6 houses, only on one foundation and with one roof. Significant costs will go to the stairs. But don’t be upset, because the house will be frame, which means both the foundation for it and the structure itself as a whole will cost much less than a structure, for example, made of brick.
Two-story frame house 6x6
The layout of a frame two-story house often involves the location of common areas on the ground floor, as a rule, this is an entrance hall or hall, a living room, a kitchen and a toilet. The placement of a bathroom on the ground floor is explained not only by the fact that the room will be used by guests who come to the house, but also by the cost of the communication system.
Two-story frame house 6x6 with a small porch
The second floor most often consists of rooms for resting family members, guest rooms in which relatives and friends will periodically stay. It is also better to place your personal office on the top floor. If desired, a second bathroom can be installed on the second floor.
Although a balcony is not a mandatory attribute of a two-story house, its presence greatly increases the comfort of living. It is on the balcony that you can plant flowers in the summer, organize a comfortable place for reading in the fresh air and enjoy stunning views of the sunset.
An example of the layout of a two-story frame house 6x6
Two-story frame house 6x6 with a balcony This might be interesting!
In the article at the following link, read about an individual project of a residential building.
Construction requirements
Before you start planning and developing drawings, it is important to read the regulatory documentation of the current legislation, which regulates the construction of baths.
This list includes:
- SanPiN 1.2. 3150-13 “Sanitary and epidemiological requirements for the placement, design, equipment, maintenance and operating hours of baths and saunas.”
- SP 22.13330.2011.
- SP 64.13330.2011 - updated version of SNiP II-25-80.
- TKP 45-5.05-146-2009, TKP EN 1995-1-1-2009. Requirements for the design of wooden baths.
SNiP II-L.13-62 contains many useful recommendations for the construction of baths. Although this document has not been relevant for a long time, many standards have been developed on its basis.
In addition, it is worth considering the following:
- It is better to build a bathhouse on a hill.
- A free-standing structure should be clearly visible from the windows of a residential building.
- When choosing a location on a site, the wind rose is always taken into account so that the smoke does not disturb the neighbors. This applies to buildings that are heated by wood stoves.
A classic Russian bathhouse with a standard set of rooms (steam room, font or sink, dressing room) is considered an outbuilding, so you do not need to obtain permission for construction. But, if communications (gas, electricity, water supply, sewerage) are centralized to the bathhouse or a second floor is being built, its registration is required.
What to consider when developing a project and planning a bathhouse
By project we mean a smaller version of the future building, transferred to paper. It contains a general drawing of the structure, diagrams of individual elements from different angles. The type of foundation and materials for building a bathhouse are indicated. Calculations were made of the amount of building materials and money spent taking into account the size of the structure. The method of supplying communications and the placement of the furnace is clearly shown. The approximate construction period is indicated. The project is always accompanied by construction permits from local services. It is unlikely that you will be able to cope with such a volume of work yourself, so it is easier to order the design procedure from experienced architects.
The layout of a bathhouse means the proper arrangement of the interior spaces, taking into account the requirements of the owners. The calculation of the size of each room depends on the expected number of vacationers.
It is important to pay attention to where the doors will be installed and which side they will open from.
Among other planning nuances:
- In bathhouses made from fresh logs, it is better to place the wood-burning stove near the wall adjacent to the rest room, and place the firebox in the dressing room.
- It is worth setting up a small vestibule at the entrance to the bathhouse premises. It will reduce heat loss in winter.
- It is convenient to place a bathing bowl or pool in the room, opposite the doors to the steam room.
- The steam room should be larger in size than the washing room.
- There is no need to overload the space with furniture. Its quantity should be minimal.
With a compact arrangement of a standard set of rooms, there is enough space for a separate bathroom, and a dressing room with access to the terrace will allow you to relax in the fresh air in the summer. Attic floor - the possibility of arranging an additional lounge for guests.
Frame houses 6 by 6 with attic
The main advantage of a 6x6 frame house with an attic is the increase in usable area at almost the same cost as a one-story house. The attic is not a full floor, and its enclosing structures are combined with the roof. Most of the costs will go only to increasing the roof area and finishing the internal walls.
An example of the layout of a 6x6 frame house with an attic
How to effectively plan a 6x6 frame house with an attic
Often a 6 by 6 house with an attic, as well as a two-story house, stipulates that all common areas will be located on the first floor, including a bathroom, and recreation rooms on the second. The disadvantage is that the ceiling height in the rooms located on the attic floor will be lower than in the main part of the house.
The height of the ceilings throughout the attic area will be variable - higher in the center of the floor and lower towards the edge. This may lead to some difficulties when performing finishing work, as well as subsequently when choosing furniture for the premises. In this case, the rooms will have to be filled with furniture according to individual sizes.
An example of the location of a staircase in a 6x6 frame house with an attic
Another example of the location of the stairs in a 6x6 frame house with an attic
The design of a 6x6 frame house with an attic, as well as a two-story one, must include a staircase. Therefore, when creating an internal layout, one should not forget that the staircase should be located in the most convenient place for use.
An example of the layout of a 6x6 frame house with an attic
Attic in a 6x6 frame house: inside view
Construction stages
There are several stages in building a bathhouse with an attic.
Preparing the site
This includes not only marking the site, but also removing stones, dry grass, and various unnecessary debris.
Foundation
First of all, it is worth deciding on the foundation. You can make a strip one or mount a pile one. As for the first of them, it is quite durable, however, it will be expensive. In addition, shrinkage will take from three to six months, which not every owner will like. It is also worth noting that strip foundations cannot be made on every soil. It should not be used in places where there is too much moisture.
Most often, a pile foundation is used for baths. Its construction is quite fast, it is very durable and practically not inferior to its tape counterpart. Despite this, a pile foundation will require too expensive equipment, as well as precise calculations.
Frame
As for the construction of the frame, it can be made from almost any material. However, the internal lining must be made of wood. When installing the frame, it is necessary to take into account not only the height of the steam room, but also other rooms. In addition, it is worth knowing how much space will be allocated for furniture.
Roof
When the frame is completely done, you can begin building the roof. If you need to slightly increase the volume of the attic itself, then you should opt for a gable roof. However, in this case it will be necessary to increase the height of the load-bearing walls from 1 to 1.5 meters. Anyone who is not particularly concerned about the usable space of the attic can opt for a sloping roof. It can be installed immediately or during the process of refurbishment of the premises.
Interior finishing
All finishing work must begin with the installation of the stove. You can make both an iron and a stone firebox - it all depends on preferences, as well as budget.
After this, you can begin finishing the entire room.
As for the steam room, its walls must be covered with boards; the best option is a hardwood board. In addition, during finishing work it is necessary to mount the frame and cover it with foil insulation.
In the recreation room, instead of insulation, you should use a vapor barrier. As for the walls, they do not have to be covered with wood - it is enough to use any finishing option. As for the finishing work in the attic, it is carried out similarly to all work in the bathhouse. It is imperative to make them waterproof and able to retain heat well indoors.
You also need to take care of the stairs. It is best to make it flat, with wide and comfortable steps. This is necessary so that after the steam room a person can calmly walk on it without slipping. In addition, the stairs must be fenced with railings, which will serve as insurance against falling from a height.
Furniture placement
Inside the bathhouse you can place various interior items, but there are those that are extremely necessary:
- Canopy in the steam room.
- Wardrobe, rack or clothes hanger.
- Shower stall or tray.
- Chairs and benches.
- Kamenka.
- Table.
- Shelves for equipment.
Additional products for which it is advisable to leave space in the building when creating a layout are:
- flower pots, preferably of a floor type, which will give the room greater aesthetics;
- acoustic system;
- laundry basket;
- sideboard with dishes;
- mini fridge.
It is undesirable to clutter the space with many decorative elements, especially those that are not fire resistant, which may be unsafe for use. Shelves and benches for the steam room are chosen only those that are treated with special compounds that prevent fire when in contact with an open flame.
Bathhouse 6*6m is the best option for a building in which everyone can equip main and additional rooms that can meet their preferences in terms of comfort, utility and convenience. The main thing is to correctly formulate the design of the project, the canvases used during installation, without violating norms and standards.
Communications
The rules imply the preparation of a building project simultaneously with the installation of all necessary communications. You will definitely need water, electricity (sometimes gas). The laying of water pipes takes place during the construction of the structure. You should not lose sight of installing a high-quality ventilation system in all rooms (including rest rooms), otherwise the humidity will increase. Humid air will cause fungus to appear on the walls. Some types of building material will begin to deteriorate quickly.
To maintain optimal heat in winter, it is important to provide a heating structure. Only with additional heating can you achieve optimal temperature conditions in cold weather. In addition to ventilation in the bathhouse, it is important to provide high-quality waterproofing and thermal insulation. Installation of communication systems in a two-story building is easier than in a one-story building with extensions.