Living in a country house and having external water supply and sewerage communications, pipes are laid below the freezing point.
In most of our country, this mark is at a level of no more than 2.5 m.
What to do if you cannot lay a pipe with water to such a depth? Let's say your site has rocky soil or groundwater is too close to the surface?
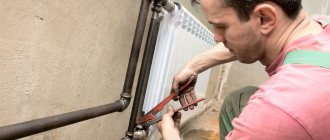
Or an extended piece of water supply runs in the unheated basement of the house, where there is a risk of freezing. You can, of course, use special pipes, but it will cost you a pretty penny.
Therefore, it is much more profitable to warm the pipe with an inexpensive heating cable.
Types of cable and how it works
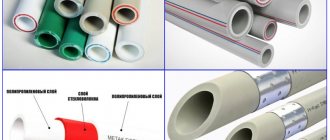
The most common types of heating cables are:
- resistive
- self-regulating
How do they differ from each other and which one is better for plumbing? Resistive ones can be single-core or two-core.
The operating principle of this brand is very simple. Inside the cable there is a core made of a special alloy with high resistance.
When current passes, the core heats up. You can purchase ready-to-install kits or order the required footage.
Which is better, single-core or double-core option? With a single-core cable, it is necessary to make a loop and pull the cable twice from the beginning to the end of the pipe in order to supply 220V voltage to its ends.
With a two-core one everything is much simpler. You measure the required distance, at the beginning of the cable line you apply phase to one core, zero to the other, and at the end you simply short-circuit them together, installing an end coupling.
This type of heating will require temperature sensors and a thermostat, similar to what is used in heated floors.
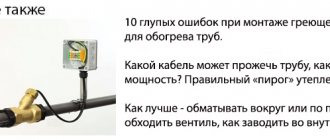
Mistake #1
You cannot use a resistive cable without a regulator!
Otherwise, it can simply melt and burn the pipe.
What kind of outer insulation should the wire have?
Internal insulation of conductors is not as important as external insulation. The external conditions determine the conditions in which the product can be used. For example, if it is necessary to run a wire inside a water pipe, then the insulation should be made of food-grade fluoroplastic, which will not affect the taste of the water or change its chemical composition. Moreover, dust and moisture protection must be according to the IP68 standard.
For roof or gutter installations, it is important that the insulation can withstand prolonged exposure to ultraviolet rays. It is usually made from fluoropolymer. The product may not indicate the shell material, but only the phrase “protection from UF rays.” But for sewerage, a cable with a polyolefin sheath is intended. Although this information is usually written in the specifications for each product, it is better to check with the seller so as not to make a mistake and buy the right wire.
Sources
- https://sovet-ingenera.com/santeh/trubodel/greyushhij-kabel-dlya-vodoprovoda.html
- https://ichip.ru/sovety/pokupka/kakoj-greyushchij-kabel-luchshe-vzyat-dlya-vodoprovoda-711692
- https://vodatyt.ru/uteplenie-truby/vybiraem-greyuschiy-kabel.html
- https://domikelectrica.ru/montazh-greyushhego-kabelya-dlya-obogreva-trub/
- https://TrubaNet.ru/kanalizacionnye-truby/greyushhijj-samoreguliruyushhijjsya-kabel-dlya-obogreva-trub.html
- https://HouseChief.ru/kabel-dlya-obogreva-vodoprovodnojj-truby.html
[collapse]
Self-regulating cable - operating principle
Self-regulating, there is no closed loop or loop.
Mistake #2
There is no need to short the cores together at the end of the cable!
Between them, along the entire length, there is a cunning polymer, which, when cooled to a certain temperature, forms different conductivity bridges.
That is, at the cooling point, the loop of two wires closes on its own, current begins to flow between them and the cable heats up. In this case, you will have different temperatures along the entire length of the cable.
The hottest point will be in the coldest place. But at no point will the temperature exceed 85C. The nominal heating is 65 degrees.
This cable is completely fireproof. Even if it is overlapped on itself, it will still not burn.
Mistake #3
However, make no mistake, when the weather is warm enough outside, it does not completely turn off on its own.
He simply reduces his consumption several times. There is no such option for its consumption to be zero when switched on.
Self-regs from different manufacturers differ in the quality of the so-called matrix. This is the same miracle polymer that transmits electricity through itself.
The vast majority of specialists use self-regulating types of cable to heat pipes. This is explained by their simpler operation and simplified installation.
You don't have to buy and connect a thermostat.
All you have to do is plug it into a power outlet, and it will immediately start working as it should.
Creation of a heating system
The implementation of plans will be easier if you divide the entire project into stages:
- Preparation of drawings and list of components, tools, consumables.
- Connecting heating elements to power wires.
- Installation inside (outside) of the pipeline.
- Additional activities.
Connecting the heater and power cable: instructions
Below is an algorithm of actions and features that will be useful in practice:
| Drawing | Instructions |
| Purchase a special kit designed for termination of self-regulating cables. It includes metal sleeves that create electrical connections. Heat-shrinkable tubes with adhesive inside will come in handy. When heated, they contract and provide the necessary insulation and tightness. | |
| The cable is cut to the required size. Protective sheaths are removed from the connected end at a length of 40-50 mm. The semiconductor matrix is carefully separated along the center line. | |
| Different tubes are placed on these areas and heated with a hairdryer. This will allow you to subsequently space the joints to improve insulation parameters. | |
| The conductors are removed from the outer layers by 9-11 mm. | |
| They are inserted into the sleeves and rigidly fixed using wire cutters. | |
| The preparation of this part of the structure is completed by putting on tubes of larger diameter (there is no need to heat them yet). | |
| Prepare the power cable in the same way. Remove insulation. Apply heat shrink tubing of suitable sizes. | |
| The wires are inserted into the sleeves one by one, taking into account different lengths, and secured with a clamp. | |
| The tubes are successively shifted and heated to obtain multi-layer reliable protection. | |
| Next we proceed to insulating the other end. Remember that the conductors in it are not connected, since the current only passes through the matrix. To completely eliminate the possibility of contact, the cable is cut with a “step”. | |
| A heat shrink sleeve is placed on top and heated. As a result, something like this will be created. |
Using the same technology, working devices are created using other types of self-regulating cables
Installation outside the pipe
With this option for placing the heater, the following table is used to approximately calculate the required power:
| Metal pipe diameter, inch | Power per 1 m length, W |
| up to ¾ | 16-17 |
| from ¾ to 1½ | 23-27 |
| over 1½ | 30-31 |
For more precise actions, you can use free calculator programs that are offered on the official websites of cable product sellers. In this case, specific operating conditions, liquid temperature, and installation features are taken into account. Experts do not recommend installing heaters with a power of more than 17 W per 1 m length on plastic pipes. But in reality, it is necessary to take into account the heat resistance of a certain type of polymer. Such restrictions do not apply to metal products.
Flat cables are better suited for this option. They adhere well to the surface and are easier to fix.
Typical installation of a cable for heating an outdoor water pipe
The cable is secured with clamps that are resistant to high temperatures. The pitch is chosen in such a way as to eliminate sagging. A protective casing is installed on top of the thermal insulation layer made of porous material to prevent mechanical damage.
If necessary, increase the heating by adding the required number of cables. It is advisable to place them in the lower part of the pipe, since this is where unwanted icing processes begin.
In this option, the insulation and heating element are protected by special metal shells
Attaching heating wires to water pipes with metalized tape reduces heat loss
Spiral installation
For your information! In some places you can reduce the winding pitch and make a reverse turn to increase the heating area.
During installation, special allowances are made around flanges, valves and fastening points.
Installing a heating cable inside a water pipe
This option looks preferable. Inside the pipe, the product is well protected from mechanical influences. The heater is located inside the liquid, so it performs its functions with maximum efficiency. The numbers confirm this. To maintain a positive temperature, 8-10 W per 1 m of route is sufficient. This figure is almost two times less than the previous (external) installation method.
But this technology can only be used on straight sections where there are no shut-off valves.
You can purchase a ready-made kit, or connect the heater and power cable according to the above algorithm src=»https://ventkam.ru/images/wp-content/uploads/2017/01/26-1.jpg» class=»aligncenter» width =»800″ height=»644″[/img] Manufacturers include bushings and sealing elements in such kits
When designing the pipeline, allow for a 90° turn and install a tee with the appropriate dimensions to accommodate the gland assembly.
Temperature control
A thermostat is used to automate work processes. The device itself is installed in an electrical panel. The temperature sensor is fixed to the pipe at the control point. It should be remembered that this element may fail over time, so it is installed in a place convenient for maintenance. The thermostat of a self-regulating heating cable for heating pipes is used in accordance with the instructions src=»https://ventkam.ru/images/wp-content/uploads/2017/01/28-1.jpg» class=»aligncenter» width=»850 ″ height=”286″[/img] Different electrical circuits are used to connect single- and double-core cables
In separate sets, a compact thermostat (with temperature sensor) is installed in the power supply circuit
Important! The disadvantage of compact thermostats is the lack of adjustment and remoteness from the work area.
Connecting pipeline heating to the electrical network using a heating cable
The total power of the heating system can be significant. Therefore, it is connected to a 220 V network through a separate machine. It is also recommended to install a specialized protection device (RCD) in this circuit. It constantly measures the current. When losses caused by insulation breakdown or touching a bare wire are detected, the heater quickly turns off.
Connecting the heater to the electrical network
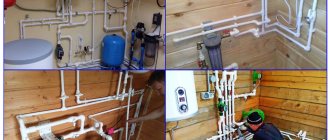
Thermal insulation
This operation is required. It will prevent heat loss and prevent cold penetration. The best insulator is air, so porous materials that are resistant to humidity are used.
Special split tubes made of foamed polymers
The water supply is installed in a special channel, which is formed by Penoplex slabs.
Food and non-food - 3 differences
Self-regulating cables are divided into food-grade cables, which can be laid directly into the pipe, and non-food-grade cables, which can be laid on top.
How do they differ from each other structurally? Firstly, the size.
Food grades, with fairly similar characteristics, have a smaller cross-section so as not to occupy useful space inside the water supply. Compare, the most common dimensions for external ones are 7*14mm, 7*15mm, and for internal ones – 5*7mm.
Mistake #4
You can't go wrong with the size, and such a cable can actually reduce water pressure.
At the same time, do not forget about the end coupling, which has a cross-section 1.5-2 times larger than the wire itself.
The second difference is the mandatory presence of a screen. External ones may not have it.
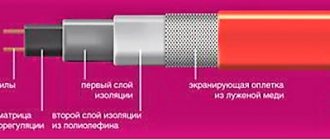
And thirdly, and most importantly, the external insulation material.
Here, for example, is a food option.
On the outside we have:
- fluoropolymer shell
This shell is chemically inert to aggressive environments and does not decompose inside the water supply.
Next come:
- armored, protective screen or braid
Mistake #5
Without such a grounding screen, the cable inside the pipe cannot be used.
- insulation layer
- two copper strands with a polymer between them
For the non-food model, the shell consists of ultraviolet-resistant polyolefin.
Useful tips
It is very difficult to navigate the sea of heating cables offered on the modern market - there are too many offers from different manufacturers. What you need to know and consider:
- Before going to the store, you need to know exactly the diameter of the heated pipe and the length of the area protected from the cold.
- At the same time, you still need to focus on the lowest temperatures to which the soil or air can cool.
- It is necessary to clarify the presence of a protective braid, which increases the reliability of the heating element and provides grounding.
- The following is also important: type of external insulation, power, temperature class, as well as the manufacturing company.
External insulation type
If a polyolefin-insulated cable is suitable for sewer pipes, then fluoroplastic protection is better suited for internal installation (directly into the pipe). Fluoropolymer is also quite suitable for outdoor installation - it protects from both moisture and ultraviolet radiation.
Temperature and power
The medium temperature system is suitable for larger diameter pipelines. The maximum system temperature is 120°C. The power reaches up to 33 W per meter.
The most powerful are with a temperature of 190°C, their power is already 95 W per meter. Such systems are not used in everyday life; their scope of application is industry.
You can select and correctly calculate the optimal power based on the diameter of the pipe. Examples:
- For water supply systems with pipes up to 25 mm in diameter, cables with a power of 10 W per meter are used.
- From 25 to 40 mm – 16 W per meter.
- From 40 to 60 mm - 24 W per meter, etc.
Recommended Manufacturers
There are brands of heating elements that have proven themselves to be long-term, stable and reliable. Imported products:
- Lavita.
- Nelson.
- Ensto.
- Devi.
- Raychem.
The most popular Russian manufacturer is considered to be the company Teplolux (SST), which specializes in high-quality household products.
Homemade heating cable
Nothing is impossible, and you can also make a heating cable with your own hands. There is enough information on this topic on the Internet in the form of:
- Videos.
- Schemes.
- Articles.
Having some skills in basic electronics, as well as the desire to produce one, using an on-board computer, a power supply, and some materials, many craftsmen make effective, reliable and safe systems for such heating.
The most common reason for making homemade products is the desire to save money, and such “craftsmen” often use “mongrel” wires instead of cables. So, when creating something like this, you need to think a hundred times before doing something that could ultimately lead to a short circuit, even a fire. In addition, everything related to drinking water requires a special, thoughtful attitude.
You can make homemade automation if you have experience in this matter, but it’s not worth experimenting with wires at all - it will end up being more expensive.
They say that the greedy pays twice - but that’s not so bad, it’s worse when such a makeshift device harms your own health and the health of your household. Not to mention the safety of the home itself and the breakdown of the water supply due to defrosting.
Reviews
There are plenty of reviews on the Internet about heating cables. Users use them to heat the following communications and surfaces:
- Drainage.
- Drainage devices.
- Water pipes.
- Sections of pipes in an artesian well.
- Sewage systems, etc.
Opinions are divided. Some claim that this method of electric heating is simply irreplaceable, while others claim that a deep trench for pipes will work “cheaply and forever.”
Users of devices such as heating cables assure that with a thermostat, heating is more profitable and saves electricity.
In addition, many are inclined to believe that the combined option is still more profitable: the pipe is buried in the ground and heated by a heating element.
It is strongly recommended not to wrap pipes located in the ground with mineral wool - they absorb moisture. This is how the insulation becomes useless, and the risk of freezing is present.
Everything, apparently, depends more on the specific situation and financial situation of the homeowner.
Which cable to choose?
The primary purpose of the heating cable is to prevent the water in the pipe from freezing. And this can only be achieved with sufficient power.
Which one should you choose in your case? In domestic conditions, a water pipe with a maximum diameter of 32 mm is usually heated.
For such a pipe, a cable with a power of 16 W/m is sufficient. For larger pipes from 50 to 110mm, choose a power of 24W/m.
If you are extreme and do not insulate the pipe at all, then such a water supply system will have to be wrapped with a cable of at least 32 W/m.
If the required power is not available, you will need to wind two cables at once.
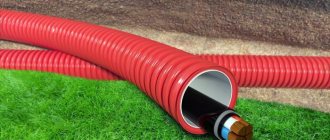
Winter water supply at the dacha: new technologies in insulation
There is an interesting option, a polymer flexible pipe, insulated at the factory. There is a layer of waterproofing on top of the insulation, and along the pipe there is a channel for laying a heating cable. Such pipes are called anti-freeze pipes or insulated pipes. For example, even in the northern regions, it is possible to make winter water supply at the dacha over the surface using ISOPROFLEX-ARCTIC pipes.
Insulated pipes for winter water supply at the dacha
Operating temperature - up to -40°C, operating pressure - from 1.0 to 1.6 MPa, pressure pipe diameter - from 25 mm to 110 mm. It can be laid in a channel or on the surface. They are flexible and supplied in coils of the required length, which allows us to minimize the number of joints.
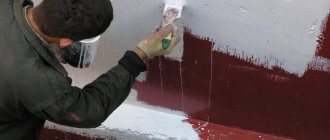
There is also a new way to insulate the winter water supply at the dacha - liquid thermal insulation or thermal insulation paint. It can be applied to an already installed water supply system, which can be a good solution.
The pipe is frozen - the reason
All heating cables operate normally only if the voltage corresponds to the nominal values specified in the product data sheet. If you have problems with the voltage at home, and it rarely rises above 180-190V, then do not be surprised that the selected power may not be enough, and one day the pipe will freeze.
Why does the cable itself sometimes die? Self-regulators are afraid of frequent switching on and off. They usually have a finite number of such switchings.
They also fail due to improper connection to the 220V power cable. Poor quality end seal and moisture getting into the shell are another reason.
To seal the food cable into the pipe, seals are used. When choosing them, pay attention to the shape of the cable. They are round or flat.
They use their own seal for a specific brand. If you choose the wrong one, you will get a leak.
Thermal insulation
Now you need to insulate your pipes for better heat retention. Special cylinders can be used as insulation.
They should be made of mineral wool or polyurethane. In addition to saving heat, you need to worry about protecting the conductor from mechanical damage. As you can see, heating water pipes with a cable can be easily done with your own hands.
heating in a wooden house.
Home> Electrician's Tips> How to install a heating cable with your own hands to heat a pipeline
Quite often, the plumbing system requires repairs due to freezing of pipes in winter.
To prevent accidents, heating is used through a cable installed inside or outside the pipe. Additional heating prevents the pipelines from freezing, and it is not difficult to install the heating cable yourself. The photo below shows how a heating cable is laid around a sewer pipe under insulation.
Heating cable laid around the pipe
How to lay a heating cable outside a pipe
For external installation you will need:
- the cable itself
- aluminum tape
It should be tape with a good metallic coating. Cheap lavsan film with a metallized coating will not work.
- nylon zip ties
- thermal insulation
To ensure that the heat is distributed evenly along the entire length, wrap the insulated area with foil tape.
Mistake #6
In this case, there is no need to wrap the entire pipe.
Let's say you have a pipe of one hundred square meters or more. Glue one strip of tape along it and that’s it. It is not necessary to use the material over the entire surface.
Mistake #7
There is no need to wrap steel and copper pipes with tape at all.
This equally applies to metal corrugated ones. Only the top layer will be enough for them.
Next you need to secure the cable.
Mistake #8
Most often this is done with the same aluminum tape.
However, this risks the fact that the wire eventually “bulges out” and begins to move away from the wall, which reduces heat transfer significantly.
To prevent this from happening, use nylon ties. The distance between the ties is 15-20cm.
The cable itself can be laid either in an even strip or in rings around it. The first option is considered more rational for sewerage and small-diameter pipes.
In this case, the overlapped spiral gasket will cost you a pretty penny. But often this is the only way to properly warm a large cross-section pipe in severe frosts.
Mistake #9
When laying the cable in a straight line, it should be placed not at the top or side, but at the bottom of the pipe.
The warmer the water, the lower its density, which means it will rise upward as it heats up. If installed incorrectly, the bottom of the pipe may be cold, and this can lead to freezing, especially in sewer systems.
In them, water flows below. In addition, such pipes are never full.
Another layer of foil tape is glued over the cable.
After that, thermal insulation in the form of foamed polyethylene is put on this entire “pie” (pipe-duct tape-cable-tie-tape).
Its use is mandatory. It keeps all the heat inside and reduces energy consumption.
The thermal insulation seam is sealed with reinforcing tape.
Otherwise, maximum tightness cannot be achieved. If you have a ready-made kit with a plug at the end of the cable, then, in principle, the entire installation is complete. Plug the cable into the outlet and forget what freezing pipes are like once and for all.
Preparatory stage
How to make a heated floor from pipes yourself? At the initial stage you will need:
- remove the existing concrete screed and, if there are level differences of more than 7 mm - 10 mm, level the surface;
Removing old flooring
lay waterproofing on the prepared floor.
Insulating the floor is required to prevent moisture from entering the system, which can cause corrosion or bacterial contamination of the pipes. As a waterproofing material you can use: polyethylene or polyvinchloride film, supplemented with a thermo-reflective layer. The joints are connected using soldering or a special adhesive tape to achieve uniformity of the coating;
Waterproofing material in the form of a film
- cement-polymer screed; cast screed.
Waterproofing the floor with special mixtures
- lay a damper tape around the perimeter of the room, which compensates for expansion when heated. If several pipe circuits are laid in a room, then the tape is also laid out between all circuits;
Attaching damper tape around the perimeter of the room
- insulate the floor. The choice of insulation depends on the environmental conditions: if the floor is an additional source of heating, then strong insulation is not required, so you can use, for example, foiled polyethylene foam;
Foil polyethylene for floor insulation
- if the floor is the only source of heating in the apartment, then more reliable insulation is required, for example, in the form of sheets of expanded polystyrene, the thickness of which is 20 mm - 50 mm;
Sheets used as insulation
- if you install a warm pipe floor with your own hands on the ground floor of a residential building with an unheated basement or in a country house, it is more advisable to use sheets of expanded polystyrene 50 mm - 100 mm thick or a layer of expanded clay as insulation;
Floor insulation with expanded clay
- A reinforcing mesh is laid on the prepared surface, which simultaneously serves to screed the concrete and secure the pipes.
The final stage of floor preparation
In stores you can purchase special mats for pipes that have both the properties of insulation and the properties of a reinforcing mesh, but the cost of such products is quite high.
Special material for laying pipes
Pipe mounting with valve
What if you have a more complex case? For example, are there fasteners and valves on the water supply section?
There are certain nuances here. First, prepare the pipe itself by gluing the tape.
At the fastening points, the clamps will have to be temporarily removed.
In this case, the wire itself must pass through the lower attachment point of the clamp.
What to do with the tap?
Mistake #10
If the cable is pulled here in a straight line or even in a spiral, then if it is necessary to replace the valve, it will no longer be possible to do this without cutting the cable.
Therefore, a reserve must be made in the form of a loop.
After this, simply fold this loop around the valve and tighten it with a tie.
Thermal insulation is stretched over everything.
Requirements for insulation
Nowadays you can find a large number of varieties of insulation for plumbing in stores. And here it is important not to make a mistake with the choice. It is worth studying the characteristics of this or that composition, purchasing the optimal one for a particular situation. In many ways, everything depends on the location of the pipeline, which is usually located in the ground or on the street. But there are also general criteria on which to base the choice.
Insulation requirements:
- Resistance to atmospheric agents;
- Fire resistance;
- Low thermal conductivity;
- Long service life;
- Easy installation;
- Low price;
- Low water absorption;
- Possibility of multiple installation.
When choosing a material for insulating pipes outdoors or underground, it is preferable to buy one that meets all of the above parameters. This approach will allow you to avoid possible difficulties when operating the water supply during the heating season.