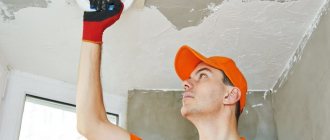
The ceiling is the most important detail of interior decoration. This structural element greatly influences the visual perception of the room and the comfort of its use. Before finishing, in most cases, the lower part of the floor slab must be leveled and brought to perfection. This work is carried out using a special construction mixture - plaster, which is available in a variety on the market. The rough finishing of the ceiling is usually carried out by professional craftsmen. If there is no opportunity to attract third-party finishers, the entire procedure can be done with your own hands, subject to compliance with certain regulations and rules.
What characteristics should you pay attention to when choosing
When choosing the right plaster mixture for the ceiling, you should pay attention to the main characteristics of this building material:
- Chemical composition - there are two types of aggregates for plaster - cement and gypsum. In the first case, the hydraulic binder hardens in wet conditions and is characterized by increased durability and reliability. Gypsum compounds are easier to apply. To achieve increased weather resistance, you should opt for a synthetic binder.
Cement plaster
- Scope of application - when purchasing, you should read the instructions on the packaging - the product should be recommended for installation on the ceiling.
- The minimum permissible thickness of one layer - the consumption of the mixture and, accordingly, the cost of finishing the surface of the floor slab depend on this parameter.
- Special characteristics are porosity, on which the heat and sound insulation properties of the mixture depend.
Gypsum plaster
- Hardening time and strength gain - when drawing up a calendar schedule, this characteristic affects the timing of finishing work.
In addition to the basic properties, attention should also be paid to the adhesion indicator, the size of the solid aggregate, the possibility of applying a textured layer and the thixotropy of the binder.
Advantages and disadvantages of plaster on the ceiling
Plaster ceilings have a number of advantages compared to other types of rough finishing of the lower part of the floor slab in the room:
- When installing this type of finishing, the entire height of the room will be preserved in full, which is important for old apartments, the size of which from floor to ceiling does not exceed 2.6 meters.
- Plastering the ceiling is considered one of the most inexpensive types of rough finishing, compared to installing a plasterboard box.
- In the case where the floor slab is built with minimal flaws, the layer of plaster can be only a few millimeters.
Smooth plastered ceiling
- If you follow the technological map and choose high-quality material, a plastered ceiling can last up to 15 years or more without the need for restoration.
- Considering that the substance contains a minimal amount of chemical components, this material has improved environmental properties and does not cause allergies in dependent people.
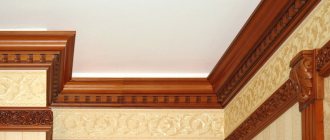
- Suitable for decorating modern or classic interiors.
Classic interior
However, in addition to the advantages, the plastered ceiling has a number of significant disadvantages, which is why it is not always chosen as a priority type of finishing:
- A large number of wet processes, the installation of such a rough coating is inevitably accompanied by the formation of stains and dirt.
Dirt during plastering work
- The main disadvantage is that if there are serious and deep defects on the floor slab, increased material consumption is required, since the plaster will be applied in several layers.
- To obtain a guaranteed impeccable result, you need to contact professional finishing craftsmen.
- Increased labor intensity when constructing the coating. Risk of making irreversible mistakes.
The working process
Thus, plastering the ceiling is advisable when performing finishing work on top of a relatively flat surface of the floor slab, or in rooms with a small height. In other situations, alternative finishing methods should be considered.
Preparation for plastering
Working with wood involves the use of certain fasteners. Experts recommend abandoning self-tapping screws and using ordinary nails.
Their length can vary from 25 to 40 millimeters. It all depends on how many layers of shingles are used. Usually this is two layers, although it can be more. The diameter of the products is 1.5-2 mm.
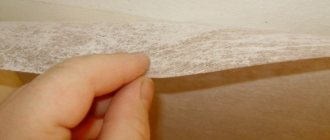
Those who want the thermal insulation functions of a wooden house to be at a high level should use the simplest thermal insulator, which is felt.
It is rolled out along the entire perimeter of the wall, nailed, after which the felt must be treated with antiseptic compounds. Before putting shingles on it, the felt is allowed to dry a little.
About the work order:
- Forgive is stuffed onto the prepared wooden surface. The first layer of planks is mounted at an angle of 450 relative to the floor. The distance from plank to plank (step) should be 45 mm. At the initial stage, you can use curved and narrow dies. It is important that the hollow of the element does not exceed 3 mm.
- The stuffing of the sheet shingles is the base on which the second layer is stuffed. Higher quality wood is used here. The design should be in the shape of a diamond with cells of 45/45 mm.
- Stuffing the output shingles completes the job. The thickness of the narrow exit shingles should be within 4-5 mm. Now you can apply the prepared solution and perform finishing work.
To plaster shingles correctly, you need to use a special tool, which you can read about below.
Tools for applying plaster to the ceiling
When carrying out work on plastering the ceiling, the master will need a certain set of special tools:
- Container for preparing plaster mixture with the possibility of mechanical mixing without splashing mixture particles.
- A set of spatulas with different widths of the working blade for ease of applying the mixture to the ceiling.
- A trowel for the convenience of manually mixing the mixture and preventing its premature hardening.
Master OK
- Aluminum strip for smoothing the applied mixture over a large area of the ceiling.
Rule
- A set of brushes for finishing the surface in hard-to-reach places.
Set of brushes
- A paint roller with soft bristles and a tray for arranging a primer for painting the ceiling.
Roller with tray
- To control the horizontal surface, you will need a building level.
Building level
- Laser level for determining the bottom level of an uneven surface of a floor slab.
Laser level
- Aluminum or galvanized slats-beacons for leveling the ceiling, in case of height differences of 20 mm or more.
Lighthouses
- A painter's cord that is stretched to ensure a horizontal plane.
Painting lace
- Dowel nails for fixing laces.
Dowel nail
- Rubber mallet for removing old plaster.
Rubber mallet
- Pencil with soft lead for marking.
- After the plaster has dried, the ceiling is sanded using special sandpaper with a fine abrasive. For ease of use, the consumable element is glued to a special plastic holder.
Sandpaper in holder
- A regular construction drill with a mixer attachment.
Mixer attachment for drill
- If there are cracks in the floor slab, before applying the plaster, a sickle mesh is glued to the surface to keep the plaster structure from cracking.
Serpyanka
- To make it easier to apply plaster onto the stream, you can use a stepladder, but it will need to be constantly moved from place to place throughout the room. The best solution would be to install construction scaffolds that will help cover several square meters of the ceiling at once without rearranging.
Construction scaffolding
- To clean the old layer of finishing or rough finishing, you may need additional metal spatulas, as well as brushes with metal bristles.
Metal bristle brush
In addition to the listed tools and consumables, the master will also need the right amount of high-quality plaster mixture and clean water at room temperature.
When is puttying needed?
Ceiling putty has a different composition than plaster mortar. The putty mixture is fine-grained, and the plaster has large grains in its structure, therefore, using putty, a smoother and more uniform surface is achieved.
Important! Putty mixtures are used for fine leveling of walls and ceilings. After the putty has dried, the surface is sanded, making it perfectly smooth and even.
Puttying a ceiling that was previously plastered is necessary before pasting it with thin paper wallpaper or painting it with interior paints. The putty is applied in 2 layers, but before that the surface is primed. After puttying, the ceiling surface needs another grinding and primer treatment.
How to level a ceiling with plaster
If the ceiling has multiple defects, deep potholes or cracks, before applying the base layer, the following work must be done:
- Any defect on the floor slab must be cleaned - cracks are opened, deep potholes are cleaned of old materials, dust and dirt.
- The inner surface of the defects is primed with the same composition as the main plane of the ceiling.
Filling potholes in the ceiling
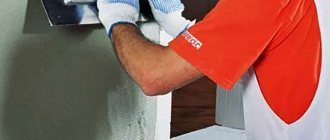
- The plaster mixture is applied to cracks and potholes, compacted to fill every pore and void, and then smoothed to achieve a flat surface with a common floor slab.
- Before applying the plaster, an elastic polymer sickle mesh is glued over the cracks along the entire length of the defect, which plays the role of reinforcing the element.
Repairing cracks in the ceiling
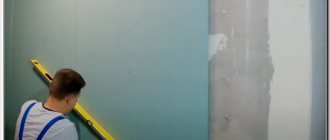
- Next, plaster is applied to the lower surface of the floor slab in the same sequence as described above - with or without beacons. If plastering is carried out without leveling slats, then a string is stretched along the ceiling to achieve an even plane.
After installation and hardening of the mixture, it is necessary to check compliance with the horizontal plane using a construction water, bubble or laser level.
Modern methods of plastering wooden walls
The plaster shingles are first filled across the entire width of the working surface - this is the beginning of the process. The name speaks for itself. The shingle is a kind of base on which the second layer of shingle is attached at an angle of 450 relative to the floor. In this case, you can use curved and narrow dies.
Note!
The thickness of the working dies should be less than 3 millimeters. Using a material of less thickness will not allow the shingles and mortar to bond well; we need adhesion.
The second layer is filled with the exit shingles at the same angle as in the first case. And in relation to each other, the location should be perpendicular: the contact angle is 900. The distance between the dies should be 450 mm. These indicators must be maintained in the second row. As a result of the work carried out, a mesh with cells of 450/450 mm should be obtained. This will give rigidity to the entire structure.
When arranging wooden buildings, thick, even dies up to 5 mm thick and 15 to 20 millimeters wide are selected for the second layer.
Take note!
It is important to observe the specified dimensions, since the use of material less than 10 millimeters wide may “fail” when driven in: it will simply crack.
If you use material more than 20 mm wide, this may cause the dies to bend and not have time to dry.
Features of applying plaster to the ceiling
To achieve the desired result and prevent defects, you must follow some recommendations from professional craftsmen:
- When installing a thick layer, the work is carried out in several stages - the thickness of one layer should be no more than 10 mm to ensure quick drying.
Plaster in several layers
- Before preparing a solution from a dry substance, you should calculate in advance the amount required for application to the ceiling. Otherwise, the remains must be disposed of.
- If more than 6 hours pass after preparing the solution, but the mixture has not been applied to the ceiling, you will have to prepare a new material, since the old plaster loses its elasticity.
- You should purchase primer and plaster from the same manufacturer with similar performance characteristics.
If you have to plaster a vaulted ceiling or other structure of increased complexity, you should turn to professionals for help, since such work will be impossible for a home craftsman to do the first time.
Basic principles of plastering work
The quality of plaster application depends on the preparation of the base and the prepared mixture. It is necessary to follow the manufacturer’s recommendations and be guided by SNIP. The human factor is also important: the qualifications of the master.
As a result of treating walls with plaster, the surface should be smooth and free of cracks. The mixture recipe largely depends on the base material: brick, wood, concrete. An important factor is the operating conditions of the structures: the exterior decoration or the interior of the room. Plastering various surfaces involves applying the mixture in several ways:
- By throwing method.
- Spreading method.
Top 5 ceiling plaster manufacturers
The modern building materials market offers dozens of options for plaster mixtures for ceilings from different manufacturers, actively competing with each other. Not every plant can boast of excellent quality materials. In order not to make a mistake in your choice, below is a rating of the 5 best brands of ceiling plaster, which was based on positive reviews on forums from satisfied customers:
- Knauf Grunband. High-quality dry plaster mixture based on cement binder. The composition contains particles of expanded polystyrene, which provide increased noise and heat insulation properties, which is especially convenient when finishing thin floor slabs.
To install a high-strength coating, no more than 10 mm of mixture is sufficient, which indicates the increased efficiency of the material.
Average consumption is up to 1.5 m2 per 1 bag weighing 25 kg with a layer thickness of 12 - 15 mm.
The average cost of one bag is from 300 to 350 rubles.
Knauf Grünband
- Ceresit CT A premium product in a higher price category. The material is characterized by increased strength, durability and resistance to cracking. Can be applied in one layer over minor defects without reinforcement with serpyanka.
Professionals note the uniformity of the structure of the substance after stirring with a mixer, as well as the ease of applying the material to the ceiling. Fits ideally in corners and slopes, repeating the contours of a curved surface.
The average cost of one bag weighing 25 kg is from 600 to 650 rubles.
Ceresit CT29
- UNIS "Teplon". High-quality gypsum plaster that hardens well in air. Can be applied in a single thick layer of up to 40 – 50 mm in one pass. This property is especially important when leveling ceilings with significant defects.
An undeniable advantage of the substance is its snow-white hue, which appears immediately after the applied material hardens.
Like any gypsum composition, plaster is easily applied with a standard spatula. Work with this material can be carried out by both professionals and novice craftsmen, subject to the instructions described above.
Among the disadvantages, it is worth noting the impossibility of using it in rooms with high levels of humidity, as well as carrying out wet cleaning of the ceiling.
The average cost of one bag is from 300 to 400 rubles.
UNIS "Teplon"
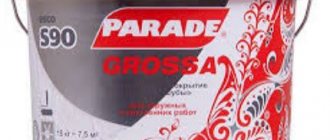
- Caparol Streichputz. A unique patented composition of the substance from a German manufacturer based on synthetic polymer resins. The plaster has increased weather resistance and can be used in damp rooms.
Also, craftsmen note a low level of toxicity, despite the presence of chemical impurities, ease of application and uniform installation. Dries within 4 – 6 hours, forms an ideal, flat surface for painting with any type of interior coating.
One of the most expensive compositions on the market is sold ready-made, in plastic containers of 16 kg, the cost of one bucket is 2500 - 3000 rubles.
Caparol Streichputz
- Plitonit T1+. Judging by consumer reviews, this cement plaster is one of the most popular finishing materials on the domestic market. A universal product - can be used in both dry and wet areas.
The base contains only natural materials, which increases the environmental friendliness of the substance.
It has a high degree of adhesion and can be used with any type of penetrating primer. The binder components have increased plasticity and bridge small cracks without reinforcement. Low consumption - up to 2 - 2.5 m2 per 1 bag of 25 kg with a layer thickness of up to 15 mm.
The cost of 1 bag is 250 - 300 rubles, which makes the plaster one of the most affordable on the market among its competitors.
Plitonit T1+
This rating is for informational purposes only, is subjective in nature and cannot be used as a direct indication to purchase. Prices are current as of June 2021.
Common Questions
Is it possible to use gypsum mixture that has expired?
Conduct a test batch of the solution and try working with it. If the plaster is plastic and adheres well to the surface, and hardens within the time indicated on the packaging, it can be used.
The workers suggested drying the gypsum plaster with a heat gun to speed up the repair. Is it possible to do this?
No. Forced drying with any heating devices will lead to cracks. At high air temperatures, moisture leaves the top layer and remains inside. Therefore, swelling of the plaster occurs. Plus, fungus begins to form inside.
Is it possible to mix leftover plaster from bags from different manufacturers?
If the composition and proportions of the components are absolutely identical, it is possible. The main thing is not to mix mixtures of different compositions and purposes.
Is it possible to use gypsum plaster on a glazed loggia?
This is only possible if the loggia is insulated and dry. If the temperature in winter drops below + 5 degrees, in the spring, when the weather gets warmer, the plaster will begin to peel off.
If work was done on gypsum plaster in the summer and it dried out, the house would not be heated during the winter. Is there a chance that it will move away from the walls in the spring?
If the work was carried out in the summer, and the plaster has dried, and in rooms that have overwintered without heating, there are no drafts or water leaks from the roof, then the likelihood that it will move away from the wall in the spring is minimal. The adhesion of gypsum plaster is high, and it is difficult to detach it from the base after setting.
Is it necessary to putty the wall after gypsum plaster before painting?
If glossing has not been carried out, it is definitely necessary.
The gypsum solution hardens too quickly, what should I do?
You can mix a small volume of solution with the addition of retarders for testing. If retarders do not help, make smaller batches in order to have time to work them out.
Caring for plastered ceilings
The ultimate goal of plastering the ceiling surface is to apply a final finish - interior paintwork. In order for the result to allow you to comfortably operate the room, it is necessary to ensure proper care of the freshly laid ceiling plaster:
- When installing gypsum material, you should open the windows for ventilation, ensuring a slight draft in the room.
Draft in the room during finishing work
- When applying cement or synthetic binders, on the contrary, it is recommended to create the effect of a thermos.
- Before applying the topcoat and paint primer, you must wait until the rough finish is completely dry.
- If defects or an uneven surface of the ceiling are detected, all work to eliminate the defects must be carried out strictly before the mixture hardens.
- After the ceiling has dried, before applying primer and paint, you need to dust and sweep the surface.
Final cleaning of the ceiling before applying paint
If cracks form on the surface of the plaster after hardening, the area must be repaired. Applying a paint coating over such a layer of rough finishing will lead to a defect in the ceiling and, accordingly, to a violation of the aesthetic properties of the new interior.
Conclusion
Using wooden shingles for plastering work reduces costs. It is not difficult to work with it, the main thing is to choose the right strips and fill them onto the surface. When applying the solution, its maximum thickness must be observed, otherwise it will cause rotting of the load-bearing structures.
The video in this article will provide an opportunity to expand your knowledge on this topic. If you have any questions while reading the publication and after it, please ask them in the comments, we will be happy to answer them.
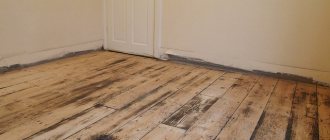
To level the ceiling surface and prepare it for finishing, traditional plastering is still used. Plastering a wooden ceiling is relevant in private buildings made of wood materials. Compared to other methods of leveling the ceiling surface, plastering offers many advantages. The cost of the plaster mixture is much lower than the price of drywall and materials for making the frame. The main advantage of leveling with plaster is maintaining the height of the room.
Briefly about the main thing
Plastering the ceiling can be easily done with your own hands. To ensure proper results, 3 main conditions must be met:
- Purchase a high-quality finishing mixture.
- Stock up on a set of necessary tools.
- All work should be carried out in strict accordance with the technological map given above.
Immediately after installing the plaster, it is necessary to check compliance with the horizontal plane using a building level. When carrying out work, it should be taken into account that plastering the ceiling is a dirty and dusty process, and therefore it is necessary to take care of personal protective equipment - masks and respirators.