Assembling furniture yourself at home is a labor-intensive task, but at the same time it is an excellent help for saving the family budget, as well as an opportunity to demonstrate an original design approach and aesthetic flair. Making cabinet furniture with your own hands is not very common, but it brings noticeable benefits and moral satisfaction. The created product can be very stylish and advantageously emphasize the overall interior design.
Select fasteners after you have decided on the base material.
In order to cope with this not very simple but fascinating task yourself, you must have at least initial skills in working with the tool and be attentive and accurate. To create cabinet furniture, you can choose inexpensive parts or use materials available in the house.
The created product can be very stylish and advantageously emphasize the overall interior design.
General rules for assembling cabinet furniture
To assemble a cabinet or chest of drawers, you must first calculate the parameters of the future product. To make cabinet furniture with your own hands, the first thing you need to do is make a drawing with the dimensions of all the parts.
Before making furniture, prepare a drawing of the future product.
You also need to determine what material you will use during assembly. Depending on this, fasteners, tools and auxiliary arsenal (sandpaper, etc.) are selected.
You also need to determine what material you will use during assembly.
Wood as a material can be “capricious”; it is important to choose high-quality boards with a good, even texture, dried and processed. Birch, poplar, maple, aspen and other hardwoods are suitable. Conifers require special conditions, so pine or spruce must be selected in combination with some other variety. Try not to select layered rocks so that the base does not split during processing.
When making cabinet furniture, pay attention to the fact that laminated chipboard may crumble during insertion of fasteners.
Do-it-yourself cabinet furniture can be made of chipboard, MDF or laminated chipboard (the latter option is the most common). These materials are processed differently.
The material requires accuracy and precision in outlines and actions.
All details of the future cabinet must be carefully checked against the drawings and carefully adjusted to the intended dimensions.
Wood as a material can be “capricious”; it is important to choose high-quality boards with a good, even texture, dried and processed.
A specialized store will help you make adjustments (trimming). This can also be done using a ruler, pencil and a wood saw at home.
If desired, you can improve the appearance with original inserts.
Chipboard panels must be coated with a protective compound - this will reduce the risk of evaporation of resinous substances. Other materials do not require this approach.
Do-it-yourself cabinet furniture can be made of chipboard, MDF or laminated chipboard (the latter option is the most common).
Common mistakes
Each private furniture maker has his own secrets on how to quickly and accurately assemble furniture. Some professionals use a table to assemble furniture, while other craftsmen can mount a large tall cabinet on the floor and install the finished structure, measuring the diagonal of the room and the product.
Difficulties may arise with inserting sinks into kitchen countertops, making radius curves, for which you need to use special equipment, hanging mirrors with glue, tape, or adhesive.
To become a professional assembler, the future master must be able to draw up a project, calculate the consumption of materials, perform detailing and cutting of chipboard, MDF boards, use equipment, tools and have some design skills. Then the finished product will be distinguished by its impeccable quality, durability, and long service life. Frequent mistakes that novice craftsmen make when assembling furniture:
- start work without first checking the availability of the mounting kit, basic structural elements, and without studying the manufacturer’s instructions;
- Universal prefabricated furniture begins to be assembled by connecting large parts - you need to decompose all the elements into units (drawers, cabinets, tables), and try to assemble a small structure;
- they don’t pay attention to the specifications in the instructions - in vain, at first glance the parts are similar, but there are left and right elements, fronts of upper and lower cabinets, and other assembly nuances;
- ignore the need to assemble the product on a hard, clean surface. For work you need a sufficient amount of free space; you can use a device for assembling furniture;
- panels made of MDF material can be damaged by using an electric tool (drill, screwdriver) - use screwdrivers until you acquire the necessary assembly skills;
- do not change the diagonal of cabinets (compartments, bedside tables, chests of drawers) before installing the back wall made of fiberboard - this leads to distortion of the part and the entire structure;
- do not take into account the assembly order specified by the manufacturer in the instructions. The result is low quality assembly, dismantling and re-installation of the product;
- they do not check the holes for fixing the fasteners, do not measure the distance between them to ensure compliance with the drawing - as a result, they have to cover the defects with plugs.
There are craftsmen from whom you can hear that they violate assembly technology in order to quickly complete the work - for example, “I hang the top of the kitchen unit before installing the lower cabinets.” Technically, this is not true - the assembly of a complex kitchen structure begins with the installation of the lower corner cabinet (often a sink), then install the remaining floor units, connect them together with self-tapping screws or intersection ties, cut in the sink, install the countertop, and only then proceed to install the upper tier of the kitchen headset There are many such subtleties in the process, and to do the job accurately, watch the video on assembling furniture.
When the master has assembled a furniture structure using simple equipment, fasteners, tools and accessories, he must make adjustments, check that there are no visible technological gaps, and that the doors are diagonal. Distributing and assembling furniture is not an easy task, but after acquiring the appropriate skills, everyone will be able to gain valuable experience in assembling furniture units of various designs. To make furniture assembly easier, the video below will help you understand the process.
This activity can be used as a business option in several steps - ordering factory furniture, delivery to the consumer in your car, installation at the installation site. Presenting photos of assembled furniture will expand your customer base if the furniture assembler is interested.
How to work with laminated chipboard - the main material for cabinet furniture?
Material such as laminated chipboard is quite actively used in the manufacture of furniture. Laminated chipboard has a number of undeniable advantages over chipboard:
- holds fasteners better;
- inhibits the evaporation of formaldehyde;
- looks aesthetically pleasing;
- You can choose an interesting texture and color.
When using natural wood, it is recommended to coat it with varnish.
Do-it-yourself cabinet furniture requires the ability to process the material, for example, to clean and cover the cuts with an edge that matches the overall surface (this must be done to avoid evaporation of the adhesive composition of the chipboard. It must also be remembered that when cutting to size, chips and cracks of the laminated part are possible. For assembly Cabinet furniture made from laminated chipboard will require care, attentiveness and accuracy.
Material such as laminated chipboard is quite actively used in the manufacture of furniture.
You can use a power tool in your work, which simplifies the attachment of a particular part to the body.
The panels should be coated before assembly, not after, to avoid smudges.
Furniture made from laminated chipboard is not always appropriate for a child's room, especially if the room is small, poorly ventilated or located on the sunny side, and the base itself is not of very high quality. Resins and chemical compounds can evaporate quickly and create an unfavorable atmosphere. This also applies to chipboard. It is better to prefer solid wood and plywood.
Do-it-yourself cabinet furniture requires the ability to process materials.
Here's what you can do!
Install the wheels.
“Rollers” on the legs of furniture will not only make it taller, but also easier to move. Screwing on the wheels is usually quite simple and there are no problems with it.
“Knock off your skates”!
Many bookcases have additional furniture legs. Do you want your furniture to look more modern? Then take them off!
“Reflashing” the fasteners
Unfortunately, many furniture models use unsightly, unaesthetic door handles. When buying a new headset, make sure that it fully matches not only the design of the furniture, but also the available connectors.
Let's change the color!
You can paint any furniture in any color, even laminate. In this case, you should use oil paints. Before using them, the surface must be sanded and primed.
Good luck! But it’s better to contact us - call right now ☎(499)394-03-19!
Tell your friends about us!
Return to list of articles
What tools are needed?
The tools available in the house are suitable for assembling cabinet furniture:
- screwdrivers;
- screwdrivers;
- Sander;
- jigsaw;
- wood hacksaw;
- ruler;
- simple pencil.
The popular design with craquelure varnish makes the facade of the cabinet look original and expensive.
Sandpaper is suitable as a material for cleaning surfaces. In order to measure the elements correctly, it is necessary to do this not on the floor, but on a table, preferably a carpenter's table or something similar. You can use stools as supports when cutting off extra centimeters from the board.
To assemble a cabinet or chest of drawers, you must first calculate the parameters of the future product.
Preparation before assembly
The selected material - chipboard, chipboard or solid wood panels - must be properly processed. Preparing the parts of a cabinet or chest of drawers involves leveling the surfaces, if it is not a laminated base, as well as cleaning them from roughness and burrs. The cut edges of the chipboard can simply be sanded and covered with a matching laminated edge.
Spot lighting is also a practical addition.
Any material that you are going to use must be of high quality and well dried so that after production the product does not create dangerous chemical fumes in the room.
Before assembling cabinet furniture, you need to carefully measure the area where the structure will be installed. For a cabinet with doors, you need to leave a little free space so that the doors can open without the possibility of friction against the walls.
You can use a power tool in your work, which simplifies the attachment of a particular part to the body.
Repeated parts of the future product must be symmetrical to each other, otherwise misalignment is likely.
Select fasteners after you have decided on the base material. Try to purchase reliable connecting parts. They should be purchased with a reserve so that if they fail, they can be easily restored.
Sandpaper is suitable as a material for cleaning surfaces.
Tabletops
A tabletop is a horizontal work surface on which you can cook, eat, read, write, etc.
Most office and desk tables, as well as cheap dining tables, have a tabletop made of the same chipboard as the main parts. The thickness is 16 or 22 mm, it is necessary to frame it with a 2 mm PVC edge.
Special countertops are used for the kitchen. They are a sheet of chipboard 28-38 mm thick, which is covered on top with durable plastic using postforming technology. Moisture-resistant countertops are green when cut, while regular chipboard is gray. A proper kitchen countertop should have a drip tray that will prevent dripping liquid from getting onto the fronts and drawers.
Cutting a regular and moisture-resistant countertop
The weak point of such countertops is the cut edge. They are usually covered with a simple melamine edge, so they become unusable within the first year of use. To avoid this, it is recommended to protect the edges with special aluminum profiles (end strip), and to protect against moisture, pre-coat the cut with silicone sealant.
There are also other types of profiles: corner and connecting strips, which are needed for joining several cabinets with different countertops.
Corner, connecting and end strip for table top
Another element is a decorative corner that closes the gap between the wall and the tabletop.
Skirting board for table top
A wall panel is sometimes used to finish the apron. Unlike tiles or mosaics, it is more practical due to the absence of seams and is inexpensive compared to glass splashbacks.
The tabletop is attached to the cabinets from below using short self-tapping screws to horizontal spacers so as not to spoil the smooth front surface.
Scheme of fastening the tabletop to the cabinet
Countertops made from natural or artificial stone are higher quality and more durable than others. Natural stone is heavy and requires special care due to its high porosity. But artificial stone does not have such disadvantages; it can be given any size and shape. The main disadvantage of stone countertops is the high price; for a small kitchen they cost from 40 thousand rubles. and more.
An alternative option is a countertop made of tiles or porcelain stoneware. You can make it yourself, but the tiles cannot be mounted on regular plywood or chipboard. The base must first be covered with cement-fiber sheets.
Main assembly steps
Before making furniture, prepare a drawing of the future product. It is necessary to once again check the dimensions of the cabinet schematically marked on paper with the proportions of the prepared parts.
- Mark the extra centimeters of the laminated chipboard panels using a simple pencil, saw off along the lines with a wood hacksaw, clean the edges and cover them with an edge.
- Attach the side, bottom and top panels to the rear panel using a screwdriver and self-tapping screws.
- Before hanging the doors, mark the locations for the hinges. If the sashes are heavy, increase the number of fasteners, otherwise over time the panels may warp under their own weight. The distance from the edge to the bottom and top loops should not be less than 12-13 cm.
- Fasten the hinges and check the operation of the doors. They should fit tightly, without gaps or displacements. Don't forget to embed the mini-lock.
- For a cabinet with sliding doors, you should choose a roller mechanism that will be located at the top and bottom of the panels. Most often, aluminum elements are used for this.
- If legs are intended, then they need to be made before hanging the doors. After assembling cabinet furniture with your own hands is completed, check the stability of the structure, how level the cabinet is and whether it “sinks” to one side or another.
- Using self-tapping screws and strips, make supports for the shelves. The latter are adjusted to size after assembling the cabinet body. Special holders are sold for glass shelves that will not damage the base.
- It is better to equip drawers (if any) with guides, then they will slide out easily and freely, without the possibility of warping and getting stuck.
The selected material - chipboard, chipboard or solid wood panels - must be properly processed
When making cabinet furniture, pay attention to the fact that laminated chipboard may crumble during insertion of fasteners. The material requires accuracy and precision in outlines and actions.
Drying time is required after each coat is applied.
Scheme and drawings
In order to independently assemble any furniture structure, the craftsman needs a drawing on which the technological process of installing the assembly unit is “outlined” in detail and clearly. The presence of schematic images simplifies the task. It is worth noting that the manufacturer is not responsible if customers damage wood chips, mirrors, or plastic parts during the assembly process, so the work must be done carefully, use mechanical equipment, and carefully study the attached diagram and instructions. What useful information does the drawing contain:
- instructions for assembling the unit (kit). Typically, the manufacturer indicates that the order’s complete set of parts, fastening, connecting, mounting, and decorative fittings must be checked upon receipt of the goods;
- the assembly of Italian furniture or a regular set from a furniture supermarket begins in the same way - with studying the specification, which indicates the number of parts, their name, size, code;
- a separate table shows the specification of fittings, consumables, and fasteners. For ease of use of the drawing and assembly diagram, the name and size of the fittings are given - screw, bolt, clamp, confirmat, clamp;
- The craftsman needs text instructions to correctly assemble the product - the specification and assembly order are indicated for each unit, and the design details and fittings are marked on the drawing - a template for drilling holes.
The diagram on how to hang a mirror deserves special attention. There are several options for installing mirror panels. To choose the appropriate installation method, you need to consider the weight of the mirror and the strength of the base plate. Technology for hanging a mirror:
- use double-sided tape - place glued strips of tape on the surface of an MDF or chipboard, “try on” the mirror, remove the protective film and fix the glass. The work is carried out with the part in a horizontal position so that the glue on the mounting tape sets. You can hang the mirror vertically, increasing the consumption of adhesive tape;
- acrylic glue - necessary to hang the mirror without damaging the amalgam. The sealant can be applied dotted or in separate strips, distributing the adhesive over the surface indented from the edge of the mirror. It is recommended to glue the slab to the mirror part in a horizontal position. Equipment for work – glue gun, glue dries in 24 hours;
- colorless construction silicone is quite suitable for securely hanging a mirror on a cabinet door. To firmly glue the parts, it is not necessary to apply silicone to the entire back surface of the mirror; it is enough to distribute the substance in thin transverse stripes, attach the mirror glass, and fix the decorative frame to the glued mirror.
As an alternative, you can use fastening hardware made according to the principle of clamping tabs. But the disadvantage of this method is the presence of visible parts of the mounting hardware. To avoid drilling mirrors and glass parts, accessories such as clamps are widely used. There is a large selection of products in terms of construction, design, and material of manufacture - the gluer can be made of plastic, have a transparent structure, round or rectangular shape. A clamp is a universal device that acts as a mirror holder or glass shelf holder. Installation option - fixation with a self-tapping screw or drilling under the clamp.
An example of a diagram for assembling a children's wardrobe according to the manufacturer's drawing: place the right side on a table for assembling furniture, install the rod holder, guides, hinge counters, rods. Place the bottom on the dowels, secure the left side panel using eccentric fasteners. Insert the back wall into the groove, secure the connecting beam, and secure the left side panel. Next, the box is assembled according to the diagram - the rods are screwed in, the sides of the box are mounted, the unit is secured with eccentrics, and the bottom is secured with euroscrews - confirmats.
After hammering in the thrust bearings, the children's closet is placed in a vertical position on the furniture assembly table, and the door hinges are mounted on self-tapping screws (the size is indicated in the drawing). The final stage of assembly is the installation of doors, rods, handles, then a drawer and shelves are inserted into the cabinet. Using such a simple and understandable diagram, which is attached in the drawing to the furniture structure, you can assemble any cabinet unit - a table, a chair, a wardrobe, a bed.
Furniture fittings
The choice of fittings for cabinet furniture is a moment no less important than the assembly itself.
| Cabinet hinges | Poorly selected loops can negate the results of your efforts. |
| Hinge mechanism with four hinges | Today this detail is being used more and more often. Adjustment is carried out both at the fastening stage and after completion of the installation work. |
| Drawer guides | You can take roller or ball ones. |
| Handles for drawer lids and cabinet doors | They need to be matched to each other. They may differ in style - it is important to adhere to a single design for the facade or interior content. For children's cabinets or chests of drawers, it is recommended to choose streamlined handles so that the child does not get hurt while moving or playing. |
Any material you are going to use must be of high quality and well dried.
Location of parts
A detail is any element of cabinet furniture: lids, tabletops, walls, facades, shelves. Each part can be either nested or invoice. Choosing the right type of location is very important.
Let's look at examples of two kitchen cabinets: one of them will stand on legs, and the second will be hanging.
Base cabinet:
As can be seen in the photo, the operating stress in the floor-standing cabinet is directed downwards from the lid and in the first option is naturally transmitted through the parts to the cabinet legs.
Correct and incorrect options for assembling a floor cabinet
In the second, incorrect option, the load is transmitted through the confirmat (furniture screw), and because of this it will be torn out of the part at a fracture.
Wall cabinet:
In the second example, the opposite is true: the load will go to the bottom shelf, and the attachment point will be on top.
Correct and incorrect assembly of a wall cabinet
If we use the same fastening scheme here as in the floor cabinet (option 1), all 4 bolts will be constantly under the load of being pulled out of the wood. Therefore, it is better if the confirmations experience stress on the fracture (see diagram “correctly”).
Furniture finishing
If desired, you can improve the appearance with original inserts. These can be mirror panels, dividers, various patterns or stencils, or ornaments. Spot lighting is also a practical addition. In addition, it looks quite stylish, especially if there are glass or frosted inserts.
When installing furniture, make sure that it is not exposed to direct sunlight.
When using natural wood, it is recommended to coat it with varnish. Finding the right shade is not difficult. To fix, apply the coating two or three times, then the surface will look smooth and even. Drying time is required after each coat is applied. This will make the surface resistant to abrasion and fading. The panels should be coated before assembly, not after, to avoid smudges.
Repeated parts of the future product must be symmetrical to each other, otherwise misalignment is likely
The popular design with craquelure varnish makes the facade of the cabinet look original and expensive.
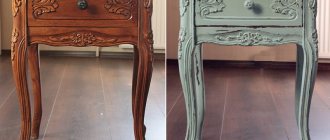
With the help of decoration, you can not only add style to a new piece of furniture, but also elevate an old product.
With the help of decoration, you can not only add style to a new piece of furniture, but also elevate an old product.
Tip: when installing furniture, make sure that it is not exposed to direct sunlight. This will avoid fading of surfaces and drying out of the wooden base.
To create cabinet furniture, you can choose inexpensive parts or use materials available in the house.
Facades
Kitchen fronts and furniture doors are usually made of more elegant material. But if you are making a drawer door inside a sliding wardrobe that no one will see, you can use regular 16 mm laminated chipboard with a 2 mm PVC edge for it. But the cabinets in the kitchen should look more presentable.
The facade is a separate furniture element. It is usually made to order. If the dimensions of the facades are non-standard, their production may take several months.
You can easily navigate the standard dimensions: usually the facades are made 2 mm smaller than the cabinet itself on each side. Therefore, for a standard 600 mm cabinet, a 596 mm façade is used.
The height of the kitchen cabinet also depends on the facade and ranges from 715 to 725 mm for floor cabinets (without legs) and low wall cabinets, and 915-925 mm for high wall cabinets.
Standard front sizes for kitchen cabinets
Types of facades
Since facades serve mainly a decorative function, the choice is huge; they differ in appearance and material.
- Facades made of laminated MDF. This is a pressed material, more moisture-resistant and dense compared to chipboard. Most often, the surface is laminated to look like wood. But no matter how strong the film is, over time it can come off at the edges and crack. The main advantage of this material is its low price and fast production.
MDF facades
- In addition to standard blank facades, there are also options with figured cutouts for stained glass. The glass is attached to the cover on the reverse side.
- Softforming - such facades are similar to ordinary MDF, but have a characteristic two-color layout with relief on both sides. They can only be used in dry rooms, bedrooms or living rooms.
Softforming
- Postforming – even higher quality and durable products. Thin plastic at the edges is wrapped 90° or 180°, thereby eliminating unnecessary seams at the corners. Chipboard or MDF boards are used as the base. Typically, postforming is done in a strict form, without unnecessary pretentious decorative elements.
Postforming
- Plastic facades are of high quality, but expensive. They consist of a base (chipboard/MDF) lined on both sides with thick plastic. They always have a strict design and a flat surface, glossy or matte. The edges of the slab are sometimes protected with ABS edges or aluminum profiles. Super-glossy acrylic plastic has been especially popular lately.
Plastic facades in aluminum profile
- Facades made of wood and veneer are suitable for lovers of natural materials, but they are expensive. In addition, there is a long debate about environmental friendliness: there is an opinion that there is so much varnish and impregnation that there is only one name left for the tree.
Wooden facades
- Painted facades to resemble enamel. They have a significant drawback - the surface is vulnerable to scratches and deformations, and has low chemical resistance. They used to be popular due to their rich color, but with the advent of glossy acrylic plastic, everything changed.
- Aluminum facades with glass are suitable for a high-tech kitchen. They look modern, but are difficult to manufacture and install. Non-standard fittings are used for their fastening.