The bottom valve appeared on the domestic market of plumbing equipment relatively recently. Although at first it was perceived with distrust, it turned out that the device is quite convenient, has a pleasant appearance and can significantly save water consumption.
What it is?
The bottom valve in faucets is a design that serves to block the hole at the bottom of the sink if you need to draw a certain amount of water into it. Abroad, the issue of water consumption is quite acute, so people are accustomed to using this resource sparingly, and the bottom valve is exactly the device that can help with this. It is a more reliable option than plastic and rubber plugs, which often fail and wear out quickly when used.
A simple device is mounted at the bottom of the washbasin , in its drain hole and, if necessary, closes the pipe connecting to the water supply. At the same time, a regular faucet with two valves is installed that regulates cold and hot water.
Push Open System
Less common valves are Push Open. Their main disadvantage is that to open the drain hole you must manually operate the valve, that is, wet your hand. But such a valve is installed quite quickly and is much easier to maintain.
It is also used for baths and bidets.
This type of sink set, like a bottom valve, began to appear in our apartments quite recently, so not many people know about it. However, it is becoming more and more popular in our country. Next, we will look at the convenience of this design and how to install it on the sink.
Device and purpose
A drain valve is a plug designed to seal the drain hole at the bottom of a sink, vanity, or bathtub. Previously, its role was played by rubber plugs, but today the process of retaining and draining water has been automated and made more convenient. The valves owe their appearance to the residents of Great Britain, who are seriously concerned about the problem of saving water and historically do not use mixers. Their washbasins and bathtubs always had 2 separate taps for hot and cold water, which was mixed directly in the sinks or bathtub.
Over time, the rubber plug was modified and it was called the bottom valve in the mixer, although the device is more related to a siphon than a mixer, without in any way affecting the supply of tap water to the consumer. But due to the fact that the valve often comes complete with the mixer and is connected to it by a system of levers, it is customary to mention it in connection with the mixer.
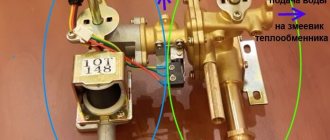
Structurally, the bottom valve is made in the form of a plug, driven by a lever installed on the back of the mixer. The device is also equipped with a spoke that connects the plug plug with the mixing lever, and a threaded connection designed to connect a drain pipe or siphon. To close the plug, just press the lever with one finger, and the flow of water into the sewer system will stop. This will allow you to rinse washed dishes in the sink, wash small items, or place aquarium fish there while cleaning the aquarium.
Summarizing
At first glance, unnecessary devices for bathtubs, showers or sinks can actually be irreplaceable. Providing comfort, they instantly become design elements and create a calm atmosphere. And the practical use of such innovations as, for example, the bottom valve, will expand as we get used to the European “thing.” Because while in Europe people are economical, in the Russian Federation they are creative.
Any theory must be supported by action, and the video in this article can become a practical guide for you on installing a foot valve.
Pros and cons of using a valve
The use of new hydraulic locking devices has several advantages.
- Economic benefit . Due to rising utility tariffs, many had to think about cutting costs. The cost of devices ranges from 500-2000 rubles, depending on the model and manufacturer. It's a small price to pay to reduce bill amounts.
- Easy to use . The valve is operated with one finger. No effort is required to lower or raise it. This is accessible even to children.
- Ergonomic shape . The device is convenient and easy to clean.
- Beautiful design . A neat metal or ceramic lid looks much nicer than a hole in the sink. It also wins in comparison with the usual plastic stopper.
- Reliable fastening . Traditional bathtub and sink plugs are tied to plumbing fixtures using fishing line, which can break at any time. Metal chains improve the situation somewhat, but they are also not entirely reliable, and they also make noise when used.
- Odor protection . Unpleasant odors in the bathroom are not always the fault of the users, and cleaning does not eliminate them.
It can be difficult to deal with the stench, but it is necessary, because sewer gases contain substances hazardous to health - hydrogen sulfide, ammonia. By plugging the drain, you can simply get rid of the problem.
Bottom plugs have no serious disadvantages, but a couple of nuances are worth considering. It will take time to get used to the peculiarities of using the mechanism: you need to monitor the water level when filling the sink.
Design can play a determining role when purchasing plumbing fixtures. Click-clack system models can be selected by style and color
There are also irritating moments in the use of spring mechanisms - putting your hand in dirty, too hot or cold water. And with lever ones, it’s inconvenient to clean the parts located under the sink and behind the mixer.
Design
The design of the bottom valves is not very diverse. Most of the product is hidden; only one element remains visible - a round metal cap. Since the drain hole is always round, the bottom valve covers are almost always round in shape. Although sometimes you can find designer products with unusual lid shapes. The most significant way the models may differ is in the color of the coating. The bottom valve included with the mixer will have a coating identical to the mixer. If you purchase the faucet and valve separately, it is better to opt for a standard chrome finish. You will have to look for a bottom valve in some other color option - 90% of all models are available in chrome.
Operational problems
Like any plumbing fixture, a mixer with the ability to switch to a shower head has its own service life. A common problem that homeowners face during operation is dripping faucets. Knowing what the mixer consists of, you can fix the leak yourself and extend the life of the equipment. The most common causes of leakage are:
- Ball mechanism or cartridge clogged. Due to the poor quality of tap water, the insides of the faucet often become clogged. This causes the mechanism responsible for mixing water to fail. You can fix this problem by cleaning or replacing the cartridge.
- Abrasion of gaskets. Due to constant friction when turning the tap or control knobs, the sealing gaskets gradually wear out and cease to perform their intended functions. Replacing the gaskets solves this problem.
- Changing the position of the spool mechanism. If the screws securing the spool become loose, it can change its position in space. Because of this, the shower switch may leak. To fix this damage, you need to tighten the screws and adjust the spool.
By what criteria are plugs selected?
First of all, you should decide on the price. You need to understand well what the buyer gets for his money - quality of materials and workmanship, design or additional convenience.
An important selection criterion is the quality of the metal and threaded connection. To understand how reliable the chosen model is, you need to make sure of the strength of the material. It is advisable to check how the plug is assembled and disassembled
Let's consider several design features on which the price depends:
- presence of overflow;
- type of control;
- design;
- brand.
The model should be selected based on the type of sink. If it does not provide for the possibility of removing excess water, install a bottom valve without overflow. An option is to replace the siphon with a more practical one.
As for the management mechanism, you need to clearly define your goals. If the sink holds water for hand washing, it is unlikely to be too dirty after use. There will be no problems with lowering your hand to the spring valve.
But if you plan to wash dirty shoes or greasy objects, it is better to give in to natural disgust and buy a lever device.
The design affects the cost of the product. Taking into account the range of prices, the overpayment for a beautiful design of the bottom valve is not that great. Therefore, you should not deny yourself the pleasure of putting a beautiful plug on the sink
The role of the brand is difficult to overestimate when choosing fittings. Brand reputation is not only advertising, but also an indicator of the real quality of goods. Before purchasing, it is advisable to read user reviews and take into account their complaints about different manufacturers.
The bottom shut-off valve is a small part, but it can cause unpleasant moments if it quickly fails. It’s better to pay a couple of hundred rubles more and buy a reliable, beautiful plug that will last for several years without breaking.
How to choose?
Different design options are suitable for specific needs. It all depends on where the foot valve is needed. If it is required for a shower tray or bathtub, then it is preferable to choose a mechanical model. It is possible to purchase the device complete with a siphon or separately.
For sinks used for washing, a set with a factory-made automatic valve is suitable; such equipment is also available for bidets. When purchasing a faucet and valve separately, you can opt for models with a chrome finish; this combination will be optimal.
The main criteria to be guided by:
- quality of the locking system, lever or mechanical;
- device for overflow (its presence or absence);
- aesthetics of appearance;
- product manufacturing company.
By the way, almost all these nuances affect the cost of the design. Of course, the most important thing is high quality and durability, which is why such equipment is chosen only from trusted manufacturers. As a rule, this means a high degree of tightness, immunity of parts to the aggressive effects of hot water and the salts it contains.
Any product of this type must have a quality certificate and other important documentation that you need to familiarize yourself with. In case of any breakdown within the specified period, the device can be replaced thanks to the warranty card.
The bottom valve is a functional accessory that helps make water consumption more economical and is easy to use, and thanks to the instructions, you can do the installation yourself.
Safety valve: operating principle and types How to strengthen the foundation of a wooden house? Warm floor ensto Three-way valve How to strengthen the foundation of a brick house? What color should I paint the gable of my house?
DIY installation of a valve on a sink
After purchasing such a product, you should immediately install it in the drain to evaluate the convenience and savings. This can be done in a small amount of time alone.
NOTE. Before you start installing the bottom valve on the sink with your own hands, you need to pay attention to the fact that the tools mainly used in the work have sharp surfaces
which can easily damage the ceramic base of the sink. Therefore, the best option is to use equipment with special jaws or without sharp teeth. You can also use conventional devices, but then you need to place gaskets on the surface of the sink itself (cardboard or metal).
The sequence of actions should be something like this:
- The lever with which the drain will be adjusted, as well as the hoses that come from the mixer, are placed in the lower hole. In this case, you can glue the faucet to the sink using sealant so that it fits securely into the hole.
IMPORTANT. It happens that bottom valves intended for installation on a sink are supplied not with soft, but with hard tubes
In this case, they will need to be bent manually to give the desired shape. It is not advisable to trim the tubes because metal filings (shavings) often get into the faucet mechanism itself, making it difficult to move it around. Therefore, if you decide to trim the pipes, you must rinse all internal surfaces with a strong stream of water for 3-5 minutes in all directions.
- Next, the body itself is mounted on the sink using a nut. There must be rubber gaskets between the body and the sink on both sides (usually they are included in the kit).
- After this, the hoses are connected to the hot and cold water pipes, respectively. Again, all seats are accompanied by spacers on both sides.
IMPORTANT. It should be taken into account that the pipes can be longer and be bent in an arc (U-shaped bend). However, zigzag (S-shaped) bends are not allowed. The fact is that in this case, the water pressure on the internal surfaces of the pipes will be uneven, as a result of which they will wear out much faster (they can leak within a year if they are used frequently in this condition).
A water seal (bottle or tubular siphon) is placed in the drain, and the valve spokes are folded into the shape of an equilateral cross. To create a rigid structure, they are secured with a self-tapping screw in a cross-shaped form made of plastic.
The ends of the spokes are connected according to the scheme: with a lever on one side and with a valve loop on the other. Thus. vertical translational movements will provide a future mechanism for draining water when the lever is pressed.
Next, a siphon and a pipe leading to the sewer are connected to the drain as usual.
VALUABLE ADVICE. Before starting work, be sure to check the system to see how well it is assembled. A sink valve usually requires precise installation into the drain, as it subsequently creates a complete plug for water. If, after passing large volumes of water, even a small leak is detected, the system needs to be rebuilt. First, just tighten all the threaded connections tighter. If this measure did not eliminate the leakage, then... There were some significant errors in the installation, and the work needs to be done again.
The bottom valve for the sink can be installed as an additional accessory on a ready-made system. It often happens that it is mounted immediately with the mixer.
Video instructions for installing the bottom valve
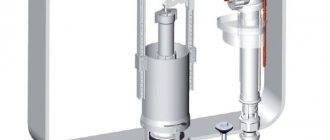
The general assembly diagram along with an approximate drawing is shown in the figure below.
Sinks with overflow
In the case where the bottom valve is already installed in the drain hole, but it does not have an overflow system, you can go the other way and purchase a siphon with an overflow, which is also easy to assemble yourself. Technically, an overflow is a tube made of any material (lately plastic is more often used), with the help of which excess water leaves the sink when the bottom valve is closed. The assembled device is shown in the figure.
A sink with an overflow is distinguished by the fact that 2 pipes go simultaneously to its siphon - 1 directly from the drain hole (a valve is built into it), and the other from the upper drain pipe, which ensures that water does not overflow.
Types of siphons with overflow
A variety of siphons are used in modern plumbing fixtures:
- The bottle type is most often used in the kitchen sink because the shape of the bottle allows it to reliably accumulate large amounts of waste that comes from the kitchen.
Video instructions for assembling a bottle siphon
- tubular type are represented by a curved elbow, in which not only excess components are deposited, but also a constant amount of water is present, which completely blocks the gap in the pipe and thereby blocks the flow of sewer odors into the apartment.
- a corrugated siphon is convenient to use when installing drains in hard-to-reach places; a classic example is a drain under a bathtub, which can also use a bottom valve.
Each of the presented types of siphons has its own advantages and disadvantages. For example, a corrugated siphon is cheap, and the overflow pipe can be turned in almost any direction. The bottle type deposits waste well at its bottom, and the pipe type reliably locks odors from the pipe.
When choosing a material, it should be taken into account that plastic siphons with overflow have several advantages over classic metal products:
- they are not susceptible to corrosion;
- they are very easy to assemble according to the instructions; You don’t need to have plumbing skills for this;
- plastic is a chemically inert material, therefore it does not support rotting processes on its surface;
- since the surface of the plastic is smooth and does not become rougher over time, traces of fat and mechanical impurities do not get stuck on the walls of the pipe;
- It is also easier to clean plastic pipes from blockages and their internal surfaces than metal ones.
Some types of siphons with overflows are shown in the figure below.
NOTE. When choosing a siphon, you should first of all take into account the dimensions of the sewer pipe and the sink itself. You must make sure that it contains a hole for the overflow pipe, and also carefully measure the diameter of its drain and the parameters of the drain pipes.
Leak check and maintenance
The serviceability of the equipment is checked step by step. After turning on the water supply, you need to make sure that there are no leaks at the joints, as well as in the design of the mixer itself. If water leaks out, additionally use a special fluoroplastic tape “Fum” for the threads, and the nuts should also be tightened.
To check the tightness of the siphon, unscrew the entire tap. At the same time, you should make sure that the valve is working properly. To do this, open and close the plug 2-3 times, fill and flush water into the sink. Carrying out such a check is a necessary condition for the further, uninterrupted operation of the system. It wouldn’t hurt to check the strength and reliability of hoses and pipes even before installing the mixer and valve.
Sources:
- https://stroy-podskazka.ru/vannaya/smesiteli/donnyj-klapan/
- https://dekoriko.ru/vannaya/smesiteli/donnyj-klapan/
- https://sovet-ingenera.com/santeh/rakovina/donnyj-klapan.html
- https://oboiman.ru/inside/donnyj-klapan-v-smesitele-cto-eto-takoe-i-dla-cego-nuzen-vybiraem-kran-dla-umyvalnika.html
- https://OmShantiDom.ru/montazh-i-remont/donnyj-klapan-v-smesitele-chto-eto.html
- https://www.tproekt.com/donnyj-klapan-preimusestva-montaz/
- https://101studio.ru/truby-dlya-otopleniya/ustrojstvo-donnogo-klapana-dlya-rakoviny.html
- 1
Why is lapping needed?
Any internal combustion engine has intake and exhaust valves through which the fuel-air mixture is drawn in and combustion products are discharged. Valve lapping is a technological process that allows you to ensure a perfect fit of the valve disc to its seat, which is called the seat. As a result, compression in the cylinders increases, the engine operates in nominal mode, delivering maximum efficiency.
If you do not lap the valve in time, part of the energy generated during fuel combustion is lost, escaping through the closed valve. Fuel consumption increases, engine power decreases, and hot gases lead to burnout of the valves. When the intake valve depressurizes, it constantly leaks the fuel-air mixture, which upsets the pressure balance in the cylinders, leading to uneven engine operation and accelerated wear.