- April 25, 2020
- Electricity
- Marina Lobacheva
LED strip is an ideal option for creating lighting in the kitchen. It is attached to cabinets or other parts of the kitchen unit. With its help, you can not only illuminate the work or dining area, but also improve the appearance of the entire room.
The installation process can be done by yourself, as it is very easy to figure out how to attach the LED strip to the kitchen set. Various methods can be used for this, but it is advisable to take into account the advice of professionals so as not to spoil expensive materials.
Concept and characteristics of LED strip
It is represented by a special tape, which is attached in different ways to different parts of the kitchen set, and is available in different lengths and colors. It consists of LEDs, represented by light-emitting diodes. They are semiconductor elements that emit light when electrical current is applied. The intensity of such radiation depends on the chemical composition with which the diode is filled.
The LED strip is connected using a stabilizer. If you connect directly, it may cause overheating and damage to the product. Lighting a kitchen set with an LED strip can significantly simplify the process of using the set, as well as improve the appearance of the entire room. Often the lighting is concentrated on an apron made of matte materials. This allows you to get soft and pleasant lighting.
The LED strip is made of a plastic base, which is equipped with a stabilizing load resistor. It is on this that diodes are applied that emit light.
Features of use
Before attaching an LED strip to a kitchen unit, it is recommended to study its characteristics. These include positive qualities:
- room owners can independently adjust the intensity and even color of lighting;
- the tape can be used to illuminate useful areas in the kitchen or as decoration;
- the strips differ in the number of LEDs and their colors, brightness and direction of light;
- Ribbons are available in multi-colored or plain colors;
- Some tapes are even equipped with a remote control, which greatly simplifies the process of using them, since you can remotely change the brightness and other parameters.
Anyone can figure out how to attach an LED strip to a kitchen unit, so you don’t have to use the help of professional installers. This allows you to save a large amount.
Benefits of use
Fixing the LED strip on different parts of the kitchen unit has some undeniable advantages. These include:
- long product life;
- high reliability of LED strip;
- absence of hazardous components;
- low electricity consumption;
- the luminous flux utilization rate is considered very high, as it is close to 100%;
- the LED strip is small in size, so it can be hidden in different niches or recesses, which prevents deterioration in the appearance of the room;
- the elements are completely safe to use;
- they are resistant to numerous mechanical influences;
- installation and dismantling are simple actions that can be easily accomplished on your own;
- The structure of the tape is considered simple, since there is no diffuser, reflector or lens.
Usually the tape is fixed directly above the work area, which simplifies the cooking procedure. Often, only lighting is used at all, so there is no need to turn on the central chandelier.
Where is it installed?
The connection of the LED strip is carried out after the formation of a special plan, which shows where its main parts need to be glued. Typically, a strip with LEDs is attached to the following elements of the kitchen set:
- under wall cabinets attached to the wall of the room, which allows you to direct light directly to the work area, which is used for cooking, washing food and other similar activities;
- in the top drawers, which makes it easy to examine their contents;
- in plinths, since they are usually represented by darkened areas of the structure.
If you do not decide in advance on the location of the lighting, this may negatively affect the operation of the entire room. Often it is necessary to completely dismantle some parts of the kitchen unit.
How to attach
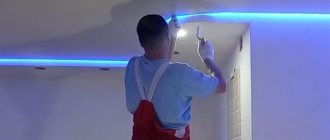
Before attaching the LED strip, the first thing you need to do is mark the installation site. Regardless of the room, along the perimeter of the ceiling in the living room or along the length of the cabinets in the kitchen, a straight line is drawn with a pencil.
Without a drawn line, you will simply stick the tape crookedly, and believe me, it will be visible and not very beautiful!
Fastening is carried out in two common ways:
- gluing the tape itself to the adhesive base;
- installation in an LED profile, which is also attached with glue or screws, dowels, depending on the base.
The first method will be an excellent solution for rooms with normal humidity and a straight, non-rough surface. Otherwise, over time it will peel off and fall off.
Some craftsmen add expensive, high-quality glue to the base before installation. This approach has one drawback - the tape cannot be dismantled later without damaging it.
During installation, do not peel off all the protection of the adhesive base at once; this should be done gradually, as you fasten it in place.
The second method is considered more reliable and safe, but at the same time labor-intensive and costly. It is worth noting that when installed in a profile, you can use diffusers; they allow you to get softer light.
After applying the markings and choosing the installation method, you need to decide on the location of the LED strip power supply (the driver is needed to power the entire circuit with electric current). A place in a niche or closet is best.
If possible, try to place the driver so that air circulates around it, because... When working, it heats up and generates heat.
Warm air must be removed, this will reduce the operating temperature of the power supply and extend its service life.
Once you have decided on a location for the power supply, proceed to installation. The LED strip is attached to the profile with glue and covered with a diffuser.
During the process you will have to cut and join the tape. There are no pitfalls in this matter, but there are still some things you need to know.
We have already talked about how to properly cut an LED strip; you can read about it here. In places where you need to connect, use connectors or soldering.
Expert opinion
Mikhailova Maria Vasilievna
Furniture store manager. Knows everything about comfort and interior design
Soldering will be preferable for aggressive environments (streets), because... less susceptible to oxidation.
Afterwards all that remains is to connect the driver and the tape with a cable.
The power cable that will connect the tape must be selected based on the driver parameters; it must withstand the consumed load. Be sure to take this condition into account.
It is advisable to attach the connecting cable to the wall in a plastic box that matches the color of the walls. The ideal fastening approach is to groove the wall, lay the cable inside and putty. If this is not possible, then use a plastic box.
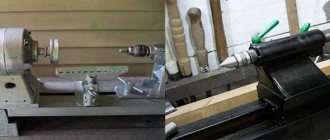
Preparation for installation
If you plan to install the LED strip in the kitchen with your own hands, then initially preparatory work is carried out. To do this, purchase the necessary materials and direct tape, which will be used to create the backlight. The following elements are being prepared for the planned work:
- LED strip of suitable power;
- electrical cable, its cross-section should be 0.74 mm;
- transformer;
- dimmer, sold together with the control panel;
- electric soldering iron;
- sharp scissors;
- material intended for soldering and rosin;
- Double-sided tape;
- electrical tape, which can be replaced with a thermal tube and a hair dryer;
- aluminum profile or PVC corner, which is intended for attaching the tape;
- electric drill;
- brackets for fixation.
The power of the LED strip for a kitchen set is chosen by the direct users, but usually 12 W is used. Installation can be done in different ways.
Methods for installing lighting on the ceiling
The most common place to install LED strips is suspended ceilings (especially plasterboard). This product can be installed on the ceiling in the following ways:
Note! The methods for attaching an LED strip to the ceiling are similar to placing it on the wall (for example, in a niche in a partition or wall).
- creating hidden lighting by installing LED in a box;
- placement of the light source on a special profile;
- installation of the product on the ceiling plinth.
The most common way to create hidden lighting is using a box. In this case, you need to create a box with a hidden cornice from drywall.
Hidden LED lighting in a plasterboard box
This is a rather complicated implementation method, as it involves creating a box around the entire perimeter of the backlight. In addition to the box, the LED strip can be installed on a profile, which today can differ both in the material from which it was made and in type. The most popular is the aluminum profile. It is best to choose when installing in the kitchen.
Profiles for LED strip
But a plastic profile can also be used here. This profile is suitable for the bedroom and living room. Modern models, which have increased resistance to temperature changes and moisture, are perfect for installation in the kitchen. Profiles for LED strip come in three types:
- corner. Used to create ceiling lighting around the perimeter of rooms. With such a profile, you can create an unusual illumination of the ceiling surface, even if there are various figures on it;
- mortise More relevant for furniture lighting. They are often used in the kitchen to illuminate the work surface;
- built-in When installed, it looks three-dimensional, which allows you to play with it in the interior of the premises in a variety of ways.
Another rather original way to attach an LED strip to the ceiling is to install a ceiling plinth. The main advantage of this installation method is the simplicity of the work, on which you will spend a minimum of effort and time. Here you just need to install the plinth at a distance of 8-10 cm from the ceiling.
Ceiling plinth for LED strip
Once the installation method (box, profile or plinth) has been selected and implemented, you can begin installing the light source itself.
Using tape
The LED strip is connected to the network using a transformer and stabilizer, but its fixation can be done using various methods. Often, ordinary double-sided tape is used for these purposes. The protective layer is removed from one side, after which the product is glued to different parts of the kitchen unit where it is planned to create lighting.
After this, the second layer is removed, to which a direct tape is applied, which is pre-cut into the required sections. The cutting procedure is performed only along special dotted lines, which are applied by the manufacturer.
In order not to use separate tape, choose a self-adhesive 220V LED strip. On the reverse side it is already equipped with a special adhesive base. First, the protective strip is removed, after which the tape is applied to the necessary elements of the headset. It is allowed to work on both flat and rough surfaces.
The tape is a very flexible element, so it can stick to curved and uneven surfaces. To increase adhesion, additional glue or paint is sometimes used. This method allows you to attach the tape, but it will not be possible to change its location in the future.
Sticker for uneven surfaces
An uneven surface is a capacious and complex concept. If we are talking about a convex or concave support, then the flexibility of the LED strip is quite enough for gluing to all such areas. Such lighting is successfully installed on arches, plasterboard structures of complex and wavy shapes, and other curved supports.
Gluing the backlight becomes more difficult if the surface irregularities are rough, ridged or porous. In this case, the best option would be to install a backing - a strip of flat material to which the backlight can be firmly glued.
A good option is to install an aluminum profile for gluing the LED strip, which is specially produced for such cases. The profile ensures reliable fastening of the backlight and at the same time acts as a radiator that removes excess heat.
If it is not possible to install intermediate elements, you will have to prepare the surface. To do this, it is primed and a layer of paint or varnish is applied to increase the adhesion strength of the tape or adhesive. Such a process takes time and requires some effort, but it allows you to successfully solve the problem.
What to do if the tape comes off?
Typically, citizens prefer to glue the product, for which they buy a 220V self-adhesive LED strip. But sometimes manufacturers skimp on the adhesive base, so literally after a few days or months the tape begins to peel off. Usually the reason is poor preparation of the base or poor quality tape.
Therefore, before starting work, it is recommended to carry out some preparatory work with the base. It is cleaned of dirt and wiped dry. Next, a degreaser is applied, and the procedure is performed a few minutes before gluing the tape. If you buy inexpensive tape, it is advisable to secure it with your own high-quality double-sided tape.
Application of glue
People who are interested in how to attach an LED strip to a kitchen set often use glue for this purpose. Only superglue is selected, which has high adhesion and dries quickly. It will allow you to securely attach the tape, so it will not fall off under different influences.
It is advisable to use gel glue, as it is easy to use. In this case, there is no need to apply glue to the entire surface of the tape, since it is enough to use a drop of 5 cm of tape. The glue is applied directly to the surface of cabinets or other parts of the kitchen unit.
Buying aluminum tape
People who do not know how to make an LED strip on a kitchen set often choose aluminum tape. This is what sellers in construction stores recommend. This is due to the fact that the material is reliable and durable.
Initially, the tape is glued to the surface of the headset, and then the LED strip is applied. To increase adhesion, some people additionally apply a small amount of superglue. With this installation, aluminum not only acts as a method of fixation, but also plays the role of a heat sink and reflector.
What will be needed for installation?
In addition to the tape itself with the desired color and the required length, you will need:
- Controller. Essentially a control panel. It will turn the backlight on and off, as well as switch colors and adjust brightness. It can be wired or remote. Connects to the power supply.
- Power unit. Plays the role of a transformer that converts the voltage to the required one. The power supply unit is selected depending on the length and power of the tape.
- Connector . Necessary for connecting individual pieces of tape into one. You can assemble the backlight without it, but then you will need to solder the segments.
Installation of aluminum profile
If the choice of LED strip for kitchen lighting falls on products that have high power, then installation of an aluminum profile is required. It can be overhead, mortise or corner.
Initially, with the help of fasteners, an aluminum profile is attached to parts of the kitchen unit. The tape is fixed inside it using tape or glue. Due to the presence of a perfectly flat surface, the product will hold firmly and reliably.
When removing the protective layer, conductive paths are often exposed, so if they are directly applied to the surface of their aluminum, this will lead to a short circuit. Therefore, to prevent such negative consequences, it is recommended to apply a layer of hot-melt adhesive that has insulating properties to the surface of the profile, and you can also make an insulating substrate.
During operation, you can attach a diffuser to the profile, which will soften the light from the backlight. It is fixed with plastic clamps or nylon ties.
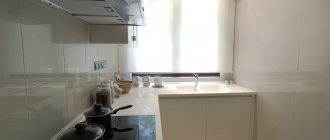
Installing lighting on kitchen units
LED lighting is very common today in the kitchen. Moreover, LEDs are often used for high-quality and complete lighting of the kitchen work area.
LED illumination of the working area
In addition to the work surface of the sink, stove and countertop, LED strips can be used to illuminate kitchen units quite effectively. In the kitchen, lighting can be installed in the following places:
- inside hanging cabinets. In this way, the internal contents of the shelves are illuminated with high quality;
Kitchen cabinet interior lighting
- on top of wall kitchen cabinets or below floor units. In this case, lighting performs only a decorative function;
Headset illumination from below and above
- illumination of drawers for spoons, forks and other necessary things in the kitchen.
Drawer lighting
You can create any type of lighting here in two ways:
- Directly stick the tape equipped with a self-adhesive base onto the surface of the kitchen unit;
Installing tape with self-adhesive base on the surface of the cabinet
- use a mortise or overlay profile. A mortise profile will make the lighting as comfortable as possible for use, but its installation requires a significant investment of time and effort to cut the required hole in the cabinet. The overlay profile is easier to install, but it will stand out a little from the background of the kitchen unit.
Mortise and overlay profile in the kitchen
As you can see, the easiest way to attach the tape in this case is to simply glue it using a self-adhesive surface. All stages of mounting this product will be similar to the previously described installation on the ceiling.
What common mistakes are made?
If you do not understand how the LED strip is attached to the kitchen set, you can make many serious mistakes. These include:
- gluing high-power tape directly to the walls of cabinets without using a profile, which leads to the product falling off, and also the LEDs quickly fail;
- using a construction stapler, with which the tape is attached to a surface made of wood or drywall, but if you choose the wrong place for fastening, this leads to damage to the LEDs;
- gluing open LEDs directly to an aluminum profile, which leads to their rapid breakage;
- the use of a plastic profile, which does not provide the desired cooling effect, so you need to use only materials specifically designed for this work;
- the use of hot-melt adhesive, which when heated emits a harmful and unpleasant odor, and it can also lead to overheating of the LEDs.
Therefore, the choice of LED strip for kitchen lighting, as well as additional materials, should be done with the participation of professionals. How durable, safe and attractive the lighting will be depends on the correct choice of elements and the execution of the work.
How to beautifully illuminate windows and curtains
Window lighting with LED strip is now not only the prerogative of public institutions. You've probably noticed glowing windows in apartment buildings, especially on New Year's Eve. You can create such a fabulous atmosphere with your own hands. Choose RGB strips, in this case you will be able to enjoy the original multi-color glow, changing in dynamics, both while in the room and passing by your windows.
Another option is to illuminate the curtains with LED strip. It brings coziness to the room and demonstrates the beauty of curtains and tulle, thanks to the play of light. It is necessary to correctly position the light source to achieve the best effect. The lighting of the cornice looks good. It’s even more interesting to place the LED strip in the plasterboard recess where the curtain is attached. Then people in the room will only see how the light magically flows across the fabric, without focusing on the source.
An option for illuminating window curtains with an LED strip placed on the cornice.
Where to hide the tape?
In order for the lighting to be beautiful and not spoil the appearance of the room, it is advisable to fix it in such a way that it is hidden. It can be hidden in different places:
- in ceiling niches;
- in recesses or niches on the wall;
- behind the ceiling plinth;
- fastening to the bottom or side of a wall cabinet;
- inside the kitchen unit.
Properly placed and correctly attached LED strip kitchen lighting looks bright and attractive. At the same time, the process of cooking or finding the necessary utensils and products is greatly simplified.
Possible installation locations
Installation can be done in a variety of locations. The main requirement is the ability to connect to an alternating current source. However, if this is a 220 Volt LED strip, then a network with an alternating voltage of 220 Volts is sufficient.
We list the main installation locations:
- in the apartment (on the ceiling, in the bathroom, in the kitchen, etc.),
- in the house (same places, plus outside, garage, bathhouse),
- in the car (in the trunk, interior and even in the headlights).
If we consider each place separately, then we can write a whole instruction of a couple of dozen pages. Ideally, one place is one article. Therefore, in this article we will analyze the basic principles of installation, which will be useful in any case. Let's get started