Lifetime
Wiring does not last forever, so you should understand that it will need to be replaced again after a certain amount of time.
Aluminum wiring lasts no more than 20 years, and the service life of copper wiring is twice as long - 40 years. It is important to know! It is for this reason that when renovating a house, it is recommended to replace all aluminum wiring with copper, as it will last much longer
When constructing new buildings, aluminum wiring is no longer used, but is replaced in old ones. Replacing wiring in Khrushchev is mandatory, since these buildings were built more than half a century ago.
Finding the location and dismantling old wiring
To carry out new electrical wiring, you will first need to find and dismantle the old conductive lines. In Khrushchev buildings, the electrical wiring diagram is arranged through technological holes in the panels. In this case, the laying of conductors can be done not only in horizontal and vertical directions, but also at an angle. In most cases, the main part of the ducts runs under the ceiling.
Initially, you will need to find all the junction boxes. They can be plastered, covered with wallpaper or covered with a special plastic casing. In one-room apartments, only one distribution box can be used. If the connection box is plastered, then you will need to tap the walls to find it. A characteristic empty sound will indicate the location of the box.
By assessing the locations of junction boxes, switches and sockets, you can understand how the old wiring is laid, and then begin the dismantling process. To do this, it is enough to pull out the conductive wires from the technological holes. In some cases, cables may become stuck in the plaster mortar. Therefore, you will need to find the place where the plaster is applied and gouge it out with a hammer drill.
Note! All work on searching and dismantling old electrical wiring must begin with relieving the voltage
Cable routing options
Replacing existing electrical wiring with a new one should begin with drawing up a diagram. Replacement of wiring can be either partial or complete. If all wires are to be replaced, a completely new circuit will be needed. It is better to entrust the drawing up of such a diagram to a professional electrician. At the same time, for correct orientation he will need the old circuit.
As a rule, the largest consumer of electricity in an apartment is the kitchen. For an ordinary room, one socket for 5-7 square meters is enough, but for a modern kitchen for the same area you will need 3 sockets. For an electric stove alone, you need a separate socket with a cable whose cross-section is between 4 and 6 millimeters.
The bathroom is another room with special operating conditions. The main distinguishing feature of the bathroom is high humidity. Therefore, sockets here should only be installed through a distribution transformer.
There are several ways to lay electrical cables: under the plaster, on the floor or under the ceiling, in the ceiling. Below we will look at the features of each option.
Laying wires under plaster
The most affordable way to arrange wiring is to lay electrical cables under the plastered surface of the walls or ceiling. For installation, you will need to create holes on the surface where fasteners will be installed. Then you can lay the wires and apply a layer of plaster on top.
The method allows you to direct several lines to each room. Not only lighting devices, but also air conditioning, heating devices, as well as other types of powerful household appliances can be supplied through their own line.
The disadvantage of this option is that plaster is practically not used in panel buildings. As a result, you will have to incur additional costs of money and time for plastering the surface.
Wiring on the floor or ceiling
The wiring can be arranged on the floor if you plan to make a concrete screed on top. The cables are placed in corrugated pipes, which are then filled with concrete. The wires can also be placed in the suspended ceiling.
The difficulty in implementing this method is that the sockets cannot be placed where the wiring is located (ceiling or floor), but will have to be installed on the walls. As a result, you will have to lay a path for the cable to the sockets. This can be done by gating the walls or hiding the electricity transmission line under the plaster.
Another option is to organize open wiring. Most often, wires are placed in plastic boxes or pipes. In this case, it is necessary to lay the wires in places where the likelihood of accidental mechanical damage is minimized. The advantage of the open type of wiring is that this operation can be carried out even when the apartment has been renovated. However, exposed cables are not very suitable for residential premises from an aesthetic point of view. In addition, this is not the best solution from a security point of view.
The best option for replacing electrical wiring in a panel house is to use old cable channels or seams between panels. In this case, you will most likely have to beat off old cement from the edge of the channel to ensure free laying of the cable.
Note! The cable in the channel must be laid without any fixation.
Installation of distribution panel
In order to correctly replace the wiring in a panel Khrushchev building, you need to start by installing a new electrical panel. If in new buildings there is a special niche for them, equipped with a power cable, then in Khrushchev houses there is nothing like that. The panel in old houses is installed using a hinged method anywhere. In Soviet-era apartments, the wire can only be installed by drilling a hole and pulling the cable through it into the room.
The phase arrangement in the apartment panel is as follows: the upper part is the neutral terminals, in the center are the circuit breakers, and the ground is at the bottom. The access cable is connected according to the diagram - blue wire to the neutral terminal, yellow to ground, and white to the upper contact of the machine.
Installation tips from an electrician
When performing work, you need to take into account the features of old-style houses, as well as installation technology, in order to avoid mistakes. Follow these guidelines:
- Be careful when gating walls and wiring areas adjacent to neighbors, as they may be adjacent to neighbors’ wiring and there is a risk of damaging it;
- Dismantling of old cables is carried out after de-energizing the facility from the switchboard in the entrance;
- Be careful when making twists and terminal connections; an insufficiently tightened bolt or poor twist will heat up when you turn on electrical appliances and can cause a short circuit;
- For equipment with high consumption (electric stove, heating boiler, boiler), you need to lay a separate line from the panel;
- If the cable was measured incorrectly and there was not enough length during installation, it is better to cut a new piece and not extend the old one. Additional twists will oxidize and heat up;
- For lighting and household sockets, it is better to use two separate lines;
- Use a three-core cable with grounding, even if there is no grounding in the house, it is possible to install one after a major renovation of the electrical network, and you can easily connect to it.
The main recommendation is that if you do not know how to work with electricity correctly, it is better to contact a specialist who will do the work quickly, efficiently and inexpensively. Phone: +7(920) 033-22-88
Electric meter in a 2-room Khrushchev house (house from the 1960s)
Masters online: 649 Orders per week: 1,546 Offers per day: 1,112
It’s because of advisors like this that fires happen (25 A), if you don’t understand electricity, then it’s better to remain silent. People can take this seriously.
It’s usually because of those who try to shoot against the background of the experience of others, without understanding anything themselves, that a showdown results.
Dear Alexander, I have 40 years of experience in electrical installation work and the current 4th group is over 1000V, and you, most likely, haven’t even seen the PUE, that’s why you write things like a 25 A automatic machine in a Khrushchev building with an old one wiring.
Yes, no matter what the wiring is, household sockets are rated for a current of no more than 16 A.
Oleg, apparently you haven’t seen the projects. PS That's it, I have no more strength. Goodbye!
The comrade is obviously guided by the cross-section of the wire.
If the wiring is aluminum, more than 10 years, then do not risk 10-16A
The wiring is definitely more than 10 years old, but it breaks when connecting the load, because the rating should be 25 according to the diagram or because they “messed up” when replacing sockets and switches. Therefore, I would like to know whether all 4 should be of the same denomination or not. Is it really true that no one lives in Khrushchev apartments anymore and there are no power supply circuits for such apartments? The scheme should be typical for those years.
In Khrushchev buildings they installed 2 plugs per phase and 2 at zero, so you only have 2 lines. The plugs should be no more than 16 A, otherwise there is a chance of burning out. If 16 A of the plugs are knocked out, you need to reduce the load, and not increase the rating, but for good reason you need to change aluminum to copper and install automatic machines instead of plugs. The machines can be installed even without replacing the wiring.
You need to start not from what you want, but from the condition of the wires. If you have decrepit aluminum, then 10A is the maximum that can be installed. And preferably with characteristic B.
Thanks for the advice, Dmitry Evgenievich! The essence of the question was that there were already traffic jam machines there, and I was trying to find out their probable denominations + hoped that someone would have a diagram. And you are talking about automatic switches, which are not there.
There were traffic jams. There are no automatic machines now. What is? And it’s no good to forget about differential protection. The scheme has nothing to do with it, you need to set it with the denominations from what you have.
Thank you I don’t plan a global repair with replacement of wiring, I just want to restore the traffic jams. The smartest thing to do would be to call a specialist who will sort everything out.
What electrical protection elements does any Khrushchev building need?
A particularly pressing issue for Khrushchev houses is grounding. Because in apartments of this type a two-wire electrical network, also called the TN-C system, has always been installed. But people now use much more electrical appliances. As a result, the risk of electric shock increases significantly.
However, there is one significant difficulty here, because changing the power supply circuits of houses on your own is generally strictly prohibited. Because of this, you often have to simply wait until the appropriate re-equipment is carried out by the management or supply company. To speed up the resolution of this issue, you can contact these organizations with a collective statement from the residents of the house.
While your Khrushchev-era building does not have grounding, you can install an RCD in the panel to provide protection from electrical shock in the event of a current leak.
We hope that thanks to the information presented in this article, you already have an idea of how to replace old wiring in a Khrushchev-era building. Moreover, you can do it with your own hands. However, if you do not have experience in electrical installation work, we recommend that you not take risks and contact a professional electrician who will do everything quite competently and safely for you.
Electrical wiring in the kitchen: design and installation rules
The kitchen is the main consumer of electricity in the apartment. Kitchen wiring provides power to household appliances: hoods, refrigerators, microwaves, bread makers, juicers. Ten years ago, kitchen life was managed with a minimum number of mechanized assistants. But modern kitchens are hard to imagine without electrical appliances. High-quality electrical wiring in the kitchen not only ensures their operation, but also prevents short circuits, wire fires, and damage to electrical appliances. How is reliable electrical wiring designed? And what needs to be taken into account when installing electrical elements - wires, sockets, switches?
Stages of work
Replacing electrical wiring with your own hands requires strictly following the stages of work, as well as following all the recommendations of experienced electricians. Only in this case can you not only get a decent result of the work, but also carry out the wiring so that it does not cause a fire.
Temporary structure
When replacing old electrical wiring in a home, the electrical system in the home must be turned off. But it is needed for the operation of electrical appliances. In this case, you should make a temporary repair shed. It consists of a structure made of plastic or wooden beams, an extension cord and a socket. This design is connected to an external meter to completely de-energize an apartment or house.
Removing old wiring
Dismantling of electrical wiring is carried out only after the electricity in the apartment is completely turned off. It is better to use a multimeter to check. Dismantling begins from distribution boxes installed under the ceiling. It is necessary to open the box, find and remove the input wire. If its removal is not possible, it is recommended to trim it as far as possible and isolate it. The remaining wires are also dismantled using this principle.
Wall chipping
Walls can be chipped horizontally and vertically. If the work is carried out carelessly and the grooves turn out crooked, this can lead to future emergency situations.
It is best to determine the boundaries of the grooves using a hammer drill, and then manually align them with a chisel. In those places where it is necessary to make an angle, it is necessary to make an oblique cut and knock out a hole. This is best done with a grinder. The absence of corners will allow the cable to lie flat and avoid bends that lead to breakage and damage to the wire.
To create holes in brick walls into which socket boxes will be inserted, you can use a crown placed on a hammer drill. For concrete walls, such a tool will be ineffective, so it is best to use a chisel.
Holes for socket boxes must be made in places where they will be convenient for use. Their locations should be determined at the stage of creating the drawing. Sockets for air conditioners, hoods and other stationary appliances should be placed as close as possible to the place where the electrical appliance will be installed in order to hide the cord.
Wiring
Before laying wires, it is necessary to prepare sections of the required size, as well as corrugations for them. After which the wires should be tightened into corrugations and installed in pre-prepared grooves. The ends of the wires must be inserted into the socket boxes.
After laying the wires, the socket boxes and grooves must be covered with solution. Then insert the wire into the electrical panel and lubricate it with thermal conductive paste. Connections must be strong and reliable. The shield must be attached to the wall using dowels.
The temporary shelter should be turned off, the wires from the meter and grounding should be routed into the panel. After which it is necessary to isolate the wire from the meter and place it in the electrical panel. The finished structure must be carefully secured, after which the walls can be plastered and further decorative finishing can be done.
Final stage
Replacing old electrical wiring ends with installing socket boxes, sockets, switches and lighting fixtures.
An important step in replacing electrical wiring is to check each branch of wires using a short circuit tester. To do this, you need to turn on the electricity, then apply current and use the indicator to find phase and zero. This will make it possible to lead the necessary wires to the appropriate terminals.
After inserting the wires into the desired terminals, it is recommended to check them again for a short circuit. If there are no problems, you can turn on the main circuit breaker and supply electricity to your house or apartment. All that remains is to check the operation of all sockets, lamps and switches.
And only after this can you begin to finish the walls and other repair work. Otherwise, it may be necessary to re-drill the walls to identify places where the wires are poorly connected.
Electrical circuit in a panel house. Home electrical planning
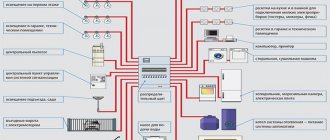
So that during the operation of electronic equipment and connecting it from various electrical points does not lead to constant reinstallation of network elements, so that you do not have to constantly ditch the walls of the apartment, experts recommend starting work on arranging the electrical network with drawing up a power supply diagram. An example of a wiring diagram and connection of electrical equipment can be seen in Figure 1.
Rice. 1. Example of an apartment power supply diagram
Such a drawing or diagram is formed in the “reverse order”: initially, all the lighting equipment and power equipment used are applied to the apartment plan; then, based on power calculations, the wiring diagram, wire cross-section, and protective devices are selected.
Power section
The power part of the electrical network includes powerful equipment used in the apartment: ovens, stoves, heating tanks, air conditioners. To connect them, separate powerful lines are allocated, protected by separate circuit breakers (RCDs). This design method will allow for safer operation of equipment in an apartment and more efficient repair work on electrical wiring networks.
Lighting part
The next block of the apartment's electrical circuit is the lighting part. There are two design options here:
- one group;
- several groups of lighting equipment.
The first type of scheme is used in small rooms equipped with a relatively small number of lighting devices. The second lighting chain method is more common. An example of such a connection is shown in Figure 2.
Rice. 2. Design diagram for several lighting groups in an apartment
If in a room, in addition to lighting elements, there is a need to use power supplies and transformers, it is also recommended to turn them on in a separate electrical circuit with a separate RCD.
Large home appliances
In any apartment, the place where a large number of household appliances are concentrated is the kitchen. Most of them continue to work when a person is not directly using them. This is a refrigerator, electric stove, bread maker, etc. To ensure correct operation of equipment and constant protection of the network from overloads and short circuits, when developing an apartment’s electrical network, experts recommend separating a separate line. Such connections are made by laying electrical wiring with a larger cross-section and installing a high-load RCD.
In which structural elements of Khrushchev can you look for wiring?
Khrushchevka is one of the types of panel houses. Wiring in such houses, as a rule, is laid through special channels that are located inside the panels. Moreover, these channels are not made during construction. They are provided for by the design of the slabs themselves. A typical arrangement of such channels can be seen in the following figure:
If you look closely at the diagram above, you will notice that the arrangement of the channels does not meet modern requirements. That is, there is no question of the currently required verticality and horizontality: some of the canals are arranged obliquely.
But the wiring in the Khrushchev could be laid not only in intra-panel channels. It could be placed, in particular, in beams located under the ceiling. That is, in those protruding structures that sometimes existed at the junction of the walls and the ceiling slab.
However, in addition to wiring, you should also find distribution boxes. Because without them, wiring is almost unthinkable. Some boxes may be open. They protrude slightly above the wall surface and are covered with a plastic cover. But there are also closed boxes, that is, plastered.
If you don’t notice any protruding boxes, you’ll have to look for hidden ones. That is, you will need to remove the wallpaper. Moreover, you will even have to tap the wall along the entire ceiling corner. The presence of a junction box will tell you the typical sound of emptiness. Once the box is found, the plaster hiding it is usually broken open.
A similar search is carried out in the ceiling slab. Because it also has channels for laying wiring.
To make it easier for you to find channels and junction boxes, let us clarify the following points:
- the electrical diagram of apartments is usually determined by the number of rooms;
- each living room has from 2 to 4 sockets (their number is determined by the area of the room) and a lamp;
- if the room is small, that is, if its area does not exceed 10 m2, then there can only be one outlet.
Open way
In this case, the wires go over the walls. But, of course, simply attaching them is not enough - it looks ugly and is extremely unsafe: the wires can overheat, there is a high risk of mechanical damage, and this is fraught with short circuits and fire. You can use a special plinth or boxes.
And if in the case of laying wiring in plaster, the plaster itself serves as an insulating material, then with the open method, “camouflage means” are used - cable channels, corrugated hoses, pipes, special skirting boards or baguettes.
Advantages:
- quick access to all wires, which means easy local repairs;
- the ability to change the layout of points;
- sometimes this option becomes part of the design solution.
Flaws:
Not everyone likes boxes on the walls, and you can’t do without them completely.
Selecting the cross-section of conductors according to the calculated load
First you need to count the total number of consumers and determine their power. By consumer we mean a separate electrical device: light bulb, fan, refrigerator, etc. In order not to miss anything, it is better to draw a floor plan of the apartment and mark on it the locations of household appliances, lighting fixtures and sockets.
Procedure:
- It is necessary to divide all devices according to power consumption in the apartment into 3 categories: lighting, devices up to 2 kW and devices over 2 kW.
- We distribute all consumers along the lines and plot them on the diagram. A separate line means a group of consumers powered through a separate machine. According to the requirements of the PUE, there can be no more than 20 points (light bulbs, sockets, etc.) on one line. It is better to connect devices with high power consumption (electric furnaces, air conditioners, electric boilers, etc.) through separate circuit breakers in the distribution panel.
- We calculate the total power consumption of each category and calculate the current load.
- Select the wire cross-section according to the table.
The current strength is determined by the formula:
I=(P/U) x cosφ, where
I – current, AU – voltage, BP – power consumption, Wcosφ – power factor.
In this case, cosφ can be neglected, since its value in household electrical networks tends to unity. Thus, the formula for determining the current load takes the following form:
I=P/U
Example: let's say we need to determine the current load of an electric stove with a maximum power consumption of 4 kW, which is connected through a separate machine. Household power supply voltage is 220 V. Substituting both values into the formula, we get:
I=4000/220 = 18 (A)
Using the table, we determine: the cross-section of the wire for connecting the electric stove must be at least 1.5 mm².
According to the PUE, the ratio of the wire cross-section to the magnitude of the current loads must correspond to the values given in the table:
Open wiring Cable cross-section Hidden wiring
| Copper | Aluminum | Copper | Aluminum | |||||||||
| Current, A | power, kWt | Current, A | power, kWt | Current, A | power, kWt | Current, A | power, kWt | |||||
| 220 V | 380 V | 220 V | 220 V | 220V | ||||||||
| 11 | 2,4 | — | — | — | — | 0,5 | — | — | — | — | — | — |
| 15 | 3,3 | — | — | — | — | 0,75 | — | — | — | — | — | — |
| 17 | 3,7 | 6,4 | — | — | — | 1,0 | 14 | 3,0 | 5,3 | — | — | — |
| 23 | 5,0 | 8,7 | — | — | — | 1,5 | 15 | 3,3 | 5,7 | — | — | — |
| 26 | 5,7 | 9,8 | 21 | 4,6 | 7,9 | 2,0 | 19 | 4,1 | 7,2 | 14 | 3,0 | 5,3 |
| 30 | 6,6 | 11 | 24 | 5,2 | 9,1 | 2,5 | 21 | 4,6 | 7,9 | 16 | 3,5 | 6,0 |
| 41 | 9,0 | 15 | 32 | 7,0 | 12 | 4,0 | 27 | 5,9 | 10 | 21 | 4,6 | 7,9 |
| 50 | 11 | 19 | 39 | 8,5 | 14 | 6,0 | 34 | 7,4 | 12 | 26 | 5,7 | 9,8 |
| 80 | 17 | 30 | 60 | 13 | 22 | 10 | 50 | 11 | 19 | 38 | 8,3 | 14 |
| 100 | 22 | 38 | 75 | 16 | 28 | 16 | 80 | 17 | 30 | 55 | 12 | 20 |
| 140 | 30 | 53 | 105 | 23 | 39 | 25 | 100 | 22 | 38 | 65 | 14 | 24 |
| 170 | 37 | 64 | 130 | 28 | 49 | 35 | 135 | 29 | 51 | 75 | 16 | 28 |
According to the requirements of the PUE, the rating of each circuit breaker should not exceed 25A. Taking this into account, it is better to power powerful electrical appliances through a separate machine. Below is the electrical diagram of a one-room apartment:
In the example given there are only 4 lines. Its advantage is simplicity. The simpler the circuit, the easier it is to maintain during operation.
Development of a power supply scheme
To draw up a diagram of the planned electrical wiring, it is recommended to use the general plan of the apartment. This will allow you to mark the required locations of sockets, switches and electrical equipment. The following factors need to be considered:
- total load of electrical appliances;
- the presence of a security or fire alarm;
- the need to lay network cable lines.
It is recommended to connect large electricity consumers through a separate outlet. This could be an electric stove, a split system, and so on. It is also better to separate the lighting and socket lines. You can use standard schemes for two-room and three-room apartments.
Operational resource
The electrical wiring of current-carrying conductors in the Khrushchev building definitely needs to change, since these objects were put into operation more than fifty years ago. In those days, aluminum cables with rubber insulation were used for electrical wiring. The operational life of such cable lines is about twenty years.
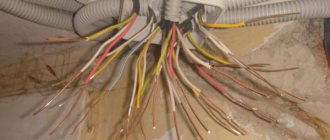
Old aluminum wiring
When independently replacing the electrical wiring in a Khrushchev-era building, it should be taken into account that currently only copper is used for wiring. Copper cable lines have a service life of more than forty years.
Methods for installing wiring in an apartment
It is important to immediately make a reservation that the following options will only be relevant for buildings with walls made of concrete or brick. They are not suitable for wooden houses, so the methods are not universal
The first method will be relevant for those houses where there is not even a layer of plaster on the walls. Then the wiring can be placed directly on the surface of the walls. There are also two methods here, which were already mentioned earlier:
- Place the cables in corrugated plastic pipes if the thickness of the finish allows.
- Simply lay the cables open if they have double or triple insulation.
The second method is encountered most often, because it is suitable for cases when:
- The plaster has already been applied.
- Its layer will not cover the wires and you will have to make grooves directly in the wall.
This is a more difficult and longer path, but most often it turns out to be the only suitable one. In addition to the fact that the grooves have to be made, the wires in them will also need to be carefully fixed - with plaster patches or plastic staples.
*(Dowel staples are especially suitable for ceiling wiring)
To make all the grooves correctly, it is better to make markings according to the diagram directly on the wall, then there will definitely not be any difficulties and there will be a chance to check everything again and correct something.
Now you need to determine how to lay the cables themselves. The lines from the distribution board to each junction box can be laid using the methods described in this table.
| Highway location | Peculiarities |
| Along the upper edge of the wall in a groove or corrugated pipe | Most often used |
| Over the floors until the floor screeds are poured (in plastic pipes) | This is the shortest way. Here, by the way, grooves are not useful either, since when the floor is filled, all the wires will be hidden. For such wiring, sockets built into baseboards are usually needed. By the way, now you can purchase special kits - a special plinth with cable channels, sockets, switches, junction boxes, etc. True, it is not suitable for any finish. |
| Along the ceiling | Here, most likely, you will have to make grooves, however, the consumption of materials will also be economical. Junction boxes can also be placed on the ceiling, but this will hardly be convenient when repairs are required. This method is only relevant when a suspended or suspended ceiling is intended to hide the lines. |
When installing the wiring yourself, only the first option is suitable, and despite the great advantages of the other two, it is no worse than them. It will just require more time, but since the plan to install the wiring with your own hands has reached the strobing stage, the hardest part is already over.
*(Grooves are the penultimate stage on the route of wiring)
Hidden kitchen wiring
Before you do hidden wiring, you will need to do a lot of dirty, dusty and noisy work. In places where switching devices will be installed, holes must be drilled. This is done using a chisel and hammer, or a hammer drill with special attachments for concrete or brick. The socket boxes are fixed into the holes made using plaster or alabaster.
To lay wires, special grooves are cut in the walls, called grooves. There is a special tool for this purpose - a wall chaser. It will be very convenient if you manage to rent such a device, because buying it is expensive. But it is very effective in use.
Firstly, you can adjust the width of the groove being cut, depending on how many wires will be in it and what cross-section. Secondly, many models are equipped with a vacuum cleaner, which allows you to work quietly without polluting the air in the workplace.
In order to quickly and reliably fix the wires in the grooves, use gypsum or alabaster mortar.
Remember that such walled up wires and switching devices cannot be moved from place to place. Therefore, first think about all the pros and cons, and only then make a decision for yourself - what type of wiring to choose for the kitchen.
The video shows a few more nuances regarding kitchen electrical wiring:
At first glance, it may seem to some that doing electrical wiring in the kitchen with your own hands is quite possible. But this is not so, the experience and knowledge of a professional is needed here in order to subsequently avoid fires, fires or electric shock to a person. Contact professional electricians or at least consult with them, and then all electrical appliances in your kitchen will work reliably.
Let's start replacing
Repair temporary shed
First of all, you need to provide power to the tool during repairs. To do this, we first attach a double or triple socket and a 16 A circuit breaker with a piece of 4 sq. mm cable to a board or piece of durable plastic. We also stock up on a long extension cord, enough for all rooms.
Then we de-energize the apartment by unscrewing the plugs or turning off the apartment breaker, manually tapping the dose near the meter, removing it and bringing the wires from the meter outside. We connect a temporary structure to them tightly twisted (twisting during repairs is permissible), carefully insulate the joints, and attach the temporary structure to the wall. We power up the apartment and get to work.
Grooving and socket boxes
The grooves must be straight, horizontal or vertical. Sloping and crooked grooves lead to accidents and injuries. Horizontal grooves lead half a meter below the ceiling.
Walls need to be hammered and drilled using a sawhorse or a stepladder with side supports, such as those used by outdoor advertisers. An ordinary stepladder can tip over due to lateral force, and you will fall down with a heavy, rapidly rotating tool in your hands.
The boundaries of the groove are first drawn with a grinder to a depth of the diameter of the corrugation and the width of the perforator bit, then a groove is knocked out with a chisel. Inside the corners, an oblique cut is made with a grinder, and a hole is knocked out with a chisel so that the bend of the corrugation is smooth.
Holes for socket boxes in brick walls are selected with a crown; in concrete - with a chisel. The crown, once it hits the reinforcement, immediately crumbles all over, and it’s not cheap. The recess for the overhead switch at the meter is also knocked out with a chisel.
Grilling is a very noisy, dusty and dirty job. Therefore, its time must be coordinated with the neighbors. It’s best for the first half of a weekday, when adults are at work and mothers with small children are walking.
Read more about gating walls for electrical wiring and its technique.
Wiring
We measure out the required pieces of cable and corrugation. We tighten the corrugated cable on the floor. Then we place socket boxes in the holes on the alabaster cushion. Then we lay the corrugation to the cable in grooves; We insert the ends of the wires into the socket boxes. Finally, we coat the socket boxes with alabaster to the level of the wall, and grease the grooves with gofor in pieces about half a meter apart.
To complete the laying of the wires, we insert the input ends of the corrugations into the VShch, lubricate them with conductive paste, grab them with a tin clamp on the screw, and connect the screw with a piece of PE wire to the ground terminal of the VShch. We put the VSC in place, mark the mounting holes, drill them, and drive in the dowels.
We turn off the power to the apartment and turn off the temporary shelter. We introduce the wires from the meter and the apartment PE into the overhead switchboard; We connect PE to the main switch housing. We put the VSC in place and secure it. We carefully insulate the wires from the meter and place them in the switchboard housing. It's time to plaster; the apartment is without power.
About wire colors
Zero (neutral, N) is always marked in blue or light blue, the protective wire PE is yellow with a longitudinal green stripe. Phase wires can be white, red, black, brown. Only wires of the same color can be connected to each other. Transition of phase to zero, phase to phase and switching on of the switch in the zero gap are unacceptable.
Preparation for repair
Before you begin directly replacing the wires, you should draw up a detailed drawing of the new route, marking all the elements of the electrical system. It must be developed taking into account the convenient connection of all electrical appliances available on the household.
Tip 1. Remember that equipment manufacturers do not recommend connecting powerful electrical appliances to the network through power strips. Separate sockets must be provided for an electric stove, boiler, air conditioner, etc.
Tip 2. Each room must have at least two cable branches: for lighting fixtures and for sockets.
After drawing up a drawing plan, you can begin purchasing the necessary materials. In addition to the cable, you will need:
- boxes
- switches
- sockets
- rag tape
You should not use system elements that have already been used, since there is no guarantee that they have retained their original performance properties. Saving on small things can lead to problems in the future. A worn-out socket will certainly need replacement sooner or later, but if a short circuit accidentally occurs in it, the new wiring may also burn out.
To change internal electrical networks with your own hands, you will also need a set of tools, namely:
- phase indicator
- hammer drill
- pliers
- screwdrivers
- angle grinder (grinder)
- soldering iron
- terminal blocks
- knife
Having everything you need in hand, you can get to work.
What tools will you need?
Tool for installing electrical wiring
Self-replacement of electrical wiring is carried out using the following tools:
- perforator;
- concrete drill, concrete drill (16-20 mm), core drill (90-100 mm);
- chisel 25-30 mm;
- soldering iron 40 W;
- grinder with a disc for stone;
- screwdrivers;
- pliers;
- side cutters;
- phase indicator;
- tester;
- cord and level;
- flashlight;
- stationery knife;
- putty knife.
Before work, it is important to calculate the number of wires - measure the length from the shield to the connection point, taking into account protrusions, niches and corners.
Wiring replacement steps
The following signs indicate the need for new wiring:
- The walls are pierced by electric current;
- When you turn on several household appliances, the plugs constantly pop out;
- Sockets spark and melt;
- Presence of a specific burning smell.
In addition, the installation of powerful household appliances (boiler, washing machine, dishwasher and others) may also require the installation of separate lines.
Replacement of electrics in “Khrushchev” buildings is carried out in stages.
- Calculation of the cross-section of the electrical cable. To do this, you need to determine the total power consumption of all electrical appliances and equipment, plus a 20-30% reserve.
- Selection and purchase of all electrical wiring elements. Customers can do this themselves or order from specialists. The second option is more preferable, since many craftsmen have personal discounts in construction hypermarkets and specialized stores, and also have a better knowledge of manufacturers.
- Drawing up an up-to-date diagram.
- Complete blackout of the apartment.
- Removing old wiring.
- Additional gating of walls (if necessary), installation of switches, European sockets, distribution boxes, automatic machines.
- Cable laying and alternate connections, according to the drawn up diagram.
- Connection of electric machines.
Redevelopment of an apartment in Khrushchev. Nuances and features.
1.1. There are no load-bearing walls inside the apartment.
Location of load-bearing walls in Khrushchev.
Even when affecting only non-load-bearing partitions, you can break some laws, which we will discuss below. Typically, the load-bearing walls in a Khrushchev building are the enclosing walls of the apartment, all or only some. The only load-bearing structures that can be located inside an apartment in brick houses are beams resting on the external and internal inter-apartment load-bearing walls. On the right in the figure is a typical example of the location of load-bearing walls in a real Khrushchev apartment (load-bearing walls and rigidity diaphragms are marked in green). Many, as we have already mentioned, mistakenly believe that if they do not affect the load-bearing walls, then there is no need to coordinate such a redevelopment. In fact, redevelopment of a Khrushchev-era apartment with any change in the configuration of the partitions entails the obligation to make these changes to the BTI documents for the apartment, and, therefore, requires appropriate approval. Moreover, most of these changes are coordinated by projects carried out by the relevant organizations with permission. You can view the project requirements here. You can read more about the definition of load-bearing walls in Khrushchev-era buildings here. Commentary on the video: The points have changed: It is not possible to combine a gasified kitchen with a living space according to clause 10.16 of Appendix 1 to Moscow Government Decree No. 508 (after the introduction of PPM No. 1335 of 08/19/2020).
1.2. Touching the bathroom.
Redevelopment of Khrushchev. Problem area.
The area highlighted in red in the figure on the left is functionally a corridor, and formally, according to the BTI, it is classified as the area of residential premises. Therefore, if we approach the issue formally, then expanding the bathroom due to this zone is impossible. In this case, it is better to coordinate the redevelopment of the Khrushchev building in two stages. First, install a partition separating room No. 1 and the area marked in red and coordinate the changes according to the “sketch”. After this, the selected zone according to the documents will be unambiguously called a corridor in the explanation. Now it is already possible to carry out and coordinate the expansion of the wet zone due to its area. In this rather cunning way, you can coordinate some other methods of redevelopment. True, now Housing Inspections have begun to request BTI plans for the apartments above and below, so this option is now very difficult to go through.
You can read more about the consolidation and expansion of wet zones here.
1.3. Dismantling the partition between the kitchen and the room.
a) it is prohibited to move or expand the kitchen at the expense of the territory of living rooms in accordance with paragraph 22 of the Decree of the Government of the Russian Federation No. 47 of January 28, 2006
Coordinated redevelopment of a two-room Khrushchev house.
b) it is not allowed to dismantle the partition between the kitchen equipped with a gas stove and the living room in accordance with clause 10.16 and clause 10.17 of Appendix 1 of Decree No. 508 of the Moscow Government. And even create an opening without a door in such a partition.
Nuances of making grooves
It is worth noting that, in accordance with regulations, it is prohibited to groove load-bearing walls and ceilings. But they note that it is not allowed to lay only horizontal grooves. If the groove is drawn vertically, then this is considered acceptable.
Naturally, you shouldn’t get too carried away here, because large vertical grooves can greatly weaken the structure. The groove should be to a depth not exceeding 10mm. The fittings should not be dismantled.
It is possible to secure the wiring in the grooves with the support of dowel clamps. In this case, it will be necessary to drill more small holes in order to install these dowels.
Recommendation: Gating is considered a difficult and noisy operation. To implement this, you must wear eye protection goggles. In this case, the procedure will go much faster if you use a wall chaser, which is equipped with 2 laser discs and a dust suction unit.
In addition to the grooves for the electrical cables, it will be necessary to drill out holes for the socket boxes. The depth of the recesses for these purposes should not exceed 45mm. The diameter can be 80mm or more. This completely depends on the dimensions of the socket itself.
If there is no desire to screed the floor in a panel house, use plaster, or install a ceiling suspension system, then replacing the electrical wiring becomes significantly more complicated. As you know, it is best to hide electrical wiring in the wall.
In this case, the electrical cable must be horizontal. Of course, it is possible to hide electrical wiring in a groove, but only vertically, since horizontal ones are prohibited. What to do with the horizontal gasket, since it is also necessary?
The panel layout helps here. You can take advantage of the gap that forms where the ceiling panels meet the wall. Quite often this place is filled with plaster, cotton wool and even various rags. It is easy to release, clean and use for laying wires.
It is also possible to try to use the previous “routes”. If the old cable is simply plastered in them, then getting it out and cleaning the channel will not be so difficult.
Problems will arise if this channel is filled with concrete mixture. If none of the options is realistic to use, then to change the previous electrical wiring it will be necessary to make open-type wiring.
Danger of using old wiring
Currently, a wide variety of electrical appliances are used in everyday life. Depending on the functionality, it has a specific power level. Old wiring is not designed to withstand heavy loads. When several electrical appliances are turned on at the same time, there is a high probability of electrical wiring ignition.
Electrical panel in an old five-story building
The initial signs of the required replacement of old conductors in Khrushchev include:
- sparking and melting of sockets as a result of connecting devices;
- the appearance of a characteristic smell of burnt insulation in the room;
- when connecting sockets or switches, the ends of the wire break off;
- current leakage through the walls.
Calculation of wiring and selection of apartment power supply
Before changing the electrical wiring in a Khrushchev building, we should perform at least an approximate calculation. This will allow you to correctly select the wire cross-section, the required number and rated parameters of circuit breakers and, of course, the power supply circuit for our apartment.
Electrical wiring calculation
In order to more correctly calculate the rated power of our apartment’s electrical network, it is necessary to draw up a detailed plan of all possible electrical appliances. In this case, you should take into account not only their rated power, but also their location, as well as the connection method.
So:
- First of all, you should divide all the devices in your apartment into powerful ones, whose rated power is equal to or greater than 2 kW, and low-power ones, respectively, less than 2 kW. To power powerful devices, it is better to provide a separate power supply group with its own circuit breaker in the distribution panel.
- Now we should calculate the total power of low-power devices. In this case, the calculation should be performed based on the most unfavorable conditions. That is, in our case it is necessary to take into account the largest number of operating devices at the same time.
- Now, having calculated the rated power of our electrical network, we have to convert it into rated current. To do this, we use the formula: I=P/(U×cosα), where I is our rated current, P is our rated power, U is the rated voltage, and cosα is the power factor. But in our case, cosα is practically equal to unity, so we neglect it, thereby adding additional margin to our wire.
- As a result, we get the following formula: I=P/U
Based on this, knowing that the voltage in our electrical network is 220V, we can calculate the rated current. Having carried out a simple calculation, we find that an electrical appliance with a power of 1000 W consumes a current of 4.55 A.
To further simplify the calculation and give additional margin to our wiring, we accept this value as 5A.
The photo shows the rated currents of wiring of different sections and materials of manufacture
Any electrical wiring in a Khrushchev-era building and its laying pattern largely depend on the type of wire used. After all, it’s no secret that copper wires have a higher throughput, and aluminum wires have less. Therefore, the choice of wire cross-section should be made according to the table below.
Choosing an apartment power plan
Now the electrical wiring diagram in the Khrushchev is selected. This is done based on clause 7.1.18 of the PUE (Electrical Installation Rules), which states that all protection devices in residential premises should not exceed 25A. This point will become the starting point for all further choices.
- So, if the power of all your electrical appliances in the apartment does not exceed 25A, then you can power the entire apartment from one machine using a copper wire with a cross-section of 2.5 mm2 or an aluminum wire with a cross-section of 4 mm2. But in modern even one-room apartments this is unlikely.
- Usually the rated current of the electrical network is more than 25A. Therefore, in this case, we need to divide the meals into groups. The power of each of them should not exceed the specified current. To do this, power groups for sockets and lighting are usually separated. But you can divide groups into rooms or in any other way convenient for you. The main thing is not to “scatter” one group across different parts of the apartment, otherwise problems may arise during operation.
Possible power supply plan for your apartment
- It is also worth remembering powerful electrical appliances, which we excluded at the calculation stage. For them, it is better to organize power from a separate circuit breaker. Moreover, if possible, it is better to do this without additional sockets. The wire cross-section and rated parameters of the switch in this case are selected based on the rated parameters of the electrical appliance according to the same principles as for individual groups.
- If you are planning to install an outlet in the bathroom, then this group should be considered separately. Indeed, according to clause 7.1.37 of the PUE, sockets in the bathroom can only be installed through an RCD (residual current device). In this case, our instructions advise that in the group with the socket in the bathroom, include sockets in the kitchen, where RCD protection will be most relevant. Although PUE does not impose such requirements on kitchens.
- Depending on the square footage and the number of electrical appliances, the electrical wiring diagram in a brick Khrushchev house can contain from two to six groups. It is better to label each of these groups immediately, and visually separate the outlet and lighting groups.
Where to start replacing electrical wiring
Structural diagram of the electrical wiring of the apartment
At the preparatory stage, a plan diagram of the new wiring in the two-room apartment is drawn up. It is agreed upon by BTI and Energosbyt. Preparation also includes:
- Visually inspect the line for visible damage.
- Drawing up a drawing of the electrical systems of the entire house.
- Purchase of consumables - sockets, cables, switches, boxes.
- Search for the necessary tools - a hammer drill, an angle grinder, an indicator, side cutters, a level, a flashlight, a mounting knife, pliers, a soldering iron, fabric insulating tape.
Buy wire with allowances after measuring the length of the route.
Power calculation
Approximate power of various electrical appliances
It is necessary to replace the electrician in such a way that failures and network overvoltages do not occur in the future. The line power is selected taking into account all electrical equipment and depends on the cable cross-section. You will need to make several calculations:
- Sum up the power of all equipment connected to the power grid.
- Add +100 W to each device.
- Divide the total by 220.
If the result is 12-15, it is permissible to use a cable with a cross-section of 1.5 mm2. This is enough for an apartment with a standard layout.
When there is a heavy load on the line, it is allowed to increase the cable cross-section and arrange communications using a two-wire or three-wire circuit.
When using thick wire there are risks of failure.
Apartment power supply diagram
Scheme of powering an apartment through an RCD.
In old houses, on each floor there is an electrical panel where the meter, packet switch, and circuit breakers are located. Therefore, when designing a wiring diagram in a two-room apartment, it is worth making an independent power and lighting circuit, planning the main and additional branches. The following connection options are allowed in Khrushchev buildings:
- Parallel - energy is supplied to the consumer from the power source via its own line. A three-core cable is connected to a single-phase device, and a five-core cable with wires of phases A, B, C, zero and ground is connected to a three-phase device. Such a scheme provides for the organization of each consumer’s own line and the installation of an individual RCD.
- Serial - a cable is pulled from one power source, and the consumer is connected to it at a certain distance. To implement the scheme, you will need a wire with a large cross-section and grooves in the walls. The energy source will be a generator producing a nominal 220 V. To save money, you can stretch the electrical cable from the panel to a specific consumer.
- Series-parallel - the circuit is used in most apartments. The distribution box is designed for consumers grouped by type (boiler, sockets, light) or location (kitchen, bedroom, bathroom).
A series-parallel connection is the best option for a budget-friendly complete replacement of the electrical network.
Dismantling the old line
Before completely replacing the electrical wiring in the apartment, you will need to dismantle the old networks. First, furniture and equipment are removed from the premises and completely emptied of all items. Then the power supply is turned off at the input. Having prepared, they begin to dismantle the finishing and network elements. It is most convenient to conduct it from distribution boxes. They are easy to “calculate” by the characteristic contours under the wallpaper or plastic covers.
After removing the lid from the box, disconnect the connections and pull the core out of the groove. Sometimes removing a cable in an apartment building is accompanied by severe damage to the wall structure. To avoid any major damage, the problem area is cut off, carefully isolated, and left in its original place. Having completed dismantling, they begin laying new lines.
Having assessed the scale of the event, many craftsmen ask: how to change the electrical wiring in an apartment at minimal cost? This option exists. With a small budget, they get by by adding missing lines, installing additional boxes, and connecting backup points.
The source of problems with the electrical network most often are connections (twisting, soldering). Therefore, partial repairs are considered a temporary solution.
It is strictly forbidden to directly connect aluminum and copper wires. The difference in their physical and chemical properties leads to a gradual breakdown of contact and destruction of the connection. Therefore, high-quality repairs require a complete reconstruction of the electrical network.
Old aluminum wire
Tools and equipment
In addition to wires and cables, you will have to purchase replacement protective equipment for electrical wiring - residual current devices and circuit breakers.
These devices are selected for each group of wires separately. A sixteen-amp circuit breaker is connected to lighting, a 25-amp circuit breaker is connected to sockets, and a 32-amp circuit breaker is used for high-power household appliances. A separate residual current device (with a current of 63 amperes) should also be installed at the input.
The actual procedure for replacing electrical wiring in a private home can only begin when all sockets, automatic devices and lighting fixtures have been purchased.
When purchasing them, you should be wary of defects and fakes. It would not be superfluous to require a quality certificate for goods.
It is also worth making sure that all the necessary tools are at hand. For example, to replace electrical wiring in a private home you may need:
- bit;
- a hammer drill and several concrete drills for it;
- soldering iron;
- phase indicator;
- grinder on stone surfaces;
- pliers.
Here you need to add a set of screwdrivers, which any owner probably has, a level, and a pencil. Other tools may be required.