The internal structure of the cisterns of many modern toilets, at first glance, is completely different from what was used 30-40 years ago. Therefore, when many questions arise related to the maintenance of sanitary fittings, for example, how to adjust the float in the toilet or adjust the outlet valve, apartment owners sometimes have uncertainty - should they solve the problem themselves or invite a third-party specialist? However, the functionality of current devices is based on the same principles as before. Their understanding, as well as knowledge of plumbing maintenance algorithms, makes it possible to maintain it in working condition on your own.
Picture 1
Purpose of the float
A separate float mechanism is a simple, small-sized device. But, working together with other elements, it performs a significant function - it regulates flushing. He is a kind of intermediary between two systems - draining and collecting water.
To understand the function performed by this element, it is necessary to understand the structure of the cistern.
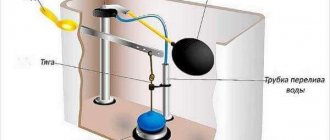
It is usually made of earthenware (cisterns are made of porcelain or plastic). It is a container with a lid on which a reset button is installed. In addition to the hole for the button, there are two more technological holes in the tank. The underwater hose is connected through one, and the drain is carried out through the other.
In addition, there are fittings inside the tank. It consists of several elements assembled into a single structure. The fittings can be of various shapes and sizes. All this depends on the manufacturer.
Despite the differences, the principle of their operation is the same. Water is drawn into the tank through the supply hose. As water fills the tank, it raises the float. Once the required level is reached, the set is closed. It continues to remain in this state until the release button is pressed.
After pressing it, other parts begin to work. The button starts the rod with the membrane attached to it. This opens the drain valve and empties the tank.
This way the float regulates the volume in the tank. When the mechanism fails, dialing continues continuously. But an overflow system will help prevent your neighbors from flooding.
Air lock is the cause of stagnation of drains
An air lock formed in the sewer system of a house can also disable the operation of the sewer collector. The air that has stopped in the system simply prevents the drains from leaving through the riser and either returns them back or passes them through, but very slowly and at the same time throws sharp unpleasant odors into the room.
The reasons for the formation of an air lock in the sewer can be as follows:
- Mistakes made when installing a plastic manifold (insufficient tightness of the pipeline, lack of connecting fittings, etc.);
- Excessive manifold turns, incorrect pipeline drops or incorrectly selected elbow angles;
- Lack of a water seal in the installed sewage system;
- Possible blockage or icing of the drain pipe in the attic or roof area.
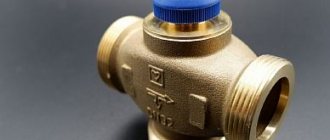
Features and types of float valves
Design of a toilet float
The float is one of the most important elements of the design of the water supply to the tank. Its purpose is to control the amount of liquid and protect against its excess in the tank. It ensures normal water supply to the toilet, so if a tank malfunction occurs, you should initially evaluate the condition of the float valve.
Previously, tanks were equipped with spherical elements, but they were not perfect enough, as they quickly filled with water and stopped functioning. Therefore, manufacturers began to produce modern versions of plumbing fixtures, where the float is made of a glass type. In practice, they are more resistant to filling with water and guarantee the longest service life. In performing its functions, the float works in conjunction with such mechanisms as: a membrane-type valve, piston, lever or plastic wheel.
The operating principle is as follows:
- When flushing, the water from the tank is drained into the bowl, and the float descends to the bottom, pulling a lever that directly acts on the piston element.
- The piston under pressure opens the valve and water is supplied inside the barrel.
- When water fills, the float begins to float, interacting back with the lever. When the pressure on the piston is released, it rises, blocking access to water by closing the valve.
Using a floating element, you can adjust the filling level of the tank. Using a lever or a plastic wheel, you need to lift it and the position of the float will determine the water level up or down. Toilet floats are available in two types:
- A ball connected to a lever. Located in the upper zone of the tank. An outdated option, as it has its drawbacks: the system is quite noisy; during operation, the ball gradually fills with water and stops working normally and regulating the level of incoming water.
- Glass type float. It moves in a vertical direction and acts on the piston through a rod rather than a lever mechanism. Located in the lower zone of the tank, it is more efficient and durable. The system also operates less noisily.
Modern toilet cisterns are equipped with glass models, as they are more efficient in operation and durable. If a breakdown occurs, most parts can be repaired manually or replaced with an analogue one.
Reasons for the formation of air jams
The finished closed-type heating system is sealed, but this does not guarantee the absence of air bubbles. Where does the gas in pipes and radiators come from?
Air appears in the heating system for the following reasons:
:
- The coolant is tap water that has not undergone special preparation - when heated, air dissolved in the water begins to release, and plugs form from small bubbles.
- The tightness of the system is broken, and air is gradually sucked in through loose connections.
- During the repair work, part of the circuit was disconnected by shut-off valves, some elements were replaced or cleaned, and then the coolant was again supplied to the repaired circuit.
- The pipeline was laid in violation of standards - the small angle of inclination of the pipes and improper installation of kinks prevent gas bubbles from entering special devices - air vents. As a result, gas accumulates in problem areas and interferes with the normal circulation of the coolant.
- If the heating system of a private home fills up very quickly (or when the coolant supply is not at the lowest point), the liquid is not able to completely displace air from complexly configured places in the pipeline and radiators.
- Air vents are missing or incorrectly positioned. Also, the reason for the incorrect operation of the air bleed device is its contamination by mechanical inclusions in the unfiltered coolant.
Separately, it is worth considering gas formation in aluminum radiators. When metal comes into contact with a slightly alkaline coolant, hydrogen is released, which accumulates at the highest point of the heating device. If the radiator is not equipped with an air vent, over time the gas lock will not allow the coolant to pass freely through the internal channels of the heating device.
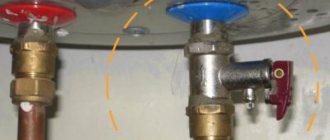
The water level in the toilet tank is above the float
And so, if your water level in the toilet tank is higher than the float, in the article I’ll tell you how to fix it.
The water level in the toilet tank is above the float
Let's consider the principle of operation of a toilet barrel: water enters the tank until the water level raises the float and blocks the water supply. If a blockage has not occurred, and the water continues to flow, then in order to avoid a flood in the toilet room, excess water flows into the toilet through the central fittings. This was the case in our case.
The first thing I decided was that the valve in the toilet was not turning off the water. I disassembled part of the assembly to inspect it.
Many people say that problems most often occur with the valve and that the valve of a toilet cistern with a bottom water supply needs to be repaired. When examining the valve, it is not clear what is wrong with it. A search in the store did not give any results, they say buy the entire assembly at once, there is no separate valve. I decided to put a thin rubber gasket under this valve so that it would press more tightly and the water supply would stop. Alas, nothing happened, the water still overflowed.
The most interesting thing was something else: when I got tired of fiddling with the toilet, I assembled it to go to the store for new fittings, and during assembly I turned the washer over from top to bottom, funnel down with the flat edge up and voila, everything worked like clockwork.
Defrosting sewerage work procedure
If a problem arises and the sewer system in a private house is frozen, you must first determine the location of the ice jam.
Craftsmen note the importance of following the order of work, and it is better to start from the place where the water exits the septic tank. This order of work is due to the fact that the sewer pipe system is designed with the obligatory condition of ensuring unhindered flow of water
This means that all pipes, incl. The drain pipe is located at a slope to the exit point.
Ice plugs must be melted so that the water can drain naturally. Otherwise (when performing work outside), you need to be prepared for the drains to flow in the opposite direction, which will necessitate pumping them out. This convincingly proves that work should begin in the direction from the septic tank to the internal pipes.
But there are exceptions to this rule. Ultimately, the order of work will be determined by factors such as:
the location where the ice plug forms. If the water is frozen in the inside of the sewer (unheated house), then it will be much easier to defrost;
cork sizes. Perhaps the size of the ice plug will be only a few centimeters, then the volume of water that needs to be pumped out can be neglected;
geometry of the sewer system. The more straight sections in the system, the easier it is to remove the ice plug;
laying method. Typically, sewerage is located underground. And if ice has formed in pipes located at a sufficient depth under a layer of frozen earth, the number of options for use is sharply reduced. You can’t get through the septic tank - you have to carry out work from inside the house.
The easiest way to organize the winter functioning of the sewer system is to contact specialists who provide sewer defrosting services. The craftsmen not only know how to defrost a frozen sewer, but also have special equipment and also provide a guarantee on their work. However, for various reasons, many people prefer to solve the problem on their own. And as reviews from forum members testify, it was quite successful and fast.
A few words about the design of the tank fittings
Before I tell you why a toilet tank may leak, I will introduce you to the design of the fittings so that you understand the principle of its operation.
Of course, there are currently a great many options for mechanisms.
However, the principle of operation of the tank always remains the same, since any fittings include three main elements:
- shut-off mechanism - is a tap that automatically shuts off the water as it enters the tank. The float is responsible for the water level at which the shut-off valve is activated;
- discharge system - is a valve that closes the drain hole. The valve is controlled by a button or lever;
- overflow system - prevents flooding of the apartment in case of failure of the locking mechanism. If the water in the tank rises above a certain level, the overflow system ensures that it is drained into the toilet.
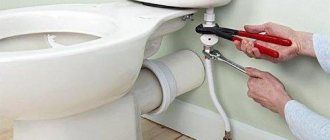
How to install?
After purchasing a new part to replace a faulty one, the question arises about its correct installation. The installation procedure is as follows:
- Close the valve responsible for allowing water to enter the drain tank.
- Drain the remaining water in the container.
- Remove the water supply pipe (you will need an adjustable wrench).
- Install a new float device in place of the old one.
- By adjusting, the desired position of the part is set.
- The water supply pipe is returned to its place.
- The valve is installed in the position where water is allowed into the drain tank.
Trouble-shooting
So, your toilet tank is leaking - what to do in this situation? First of all, you need to find out the reason why the leak occurs. There may be several options:
Possible causes of tank leakage
Next, we will consider all these troubleshooting options and ways to eliminate them.
Incorrect setting
Most often, the reason for constantly bubbling water in the toilet is trivial - the float of the locking mechanism is incorrectly configured or its setting has gone wrong . As a result, the valve does not shut off the water before it enters the overflow system.
How to understand that in a particular situation it is the overflow that has been identified? At first glance, there are no external manifestations of the problem; at the initial stage, water gradually begins to accumulate in the tank vessel after each drain.
Based on the performance characteristics that the design provides, once it reaches a specific level, filling should stop. But this does not happen, and the liquid slowly seeps into the toilet.
Such an unpleasant moment manifested itself as a consequence of a breakdown of the filling valve or float. You must lift the lever with the float yourself. If the valve works, the main reason is in the float.
Diagram of the locking mechanism
In this case, you need to lower the float to a lower level with the shut-off valve completely closed.
The setting process largely depends on the design of the locking mechanism:
- old model - in this case, the shut-off valve and the float are connected by a metal lever. To change the water level at which the valve will operate, you just need to slightly bend the lever with your own hands.
Some models of Soviet-style fittings have a plastic lever and consist of two halves connected by a plastic bolt. In this case, you need to loosen the bolt, change the angle between the levers, and then tighten the bolt to fix them in this position;
Old style float with metal rod
- modern model - the position of the float changes relative to the lever by moving it. To do this, you need to apply some force or even press the spring locking mechanism.
Modern float adjustment
As a rule, setting the float takes only a few seconds. The only difficulty may arise with dismantling the tank cap.
To remove the tank cap, you need to unscrew the ring
Usually, to remove it, you need to unscrew the ring surrounding the drain button. Old plastic tanks have clips on the sides.
The depressurized float is immersed in water
Depressurized float
After adjusting the float, make sure that it floats on the surface of the water and the locking mechanism works as expected. If it turns out that the float is “submerged” or even submerged in water, it is useless to adjust it, since it has become depressurized .
In this case, this part must be replaced. As a rule, it changes along with the shut-off valves.
Therefore, the dismantling instructions look like this:
- turn off the water supply;
- flush the existing water into the toilet;
Unscrew the connection nut
- unscrew the nut of the flexible connection;
Some valve models can be disassembled
- then unscrew the nut that secures the shut-off valve.
A depressurized float can be soldered. To do this, melt a regular cellophane bag and seal the hole or crack with it. However, keep in mind that such repairs can only temporarily solve the problem.
After this, you need to take the shut-off valve and go with it to the nearest plumbing store to purchase a similar mechanism. Install the new part by performing the steps in reverse order.
Faulty locking mechanism leaks when the float is raised
Damage to the enamel inside the toilet bowl
If the enamel surface inside the plumbing bowl is rough, or scratched, or there are cracks or chips, all this may be the cause of poor flushing of the toilet. In such cases, experts recommend thinking about buying new plumbing fixtures. But if for some reason you are unable to purchase a new toilet, you can repair the old one.
For this you will need:
- special putty (can be replaced with waterproof sealant), which is suitable for ceramic surfaces;
- powder paint;
- spray gun.
Once you have purchased the necessary material and tools, you can begin repairing plumbing equipment. To do this you need to do the following.
First, you need to clean and degrease the surface of the toilet bowl (from the inside). Secondly, places where there are cracks and chips should be cleaned with sandpaper (preferably fine-grained).
After this, all problem areas must be covered with putty or sealant. Wait for the putty to dry well before painting the surface.
Even if you have restored old plumbing, you still need to think about buying a new toilet. Because painting a ceramic surface at home cannot be compared with factory enameling. In addition, such a coating will not last long, and the toilet will again begin to flush poorly.
We regulate the operation of the float, shut-off and overflow valves of the toilet cistern
The internal structure of the cisterns of many modern toilets, at first glance, is completely different from what was used 30-40 years ago. Therefore, when many questions arise related to the maintenance of sanitary fittings, for example, how to adjust the float in the toilet or adjust the outlet valve, apartment owners sometimes have uncertainty - should they solve the problem themselves or invite a third-party specialist? However, the functionality of current devices is based on the same principles as before. Their understanding, as well as knowledge of plumbing maintenance algorithms, makes it possible to maintain it in working condition on your own.
Picture 1
Chemical cleaning
The chemical method is recommended for use when plumbing fixtures are clogged with biological deposits. The essence of the method is simple: under the influence of a chemical substance, the mud plug dissolves and gradually disappears. Acid or alkali based compounds are used to clean drains. Their form does not matter - it can be liquid, granules, gel, or powder.
Choose a chemical that suits your type of pipes
Before using the product, be sure to read the instructions - pay attention to the dosage of the product and the duration of its “working”. After that, start cleaning:
- pour or pour the required amount of “chemicals” into the sewer hole of the plumbing fixture being serviced;
- close the toilet lid or bathtub opening;
- wait the indicated time until the composition eats away the blockage;
- rinse off the “chemistry” and check how the water flows - if the problem is not eliminated, repeat the procedure.
Important! When purchasing a chemical, pay attention to what type of pipeline it is intended for: if your sewer pipes are plastic or cast iron, a universal “chemistry” will be suitable for them, but for steel pipes you should choose special compounds - those that will not react with the steel surface
Types of shut-off and overflow structures for toilet cisterns
We are not talking about automatic or installed systems. The devices in question are widely used sanitary equipment. The principle of its operation will be easier to understand using the example of outdated designs (Fig. 2), especially since they have not yet completely gone out of use, and sometimes they also have to be adjusted. In them, as in modern products, two main mechanisms can be distinguished: filling and draining, as well as an overflow unit.
Outdated designs
Inlet
The design of the filling fittings includes an inlet valve 5 of the rod type. Its operation is controlled by the float of the toilet tank 3, acting on the shut-off rod through a brass rocker arm. A similar system was called a float valve and is still used today in a slightly modified form.
Figure 2
Figure 3 will help you understand the functioning of the filling unit more clearly. It shows the water level 1 after the storage tank has been emptied, after which the float mechanism 2 (including the rocker arm or spoke lever 3) is in the lower position. The upper part of the rocker arm 3, located in the body of the tap (valve) 4, moved the pusher rod 5 with the elastic gasket 6 to the left, thereby activating the water supply through the inlet 8 and the inlet 10. As the container is filled, the lower end of the lever moves up, and its upper arm Accordingly, the pusher moves to the right and gradually closes the spout hole, pressing gasket 6 against it.
The tap is secured to the wall of the tank using a fastening nut 9 from the outside. The threaded connection of the tap is sealed with a rubber gasket 7 from the inside. To dampen the noise of the falling jet 11, a tube of suitable diameter is additionally placed on the spout fitting of the inlet valve, lowering its lower end below the minimum water level.
Figure 3
Release (drain)
Adjusting the toilet tank cannot be complete without adjusting the outlet and overflow units. Their diagrams are shown in Figure (diagram) 2 - plumbing fixtures with lever-type drain mechanisms. But, despite the similar types of drives (rocker arms 4), they have fundamental differences in operating principles.
Tank with siphon
Figure 2a shows a drain system using siphon chamber 1. The curved cavity solves two problems at once:
- Serves as a fixed height overflow. The liquid level in the right receiving part of the siphon cavity always corresponds to the adjusted water level in the tank; it cannot be higher than the dividing partition. If the toilet float 3 is not configured correctly - it does not have time to close the inlet valve 5, then the liquid flows into the left side of the siphon (air) and flows out through the flush pipe.
- Supports (automates) fluid discharge, allowing handle 6 to be released immediately after activation. At the beginning of the flush cycle, water rushes down under the raised valve 2. When it is in the lower position, the flow continues through the curved siphon tube due to the vacuum created by the flow falling at high speed in the vertical flush pipe. An effective pressure drop caused by a moving liquid is only possible if the plumbing tank is placed high enough.
Bleeding air in radiators
So, first of all, you should focus on bleeding air from heating devices - radiators. In this case, you should use the already proven option: bleed the air through the Mayevsky valve. This tap is usually installed instead of blind plugs on the radiator, at the highest point. This arrangement implies the accumulation of excess air directly under the valve. In other words, when it opens, the first thing that will come out is air, and then water will come out, which will indicate that the plug in the heating system has been completely eliminated.
To do this, you just need to place a container into which a small amount of liquid will be poured out along with the air. Open the tap and wait until only water comes out, without the characteristic sounds of air bubbles.
Typical breakdowns and ways to fix them
Even despite the abundance of different models of modern shut-off and overflow equipment, adjusting the toilet tank often comes down to standard algorithms. Many methods for detecting and troubleshooting are reminiscent of those that accompanied the operation of previously popular products. At the same time, plumbing problems are much easier to sort out if they are separated into separate groups. As a result, we get the following series of questions, arranged in descending order of frequency of occurrence:
- Continuous flushing of water into the toilet.
- Filling the storage tank is not activated.
- Water detected outside of plumbing fixtures.
Continuous flushing of water into the toilet
It’s not for nothing that the question comes first, since it arises in the vast majority of cases of plumbing breakdowns. If the water in the toilet tank does not stop, the reason may be:
- in exhaust valve leaks;
- overflow setting;
- constant operation of the inlet valve.
To begin diagnosing the system, you first need to remove the cover from the flush tank. For the majority of plumbing fixtures used today, it is enough to unscrew the decorative nut of the stem or the button nut located in the center of the cover. The operation may require some effort and ingenuity, since the flanges of the nuts are often completely smooth. It is easier to grip the edges of the fastener by wearing rubber gloves. For push-button models, for convenience, it is easier to rotate the button in a recessed position (Fig. 11).
Figure 11
Having removed the lid, you can begin to adjust the water drainage in the toilet; but first it is better to put the ceramic part away or even take it to the next room so as not to accidentally break it. If it is damaged, it is unlikely that you will be able to purchase a replacement separately.
Exhaust valve
Its tight fit to the seat ensures the tightness of the flush unit. The valve is made of elastic rubber, which over time loses its original properties: it hardens and deforms. In addition, deposits may accumulate and mineral particles may adhere to the sealing surfaces of the bulb or membrane and outlet. In all such cases, the valve in the toilet tank does not shut off the water. It is quite simple to make sure that the problem is in this particular unit - you need to weigh it down, press the valve element with your hand, sealing the place of its contact with the outlet hole. If the leak in the bowl has stopped, then you should find out the reason for the violation of the seal of the shut-off unit.
- Inspect the mating surfaces and clean them if necessary.
- Deformed or hardened rubber parts will have to be replaced (Fig. 12). To slow down the aging process of the material, you can use special preventive lubricants.
- Make sure the reservoir valve fits evenly in place. This can be prevented by distortion on the guides of the release mechanism, sticking of the button or float, if it is present in the design (Fig. 10, far right). In this case, adjusting the water flush in the toilet is easily achieved by returning the corresponding parts to their working position. However, if the misalignment is caused by the breakdown of their parts or wear, then the exhaust valve assembly will have to be replaced.
Clearing the blockage
A small child can easily throw his toy into the toilet. It can get stuck in the water seal of the plumbing. The first thing any person will do is try using a plunger. This simple remedy often solves problems within seconds. By creating serious artificial pressure in the system, the device simply pushes the plug further through the pipes.
Try using a plunger
This can all end well. Having flown through the pipes, the interference will simply jump out into the expanses of the city sewer and will no longer be able to bother anyone. But if the house is multi-story, then having slipped down straight pipes, the blockage may encounter a new obstacle in the form of a turn in the system.
If the pipe is tightly clogged, then everything that is washed away from the upper floors will be on the floor of the residents of the first tier. The top guests, without exception, will see slowly draining water in their toilets instead of a rapid flow.
In this case, a plumbing cable will correct the situation. From the site of a real disaster, namely from the toilet on the first floor, it is necessary to pull out the plug using a flexible shaft or destroy it. Usually such a tool has a hook at the end. It can be used to remove rags and other soft items. There are cables with removable ends. One of them is capable of breaking the cork if it cannot be removed.
Cleaning cable
Blockages in pipes can be caused by organic debris: hair, fats, food and other objects. You can cope with them using active chemistry. There are many products sold in stores that can dissolve organic matter. After reading the instructions, you need to pour or pour the active substance into the drain and wait time for it to take effect.
This method is not suitable for residents of private houses who use a biological station for wastewater treatment. The active environment in the chemical will kill the beneficial bacteria needed for the system to function.
There is another way to deal with blockages that occur in the toilet water seal. But not everyone can cope with it. The volunteer or the punished culprit (if it is not a child) puts on rubber gloves and tries to remove the obstacle from the drains with his hand. The result depends on the perseverance and impressionability of the person.
Heating system without air locks
To ensure that air in an individual heating system does not accumulate in problem areas, but goes outside, it is necessary:
- correctly design and install the pipeline, correctly install radiators;
- use automatic and manual air vents.
Let's look at how to expel air from a heating system with natural circulation and top wiring
When arranging a pipeline, it is important to maintain an inclination angle at which air bubbles move freely upward, to the highest point of the circuit, without accumulating at turns and flat areas. At the highest point of such a system, an open-type expansion tank must be installed, through which air bubbles enter the atmosphere
To bleed air from a system with forced movement of coolant or a gravity system with bottom wiring, a different principle is used
. Return pipelines are installed at a slope (this simplifies draining liquid from the system), and at the top point of all individual circuits, automatic valves are installed through which air is discharged as it accumulates.
In addition to automatic air vents, the system also uses manual Mayevsky valves. Such air vents are mounted on heating radiators - on the upper pipe on the opposite side of the pipe supplying the heated coolant. To ensure that air enters the valve and does not accumulate in the upper radiator manifold, it is recommended to install the heating device at a slight angle. Air release is performed manually as needed.
How to find an air lock?
Ideally, the system independently copes with airing thanks to automatic valves through which air is released. If you discover that a particular heating device or part of the circuit is not working properly, you need to find the place where the air has accumulated.
Touch the radiator - if its upper part is colder than the lower part, it means that coolant is not flowing there
. To release air, open the Mayevsky valve installed on a steel, aluminum or bimetallic radiator, or the valve valve mounted on cast iron batteries.
You can also determine the location of airing by sound - under normal conditions, the coolant moves almost silently, extraneous gurgling and sounds of overflow occur due to an obstacle in the flow
.
Metal pipes and heating appliances are tapped with light blows - in places where air accumulates, the sound is noticeably louder.