Like any other mechanism, the water block has wear parts in its design. When they become unusable, the operation of the heater deteriorates or stops altogether. Common situation?
If a malfunction occurs, a home craftsman is quite capable of repairing the water unit of a geyser on his own by disassembling the gearbox and replacing used consumables. To begin with, we suggest you figure out how to disassemble and repair the water unit of an instantaneous water heater yourself. The information will also be useful when performing preventive examinations. We will provide the presented material with thematic photos and video materials.
Purpose of the water node
Regardless of the complexity of the design, geysers used to heat water in houses where there is no hot water supply (DHW) operate according to the general principle. The water passing through the heat exchanger is heated by gas, which is supplied to the burner when liquid flow appears through the water unit and is shut off when the hot water tap is closed.
The water unit is the first automatically operating block of the geyser on the path of cold water.
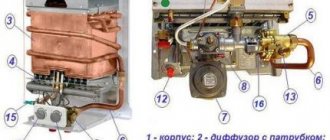
The water unit (A) is located at the very beginning of the journey made by water along the water “main” of the gas water column, so it is easily detected after removing the housing. Structurally, the block is connected to the gas unit (B) and the heat exchanger
The main task of the water block is to send a signal to turn on or off the gas unit working in tandem with it, regulate the gas supply to the burner and the water supply to the heat exchanger coil (ensuring normal operation of the column).
Thanks to the original internal device, when you open a hot water tap, the water reducer gives a signal:
- to open the gas, provided that the flow of heated water is not lower than specified;
- to stopping the gas supply when the tap is turned off or the hot water pressure is insufficient.
At the same time, the water reducer (also known as a frog, or water regulator) is one of the safety devices of the water heater, since with low water pressure it prevents overheating of the heat exchanger, which fails due to regular overheating. We talked about repairing the heat exchanger in our other article.
Setting details
These devices have only one geyser temperature regulator. Thanks to it, the heating temperature and power are adjusted. The self-diagnosis system evaluates the operation of the components when turned on. If there are problems, the red light comes on and the device is blocked from starting. Then it is necessary to adjust the water pressure.
Then you need:
- Remove batteries from the compartment;
- Turn off the microswitch;
- Provide a source of electricity;
- Turn on the hot tap and turn on the microswitch;
- The pressure on the burner should be maximum;
- After saving the settings, the orange lamp will turn on.
In other columns, the water temperature is adjusted by turning the toggle switch and controlling the strength of the water flow.
Important! When adjusting, it is prohibited to exceed the maximum temperature specified in the instructions.
Unfortunately, it is impossible to easily set the settings according to the instructions. Each system has different meanings. If you have difficulties setting up the gas water heater temperature regulator with your own hands, you should turn to professionals.
Device of a frog instantaneous water heater
In order not to carry out repairs blindly, you need to understand how this or that unit works. For a better understanding of the purpose of the parts and the principle of operation, let’s consider the design of the water block of a gas water heater used in everyday life. Let's do this using the example of one of the most common columns - Neva .
The water reducer is colloquially called the heart of the water unit. The body of the “heart” consists of two parts – the base and the cover, connected with screws. In Neva the body is made of brass. In modern drives, gearbox housings are also made of silumin, polyamide or high-strength plastic.
In the lower part of the base there are inspection holes for draining water, plugged with screws.
The regulator body is made of brass. The base and cover are connected by 8 screws, which, before screwing in during reassembly, it is advisable to lubricate with graphite grease or lithol
The internal structure of the water unit gearbox is thought out to the smallest detail. Everything is simple and reliable, so it can only be dismantled to replace consumables.
The base has two pipes. According to the introduction, water flows into the frog. Using a union nut, the pipe is connected to the water supply pipe. There is also a sealing gasket installed here that protects against leaks, and a filter mesh that protects the insides of the frog from debris particles getting in with the water. The presence of a filter extends the life of the membrane, which is especially sensitive to the presence of debris, which acts like an abrasive when the water flows and the membrane moves.
The outlet pipe is equipped with a Venturi fitting . The pipe is connected to the tube through which water from the reducer goes to the heat exchanger coil with a union nut. A sealing gasket is also installed here. Above the narrowed part of the Venturi fitting, a bypass hole is made in the body of the base, through which water from the lower cavity of the regulator, through the fitting, enters the upper cavity separated by a membrane - under the cover.
The gearbox cover is shaped like an inverted bowl. In its center there is a channel for passing the rod and installing a sleeve equipped with a nut. At the lower end of the rod (on the inside of the cover) there is a disc of a plate in contact with the membrane (diaphragm). The upper end of the rod mechanically transmits a signal to the gas block valve.
On the side of the cover there is a bypass channel equipped with an adjusting screw and a retarder ball made of metal or plastic. The lower hole of the channel (when connecting the halves of the housing) coincides with the bypass hole of the base. The channel with the ball works like a ball valve.
Design of the water part of the water-gas unit of the Neva Group of Companies. The numbers indicate: 1 – base, 2 – cover, 3 – membrane, 4 – plate, 5 – rod, 6 – inlet pipe, 7 – outlet pipe, 8 – filter mesh, 9 – union nut, 10 – fastening screw connecting GU and VU, 11 – rod bushing, 12 – bypass channel, 13 – , 14 – Venturi fitting, 15 – gas block pipe, 16 – rod spring, 17 – rod seal, 18 – sealing gasket, 19 – water flow limiter, 20 – hole for draining water with a plug, 21 – water flow regulator
Between the lid and the base there is a membrane - which performs the main function of the block. Previously, membranes were made of rubber. Of the modern materials, silicone is the best. There are also combined rubber-metal diaphragms. Along the edge of the membrane disk there are holes for fastening screws, as well as a bypass hole.
Operating principle of the Venturi fitting
To understand in detail the principle of operation of the frog, we understand how the individual parts of the device work. Let's start with the Venturi fitting. It is a tubular cylinder, in the channel of which an artificial narrowing is made. The narrowing of the channel causes an increase in flow velocity and a decrease in pressure at the bottleneck.
The result is a difference in fluid pressure:
- before narrowing, the water presses on the walls with greater force;
- in a narrow place where the flow speed is maximum, the pressure is reduced.
Where the pressure in the fitting is minimal when the tap is opened, a bypass channel begins, through which water from the lower cavity of the frog enters the upper. When the tap is closed, there is no water flow to the coil. There are also pressure differences in the fitting and in front of it. The pressure in both communicating cavities of the gearbox is the same. The membrane occupies a position in the middle.
The design of the Venturi fitting is responsible for the appearance of the pressure difference. Pressure with closed (a) and open (b) hot water taps. How does a ball valve work?
The water pressure in the lower cavity is a constant value, equal to the water pressure in the water supply. The water pressure in the upper cavity of the frog is a variable value. The maximum pressure in it, equal to the water pressure in the water supply system, is achieved when the hot water tap is closed. When the valve is fully open, the flow velocity at the narrowing point of the fitting is maximum. The pressure in the bypass channel drops to a minimum, followed by a decrease in water pressure in the upper cavity of the gearbox.
How does the frog membrane work?
When you open a hot water tap and a pressure difference appears, the membrane, trying to bend upward, presses with force on the plate rigidly fixed to the rod. The rod extends outward and transmits force to the gas block valve, which is responsible for turning on the gas supply to the burner. The pressure difference is sufficient to generate the necessary force due to the membrane area, transfer it through the plate to the rod and overcome the elasticity of the spring installed on the rod.
When you close the tap, the flow of water in the column stops and the pressure difference disappears. The membrane returns to its original position, ceasing to put pressure on the rod. The spring pushes the rod back and the gas valve closes.
Membranes can be made of rubber, plastic or silicone. Their shape corresponds to the configuration of the frog, so sometimes it can be difficult to find the right model to replace
From all that has been said above, it becomes clear that the membrane is one of the most important parts of the unit, ensuring its automatic operation and working “for wear”. It is the violation of the integrity of the membrane that most often causes the water unit to fail.
Purpose of the retarder ball
If you remove and shake the cover of the water reducer, you can hear a metal ball rolling around inside it with a knock. You can see it if you unscrew the adjusting screw. When the column is turned on and off, a small steel (or plastic) pea rolls along the bypass channel, either partially blocking its lumen or freeing up more space for the flow of water.
Rolling back in the direction of the screw when the tap is turned on, the ball partially blocks the lumen of the channel. Water leaves the upper cavity slowly, so the gas valve opens smoothly. When the tap is closed, the pea moves in the opposite direction, the lumen is quickly cleared, and the pressure drop is eliminated. Therefore, turning off the gas water heater occurs quickly.
The retarder ball can be purchased together with the repair kit. Removing the ball or incorrect adjustment may cause the gas to turn on quickly, accompanied by a popping noise.
In this way, the smooth opening of the gas and its rapid shutoff are also carried out automatically, which is why the channel with the ball is also called a ball valve. The smoothness of the gas opening is adjusted using an adjusting screw hidden under a screw cap. This is done in extreme cases, since usually the gearbox is well adjusted by the manufacturer.
About the role of the plate and rod
When assembled, these two parts look like a mushroom with a cap. The rod is a metal rod that extends toward the gas block when the hot water tap is turned on.
A plastic plate is attached to one end of the rod, which, bending, is pushed by the membrane; with the other end of the rod, it presses on the valve of the gas unit, which opens the gas supply to the burner.
To prevent water leaks into the gas supply channel and onto the microswitch platform, several seals are installed in the rod connections.
The picture shows the most common rod configuration. On the axis (1) of the rod are strung (in order of priority from the water to the gas unit): a nut (2) with a sleeve (4), with which the rod is attached to the gearbox perpendicular to the membrane; stem seal (not visible), built into the bushing; rod bushing oil seal (3); rod skirt (5) – used to control the position of the microswitch platform foot (MS); the rod spring (6) ends with a small skirt; rod seal (7)
In some models of water reducers, the plate and membrane are combined in one part - a reinforced membrane. The reinforced membrane has a strict orientation relative to the axis of the rod, so the rod seal lasts longer, and the membrane is more durable
In modern models, the gas valve control mechanism is duplicated. Switching on is done mechanically (by pressing the stem on the valve) and using a microswitch. In the latter, when the tab is retracted (by the retractable rod), a closure is made and a signal is given to open the valve.
Bypass and other gearbox innovations
In modern water heaters, for example, the Electrolux brand, you can find improvements - a bypass with a water flow regulator . This is a channel parallel to the Venturi tube through which the flow of water is controlled.
When the bypass regulator closes, all the water flows through the fitting, therefore, the pressure drop is maximum, the gas opens to full capacity. When the bypass is opened, the flow of water through the Venturi decreases, at the same time the pressure drop decreases and the gas valve opens less. The heating temperature of the liquid decreases.
In the same columns, the base of the body is equipped with a valve that regulates the flow of water through the frog (feedback device). If the pressure in the water main increases, the valve will partially close and open wider as the pressure decreases.
Water reducers of modern dispensers are equipped with several regulation and protection systems. Water flow valve eliminates surges in water pressure
Another protective device for the water unit is a safety valve , which relieves pressure and thereby protects against rupture of the column pipe. It consists of a tube, the end of which is closed with a stopper, and inside there is a spring-loaded (with a spring, the compression force of which is regulated by a pressure screw) retaining valve. If there is a leak in a given place, tighten the clamping screw a little tighter.
. INDICATION OF SAFETY PRECAUTIONS…………………………….
Page 2
- Image
- Text
2
CONTENT
1.
INDICATION OF SAFETY PRECAUTIONS ………………………………………………………………………………………. 3
2.
DESCRIPTION AND OPERATION OF THE DEVICE ………………………………………………………………………………….. 4
2.1.
Purpose of the device…………………………………………………………………………………………………………………… 4
2.2.
Technical specifications………………………………………………………………………………… 4
2.3.
Scope of delivery ………………………………………………………………………………………………………………….. 5
2.4.
Device design “NEVA-4011”…………………………………………………………………………………. 5
2.5.
Operation of the device “NEVA-4011” ………………………………………………………………………………….. 6
2.6.
Device design “NEVA-4511”…………………………………………………………………………………. 9
2.7.
Operation of the device “NEVA-4511” ………………………………………………………………………………….. 11
3.
INSTALLING THE DEVICE …………………………………………………………………………………………………………….. 12
3.1.
Installation location and diagram ……………………………………………………………………………………… 12
3.2.
Installation of the device……………………………………………………………………………………………………………. 13
3.3.
Connecting the device to the water supply network………………………………………………………………. 13
3.4.
Connecting the device to the gas network…………………………………………………………………………………….. 14
3.5.
Connecting the device to a liquefied gas cylinder ………………………………………………… 14
3.6.
Rules for installing flexible hoses…………………………………………………………………………………. 14
3.7.
Connecting the device to the chimney…………………………………………………………………………………. 15
3.8.
Installation of batteries for the device “NEVA-4511” …………………………………………………………….. 16
3.9.
Checking the device …………………………………………………………………………………………………………………. 16
3.10.
Conversion of the device to a different type and pressure of gas …………………………………………………………… 17
4.
USING THE DEVICE…………………………………………………………………………………………………………… 17
4.1.
Switching on the device “NEVA-4011”…………………………………………………………………………………. 17
4.2.
Turning on the device “NEVA-4511”…………………………………………………………………………………. 18
4.3.
Regulation of temperature and water flow………………………………………………………………………………… 18
4.4.
Turning off the device…………………………………………………………………………………………………………….. 19
4.5.
Replacing the batteries of the device “NEVA-4511” ……………………………………………………… 20
4.6.
Frost protection ……………………………………………………………………………………… 20
4.7.
Actions in case of an emergency………………………………………………………… 20
5.
MAINTENANCE ………………………………………………………………………………………. 20
5.1.
Inspection…………………………………………………………………………………………………………………………………… 21
5.2 .
Care ……………………………………………………………………………………………………………………………. 21
5.3.
Maintenance…………………………………………………………………………………….. 21
6.
POSSIBLE DEVICE MALFUNCTIONS AND METHODS OF THEIR ELIMINATION …………………….. 22
7.
RULES OF TRANSPORTATION AND STORAGE………………………………………………………………. 25
8.
WARRANTY ……………………………………………………………………………………… 26
9.
CERTIFICATE OF ACCEPTANCE …………………………………………………………………………………………………………… 27
10.
NOTE ABOUT THE INSTALLATION OF THE DEVICE AND
CARRYING OUT MAINTENANCE …………………………………………………………… 27
11.
CATALOG OF COMPONENTS ……………………………………………………………………………………….. 28
12.
SERVICE CENTERS FOR MAINTENANCE OF “NEVA” WATER HEATERS ………………… 32
Preparing for water unit repair
Often, after disassembling the frog to install a new membrane, you will find that in addition to it, it is necessary to replace one or more gaskets of different diameters. Therefore, you need to start repairs by purchasing in advance a complete repair kit for the water unit that matches the model of your gas water heater.
To carry out repairs or preventative maintenance, it is best to stock up on a repair kit, since when disassembling the water reducer, it may become clear that it is necessary to replace not only the membrane, but also several other parts
In addition to spare parts, you will need tools. For old type units: adjustable wrench, screwdrivers for straight and Phillips slotted screws. For modern Neva models and Chinese water heaters, you will need a screwdriver with a Ph2 bit, preferably magnetized. There are also devices with “tricky” fasteners. A remedy for solving the problem of soured screws, for example, WD-40, will not be superfluous.
You will also need two adjustable gas wrenches. They are necessary so that when dismantling and reinstalling while screwing on fittings (flexible hoses or fittings) they do not cause damage to the fittings of the unit.
If excessive force is applied to the fittings, microcracks or hidden cracks may form that are not visible from the outside. To prevent this from happening, hexagonal pads are made on the fittings, which are held against displacement by one of the keys. The second key is used to screw or unscrew the fittings.
Documentation
In order to install a gas water heater in an apartment or private house, you will need the following documents:
- Technical passport of the purchased dispenser or indication of the model in case of subsequent purchase of the unit.
- A report on the technical condition of the hood or chimney, drawn up by the exhaust and chimney duct inspection service.
- Project for placing new water heating equipment and connecting it to the gas and water mains in accordance with the technical specifications.
- An application submitted by the owner for the reconstruction of a premises with a water pump must additionally provide proof of ownership and a technical passport for the apartment.
- An application for installation work sent to the gas supply organization (Gorgaz) with a project attached.
The company engaged in the maintenance of the purchased gas water heater or specialists from the gas supply organization are required to perform the following actions when installing the equipment:
- Make a connection into the gas pipeline with the installation of metering devices and a shut-off valve.
- Hang the column with the flammable surface of the wall lined with insulating materials (tin in combination with asbestos or basalt sheets), connect a flexible gas supply to the unit.
- Connect the column to the chimney or exhaust system using a pipeline.
- Connect flexible hoses from the unit to the cold water main and hot water supply pipes.
- Upon completion of the work, the Gorgaz specialist must set up and start the dispenser, seal the gas meter and draw up a report on putting the unit into operation.
The cost of installing a gas water heater at home by private specialists will cost about 3,000 rubles; gas supply companies, depending on the region, carry out the connection at their own prices.
Rice. 10 Recommended spacing and placement of insulation
2
Operating principle
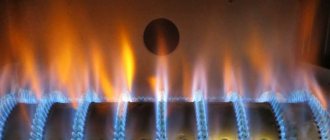
Having become familiar with the design of geysers, it will be easier to understand the operating principle of these units. When fuel burns, thermal energy is released, heating the heat exchanger. Most often, this part of the burner is made of copper or special alloys with high thermal conductivity.
Around the heat exchanger there is a coil, which is also made of materials with high thermal conductivity. As a result, it heats up and transfers thermal energy to the water. After this, the hot liquid enters the pipeline. To remove combustion products, the unit is equipped with a chimney.
It is worth considering separately the operating principle and design of the gas water heater reducer. This is one of the most important design elements, since its main task is to start the column and supply water. The node works as follows:
- 1. When the tap is open, water flows into the water reducer of the gas water heater.
- 2. In one of the chambers of the device, pressure begins to increase, which sets the membrane in motion, which, bending, pushes out the plate.
- 3. The plate acts on the water rod, which moves the gas block pusher.
- 4. This triggers the switch, which starts the control unit, and it gives the command to ignite the unit.
- 5. At the same time, the gas valve is released, opening the fuel supply.
If a flame appears, a special sensor turns off the spark plug. When the hot water tap closes, the pressure in the two chambers of the reducer is equalized and the gas valve shuts off the fuel supply. The principle of operation of a battery-powered geyser is no different from units powered from the mains.
Depending on the ignition method, the columns are divided into three types:
- 1.
Manual. First you need to open the fuel supply, then manually light the fire using matches or a lighter. - 2. With piezo ignition. Unlike the first type, the burner is ignited using a button that activates the piezoelectric element.
- 3. Automatic machines. These units are fully automated and designed as efficiently as possible.
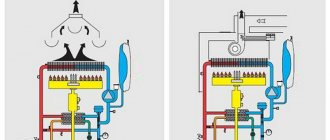
The structure of a gas boiler and the principle of its operation
3
Recommendations for maintenance and repair
All elements of the column structure are subject to destruction due to various factors. Any gas equipment requires regular maintenance. If defects are identified during maintenance work, they must be eliminated as quickly as possible. Of course, some repair work should be entrusted to a professional, but some can be done independently.
The principle of operation of a double-circuit gas boiler
3.1
Dismantling and adjusting the gearbox
You must first turn off the fuel and water supplies. Only after this can you begin to carry out preventive or repair work. To remove the gearbox, you need to perform several steps:
- Water is drained from the heat exchanger;
- using an adjustable wrench, the gas and water pipelines are disconnected from the column;
- If no mistakes were made at the previous stages, the gearbox can be easily dismantled.
Depending on the model of the unit, changes may be made to its design. To avoid problems when dismantling the water reducer, you must first disconnect all pipes and parts that make the work difficult. The housing should be easy to remove; no physical effort is required.
To adjust the gearbox, you must use special bolts located on the back side of the unit. Most often, the unit is already prepared for operation at the factory and does not require additional configuration. It is not advisable to adjust the unit unless absolutely necessary.
3.2
Cleaning the water unit
This event must be held at least once every 12 calendar months. When unscrewing the fastening bolts located on the unit cover, you must be careful not to damage the folds. When the cover is removed, it is necessary not only to clean the internal space of the gearbox, but also to perform the following procedures:
- 1. All solid residues must be removed from the bottom of the part, and the coarse water filter must also be rinsed.
- 2. It is advisable to lubricate the rod with grease or castor oil.
- 3. If you suspect that the gasket has lost its former elasticity, it also needs to be lubricated.
With regular maintenance of the unit, its service life can be significantly extended. Most often, the rod seal and membrane fail. The first element must be replaced once every 3 years, and the second - after the appearance of ruptures or microcracks. In addition, during intensive work the spring for returning the rod to its original position may break.
Having carefully studied the design and principle of operation of the gas water heater, you can carry out all preventive measures yourself. If you don’t have confidence in your own abilities, then you should turn to professionals for help. When working with the unit, you must strictly follow the instructions.
This is interesting: What wire cross-section is needed for 15 kW 3 phase to enter the house
Possible malfunctions of the “frog”
The body of the water regulator is durable and designed to operate at high water pressure (flow rate up to 3 m3/hour). There are few parts in the water unit that can become unusable and cause breakdowns of the gas water heater.
Possible malfunctions:
- membrane rupture;
- violation of the integrity of the plastic plate - the membrane cannot move the rod;
- scale formation on the rod , slowing down the movement of the rod or leading to its jamming, which occurs due to leakage of the stuffing box;
- destruction of the retarder ball (very rare, but it happens), clogging of the channel, jamming of the ball;
- the filter mesh is filled with debris , which reduces the water pressure due to blocking the passage;
- debris getting into the Venturi fitting due to which the pressure in the hot water tap decreases, the column does not work;
- wear of gaskets and seals is the cause of leaks leading to scale formation.
Most of these malfunctions have characteristic symptoms that can be identified during an external examination.
Leakage of the oil seal gasket leads to the formation of scale and souring of the rod. All scale should be removed. Unscrew and clean the bushing, replace the gasket and seals, clean and lubricate the rod
Any leaks require intervention, which should not be delayed for long. Prolonged exposure to water oxidizes contacts. As a result, the microswitch becomes irreparable and completely unusable.
water flow regulator...
Page 10
- Image
- Text
10
1
— water flow regulator; 2 — gas flow regulator; 3 - plate; 4 — water-gas unit; 5 - burner;
6
— cold water supply fitting; 7 — gas supply fitting; 8 — hot water outlet fitting; 9 - gas outlet
general device; 10 - candle; 11 — flame presence sensor; 12 - heat exchanger; 13 — electromagnetic valve; 14
— battery compartment; 15 — electronic control unit; 16 — thermal relay (draft presence sensor);
17
— microswitch (water flow sensor); 18 — water temperature sensor; 19 — thermal relay (overheat sensor
wa water); 20 - plug for draining water; 21 — fitting for measuring gas pressure; 22 — rear wall; 23 — screws for fastening the cladding.
Figure 5. View of the device “NEVA-4511” without cladding
Comments
Select → I found the instructions for my water heater here! #manualza
- Click →
Why can’t you cook dumplings on a submerged submarine? Because in the cooking instructions, on the back of the package it is written: - Cook for 5-7 minutes after surfacing.
Manualza!manualza.ru
Still not with us?
Diagnosis of causes and elimination of breakdowns
Most internal violations can be identified through external diagnostics, testing the operation of the column. External symptoms indicating a frog malfunction most often point to the direct culprit. Only some of the external manifestations may be the result of various reasons, which will become clear after dismantling the water unit.
Problem #1 - low hot water pressure
If the pressure in hot water is less than cold, the cause may be a clogged filter mesh . It can be eliminated by cleaning, which does not require disassembling the frog, however, more often than not this reason is not the only one, so the device should be disassembled, at least for the purpose of prevention.
Another reason is a clogged Venturi fitting channel . In this case, disassemble the gearbox, unscrew and clean the fitting.
We discussed other reasons for low water pressure in the column in this article.
Problem #2 - the column does not turn on
If the column does not turn on with sufficient water pressure, then the diaphragm may break . It can be eliminated by disassembling the frog and replacing the membrane. The best replacement option is silicone. Normal - like the original one (sold separately or in a repair kit). Not the best - replacing it with a suitable one or making it yourself.
Another reason is souring of the rod . Remedy: the gearbox is disassembled, the rod is cleaned of scale, ground and lubricated with mineral oil, and the seals are replaced.
Breakage of the water reducer plate is less common than a diaphragm breakthrough. It is necessary to use the original part to replace it; for this purpose it is more rational to purchase a repair kit
Also among the possible causes is a broken plate . Without it, the membrane is not able to move the rod. Eliminated by replacement.
Problem #3 - turning on the speaker with a delay
If, when you open a hot water tap, the column turns on with a significant delay, this may be due to incorrect adjustment of the ball valve (the adjusting screw is turned out too much). To correct, screw in the screw after making several turns.
Other reasons: clogged bypass channel or jammed retarder ball . We need to analyze the frog. The blockage is removed by cleaning the channel with a thin wooden stick and rinsing. The ball can be removed by unscrewing the plug and the adjusting screw.
Problem #4 - the column works after closing the tap
If the column, after closing the tap, continues to work for some time and then turns off, most likely the reason lies in incorrect adjustment of the smoothness of activation . The adjusting screw must be turned out after making several turns. To adjust the smoothness of turning on the gas, unscrew the plug, then use a screwdriver to screw in the adjusting screw a few turns to speed up the turn on of the gas supply, or unscrew it a few turns to slow it down.
Also, the cause of this problem may be a stuck microswitch . When exposed to flowing water, its internal contacts become deformed and crack. The device is replaced with a new one. After replacing the microswitch, the testing column is turned on for a couple of minutes and turned off. The leak itself is a reason to dismantle the frog and inspect the rod seals.
The microswitch is mounted on a platform attached to the water part of the unit. To protect against leaks, the body of the new part is lubricated with lithol or solid oil.
Another reason is the appearance of interference with the free movement of the rod . There are two possibilities: the reason is the design of the gas part or a malfunction of the water unit. In the latter case, the rod may be delayed by the resulting scale or may not move due to broken springs. The gearbox is disassembled, cleaned and, if necessary, parts are replaced.
The last two malfunctions ( sticking of the rod and microswitch ) can lead to serious consequences. Immediate elimination is required.
Problem #5 - the water heater does not gain power
The full power of the water heater is not achieved, and the blue flame of the burner is sluggish and goes out during operation. The most likely reason is a leaky membrane . Eliminated by replacement.
Problem #6 - no clicking noise is heard when igniting
If (with a wick igniter of the burner) the jet is cleared, but the flame dances too far from the edges of the burner, its tongues are more than 3-5 cm, then the diaphragm has broken. It is necessary to disassemble the assembly and replace the membrane.
Problem #7 - there is a water leak from the gearbox
The main reason is wear of the sealing gaskets or oil seals. They make a replacement.
Problem #8 - when the water is turned on, the rod is inactive
In some models, the movement of the rod can be observed visually. If the rod remains motionless when opening a hot water tap or does not extend to its full length, then the problem is a leaky membrane or a broken plate , which will become clear when disassembling the frog.
In columns with a microswitch, if the rod plate breaks or the membrane breaks, the platform foot does not return to the microswitch, but remains at a distance of more than 1-2 mm from it. After the hot water is closed, the gas continues to burn, and the column is turned off by a thermal relay. If the distance does not exceed 1-2 mm, the foot can be carefully bent until it fits completely
Such damage can be eliminated by replacing the damaged plate or membrane. Before disassembling the unit, it is advisable to stock up on new gaskets and seals.
What batteries are needed for a gas water heater?
The following types of products are suitable for installation in gas water heaters:
- D-LR20.
- D-R20.
The first type is an alkaline element. These batteries last for 5 – 6 months. The R20D is a conventional salt power source that will need to be changed quite often, because cheap products dry out very quickly. Both batteries have a voltage of 1.5 volts.
Alkaline batteries allow you to change the battery less frequently. But both batteries cannot be charged later. You can save money if you install a battery instead of a disposable power source.
Rules for dismantling and disassembling the gearbox
Regardless of the modification of the geyser, before starting repairs or preventive maintenance, turn off the supply of gas and cold water to the unit.
To drain water from the system, open the hot water tap, located below all water taps powered from the column. We place a wide container (basin or bucket) under the dismantled water unit, where the remaining water from the gearbox will be drained.
Removing the gearbox from the column
Often the frog can be removed separately. But in some columns this is impossible, so you will have to dismantle both blocks together. There are models of instantaneous water heaters in which, in order to gain access to the insides of the frog, it is not at all necessary to dismantle it - just remove the cover.
Dismantling the frog of the Neva 3208 water heater
In the Neva 3208 column, it is easy to dismantle the gearbox, as in other similar devices. To do this, you need to unscrew the union nuts on the inlet and outlet pipes of the housing, and also unscrew the three screws that secure the frog to the gas unit. When unscrewing the nuts and screws securing the water regulator, hold the unit being removed with your hand so as not to accidentally deform the parts of the gas unit.
When dismantling the water regulator, use a wrench to unscrew the 2 union nuts of the pipes in the indicated order, then unscrew the 3 screws with a screwdriver
The procedure for removing the Neva-Transit gearbox
To repair the water reducer, it must be removed from the column housing. Let's look at how to do this using the example of dismantling the Neva-Transit dispenser, since the fastening of gas-water units in many modern models is very similar. First, remove the adjusting knobs on the front panel. They are simply put on stock.
After that, unscrew the screws and remove the front panel. Please note that the digital display on the front panel is connected using detachable terminals to the electronic devices of the column. Therefore, by pulling the panel towards you, we disconnect the terminals and only after that we remove the panel completely.
Next, we will consider the process of extracting the water unit in the next photo selection.
Image gallery
Photo from
Step 1 - unscrewing the first two screws
Step 2 - Disconnecting the Ground Terminal
Step 3 - disconnecting the frog and column burner
Step 4 - carefully remove the water unit
Do you have a Neva gas water heater? We recommend reading in more detail about typical faults and how to fix them.
Disassembling the water regulator
Having freed the frog and drained the last water from it, unscrew the lid. Often the screws are soured. To make the work easier and to avoid tearing off the splines, we use the special tool WD-40. After unscrewing the screws, remove the cover, remove the membrane and inspect the condition inside.
We replace parts that have become unusable, clean and rinse the insides (surfaces, channels, if necessary, clean the outside of the body), install the parts in place and reassemble the frog in the reverse order.
Reassembling the frog
It is especially important to set the aperture correctly. The bypass hole must exactly coincide with the holes of the same name in the cover and base. If the channel connecting the cavities of the base and cover is blocked, the column will not work.
After installing the cover on the base, tighten the screws. We install the assembled gearbox in place (also in reverse order), not forgetting about the sealing gaskets on the pipes and on the connection of the water-gas unit with the gas burner leg platform.
The screws should be tightened and tightened without any misalignment. To do this, they are installed and baited in pairs, crosswise, and similarly screwed in until it stops.
A gasket is installed in this place (between the burner and the gas unit). Be careful - the safety of the gas water heater is ensured by the tightness of this unit
Testing a repaired unit
After installing the repaired frog, we check the operation of the water part without connecting the gas by opening the hot water tap.
We observe:
- whether drops have appeared on the connections;
- Is the flow rate the same when turning on hot and cold water separately;
- does the burner igniter click?
- Does the rod move normally when opening and closing the tap?
If not everything is going as it should, you should double-check your work. However, sometimes the reason may lie not only in the water node.
Only after the mounted frog has passed the test can gas be supplied to the column. But do not forget about the safety rules when using the speaker. And if you smell gas, you should immediately turn off its supply, arrange ventilation and call the gas workers.
How to choose power supplies
The safest option to avoid making a mistake in choosing a product is to go to a store with old batteries and buy batteries with similar parameters.
When choosing, be sure to take into account the manufacturer’s recommendations and pay attention to the appearance of the product when purchasing it. However, this approach may not protect you from purchasing low-quality units.
Additionally, you should pay attention to the following nuances:
- compliance with the expiration date;
- packaging integrity;
- absence of abrasions and mechanical damage on the case;
- correct shape of the power source.
The abundance of counterfeits on the market and storage of products in inappropriate conditions without maintaining the correct temperature conditions significantly affect the service life of batteries and accumulators.
Power supplies purchased at the nearest crossing are unlikely to be certified and reliable products. Therefore, purchase batteries from official offline and online stores. After all, the use of any damaged battery is fraught with fires and damage to equipment.
Required water pressure
The minimum pressure required to turn on the selected column is indicated in the equipment documentation
Paying attention to this parameter is especially important when installing a heater in old houses built in the 60-70s, since the pressure in their pipes is often insufficient for the heater to operate. If the manufacturer states that the minimum requirement is a pressure of more than 0.15 bar, then in an old building there may be problems with the functioning of this column
Another point is the ability of the column to withstand the hydraulic shock that periodically appears during water supply. This is the name for a short-term increase in pressure in pipes, which can cause leaks and damage to connections. With a value in the range of 11-12 bar, the column is able to withstand such changes.