No kitchen can do without a countertop, as this detail of the kitchen interior performs a number of important functions:
- is a work surface for cutting food and preparing it;
- is an area for placing the necessary equipment and tools;
- sometimes a tabletop can be used instead of a table.
Restoration of a veneered kitchen table top
The kitchen countertop tends to wear out over time; various chips may appear, since it is subjected to numerous mechanical influences and loads for a long time.
Partial restoration of a burn on a kitchen countertop before and after
Therefore, it is restored, updated and repaired more often than other furniture components of the kitchen in order to restore its attractive appearance.
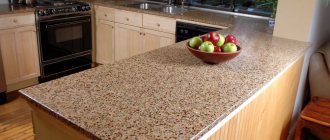
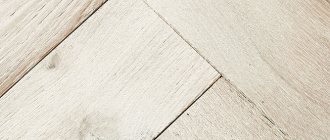
A chipboard tabletop has a low price, as well as a large selection of a wide variety of colors and textures
These elements of kitchen furniture are made from various materials: wood, chipboard, stone, plastic, glass.
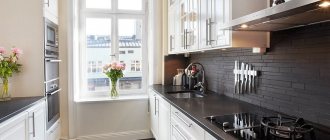
hpl panels for chipboard cladding have a huge number of color options and attract buyers at an affordable price
The most common type are those made from chipboard, as they are inexpensive and can withstand high temperatures. As an option, there are separate matte and glossy ones, coated with plastic. For their production, laminated, melamine and laminated chipboard is used.
Laminated chipboard - the sheet is covered with paper impregnated with resin
For laminated chipboard, the same paper is used, but of greater thickness, impregnated with melamine resin and fixed under pressure
The tabletop can be damaged due to exposure to moisture and heat, excessive looseness and other damage appear on it. Many people wonder how to repair a kitchen countertop.
Chipboard covered with film is afraid of moisture; the ends and edges of the tabletop suffer from water ingress
Ceramic tiles or mosaics are often used to restore the worn surface of a kitchen table.
Very often, countertop repairs can be done independently without the use of special tools.
Restoration of a table top made of chipboard before and after
Holes
Repairing holes on the surface is quite easy, because most often they are not too deep.
They arise from sharp blows with a heavy object, for example, with a hammer when beating meat.
First you need to clean the hole with a file to make the wax stick better. Then properly degrease the top of the hole with solvent or alcohol.
A tabletop made of chipboard or solid wood can be restored with your own hands.
After the degreaser has dried, heat the wax until soft. To make the final stage of work easier, it is recommended to immediately select a filler that matches the color of the material.
We seal the hole with wax, leaving a little of this material on the surface of the countertop.
After hardening, use a plastic spatula to remove excess from the surface.
We polish the repair area well with a felt rag. If the texture of the wax after polishing matches the rest of the surface, we complete the work.
If additional coating with furniture varnish is necessary, we carry out such manipulations. Some time after the varnish has hardened (16-24 hours), we polish it again with felt.
The tabletop is covered with a layer of varnish to secure the result.
Tips for repairing damage and preventing it
Tabletop repairs are carried out as carefully as possible so that the restoration site does not stand out from the rest of the surface.
A few tips will help with this:
- When choosing how to cover a chipboard countertop, pay attention to the rest of the kitchen design. If the facades are glossy, choose a glossy varnish coating. For calmer kitchens, matte varnish is more suitable.
- If you couldn’t find a coloring composition that perfectly matches the color of the countertop, then a tint varnish will help hide the differences between the problem area and the rest of the surface.
- To prevent delamination of the work surface, immediately after purchase, cover its ends with silicone compound and plastic strips. Additionally, the entire surface is treated with varnish.
Scuffs
Scuffing is one of the easiest defects to eliminate. The depth of the abrasion is small, just rub the damaged area with a furniture felt-tip pen. You should not work it directly on the surface. It is recommended to first paint a soft cloth, such as silk, with it. And then use this rag to thoroughly treat the abraded area.
Before you begin repairing the product, you should conduct a small diagnostic and assess the nature of the damage.
In this simple way you can deal with shallow abrasions. If the size of the defect is too large, we paint the surface with a felt-tip pen of the appropriate shade, and then polish the resulting area with a piece of cloth.
Using this technique, it is possible to blur the boundaries of processing with new paint and smooth them out visually.
If it is necessary to restore a varnished surface, before painting, use fine sandpaper to thoroughly clean the area of wear, degrease it, and only then paint. After the furniture marker has dried, we coat the work area with varnish, which we also polish 16-18 hours after application.
To avoid new scratches, it is better to cover the surface with a protective compound or transparent film.
Chips
Chips occur quite often, because in the kitchen there are a lot of dishes and cutlery with sharp edges.
To remove the chip you will need wax. Here, too, the main recommendation is to choose a material that matches the color of the countertop, because painting the wax base can be quite problematic.
Such damage to the edges of the tabletop will require even more labor-intensive repairs.
We cut it off or thoroughly sand the chipped area, melt the wax and apply it to the problem area. We wait for it to dry completely, polish it - and you’re done.
The molten composition is applied to the damaged area and given the desired shape.
If you need to tint the repair area or varnish it, we complete the restoration process with such work
After the wax has hardened, the excess is cut off and sanded.
Choice
But limiting ourselves to size alone is not everything.
In order for the plank for the end of the tabletop to fulfill its function clearly, you need to pay attention to other subtleties. So, along with aluminum products, plastic structures can sometimes be used
But they are not durable enough and are easily damaged by sharp objects, so you can choose such models only as a last resort when there is an acute shortage of funds. Metal structures should ideally have a matte appearance so that any roughness is less noticeable; Otherwise, it is enough to consult with sellers or countertop manufacturers.
Scratches
Removing scratches from a surface is as easy as removing abrasions, and maybe even easier. Before starting work, degrease the surface. If the scratch is shallow, it can be quite simply rubbed with a piece of wax (often there is no need to even melt it).
If the scratches are deep, you can use soft wax.
If the scratch depth is more than 3 mm, we perform preliminary cleaning of the surface from dirt for better adhesion of the wax.
Then we polish the work area with a piece of felt. If necessary, tint with furniture varnish. It is recommended to use ear sticks for small scratches; for larger scratches you will need a brush of the appropriate width.
Finally, the tabletop should be coated with colorless varnish.
Note! If there are several deep scratches nearby, it is recommended to completely remove the surface layer of the countertop in this area. This will allow you to avoid repeated damage to the integrity of the treatment area due to exposure to moisture - even with the most painstaking work, microcracks will certainly remain and grow over time.
Wax is applied to the scratch using a rubberized spatula.
Chipboard edges
To ensure that your countertop or cabinet edging is beautiful and durable, the best way is to have it edged in-house. This is usually done in the same place where laminated chipboards are purchased and ordered.
Approximate prices for application (per 1 linear meter including material):
- PVC edge 2 mm – 40 rub.;
- PVC edging 0.4 mm – 25 rubles;
- edge for melamine chipboard – 25 rubles;
- You will have to pay additionally for processing curved sections.
The most popular PVC edge in Russia is Rehau; it has a wide selection of colors, so you can choose a color to match any chipboard. The width of the tape varies - from 15 to 45 mm.
To order this service for a store, you must first prepare a diagram of how to glue the PVC edge: in what places to apply it and what thickness. Those places that will not wear out can be covered with 0.4 mm PVC to save money (for example, the back and bottom edges). All visible areas are treated with 2 mm PVC. Where the joint will be attached to the joint with another part, no processing is needed.
The difference between PVC coating 0.4 and 2 mm
- On the internal inset shelf, only the front edge is treated with a layer of 2 mm.
- The top cover is on all sides (the back edge is 0.4 mm, the rest - 2 mm).
- The drawer front is processed on all sides with a thickness of 2 mm.
To simplify calculations, you can use special furniture programs; they create a project automatically. As a result, to assemble an average wardrobe, a PVC edge for chipboard will cost 1.5-2 thousand rubles. It won't be very cheap, but it will be of high quality, safe and durable.
Cracks
Cracks on the surface of the countertop are the most common reason for its complete replacement. As the material most susceptible to negative influences, the top layer will certainly become unusable after some time. And the thinner and cheaper the material of the top layer of the countertop, the sooner it will begin to become covered with cracks.
If even small cracks appear on the countertop, urgent repairs are required - otherwise the crack may grow larger, and then the panel will no longer be repairable.
Before you begin work on restoring the countertop from cracks, it is necessary, in principle, to assess the feasibility of such work.
A wide crack in the top layer across the entire tabletop makes repair impractical. Even the most painstaking work will inevitably crack again after a while.
Glue is taken into the syringe and the crack is filled along the entire length. If it is very thin, a needle is put on the syringe for more precise coating.
If it is shallow and small, we proceed according to the standard scenario.
We clean, degrease, apply wax, polish. Additional painting and varnishing as needed.
It is recommended to immediately apply wax of a suitable shade; due to the large size of the cracks, even professionals are not always able to restore the uniform color of the surface.
A day later (after the glue has dried), the restored area is painted over in a suitable tone.
Wetting the tabletop
Soaking is another fairly common case of tabletop damage. The reason for its appearance is prolonged exposure to moisture, so most often the edges are subject to such defects.
If the wood chip layer is swollen under the laminated film, it will take some effort to correct the situation.
Soaking immediately attracts attention, so many people strive to eliminate this problem as quickly as possible.
Note! Fixing this problem often requires complete removal of the countertop.
First, you should thoroughly dry the countertop. Then mechanical cleaning of the soaking area from rotten parts is carried out.
The restored area is covered with bars and clamped with a clamp. The product is left in this position for 24 hours until the glue dries completely.
After this, furniture glue mixed with sawdust is placed into the resulting cavity; you can even use the remains from the previous step.
Note! Now it is important to press the glued layers as best as possible on the wet side.
Leave the tabletop under load for at least 24 hours. The more pressure the load puts on the repair site, the smoother and more uniform the result will be.
Treating the ends with water-repellent sealant or silicone compounds will help prevent swelling of the wood-based base under the laminated film.
After the glue has dried, install the tabletop in place. It is recommended to treat the open and unprotected side surfaces of the tabletop with silicone sealant; it will protect against repeated damage.
Types of edges
To seal the ends of chipboard you can find the following types of edges:
- Melamine (paper) edge with adhesive layer. An excellent option for DIY work at home. Easy to glue, but not practical to use.
- PVC edging . Strips of polyvinyl film intended for sealing the ends of chipboard panels and countertops. They do not have an adhesive layer and are difficult to work with your own hands.
- (Acrylonitrile Butadiene Styrene) plastic edge A practical option, it is sold with an adhesive layer, so it is convenient for DIY work. It is the ABS edge that will be used in the description of the work in this article.
Burns
Burn-through occurs when the surface is exposed to too hot dishes. Before you restore a kitchen countertop made of laminated chipboard, you need to get rid of the visible burn area. We work with sandpaper or a file, as necessary.
If the protective laminated layer is exposed to high temperatures, it will leave an unsightly burn mark.
And then we carry out the same algorithm as for a scratch - fill it with wax, sand it, paint it or varnish it.
By following our simple tips, you can easily, quickly, and most importantly, economically bring your countertop to its original form.
The best option is tabletops, the edging of which is made of aluminum tape.
From the author
The background to the work described in this article is as follows. For the kitchen, a 2400 mm long kitchen worktop was ordered. Since the tabletop is sold in 3000 mm pieces, the manufacturer received a completely finished tabletop 2.40 cm long and the remainder of the tabletop 60 cm. It was this remainder that had to be glued to the edge of the tabletop.
Installing a countertop is a complex and time-consuming job that requires special tools and practical skills. Installing a countertop without practicing such work is almost impossible. Therefore, I recommend that if you do not have similar work experience, you invite professionals to install the countertops. The craftsmen of the company santex-mastera.ru, who can be invited on the website https://www.santex-mastera.ru/, will carry out professional installation of the countertops, using modern tools and linking them to your kitchen furniture.