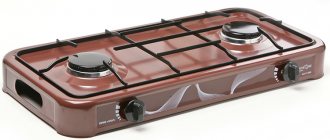
Before you begin to regulate and configure the gas stove, or rather, the operation of its burners, you need to understand what a properly burning flame looks like, which, in fact, they produce. The color of the fire should be blue, and it is better when the flame has a bright blue tint of glow. If instead the fire looks yellow or orange, then this means there is a clear lack of air in the combustible mixture coming out of the burners of your stove. In general, the whole point of adjusting the flame of a gas stove is largely to change the ratio of gas and air in the very final mixture, which you, we hope, safely, and perhaps automatically, set on fire, receiving at your disposal the flame of the kitchen hearth .
This is about the theory. But in practice, everything is also, in general, not difficult. Since, to carry out work on adjusting the flame of a gas stove, you need, having familiarized yourself with its design, to get to the air dampers that regulate the air supply to the combustible mixture. They are usually located near each of the stove burners. Therefore, having disconnected your kitchen unit from the gas and electricity supplies, you should remove its partition, which hides access to the adjusting mechanisms of the burners, to the air dampers. And as soon as you get to them, you need to reconnect the stove to the gas line, and also, if necessary, to the electrical network, after which, by turning on each burner in turn, you can achieve the desired color of its combustion flame. To do this, you just need to turn a special screw, which specifically regulates the air supply to the gas-air combustible mixture.
Additionally, you may need to change the minimum flame level of each burner on your stove. In modern stoves, a special gas control valve, as well as a thermocouple included in its composition, is responsible for this. If their contacts are subject to oxidation, this will directly affect the minimum combustion level of the burner flame. The essence of the operation of this mechanism is that it stops the supply of gas to any of the burners if its fire was extinguished due, for example, to boiling milk spilling over the surface of the stove.
When the burner is functioning normally, that is, its flame is burning, the thermocouple sensor heats up from the energy released, which makes it possible to supply a gas-air mixture to the burner. But as soon as the fire is extinguished for some reason, the same thermocouple sensor cools down, automatically, blocking the gas outlet through this problematic burner. This helps protect the public from possible fires and explosions that may occur due to improper handling of gas.
As you understand, if a deposit of a certain thickness forms on the surface of the thermocouple sensor due to regular contact of food liquids, this will clearly reduce the overall sensitivity of the gas supply control valve. Accordingly, in order to avoid emergency and simply inconvenient situations, you should simply clean this mechanism, removing all unnecessary formations from its surface.
Cooking, unfortunately, takes a lot of effort and time. Often, the duration of cooking depends not so much on the complexity of the dish, but on the power of the gas stove: with a nominally weak technique, everything takes longer to cook and fry. Finding ways to increase the power of a gas burner is so relevant because spending a free evening on yourself is much more pleasant than standing at the stove.
But are these modernization methods really safe? And are gas games worth the time savings? We will consider these pressing issues in detail in this material, providing it with visual photos and useful videos.
Briefly about the power of the burners and stove
The total power of the working surface depends on the number of burners and their direct power, indicated in the equipment passport. The average for one burner is 2-2.5 kW. With decent gas quality and normal pressure in the line, this value is quite enough for comfortable and relatively quick heat treatment of products. In this case, the maximum power of the burner is determined when the regulator is turned to the maximum and gas is fully supplied.
Manufacturers often offer household hobs, the burners of which have different power ratings:
- on small ones - 0.7-1.2 kW;
- on average - 1.3-1.8 kW;
- on large ones - up to 4 kW and more.
Such a technological solution is quite logical and convenient: it makes no sense to brew coffee in a Turk on a powerful WOK burner or try to boil a large volume of water on a small one. Choosing different capacities allows you to save gas, and if the room temperature is maintained using an air conditioner, you can also save electricity.
Thus, the acceptable parameters for the calorific value of the gas used by a hob from the middle price segment, consisting of 4 burners, is 8-10 kW. More budget models usually have a total power of 5-7 kW.
Cooking surfaces with a high calorific value for normal safe operation may require the installation of a separate chimney or the installation of a heavy-duty hood. However, for home use, purchasing such models is not always advisable.
Gas stoves with two- and three-circuit burners are especially popular. The so-called double or triple “crown” is a powerful burner in which the flame is produced not in one row, but in several circles. This device allows you to cook faster and heat dishes more evenly.
A crack has appeared on the ceramic automatic ignition spark plug
The automatic ignition system is the most unreliable and capricious thing in the entire stove. Breakdowns here are not uncommon, especially given the poor quality of some gas stoves. Normally, the system should work without failures. By the way, I have seen excellent “seven-core” ignition in Gorenje and Smeg gas stoves.
During diagnosis, the first thing to examine is the electrodes. An electrode is a ceramic candle, a rod if you like, that has a metal core. You should carefully inspect it to make sure there are no mechanical damage or cracks. The candle itself must be securely fixed next to or inside the burner.
A sign of a crack is sparking on some burners. They will require replacement spark plugs. To access damaged parts, the cooking table is disassembled. The spent candle is disconnected from the burners (by the way, there are locking rings here, they cannot be lost) and from the impulse block. A new one is installed to replace the worn-out node and the connection is made.
Tip from the expert: never press the ignition button if the burners are removed from the stove. This way you will get a breakdown.
Gas stove burner design
To understand how you can increase the flame in a household gas stove, it is worth familiarizing yourself with the structure of the burner itself, the principle of gas supply and combustion.
The first thing worth remembering once and for all: what burns in the stove is not just pure gas, but a gas-air mixture. It is its final composition, the ratio of gas and air, that largely determines the size and efficiency of the fire that the consumer receives from the burner.
Burners in burners, depending on the method of air intake, are of three types:
- Diffusion ones are usually used in ovens. There is no air leakage in such structures; mixing with gas occurs naturally.
- Kinetic burners use line pressure to capture the right amount of air to create the right fuel mixture.
- Combination burners successfully use both methods of adding air to gas. These are the devices used in most household gas stoves.
The design of the burner itself has a simple, but precisely calibrated configuration.
The pipeline ends at a tip into which a nozzle is mounted. Its passage hole has a certain calculated diameter. It is through this that gas is supplied to the mixer, in which fuel is mixed with air. From the mixer, the flammable composition enters the burner, in which a flame is produced.
It is worth paying attention to the area between the jet and the mixer. While the gas travels this distance, exactly the amount of air that is necessary to obtain the optimal combination of fuel and oxygen is mixed into it. This distance is also strictly calculated, so that the gas burns completely and with the highest possible efficiency.
How to fix it?
Most often, when gas ovens malfunction, owners are in no hurry to contact specialists, hoping to carry out repairs themselves. What kind of breakdowns can be repaired without danger with your own hands? This is discussed below in our article.
- Cleaning the regulator knob. Before starting repairs, turn off the gas supply. Troubleshooting begins with cleaning the taps. After removing carbon deposits, dirt and grease from them, clean the spring. Wipe the cork carefully so as not to damage it. Disturbing the surface will cause gas leakage. Use only a soft sponge. Next, the plug is treated with graphite lubricant without touching the holes. Remove greasy deposits from the stem with a knife. Afterwards, the handle is assembled in the reverse order of disassembly.
- How to fix oven doors. Over time, the oven door becomes loose, causing it to not fit tightly or not to close. To fix the problem, unscrew the mounting screws connecting to the stove. Having loosened them well, move the door in different directions until you find a position in which it is firmly seated on the hinges. To control, place a sheet of paper between the seal and the edge of the oven. If it does not clamp well, do the procedure again. After installation on the hinges, the bolts are tightened into place.
If it is noticed that the loss of heat is associated with damage to the seal located around the perimeter of the door, replacing it will not be difficult.
- Remove the old seal. In some oven models it may be attached with screws; to get to them, pull off the protruding edge of the rubber, in others it is glued.
- Wash the channel and door with liquid detergent. Clean off any old caulk or adhesive residue. Degrease.
- Install a new seal by starting from the top, then down and to the sides. Complete the process by bringing the edges together at the bottom center. If the elastic needs to be glued, choose a food-grade adhesive that is heat-resistant up to 300º.
Among other failure options.
Checking and cleaning the thermocouple. The oven burns as long as you hold the handle - then you need to check the thermocouple mount. In the lowest position it should touch the tongue. If the placement is incorrect, most models allow you to adjust with screws. It is possible that the thermocouple contacts are dirty and this is preventing the flame from being maintained. Try cleaning the part with sandpaper.
Ways to increase the power of a burner
Based on the design features of the burner, several methods of increasing the power of the stove are popular. But is it appropriate to test them on your own experience?
It is worth recalling that even independent repair of gas appliances is prohibited, and even modifying equipment at home is an undertaking bordering on dangerous and even deadly sabotage.
Unfortunately, explosions and carbon monoxide poisoning are tragedies that shock the public with the frequency and number of victims. Therefore, it is definitely not worth altering the design of the burner for the sake of your own convenience. And the methods described below are more useful for understanding theory than for practical application.
Method #1 - boring or replacing the jet
The nozzle through hole is one of the main regulators of the gas volume, which gradually enters the burner. To increase the power of the burner, you need to carefully bore the nozzle or replace it with a part with a wider feed hole.
For boring, you can use a sharp knitting needle with a diameter of up to 3 mm. But you shouldn’t get too carried away - uncontrolled enlargement of the hole or replacement of the nozzle is fraught with extremely unpleasant consequences.
It is impossible to increase the gas flow without miscalculations, since the burner itself must be able to process it. Excess gas will cause the flame to pull away from the burner. The fire will change color to red, soot will appear, which is almost impossible to remove from the dishes. The problem can be solved by installing a larger diameter burner.
However, replacing the burner is not always possible due to the design of the stove body itself. Even if you actually replace the burner, the new volume of gas transmitted through the nozzle may not be enough. This threatens even bigger problems: the flame can jump down and burn out near the nozzle itself.
But a sluggish flame and soot in this case are the lesser of evils. A falling flame indicates incomplete combustion of the gas, which releases combustion products dangerous to life and health - soot and carbon dioxide.
Method #2 - reducing the jet-mixer length
Fortunately, this method is less popular among tips on how to try to increase the power of a gas stove. This method is more dangerous than the previous one, as it involves even more interference in the design of the burner, is less effective and can also lead to negative consequences.
The size of the area that is emphasized in the description of the burner design also affects the power of the flame produced. If you reduce this zone, gas will flow into the burner faster and the burner power will increase slightly.
However, the portion of air required for normal combustion simply will not have time to be added to the incoming gas. As a result, the modernizer will receive the same red flame with soot, which is likely to come off the burner.
Method #3 - removing the divider
You can try to increase the burner power without affecting the operation of the nozzle. The divider covering the burner evenly divides the flow of the gas-air mixture, distributing the flame into separate bundles. Removing the divider increases the area of contact between the flame and the cookware. The column of fire becomes higher and larger, and the heat treatment itself proceeds faster.
However, this is only a temporary measure and is not suitable for every pan. For this kind of cooking, you need to use tall cauldrons or special WOK pans. Additionally, a fire uncontrolled by a cutter becomes quite dangerous.
Method #4 - increasing gas pressure
The pressurization method is only suitable for stoves connected to gas cylinders. The standard pressure in a cylinder for domestic use is about 1.6 MPa. But this value is not constant: the force of gas pressure on the walls of the vessel can be influenced by both the degree of filling of the cylinder itself and the temperature in the room, the composition of the gas, etc.
The higher the temperature of the gas, the more it expands, pressing on the walls of the container. Therefore, the cylinders are not filled completely, but approximately 85%. And, the less gas remains in the vessel, the weaker its flow flowing to the burner.
You need to try to increase the pressure of the gas entering the stove using a reducer, the so-called “frog”. It is unsafe to damage the design of the unit, and, fortunately, most modern gearboxes are non-separable. However, replacing the part may solve the problem. Supplying gas with increased pressure will provoke more air leaks, due to which the flame on the burner will increase significantly.
But do not forget about safety precautions and monitor the gas supply even when the burner control is closed. Too high a pressure can cause gas leakage even when the burners are not turned on.
Based on all of the above, you can understand that when choosing one of the ways to increase power, you should be extremely careful and not overdo it.
The only safe and affordable way to increase the power of your burners is to buy a new hob or stove. It is necessary to initially select gas equipment that meets the needs of the family. Any attempts to change the passport parameters of burners by an inexperienced technician at home will inevitably lead to serious problems.
If you have a faulty electric ignition
Almost all devices are now equipped with it, which has a positive effect on ease of use. Let's first define how electric ignition works and works.
Electric ignition consists of four parts:
- transformer (unit) operating from a 220 V electrical network;
- electrical wire leading from the transformer to the ignition mechanism;
- ceramic candle;
- ignition button located on the control panel, next to the rotary switches.
The mechanism of electric ignition is as follows:
- When you press the button, the circuit closes;
- The transformer generates the current for the spark;
- The pulse is supplied through the wires to the gas burner;
- The ceramic candle produces a spark and the burner ignites.
It is noteworthy that the candle fires on all burners without exception, however, only the one that receives gas is ignited.
It is very important to ensure that the network always has one voltage - 220 V. To protect your stove, you can buy a household voltage stabilizer, which will protect you from unexpected current surges
Otherwise, short circuits and unstable operation of the network negatively affect the electric ignition and can cause breakdown. If your hob exhibits the following malfunctions, then the problem is with the ignition:
- you turn on the button, but the ignition does not work;
- one or all spark plugs spark;
- you release the button, and the ignition works.
You turn on the button, but the ignition does not work
The first and most common reason is contamination of the mechanism button and/or burner with dirt and combustion waste. Cooking food entails splashing fat and food all over the stove, so this problem is not uncommon. Clean the ignition button, wipe the burner, clean the nozzle with a needle or any other thin stick, wait until everything is dry.
One or all spark plugs are sparking
If the spark plugs on all burners sparkle orange or yellow and operate intermittently, then the problem may be a faulty electric ignition unit. It needs to be replaced, but doing it yourself is extremely difficult. The block is located in the middle of the panel; it needs to be disassembled and the contacts disconnected, so it is better to trust professionals in this situation. To be sure that the problem is in the transformer, do the following:
- in the dark, with the lights off, turn on the ignition button;
- if a spark appears on all burners of the color described above (yellow, orange), the unit definitely requires replacement;
- if the spark is blue, the unit is working.
If the integrity of the spark plug is damaged or its rod is oxidized, it will spark orange or yellow intermittently. This is solved by replacing the faulty spark plug. However, such problems are quite rare and this is due to the design of the candle itself. It is a steel wire, one millimeter thick, encased in porcelain. For a candle to become unusable, it must be in very unfavorable conditions of high humidity or subject to shock.
You release the button, but the ignition works
This may be due to a faulty transformer or oxidation of the contacts.
When washing the panel or boiling water, liquid can penetrate into the middle of the device, onto the contacts. With constant leaks and heat coming from the burners turned on, the contacts oxidize. They become rough, they can stick together and break. Their technical cleaning and high-quality drying will help.
Why does the burner burn poorly?
If, according to the passport, the burner has more power, but in fact does not produce the required volume of flame, it is worth looking for possible reasons for the decrease in the efficiency of the equipment.
The most common reasons for poor combustion are the following:
- line pressure is too low;
- the air-gas mixture enters the burner in insufficient volume;
- the holes in the crown or jet are clogged with combustion products;
- the design of the burner is damaged or the gas hose itself is damaged;
- the burner does not match the installed burner.
The last option is rather an exception to the rule, since all hobs are thoroughly tested at the manufacturing plants. Equipment diagnostics and repairs must be carried out exclusively by a certified gas service technician.
Another reason for the burners not working properly could be an unsuitable jet. Many gas stoves come with two types of these nozzles, each of which is suitable for a specific type of gas: bottled or mains.
The gas pressure in the cylinder is significantly higher than in the pipeline, so nozzles with a narrower opening are used to connect the stove.
It is possible that when installing and connecting the stove to the centralized gas supply pipe, nozzles of the required type were not replaced, so the burner does not work correctly.
Breakage Prevention
Gas stoves are used everywhere and are popular because they are quite unpretentious in use and maintenance. There are many brands of stoves, the most popular and safe are the Hephaestus model plates. But in order for a stove of any model to serve you faithfully for many years, you need to properly care for it and follow safety precautions. This is the only way to reduce the likelihood of breakdowns and generally reduce them to a minimum.
In order for the stove to serve you for a long time, you first need to properly care for it.
It is useful to completely clean your stove of dirt at least once a week. Try to wash the surface immediately after cooking if you see stains of oil, any other liquid or food residue. First, remove large residues and crumbs, and then wipe the surface with a damp cloth or sponge.
Important! Do not use powders or other similar cleaning products, as they will have a detrimental effect on the enamel surface of the stove. The abrasive nature of the powder can cause scratches and microcracks. The same goes for cleaning devices; they should be soft in structure.
See alsoShells as an interior element
Adjusting the flame on the stove burners
It is necessary to debug the normal operation of the burner in cases where the flame loses its efficiency and quality. Setting up a gas stove should also be done by a specialist. But understanding the algorithm of this process will be useful for any user.
First, it’s worth understanding what a properly burning stove flame looks like. The fire should be blue. An intense bright blue glow is a sure sign that the stove is working correctly and does not need debugging. A yellow, orange or red flame indicates an incorrect composition of the combustible mixture. In this case, there is clearly not enough air; its flow must be increased.
To change the gas-air mixture entering the burner, it is necessary to adjust the operation of the air dampers, which are usually located near each burner.
Direct setup goes like this:
- after disconnecting the stove from the gas system, it is necessary to gain access to the adjustment mechanisms under a special partition or in the gas control knob;
- the stove is reconnected to the main line, gas is supplied alternately to each burner;
- the volume of air entering the mixer is adjusted by turning a special screw;
- As soon as the flame in each burner acquires the correct color, you can turn off the stove again, reassemble it and connect it to the main line.
When setting up the stove, you may need to work with the gas control valve and its thermocouple. If the flame regularly goes out at a minimum fuel supply level, perhaps the problem lies in the gas control. The operating principle of this option is based on a special sensor that responds to the energy released during the combustion process. If the flame goes out unexpectedly, the thermocouple sensor cools down, signaling the gas supply to stop.
However, oxidation processes and a decrease in the sensitivity of the sensor due to the ingress of liquids or the formation of deposits from food deposits can provoke incorrect gas shutoff outside of an emergency situation. Therefore, both the stove and this block should be kept clean, and if necessary, call a professional to clean it.
If you are faced with unusually noisy operation of the burner, we recommend that you find out the cause of the noise of the burner and how to eliminate it.
Basic rules for oven care
Caring for the oven is about the same as caring for the stove. Take some time to clean its surface.
There are two ways to remove contaminants:
- Classical. You simply apply detergent to the inner walls of the cabinet, and it should not contain powder or abrasive, which is also bad for the enamel. Leave for about 1-2 hours so that the dirt is corroded. Then scrub off the plaque with intense movements. But you should do this carefully and use a soft sponge.
- Hydrolytic. This method is suitable for adhering dirt and grease crust. To do this, dilute the detergent in a saucepan with water and place it in the oven, preheated to 80-95 degrees for about half an hour. The stubborn dirt will become soaked under the influence of steam and will become much easier to wipe off.
There are two ways to clean a gas oven.
Important! Proceed to washing the oven only after it has completely cooled down! Then rinse off the foam with a sponge soaked in water and wipe dry with a cloth.
If you follow the simple rules listed above, you can maintain the original condition of your stove and prevent breakdowns. Carefully monitor the operation of the burners and oven, and if any problems arise, take a closer look at the equipment. If you yourself are not able to understand what could have caused the malfunction, contact the service center. When providing services, ask what led to the breakdown and use the recommendations of the experts. Read educational articles on this topic. And, of course, regularly take care of your gas stove so that it serves you as long as possible and delights you with delicious dishes!
See alsoHow to beautifully decorate a wall with photographs
Conclusions and useful video on the topic
The operation of a burner without a divider and the potential size of the flame when cooking directly from the burner is presented in the following video:
An example of the operation of jets for bottled gas in a hob connected to the main gas pipeline is clearly shown in the following video. After replacing the injectors, the flame becomes almost perfect:
Interfering with the design of a gas burner is an unacceptable and risky idea. Residents of apartment buildings must be especially responsible, because in the event of an accident, not only their own lives are at stake, but also the fates of all neighbors. Approach the choice of equipment seriously, calculating in advance the power of the equipment necessary for comfort, so that after purchase there is no need for dangerous and unjustified modification.
Would you like to share your experience of increasing the power of the burner? Tell us about it in the comments block, join the discussion - we and our readers are interested in your opinion.
If you still have questions, do not hesitate to ask our experts and other site visitors - the feedback block is located below the article.
Ignition produces a spark, but the burner does not ignite
If a spark occurs when turned on, but no fire occurs, the reason is the thermocouple. It is necessary to intercede if repair is impossible. Updating the solenoid valve also gives a positive result. After this, the stove works stably.
Advice! Check the picture of the ignition unit - if it is in order, but a spark does not occur, the problem lies in the unit or power supply wire.
If there is a spark, the dust burns, but goes out quickly, press the button to supply gas for a long time. Perhaps the sensors responsible for supplying the flame do not have time to warm up.
Results of the work done
After gas supply and control washing, no gas leaks were detected! The faucet is sealed and works much more pleasantly, without jamming!
Alexander Birzhin, rmtn.ru
Details Published 12/20/2016 16:38
What should we do if we smell an unpleasant gas smell in the kitchen? There is a high probability that this is leaking from the gas valve, which is located directly in front of the device.
As soon as you hear the smell, you should call emergency services, because the gas is highly explosive.
But it’s also worth knowing how to deal with such situations yourself. If the valve is to blame for the leak, then it is better to replace it; for polypropylene pipes, a frialen 63 ball valve is suitable. But simply lubricating the faucet may be enough. To do this, we will study in detail the instructions on how to carefully lubricate the faucet.
Flat slot screwdriver
Rag
Gag
Graphite, solid oil or technical Vaseline
Soap
1
Examine the gas tap, paying attention to how the main part of the tap is made. It can be made in the form of a cone with a hole all the way through, or pressed with a twisting spring using a special plug. Unplug all electrical appliances;
Unplug all electrical appliances;
Ask all uninvolved people to leave the room, if possible, the premises.
Make sure there is no open flame in the room and never smoke while working.
3. Next, unscrew and remove the valve from the faucet and gag it to reduce the gas flow. Carefully remove all old grease with a dry cloth and apply new grease without filling the holes.
4. After everything is done, you need to very quickly replace the gag in the gas tap with a bolt. Carefully twist the spring and clamp it with a plug. We resume the gas supply if you shut it off earlier.
5. Ventilate the room well. Then prepare a solution of soap and apply it to the tap. If there are no bubbles, then you have done the job. But still, when there are bubbles, try to assemble the faucet again and check for leaks in the same way. When the problem persists in this case, urgently call the gas service. Since even the smallest leak can lead to a destructive explosion.
Gas is the main assistant to the cook and fireman; with it you will not be cold and hungry. Knowing the safety rules and behavior patterns during emergency situations will protect you from harm and help strengthen your “friendship” with the gift sent to us by Mother Nature. Still don’t know what to do when the gas tap in the kitchen leaks and how to check if there is a leak? Well, let's get down to business then.