To allow access to the site, special openings are made in the fence. And to ensure that this place does not remain empty and that everyone does not enter through it, gates are built. A gate is something similar to a gate, only it is intended for people to enter.
Wickets can be made from various materials. This is a small door that is held on hinges, like doors in a house. It can cause various constipation mechanisms.
Many types of gates are not that difficult to make yourself, with minimal skills and knowledge. By looking at photos of gates made by yourself, you can find entire works of art.
How to build a gate yourself
Before starting construction, it is necessary to determine the exact dimensions of the future gate. Usually it is built at the same level as the fence and should not exceed a height of 2 m. If the fence is higher, then another transverse bar is added to its structure to strengthen the gate.
When designing the width of the gate, it is important to take into account the ability of not only the free passage of people, but also the ability to bring in furniture.A very wide gate will look bulky and will create additional stress on the fastening materials. Therefore, it is optimal to build a gate 1 m wide.
How to properly install wooden posts
The pillars are installed in this way:
- Using a drill, we dig a hole a meter deep;
- the distance between the planes of the pillars placed “facing” each other should be slightly greater than the width of the gate, this is within the range of about 120 cm;
- pour 5 cm of sand into the bottom of the hole and spill a lot of water for shrinkage;
- add 5 cm of crushed stone;
- we burn the underground part of the pillars with a gas torch or blowtorch, or you can treat the entire pillar with an antiseptic to protect it from rotting;
- Place a pole along a plumb line, fill the hole with crushed stone and compact it;
- the base must be filled with liquid cement mortar and sand. The stronger the solution, the faster you can start installing the gate.
Set of tools for work
Many owners try to build a gate on their own. Before starting work, you should stock up on the necessary tools. For work you will need:
- measuring and marking tools;
- garden auger, shovel;
- welding machine;
- Bulgarian;
- screwdriver
- nails and screws;
- material for making the structure frame;
- equipment for making concrete mortar.
Drawing construction and material selection
You should decide in advance on the size of the gate and the material used. The drawing should not only indicate the dimensions of the future structure, but also provide for the location of individual elements in the form of inserts or gaps.
Wickets made of profiled metal can be combined with elements made of plastic or polycarbonate, and forged metal elements go well with wood.
The lock for the gate and the handle should be purchased in advance and their installation should be considered. After completing the drawing, you can begin to prepare materials for the construction of the gate.
Covering and decor
Before covering and decorating the gate, the frame and posts must be sanded, treated with an anti-corrosion primer and painted with two layers of paint. It is advisable to remove the gate structure from its hinges and assemble it on a flat surface (see the paragraph on welding the frame).
There are many options for decorative design of the gate:
Net
The easiest way to finish a gate is by covering it with mesh. Wicker or woven mesh is cut to size, welded to the frame and painted.
Polycarbonate
Polycarbonate is secured using self-tapping screws. The polycarbonate is cut out, the ends are covered with an end profile and special adhesive tapes. The combination of polycarbonate and forged pattern looks beautiful.
Profiled sheet or other metal
Covering gates with corrugated sheets is very popular. Installation of corrugated sheets is carried out in the following sequence: the sheet is cut using a grinder, screwed using colored roofing screws with rubber washers into the lower part of the wave. The edge of the sheet is processed with a file, coated with an anti-corrosion compound and paint.
The gate is also sheathed with sheet metal. Installation of the sheet can be welded or threaded - with self-tapping screws. More often the sheet is attached to the frame by welding.
Tree
You can cover the gate with wooden boards and even bamboo. The boards are sanded, primed with antifungal primer and painted. The bamboo is cut, coated with primer and varnish. Fastened with self-tapping screws.
Forging
The most beautiful designs are made from forged parts. Forging work is complex, but you can buy ready-made forged parts and weld them onto the gate frame. The main thing is to think ahead and draw a picture, and then carefully carry out the welding work. Separate parts of the picture can be decorated with gold paint, or the entire picture can be covered with bronze or copper paint.
Locks
A lock or latch is installed on the gate. A mortise lock is preferable - when opening the gate outwards it is more difficult to break it. At the place where the lock is inserted, a slot is made in the gate frame pipe (with a grinder with a small disk). A casing is welded from the sheet and welded to the pipe. The casing protects the lock from breaking and from precipitation. A lock is installed in the slot in the pipe, attachment points for screws and the cylinder mechanism are marked, and holes are drilled for them in the casing. The lock is installed. The lock strike plate is attached after the final installation of the gate - its location is marked, holes are drilled, and the bar is screwed in with self-tapping screws.
At the very end of the work, the handle is attached. The installation can be welded or threaded.
Frame blank
The basis of a strong gate is the correctly selected material for the frame. Usually they take 4 beams and connect them into a frame. A crossbar is mounted in the center of the frame. The frame is tried on to the size of the span and only after that the hinges are hung and filled with sheathing material.
The structure can be strengthened by using reinforcing bars or metal corners. If desired, the gate is made blind, which firmly hides everything that is beyond its border.
Choosing a location for the gate
It is usually installed together with the fence in the place that is most often used to enter the site.
If there is no need to install a gate at the entrance to the summer cottage, the most convenient place for the gate is selected. In this case, any type of swing gate can be built.To enter the territory of the site for motor transport, a gate is installed, where the gate can open as a separate door or gate leaf.
The most common and convenient option is to install a gate next to the fence, when, if desired, you can enter the territory of the dacha through the gate, and enter through the gate.
In this case, the wicket and gate are separated by a boundary post, which serves as a support for the structure.
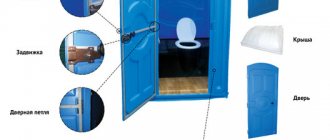
Device, types of structures
The gate is supported on support posts. It consists of a door leaf, placed with or without a frame, which is attached to the pillars with hinges (curtains). It can be a built-in part of the gate or located separately from it. For reliability and convenience of closing/opening, it is equipped with a latch, a lock (padlock, electromechanical or other type), and a deadbolt. To prevent precipitation from getting into the door lock, a small canopy is installed on top. To notify you of the arrival of guests, a bell and intercom are installed at the gate, and a surveillance camera is mounted above.
According to the design and method of opening, the gate can be swinging or sliding. It can be part of sectional, rail, combined devices with gates, but they are used extremely rarely.
In the private sector, the most popular type is the swing gate, including because you can quickly make such a gate yourself.
Material for support posts
Metal or profile pipes with a diameter of up to 80 mm are often used as pillars. The wall thickness must be at least 4 cm. Pipe pillars are a reliable support for the structure.
Their light weight allows you to install them yourself in a short time. Sometimes stone or brick pillars are used. Their production is a longer process.
The disadvantage of the seemingly impressive support of such pillars is the tendency of the masonry to sag and collapse.
Important! To strengthen the structure of such pillars, a metal pipe is passed inside.
Hinged or sliding?
Structurally, gates are divided into two types: swing or sliding.
Their advantages and disadvantages are given in the table:
| Wicket type | Advantages | Flaws |
| Swing | ease of manufacture | In winter it is necessary to clear snow |
| light weight | There is no sound insulation at all | |
| low price | ||
| beautiful appearance | ||
| Time-tested design with hinges is trouble-free | ||
| Sliding | manufacturing is more difficult than swing | If there is a power outage, it may be difficult to enter the site |
| the price is higher (the electric motor and automation are more expensive than simple profiles and sheets of metal or corrugated sheets) | If the electric motor breaks down, it takes time to purchase and replace; during this time the gate cannot be used | |
| beautiful appearance | There is no sound insulation at all | |
| small space saving | Difficult to install on your own |
In general, the choice of the type of gate is a matter of taste, although many prefer the traditional hinged design - it’s more familiar. The main advantages of sliding work are that automation and saving space for opening are not so relevant for small gates.
Mounting and installation of the wicket frame
Before you start covering the frame, you should level the frame and try it on. To do this, the workpiece is inserted into the prepared opening and the gaps are aligned.
It is important not to forget to leave about 10 cm of free space at the bottom for the smooth opening of the gate. After hanging the loops, the workpiece is re-fitted and its movement is smooth.
Variety of wickets
The choice of material from which the gate will be made should be approached carefully. The gate can be different in shape and material of manufacture. It can be decorated or left invisible to passersby.
Wooden gate
Every owner can make a wooden gate with their own hands. Such a structure has a number of positive qualities:
- use of environmentally friendly material;
- affordability;
- ease of purchase and delivery;
- ease of manufacture.
Among the negative qualities of wooden gates, they note the ease of breaking and short service life due to the inability of the material to withstand precipitation.
In order for the wooden structure to last longer, it is treated annually with special protective agents.
Preparatory work before assembly
Before purchasing lumber, be sure to decide what height your gate will have and what the size of the gate will be. Remember that for reliability, the support pillars need to be deepened into the ground by about a meter .
If you want to build a gate “for centuries” with your own hands, it is better to make the supports not from wood, but from concrete, brick or metal. And in order to maximize the service life of wooden poles, before installation they are impregnated with an antiseptic, and the underground part with resin or bitumen mastic.
The area for installing gates and wickets must also be prepared in advance:
- remove large stones;
- loosen hard clods and level the soil;
- if necessary, mark the placement of supports using a cord stretched between the pegs.
It will be very difficult to install pillars with your own hands, so it is advisable to invite an assistant so that you can hold the pillars and concrete at the same time.
The shutters are hung on the gates only after the concrete has completely dried, and the supports at the top are best fastened horizontally with a common beam, which will prevent the pillars from warping under the weight of the shutters.
Gate made of profiled sheets
To make such a gate, a metal structure is first constructed from profiled pipes of the required dimensions, then it is filled with metal sheets.
There are several types of profiled flooring. Therefore, you should consider your choice in advance:
Sheets of the H series are distinguished by increased thickness and special stiffeners. A structure made from such sheets will be heavy and expensive, so it is better not to use them for a gate;
The ideal option would be to use sheets of the NS series. They are of medium thickness and are specially designed for use in the construction of fences and roofs.
Metal sheets of the C series have a small thickness. It can be used for construction of gates due to its attractive appearance. In this case, you should select a material with a thickness of at least 0.5 mm.
A gate with a fence made of corrugated sheets will reliably protect the area not only from prying eyes, but will also become a reliable defense against attempted vandalism. The disadvantages of using such a material are the susceptibility of the sheets to corrosion and simplicity of appearance.
How to make a door in a gate leaf
You can save a lot of effort and money if you install the door structure into the gate leaf. However, this only applies to metal swing products. A door installed in a sliding or sectional gate is very difficult to make yourself.
The location of the gate is closer to the inner edge of the sash
The step-by-step instructions are as follows:
- The support next to the door must be reinforced (corrugated pipe 110x110x4 mm), concreted at least 1.3 meters deep, regardless of the depth of soil freezing.
- The width of the gate should be no more than half the length of the gate leaf.
- The frame is made with one transverse stiffener and two diagonal ones.
Drawings of metal and wood structures
With wooden structures it is a little more difficult: it will not be possible to make a door entrance without losing the rigidity of the structure. This can only be done if the gate leaf is made of durable (expensive) wood.
If the gate leaves are made of coniferous wood, the gate can only be hung next to the gate.
Inside view
Mesh wicket
Chain-link mesh is often used to make gates. Ideally, this gate fits a fence made of the same mesh. Typically, such a structure has the same height as the fence. The convenience of using the mesh lies in its inexpensive price and ease of processing.
It is important that with good care, such a gate will last a long time. However, a mesh gate has the disadvantages that the area is clearly visible, and the wire is easily cut and cannot serve as a barrier to intruders.
For the construction of a gate, a mesh coated with a special PVC coating measuring 50x50 mm with a wire diameter of no more than 2.5 mm is ideal.
The use of such material does not require additional processing, and the high anti-corrosion properties of the treated wire will allow the gate to serve for as long as possible.
Manufacturing procedure
The first step is to install the pillars (depending on the size of the sash, timber 60x60, 100x100 is taken), and the sash is made according to the size of the resulting gate opening. Standard sash dimensions are 1.1x2m.
Dig two holes 70 cm deep the width of a bayonet shovel. It is convenient to use a garden auger for these purposes. The screenings are poured into a 5 cm layer at the bottom of the hole. Then you need to prepare a wooden beam. Its lower buried part is burned with a blowtorch and treated with bitumen. Then it is placed in the hole on spacers and filled with concrete.
To limit the travel of the gate, slats are placed on the posts to imitate a quarter.
Scheme for installing columns in a bundle
Important! To achieve an ideal mutually parallel position of wooden poles, it is recommended to first knock them down crosswise with slats, thus assembling a rigid box. After this, they are installed in the pits in the form of such a structure and concreted. After the concrete has hardened, the slats are removed.
Assembling the gate on the frame
For assembly, prepare two identical horizontal beams along the width of the gate, onto which vertical slats will be placed. They are placed on a prepared table parallel to each other. It is advisable to make markings on the table and screw in the stubborn punks.
To maintain a constant gap between the vertical slats, prepare a thin rail, which is laid in front of each subsequent sheathing strip to be filled. The figured top edge of the picket fence is cut out with your own hands using a jigsaw after all the slats are nailed (or screwed). Therefore, it is not necessary to ensure that the top of the sheathing is level. The ends of the sheathing strips can be cut with a cone, and the edge of the slats can be processed with a figured cutter.
What does the assembled sash look like?
To attach the pickets, it is better to use stainless steel screw cutters. After the vertical strips are filled, the structure is turned over, the strut is measured and inserted.
Frame sash assembly
Making a wooden gate with your own hands is more difficult if you choose a frame structure. The complexity of the work depends on the design of the sash and whether it has curved lines. As a rule, the lower jumper of the frame and two side straight ones, and the upper jumper can be either straight or curved. The sash can be divided into 2 segments, with the lower part being solid and the upper part being transparent.
For the frame, a 30mm thick timber is taken, and the filler is made of 10mm thick lath and plywood. The essence of the design is that using a hand router, a groove is made with a 10 mm cutter on the inside of the jumpers. Slats or plywood will be inserted into it. If it is necessary to make a ledge less than 10 mm, then take a thicker lath (12 mm, 14 mm, etc.) and make the groove with a corresponding cutter.
Schematic diagram of the frame structure assembly
The vertical bars do not have to be cut to length; the excess ends can be trimmed off after assembly. And the transverse ones must be cut to length, since 3 cm spikes will be cut on them. If the width of the side post is 70 mm, then the length of the transverse will be 80 mm less than the width of the gate (140-60mm). The thorn is cut with a hacksaw, the cheeks are chopped off with a chisel. The eye in the rack is drilled out using a drill and finished with a chisel.
The infill lath (or plywood) is cut to exact size based on the depth of the groove.
Frame assembly process
The frame is assembled with glue, the tenons are reinforced with blind dowels. First, the lower jumper is connected to the stand, the filler is inserted, then the upper jumper is put on and the second stand is inserted. For tightening, use a hip or rope twists.
The simplest DIY design:
Polycarbonate – a new generation material
This material appeared on the construction market recently, but has already managed to win the preferences of summer residents.
A gate made from this material has a refined and attractive appearance. It is easy to process and assemble, does not fade in the sun and has a high degree of wear resistance.However, despite all its attractiveness, there are negative aspects of its use:
- is destroyed by both high and low temperatures;
- does not tolerate mechanical stress;
- is not an environmentally friendly material.
Forged gate - the ideal choice
Hand-forged metal gates are often a real work of art. Such a gate will not stand next to a dilapidated fence.
Both the house itself and the fence around it must comply with the use of such material. The impressiveness of the forged gate and its unique appearance emphasize the sophistication of the choice of the owners.The positive aspects that highlight its effectiveness are:
- reliability and strength of the material;
- durability with proper care, which consists of regularly lubricating the hinges and painting the metal elements;
- the possibility of combining metal with wood, polycarbonate, stone;
- environmental friendliness.
Among the existing disadvantages, they include the high price and heavy weight of the structure. It is better to entrust the installation and installation of a gate made using the forging method to specialists.
Having a beautiful and reliable gate is the dream of every owner. You can bring it to life with your own hands. The instructions on how to make a gate, located on various construction sites, can help with this.
DIY installation
Anyone can install a fence, wicket and swing gates made of corrugated sheets. Difficulties may arise if you plan to use sliding gates. Installing sliding gates is justified when there is not enough free space on the site or in front of it, when there is simply no room for swing gates.
After the fence pipes are installed and the solution strengthening them has dried, you can begin installing the frame. Square pipes must be welded to the posts, and their number will depend on the height of the fence. When the frame is made, it should be covered with profiled flooring. Sheets can be secured with metal screws or rivets.
It should be noted that, having secured the corrugated sheets with self-tapping screws, they will be easy to replace in the future if they become unusable, therefore this fastening scheme is most justified.
Do-it-yourself assembly of a fence, gate and swing or sliding gates cannot be done without the following tools:
- Welding machine;
- Screwdriver;
- Roulettes;
- Cutting power tools (grinders for shortening pipes and sheets);
- Construction level.
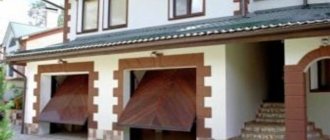
Photo of a garden gate
Total
Category: Fence and gates