In this article we will show you how to connect your Internet cable that has broken or simply needs to be extended. It’s clear that you don’t need any special knowledge to connect the wires. Therefore, we decided to give you practical tips and recommendations on how best to connect a network cable and show you what connection methods are available. Now, perhaps, let’s move on to considering several connection options, and you yourself can decide which one is most suitable for you.
Method No. 1: Twist the wires by hand
For this method you will need electrical tape, a knife and your hands, from the right place. In almost any home these items are always available.
- The first thing to start with is to take both ends and remove the protective outer braid from them.
- Now unwind all the wires individually and remove the insulation from each.
- Twist all the wires strictly according to color. In this action, twisting must begin with the insulation, as in the photo.
- It is advisable to trim the sharp ends of the twisted strands, but not necessary.
- We isolate each color of twist separately, and at the end all together.
Maybe
How to connect an internet cable to a power outlet
Now we come directly to how to connect the Internet outlet. Let's start with the varieties. Like regular electrical sockets, information sockets come in two modifications:
- For indoor installation. A plastic mounting box is built into the wall. The contact part of the socket is then inserted and secured into it, and everything is covered with a plastic decorative panel on top.
Computer socket RJ45 internal - For outdoor installation. This type of socket is very similar in appearance to the usual telephone sockets: a small plastic case that is mounted on the wall. It also consists of several parts. First, the housing with the contact plate is mounted, then the wires are connected, and then everything is closed with a protective cap.
Outdoor Computer RJ-45 Outlet - Wall Mount
According to the number of connection points, there are single and double computer sockets.
Although computer sockets differ in appearance, the principle of connecting conductors is the same. There are special contacts equipped with microknives. The protective sheath is cut through the inserted conductor. As a result, the metal of the microknife contacts fits tightly to the metal of the conductor.
How to connect a computer wall socket
Inside each outlet there is a hint on how to place the wires when connecting the Internet cable. Manufacturers stick on the color scheme that we saw when crimping the connector. There are also two options - “A” and “B”, and we also use option “B”.
An example of color coding on the body of a computer socket
The case is mounted on the wall, usually with the cable inlet up and the computer connector down. The next steps are simple:
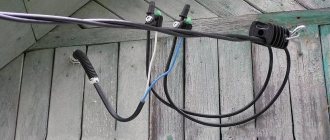
- Remove the protective insulation from the twisted pair by about 5-7 cm. This must be done carefully so as not to damage the insulation of the conductors.
- In the photo you can see that there is a small plastic clamp on the board. A conductor is inserted into it and secured so that the piece stripped of insulation is below the clamp.
Connecting a 4-wire wall outlet - On the case you see microknife contacts. Connect a wire of the desired color to them and insert it, trying to reach it to the very bottom of the contact group. When the conductor passes the knives, a click is heard. This means that it is in place and the insulation is cut through. If you fail to achieve a click, after everything has been routed to the contacts according to the colors, take a regular straight screwdriver with a thin blade and force the wires down. The same can be done with the back (non-sharp) side of the knife.
Eight conductors are connected according to diagram “B” - After all the conductors have reached their place, the excess (protruding pieces) is cut off.
- Put on the lid.
Connecting a twisted pair cable to an outlet is really a simple procedure. Even the first time it will take a few minutes. You can see again what they do and how in the video. It first shows the connection of an Internet cable with 4 wires, then with 8.
Sometimes you have to get up in bed to turn off the light. But you can control lighting from several points. How - read the article about connecting pass-through switches.
Method No. 2: We make twisting with soldering
This option will, of course, be more reliable than the first. It is performed as follows.
- We do everything the same as in the first option until the moment when it is necessary to insulate each color of the core with electrical tape.
- Having twisted all the wires according to color, take a soldering iron and start soldering. There is nothing complicated about this; even a person who picks up a soldering iron for the first time can cope with it.
- After soldering, we insulate each twist separately with electrical tape, and then all together.
This twist will last much longer, so if you have a soldering iron, we recommend using it. That's all, now you know how you can connect twisted pair cables to each other using a soldering iron.
See also: How to find out if there is bluetooth on a laptop.
General information
Very often there is a need to wire a home network of devices with Internet access. Solving the problem is very simple, since you need to purchase a router, configure it and connect all devices to it. In this case, cable crimping is necessary. There are two ways out of this situation: seek help from a specialist or perform the crimping yourself. Crimping a network cable is inexpensive, but in some cases it can be unprofitable, since you need to adjust and wait for a specialist to arrive.
In some cases, for convenience, you need to use your home network, since it is not very convenient to run with a flash drive from one computer to another and download your favorite show or movie. To do this, you need to know how to properly crimp a twisted pair with 8 cores.
Twisted pair categories
Alexander Bell is considered the creator of the twisted pair cable, who proposed a twisted pair wire to protect a telephone line from interference caused by adjacent telegraph wires or power lines. This twisted pair of wires was used successfully for almost 100 years until it was replaced by modern types of copper cable.
Twisted pair. General form
Like any telecommunications equipment, international standards have been developed for copper cables. In this case, ISO/IEC 11801. In addition, there is the EIA/TIA 568 standard, which is valid in the United States and its satellites. These standards have been supplemented several times and today there are 8 categories of twisted pair cables:
- Category 1 (Cat1). The same twisted pair of Alexander Bell wires. Used only in analog telephony.
- Category 2 (Cat2). A two-pair cable designed for Arcnet and TokenRing networks and providing transfer speeds up to 4Mbps. Discontinued in the early 2000s.
- Category 3 (Cat3). The first cable is 4 pairs. Designed for 10Base-T Ethernet networks. Out of production in the 2000s.
- Category 4 (Cat4). 4-pair cable for Token Ring networks, 10/100Base-T. Out of production, but found on older networks.
- Category 5 (Cat5). The first cable capable of transmitting information at speeds up to 100 Mbps. Almost completely supplanted by its successor.
- Category 5e (Cat5e). Improved version of cat5. The most popular category today. The cable is capable of transmitting data at speeds up to 1 Gbit/s. It is found in two versions: two-pair and four-pair.
- Category 6 (Cat6). Introduced in 2002. The throughput of twisted pair is 10Gbps. The first cable capable of operating at 10Gbps, albeit over a short distance. Considered as a possible alternative to cat5e.
- Category 6A (Cat6a). Modification of the Cat6 standard, introduced in 2008. The throughput of twisted pair Cat6a - 10Gbps is maintained at distances of up to 100 meters. The actual analogue of Cat5e for 10GE networks.
- Category 7 (Cat7). Introduced in 2002 along with Cat6. The standard was initially positioned as a more powerful version of Cat6, capable of transmitting 10Gbps over a distance of over 50 m, but with the advent of Cat6A it lost its relevance.
- Category 7A (Cat7a). Deep modernization of Cat7, designed to work with 25GE. The bandwidth of this cable also allows you to transmit a 40GE signal, but only over a distance of 1-15 meters.
- Category 8 (Cat8). The newest standard, introduced in 2016. This four-pair cable is capable of transmitting a 40GE signal over a distance of up to 42 meters. Cat8 is divided into 2 categories: Cat8.1 - standardized to work with RJ-45 connectors and is backward compatible with Cat6A cables.
- Cat8.2 – designed for connectors such as TERA (developed by Siemens Company), GG45 (developed by Nexans), and ARJ-45 (developed by Bei Fuse Ltd). These connectors are proprietary and the prospects for their use are still vague.
Types of twisted pair
In addition to categories, copper cables are distinguished by design. The following types of cable are distinguished:
- UTP is a cable with a simple sheath, without armor or protective shield (unshielded twisted pair). Usually installed indoors.
- FTP – shielded twisted pair (foil shield).
- STP - Here each pair of wires is placed in a protective shield and a wire mesh armor is laid between the two shells.
- S/FTP, also known as SSTP, is a double shielded cable. The first one braids each pair separately, the second one covers the entire bunch.
- U/STP – similar to STP, but without external armor.
- SFTP - This shielded twisted pair cable has the thickest cable of all. It has three screens: an internal one covering paired wires and two external ones. One is made of foil, the other is made of wire mesh.
The differences in performance are by no means limited to cable design. The materials from which it is made also play a role. Thus, conductors made of pure copper have better conductivity characteristics compared to their counterparts made of copper-plated aluminum. Another thing is that copper conductor is much more expensive than aluminum.
Shell materials should also be differentiated. The most popular shell today is polyvinyl chloride (PVC). A cable with such a sheath is marked with the letters PVC and is most often painted gray. It is intended for installation indoors. This casing is very cheap, but burns well and has limited resistance to heat and cold.
Another popular cable sheath material is polyethylene (designated PE). It is used in cables for outdoor installation. Outdoor twisted pair cables withstand temperature changes well and are not afraid of dampness. In a number of options it is equipped with a support cable. This allows you to stretch the cable between the supports without the risk of damaging the conductors.
In recent years, twisted pair cables with a sheath made of a low-smoke, halogen-free compound (LSZH marking) for indoor installation have been gaining popularity. It burns poorly and does not emit harmful substances. Therefore, if strict fire safety requirements are imposed on lines or premises, this should be chosen. Yes, it is more expensive than PVC, but it is more durable and safer.
There are also rarer cable sheaths. For example, the FRNC marking means that the cable sheath is fireproof and corrosion resistant. The polyurethane (PUR) shell offers excellent resistance to oil and repeated bending. Such cables are used in robotics and other areas with special requirements for conductors.
Category and containment
The twisted pair category is very important. To connect to the Internet or conduct communications for a computer network, you should use a category of at least CAT5. In exceptional cases, CAT6 and CAT6a are suitable. Category designations are embossed on the shell. There are a total of 7 types of categories for twisted pair:
- I - 1 pair (bandwidth 0.1 MHz): used in telephone communications.
- II - 2 (1 MHz): networks with data transfer rates up to 4 Mbit/s.
- III - 4 (16 MHz): 10 and 100 Mbit/s.
- IV - 4 (20 MHz): up to 16 Mbit/s.
- V - 4 (100 MHz): 100 Mbit/s (2 pairs are used).
- Ve - 4 (125 MHz): 100 Mbit/s (2 pairs) and 1 Gbit/s (4 pairs).
- VI - 4 (250 MHz): from 1 to 10 Gbit/s.
- VII - 4 (600 MHz): shielded up to 10 Gbit/s.
You might be interested in: Types and types of cable channels for electrical wiring and their installation
Twisted pair also differs in the shape and color of the sheath. The common type of power cord is gray sheath. The orange (bright red) color of the sheath indicates that the power cord does not support combustion. The latter type of wire makes sense to use in areas prone to fire. In addition, twisted pairs are flat and round. They do not differ in technical characteristics.
The Ethernet cable consists of 2 (4 wires) or 4 (wires) pairs. At speeds up to 100 Mbit/s, 2 pairs can be used. If the data transfer rate is in the range from 100 Mbps to 1 Gbps (1000 Mbps), then all 8 wires (pairs) should be used. When designing your home network or connecting to the Internet, you should take these features into account. It is better to stretch 4 pairs at once, since if the information transmission speed increases above 100 Mbit/s, you will have to re-tighten the cable.
Method No. 3: Use scotch-lock to connect the twisted pair
Scotch-lock is a small connector made of durable plastic that is not afraid of environmental influences. It is filled with a special hydrophobic gel, thanks to which oxidation will not occur inside the connector.
This connector is a very convenient thing, the only drawback is that it is difficult to find on sale. Prices start from three rubles and above.
- Remove the main braid from the cable and, color by color, without removing the insulation, insert the two wires into the adhesive tape.
- Take pliers and squeeze. If possible, ring the created connection with the tester.
How to extend the wire: 3 options
It is very inconvenient to use the Internet when you cannot move freely. Many people install network cables to make using the Internet more comfortable. There are several simple ways to extend the cable.
When purchasing, it is important to pay attention to the appearance of the joyner, as it is very similar to a telephone adapter. It will not be difficult to distinguish a twisted pair, since the adapter has 8 contacts, while the telephone adapter has only 7. A computer network card is inserted into the patch cord, the other end of the cord is connected to the network cable
A computer network card is inserted into the patch cord, and the other end of the cord is connected to the network cable.
Internet cable extension options:
- Router. Convenient and reliable extension option. The router has a couple of sockets to which you can connect a network cable. A router is a “splitter” of the Internet. It allows you not only to extend the cable, but also to connect additional devices to the channel. You can skip the cable altogether if you buy a Wi-Fi router.
- Purchasing a new cable. The old cable can be replaced with a new one by simply measuring its length first. This method is time-consuming because you will have to call a technician to reconnect. But if we are not talking about a multi-storey building, but about a private one, then the method is quite suitable.
- Performing twisting. Masters do not recommend using this method. It involves cutting the cable and then inserting an additional piece of the required length into it. The two pieces need to be connected with electrical tape.
Twisting can lead to short circuits, which will lead to poor connection speed or a complete lack of Internet access. The most reliable and modern way to extend the cable is to use a router. If you are not sure that the attempt to extend it yourself will be successful, you can always turn to your Internet provider for help.
It often happens that the technician interrupted the wiring while performing repair work. While working with an angle grinder or other tools, some people may accidentally cut the electrical wire laid in the wall. Damage is indicated by sparks, power cuts, or knocked out plugs.
The wires located in the installation box may also break. Often there is not enough length to connect them correctly. It should be noted that experts advise not to repair one wire, but to replace the entire damaged section. Of course, this method is suitable for those who are not afraid of damage to finishing materials and are ready to make new repairs.
How to extend an aluminum cable:
- Twist the ends of the cable if they are long enough. The twist must be wrapped with electrical tape. This method is the most unreliable, because the twist may break again, which will return the problem.
- A special heat-shrinkable tube can be attached to the ends of the wires. This method is suitable for connecting and extending any cable. In order to carry out the plantings correctly, the tube must be heated.
- All types of wires (copper and aluminum) can be extended using a block. The ends of the cable must be stripped, and then the block must be selected.
- If the wires have broken off, they can be repaired using a coil. It is screwed onto the ends of the wires. After the required density has been achieved, you need to insulate the wires.
Extending twisted pair cables does not require special qualifications, and if done correctly can even be reliable. When twisting wires, you need to follow the one level rule and insulate each individual connection. An interesting method is the displacement of joints made by twisting or soldering.
Method No. 4: Use an adapter or splice
If you need to connect two cables that are crimped, then the ideal option is to buy a special adapter, see the picture below.
If a wire is broken or extended, a twisted pair splicer will help. You just need to insert the network cable on both sides according to the colors and use a thin screwdriver to press all the wires in until they stop. An example is given below.
See what to do if it says: Authentication error when connecting to wifi on an Android phone.
An Internet cable can be in the form of:
twisted pair
Information about the cable is contained in the markings. The classification is based on the AA/BBC formula, where AA is the presence of a common screen, B is the presence of insulation for each pair. The last two letters reflect the type of twist (TP - twist in pairs, TQ - twist in fours).
The presence of protection is the main feature of twisted pair cables.
fiber optic cable
This is the fastest data transfer technology on the Internet. Not only cities, but also continents are connected through such cables. Fiber optic cable has many advantages, for example:
- Good throughput;
- Durability;
- High speed of information transfer;
- Anti-interference, etc.
However, the cost of this cable is very high.
coaxial wire
The main feature of such a wire is the wave impedance, on which the quality of the signal depends. Most often it is used to lay routes for video tracking systems. Despite the fact that some characteristics of coaxial wire are higher than that of twisted pair, it is much less common, since twisted pair has a lower cost, is easier to install and is faster to install.
Tools
To crimp an Internet cable at home, you need not only wire and connectors, but also a specific tool.
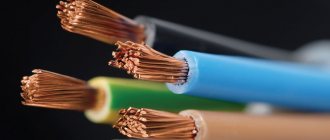
Cable
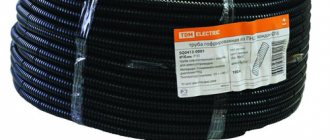
The stability of signal transmission depends on the correct choice of cable. You need to select a twisted pair cable of category CAT 5E and higher, preferably with four pairs. A wire with a fireproof braid will be more durable and reliable. Flat or round, it doesn't matter.
You need to consider where the wire will be located. If it is not put away in cable channels and is simply stretched around the room, the UTP type is suitable, otherwise you need to consider more expensive types of wire with a common shield or pair protection.
If you need to connect two PCs or a router and a PC with a cable, then a stranded wire is selected, but for ease of crimping it is better to use a single-core wire. For sockets - with one core.
Connector
In addition to the wire, you need to prepare a switching element, also known as a connector or Ethernet plug. Often referred to as RJ-45.
Many connectors have a similar design. Their body is made of transparent plastic for visual control of the crimping process. There is a latch on top that allows you to secure the plug after installation in the port. At the back there is a connector for cable entry, a little higher, on the case there is a fixing bar that ensures a reliable connection.
Inside, the connector consists of eight channels, the diameter of the cores. They go to the end wall of the plug, where there are 8 separate contacts. Initially, they are raised up and do not prevent the cable from entering through the channels until it comes into contact with the end wall. Each has pointed protrusions on the bottom.
When crimping, the contacts move down, pierce the insulation and establish a connection with the conductors. They are recessed flush with the surface of the connector and form contact pads for connecting to the port of a router, PC or other device.
Some connectors have auxiliary inserts that make it easier to correctly insert the cores into their positions under the contacts.
Crimping tool
The following tool is used to crimp twisted pair cables:
- Crimper. These are crimping pliers. To crimp a connector, place the edge of the wires into them, then install the connector into the socket on the tool and squeeze the handles until they click. You need large pliers (light pliers break quickly), but comfortable and light so that your hand does not get tired. The crimper halves must be even in relation to each other, otherwise the plug will break during the crimping process of the wire.
- Stripper. A tool for cutting cables, stripping insulation, or otherwise working with it. Much more convenient than a simple stationery knife.
- Tester or multimeter for crimp diagnostics.
It is not necessary to use a professional tool for crimping, especially if laying the wire will be done once. But with it it will be easier to complete the task, and the result will be higher.
Features of home connection of computer devices
Often a situation may arise when adjustments need to be made to the computer network already installed inside the apartment with wired and wireless connection methods.
It’s good when all you need to do is simply connect the equipment via Wi-Fi and register the security keys. But an option is possible when you need to connect home computer devices only via twisted pair, and all the existing wires are already connected and hidden.
In offices, twisted pair cables are usually laid in special boxes that have a reserve space. It's easy to add another cable to them.
But the home network can lie above a suspended ceiling, under the floor covering, or in other hard-to-reach places. And even if it is mounted in a plinth with a cable channel specially equipped for this purpose, then there is a high probability that it is impossible to add anything else to it for connection.
Technically, it is correct to install an additional switch by connecting an existing cable to it to connect to two network devices. Here, an ordinary 4-port network concentrator (hub) or its more modern counterpart - a switch (switch) would be sufficient. Moreover, we would have one nest left in stock.
We will consider a method that will eliminate the laying of an additional cable, using one already in use as if there were two of them.
When using the described connection technology, it is important to understand how and in what situation this method can be implemented in practice without creating subsequent problems
What you need for crimping
- To terminate twisted pair cables, professionals recommend using the following tools:
- Crimper. These are special pliers used for crimping RJ-45 and/or RJ-11 connectors. The crimping process is quite simple: the prepared end of the twisted pair is inserted into the connector, which is placed in the corresponding socket of the flares, after which the handles of the tool are compressed, resulting in crimping until a characteristic click is made.
When choosing a crimper, you should pay attention to the following points:
- The tool must be quite massive. Light pliers, as a rule, do not have sufficient strength and quickly fail. On the other hand, a heavy tool will cause fatigue quickly.
- The halves of the pliers press should not be bent (displaced) relative to each other. The slightest displacement leads to breakage of the connector during crimping.
- Ergonomics, the tool should be comfortable.
Stripper is a universal tool for “cutting” twisted pair cables (cutting, removing insulation, etc.). Of course, molding the end of the cable can be done using a mounting knife, but a stripper is more convenient for this purpose.
The advantage of this tool is that when removing the outer insulation, the coating of the wires is not damaged
Please note that the stripper is not allowed to cut an FTP cable (having a foil screen, that is, shielded)
Twisted pair tester. Using this device, you can identify both a problem with the cable (break, short circuit) and incorrect crimping. There are devices with expanded functionality, they allow you to measure the speed in the LAN segment, the level of attenuation, etc.
As a rule, simple models with a minimum set of functions consist of two blocks: main and remote, the accepted designation in English is master and remote, respectively. Each block has LEDs numbered 1 to 8 and a ground wire G.
Testing is carried out as follows:
- The cable under test is connected to the main and remote modules.
- If the conductor is intact, the corresponding indicator lights up green; if there is a break, the LEDs do not light up; if the pairs are reversed or there is a short circuit, the color red is displayed. Some devices, in addition to light indication, can also provide tonal signals.
- Cross crimping tool, used when connecting sockets, patch panels, etc. It is not used for cable crimping; we have included it because it is included in standard kits for cutting twisted pair cables.
Actually, universal pliers will be sufficient for crimping, but it is more convenient to remove the insulation with a stripper, and use a tester to test the correctness of the wiring. On the Internet you can find a description of how to crimp connectors using a flat-head screwdriver.
This is indeed possible as a last resort when a crimper is not available. The quality of such a connection will be unreliable, so as soon as possible it is necessary to clamp the cable using pliers.
Conclusion
The easiest way is twisting; it does not require special skills, tools or effort. But still it is not suitable for providing high-speed Internet.
If you are aiming to obtain high-quality data transmission, then it is better to purchase a factory-made cable and connect it to the necessary devices according to the instructions. It will be safer and better quality.
Sources
- https://rusenergetics.ru/raboty/obzhim-vitoj-pary-konnektorom-rj-45
- https://skomplekt.com/vitaya-para-kategorii-obzhim-sovetyi/
- https://www.asutpp.ru/obzhim-vitoj-pary.html
- https://sovet-ingenera.com/elektrika/provodka/kak-soedinit-vituyu-paru-mezhdu-soboj.html
- https://www.bazaznaniyst.ru/sposoby-soedineniya-vitoj-pary/
- https://lanportal.ru/lan/kak-soedinit-lyuboj-internet-kabel-vituyu-paru-mezhdu-soboj.html
- https://eserver24.ru/stati/5-sposobov-soedinit-vituju-paru
- https://nastroisam.ru/kak-udlinit-internet-kabel/
Secure the connector
Frame: Electronics&Computers / YouTube
Next, you need to fix the plug, which is needed so that the cable does not accidentally pull out and you are not left without the Internet. This can be done later, but it’s better not to put it off: this way you won’t have to hold the wires while crimping.
To do this, unfold the plug with the contacts facing up and place it on a table or other hard surface. Make sure the outer shell fits slightly deeper than the retainer. If this is not the case, pull out the wire and shorten the wires a little. Using a screwdriver, press the small tab in the recess at the edge of the connector to press the cable.
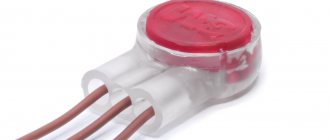
Coupler
This technology is considered the best option for home repair of cable lines. The result of such work will be a neat connection of the cores, which can not be hidden from prying eyes. The coupler is a compact box equipped with 16 terminals. This technology is used in the design of network sockets.
The ends of the LAN cable are inserted into the box on both sides. This allows you to connect them in the correct order, according to color. Using a screwdriver, the edges of the wires are securely fixed in the blade contact and covered with a lid. The advantage of this method is the absence of loss of Internet signal transmission speed and the absence of the need to use special devices for repairs.
RJ-45 connector crimping
The Internet cable entering an apartment or house, most often called twisted pair, often ends in a small plastic connector. This plastic device is a connector, usually RJ45. In professional jargon they are also called “Jack”.
This is what an RJ-45 connector looks like
Its body is transparent, so wires of different colors are visible. The same devices are used on connecting wires that connect computers to each other or to a modem. Only the order of arrangement (or, as computer scientists say, pinout) of the wires can differ. The same connector is inserted into a computer socket. If you understand how the wires are distributed in the connector, there will be no problems connecting the Internet outlet.
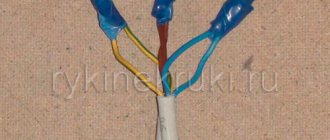
Internet cable connection diagram by color
There are two connection schemes: T568A and T568B. The first option - “A” is practically not used in our country, and everywhere the wires are arranged according to the “B” scheme. It is necessary to remember it, since it is what is required in most cases.
Internet cable connection diagrams by color (use option B)
To finally clarify all the issues, let's talk about the number of wires in a twisted pair. This Internet cable comes in 2-pair and 4-pair versions. To transfer data at speeds up to 1 Gb/s, 2-pair cables are used, from 1 to 10 Gb/s - 4-pair. Today, apartments and private houses are mostly supplied with flows of up to 100 Mb/s. But with the current pace of development of Internet technology, it is quite possible that in just a couple of years the speeds will be measured in Megabits. It is for this reason that it is better to immediately expand a network of eight rather than 4 conductors. Then when changing speed you won't have to redo anything. The equipment will simply use more conductors. The difference in cable price is small, and sockets and connectors for the Internet still use eight-pin ones.
If the network is already wired in two pairs, use the same connectors, only after the first three conductors laid according to scheme B, skip two contacts and place the green conductor in place of the sixth (see photo).
Connection diagram for 4-wire internet cable by color
Crimping a twisted pair cable into a connector
There are special pliers for crimping wires in the connector. They cost about $6-10 depending on the manufacturer. They are more convenient to work with, although you can get by with a regular screwdriver and wire cutters.
Connector crimping pliers (one option)
First, the insulation is removed from the twisted pair. It is removed at a distance of 7-8 cm from the end of the cable. Underneath there are four pairs of conductors of different colors, twisted in twos. Sometimes there is also a thin shielding wire; we just bend it to the side - we don’t need it. We untwist the pairs, align the wires, spreading them in different directions. Then fold according to pattern “B”.
The procedure for sealing the RJ-45 connector in the connector
We clamp the wires in the required order between the thumb and forefinger. We lay out the wires evenly, tightly to each other. Having aligned everything, we take wire cutters and cut off the excess length of the wires laid out in order: 10-12 mm should remain. If you attach the connector as in the photo, the insulation of the twisted pair should begin above the latch.
Cut it so that the wires remain 10-12 mm
We insert a twisted pair with cut wires into the connector
Please note that you need to take it with the latch (protrusion on the cover) down
We insert the wires into the connector
Each conductor must get into a special path. Insert the wires all the way - they should reach the edge of the connector. Holding the cable at the edge of the connector, insert it into the pliers. The handles of the pliers are brought together smoothly. If the body has become normal, no special effort is required. If you feel that it “doesn’t work”, double-check whether the RJ45 is installed correctly in the socket. If everything is fine, try again.
When pressed, the protrusions present in the pliers will move the conductors to the microknives, which will cut through the protective sheath and ensure contact.
How connector crimping pliers work
This connection is reliable and problems rarely arise with it. And if something happens, it’s easy to re-terminate the cable: cut it off and repeat the process with another “jack”.
Video tutorial: crimping an RJ-45 connector with pliers and a screwdriver
The procedure is simple and easy to repeat. Perhaps it will be easier for you to do everything after the video. It shows how to work with pliers, as well as how to do without them, and do everything with a regular straight screwdriver.
Extension of TV cable using F-connectors
This option for connecting the wire involves visiting a store where you need to purchase two F-plugs (for each of the 2 ends of the cable) and one adapter - F-socket. It is recommended to take a piece of TV cable with you, since components are sold for different diameters. The tools you will need are a regular or construction (segment) knife and wire cutters.
Building up an antenna cable begins with preparing its sections:
Make a careful cut into the outer shell. For ease of operation, the length of the cut should be greater than the length of the F-plug body. In the future, it can be adjusted by removing the excess part of the central core. Fold the casing in the opposite direction and remove it completely. Turn the copper shield and the foil underneath towards the remaining outer shell. To perform the procedure, they can be slightly incised
At this stage, pay attention to the possible presence of a coating of a thin layer of polyethylene or lavsan on the inside of the foil. These materials greatly impair the transfer of contact to the F-plug housing
To solve the problem, screw back half of the wrapped foil. This way the side with poor current transmission will be on the inside. Using a sharp knife, cut the insulation of the central core. Try not to leave notches on it, as they reduce strength and can lead to breakage. Take the F-plug and screw it onto the cable. It must fit snugly, since the fixation is achieved only by clamping force. Trim off any excess center core. Its edge should protrude 3-5 mm beyond the F-plug body.
If the diameter of the cable is smaller than the internal diameter of the F-plug, then before turning off the screen with foil, wrap electrical tape around the outer sheath.
This completes the preparation of the two ends of the cable. Now take the F-socket and connect the first and second plug to it. Fixation is ensured by screwing the movable head of the F-connector onto the thread of the adapter. The result will be a neat and reliable connection. In its place, you can also install a splitter, which will be discussed later.