Cellar flooding is a very pressing problem for places with high groundwater levels. If the cellar was built quite a long time ago, then most likely without following certain rules for waterproofing.
The construction of cellars at high groundwater levels is, of course, permitted, but it is necessary to follow some rules and recommendations that will ensure trouble-free operation of the storage facility for many years.
How to choose a place
Choosing the right location for a building is key and the following factors must be taken into account when inspecting the site:
The greatest elevation and dryness, so that the cellar does not flood or is exposed to water as little as possible.
A slight spring rise in groundwater is normal, but it should not come to the surface from above the area of the proposed cellar.
Convenience of approach, because in winter, in order to get the harvest, you will have to dig a path to it or wander through at least waist-deep snow.
The pliability of the soil so that it is soft enough for digging, because if during excavations you unexpectedly stumble upon a rock close to the surface, all the work will go down the drain, but at the same time it will not look like swamp slurry.
The fourth factor is, of course, aesthetic. The appearance of the cellar should not disturb the overall harmony, so it is necessary to either install it in the right place or resort to design.
Determining the groundwater level
If in swampy or low-lying areas the close passage of groundwater does not surprise anyone, then flooding of the cellar in dry areas can be an unpleasant surprise for the gardener.
Groundwater is a rather unpredictable thing: it can not only accumulate in lowlands, but also flow down from the mountains or rise to the surface when the snow cover melts.
Therefore, so that the funds and effort spent on construction are not in vain, it is necessary to check their availability in advance.
Finding out the level of groundwater is not at all difficult, and the verification operation must be carried out during the flood period, when they come as close to the surface as possible in order to protect against unexpected spring flooding.
To work, you only need an ordinary drill no shorter than two meters (the average depth of a standard cellar) or, as it is popularly called, a brace and a rod made of any material of the same length.
With this drill, a simple hole is drilled to the maximum depth, which is left for a day, after which it will be necessary to determine the result.
After the required time, a rod is immersed in the hole, the moisture content of which at a certain length from the ground will indicate the depth of the flooding.
If the rod remains completely dry, this is a great success, meaning that the site is completely dry and ideal for construction, however, more often than not, water is present at some level.
When assessing the result, it is necessary to remember that also in a day, like a test well, the pit dug for the cellar will be filled with groundwater to the same depth.
We recommend watching a video on the topic:
Therefore, in order to avoid diving during construction when the water level is too high, you must either choose another location or purchase a special drainage pump (not to be confused with a regular water pump) for the duration of the entire construction.
Reasons for the appearance of water
Before eliminating water from the basement of the garage, you need to understand the main reasons for its appearance. There are several main reasons why the water level in it rises. These include:
- The location of the garage building is low. Sometimes people locate their car storage facilities in inappropriate locations. For example, some people build them in a low area, which causes rainwater to gradually flow into the basement and accumulate in it.
- Groundwater. Flooding also often occurs due to high groundwater levels. To prevent the basement from flooding, before construction you need to make sure that groundwater is not in the upper layers of the soil.
- Poor quality waterproofing. After building a car garage, many people refuse to waterproof the inspection hole. This leads to water accumulation and increased indoor humidity.
Which material to choose
If the gardener nevertheless decides to build a cellar on an area with close groundwater. He needs to remember that moisture, one way or another, destroys all materials faster, just some more, and others less.
Under no circumstances should you use wood or brick for construction, as the wood will instantly rot and will not keep moisture from penetrating inside.
And brick, despite its apparent strength, crumbles very easily and is destroyed by moisture, and due to its porous structure it allows dampness to enter. For obvious reasons, the option of building an earthen cellar should not even be considered.
It is better to use modern materials specifically designed for such cases, for example, waterproof cement brands that can harden even under water.
Such cement will cost twice as much and will probably have to be ordered, but it will simplify construction as much as possible and prolong operation, but simple cement or concrete blocks will also be suitable, although they will deteriorate over time.
Stone is the strongest material, but its use is not considered, since few people can find so many natural stones of the desired shape and size near their site, and the very construction of walls from it requires certain construction skills.
Wall insulation
Regardless of the material used to construct the cellar enclosing structures, they need to be protected from the penetration of moisture from the outside. Moreover, waterproofing must be external (see Waterproofing basements from groundwater: options and work execution)! If it were made from the inside, it would be impossible to even hammer a nail into the basement wall without breaking it.
It is important! Between the vertical structures and the walls of the pit, it is necessary to provide openings of sufficient width to make it convenient to carry out backfilling. It should be done layer by layer, by careful compaction. At the same time, keep in mind that too dry soil, as well as waterlogged soil, cannot be properly compacted.
- Considering the high moisture permeability of wood, in conditions where water is nearby, its use cannot be called the right solution. This concerns the recessed part, but build a cellar - please. Cellar walls made of stone, blocks or red brick are the most reliable option, and it is much easier to protect them from moisture.
Natural stone: a wine cellar classic
- In fact, almost no one builds cellars today from stone. The only exceptions are areas where stone is mined, and you can buy it for pennies, or there is a river near the site, on the banks of which you can collect stone for free. But bricks, as well as concrete blocks with various fillers, the use of which greatly simplifies the work, are on sale everywhere.
- But in defense of the stone basement, I would like to say at least a few words. This structure best maintains a constant temperature and never freezes. As for humidity, imagine that there is no condensation in a stone cellar. Even in the absence of exhaust ventilation, there is no dampness in it, and the air is always fresh.
A single brick wall is ideal for a cellar
- This may be why wine cellars are traditionally built of stone, although now clay bricks are more often used for this purpose. The laying is carried out on a ready-made base that has gained a certain strength. Regardless of the type of floor insulation produced, strips of roofing material must be glued under the first row of masonry.
- Horizontal waterproofing should not be neglected, as it prevents capillary absorption of moisture into vertical structures. The masonry itself is carried out traditionally: the rows are also established, the mooring cord is attached, the horizontality of the rows is verified and their reinforcement is carried out.
Basement wall plastered on the outside
Note! Apart from waterproofing impregnations, the best protection against the destructive effects of moisture for brick and block masonry is plaster. Therefore, it is better to lay the masonry in a waste area, so that later it will be convenient to apply plaster.
- Well masonry technology is ideal for the basement. Two parallel walls are laid out in half a brick, and the space between them is filled with loose or foam insulation. For a shallow cellar, this method is very relevant, since its walls can freeze and therefore need insulation.
Hollow concrete block: an excellent option for cellar walls
- A similar effect can be achieved by using concrete blocks with large voids. Their internal space is filled in the same way with insulation or, if higher wall strength is required, it is filled with concrete. Block masonry is plastered on the outside, having previously treated the surface with concrete contact or liquid glass.
- Plaster does not stick to bitumen mastic, which is often used for vertical external waterproofing. If you really use it, then instead of plaster it is better to take a roll of material and stick it on the mastic. And even if you just paint the outside of the wall with paint, this will already be excellent protection against moisture.
Impregnations are better suited for stone and concrete, plaster and coating for brick, painting and roll membranes for wood.
There are no universal methods: each option is good in its own way. The main thing is that the goal is achieved quickly and with minimal financial costs.
Cellar design
For the construction of a cellar, there are several options for its design, but if the groundwater is located close to the surface.
The ideal option would be a semi-buried cellar, which will not be completely covered with water, is better ventilated, and is easier to build.
Since the depth of the flooded pit is much smaller, and in the summer it is easier to warm it up and dry it both inside and out.
The design of a semi-buried cellar is a building submerged only half below ground level, and well insulated on top and covered with the same soil.
Semi-buried cellar
The difference between a semi-buried cellar and an above-ground one is that part of it is located in the ground. If the groundwater level is high, you can deepen a semi-buried cellar by half or a third of its height. The floor level should be 0.5 m above the water level.
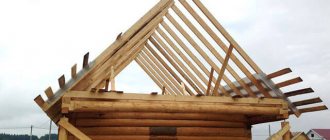
Often one of the sides of the structure rests on the slope of a hill. The walls are made of bricks, blocks, wood or monolithic concrete. The roof is usually made of boards coated with clay. The entire structure is covered with roofing felt or roofing felt.
Important: the walls and roof should be well insulated with earth from the outside in order to avoid freezing of the room.
How to prepare a place
After checking the level of flooding in an area, many people think hard about how to make a cellar if there is groundwater nearby and whether this can even be done.
Theoretically, it is possible to build a cellar even under water, the main thing is to carry out the construction process correctly and choose the right waterproof materials.
When building a cellar in an area with high groundwater levels, it is necessary, first of all, to arrange good drainage, which is especially important if the future building is not a monolithic concrete sarcophagus.
Before drainage begins, the area that will go under the cellar is marked out and a pit is dug.
If the water level in it is too high or it rises too quickly, it is necessary to pump out the water using a special drainage pump.
At the same time, keeping an eye on the walls and bottom of the pit, since draining too quickly can lead to swimming and erosion of the walls and the bottom itself.
Next, the process of arranging drainage begins, which can be done both externally and internally.
How to make a cellar with high groundwater
It is best to start any construction based on the experience of FORUMHOUSE users.
In our material we will talk about what points you should focus on if you plan to build a cellar at a high groundwater level.
Before we start building a cellar in groundwater, we need to decide on its design and size.
There are cellars:
- completely buried;
- semi-recessed;
- ground.
The size of the cellar depends on the number of products that are supposed to be stored in it. For a family of 3-4 people, a small room is enough - 1.5x2 meters, laid to a depth of 1-2 meters. If you plan to store a large number of products, then the dimensions increase to 3x3 or 3x5 meters.
The cellar can be of any shape - square, rectangular, with a vaulted or flat ceiling, but the choice of design primarily depends on the type of soil on the site and the depth of groundwater.
If groundwater is close, you need to think hard about whether it is worth building a completely buried cellar. After all, in the spring it can turn into a real swimming pool.
Cellar in conditions of high groundwater
Sukhinichanin:
– My neighbor pumps water from the basement under the house for several days every spring. I warned him that with our groundwater level, it is useless to dig deep and build a cellar or basement.
Basement with close groundwater.
The husband of FORUMHOUSE member Kate thought for a long time about how to make a subfloor in a damp area. I wouldn't do anything better.
Kate: – My husband and his father built a crawl space under the barn. Close groundwater, there is high water. A whole carload of tar has probably already been used up for waterproofing. All the work was to no avail, the water found a place, the underground was flooded, and the water has been standing in it for several years.
To avoid this, first of all, you should carry out a whole range of measures related to the drainage of surface and groundwater, for which a drainage system is installed.
A pit is made in the floor of the cellar, a drainage pipe is inserted into it, which goes to a depth and drains water, preventing supplies from getting damp.
Another option is drainage at the level of the cellar base plate. The wet cellar is surrounded by a drainage pipe, which goes downhill to the far end of the site. Also, to pump out water, if it is impossible to arrange a natural slope, you can cut a hose from a drainage pump into the drainage pipe, which will pump out the water.
If the area has a high groundwater level, then it is necessary to do good drainage!
In addition to drainage, good waterproofing is also needed. To do this, you can use the experience of a forum member with the nickname vlad55 :
– I once helped my relative build a cellar under the garage. The garage was located on the bank of the lake. The water level in the lake is subject to seasonal fluctuations of up to 1 meter, so that the sound of waves can be heard behind the wall of the garage.
Digging a pit and making reliable waterproofing in such conditions is not an easy task. The forum member did this: in the spring, in May, when the water level in the lake dropped, the builders dug a hole, made formwork and cast a concrete floor and walls 10 cm thick.
Two weeks later, when the concrete gained strength, the builders coated the floor, all walls, corners with molten bitumen and glued waterproofing on the still hot bitumen.
They glued the waterproofing strips in two layers: one layer along and one across. After this, formwork was again erected inside the cellar and the second walls and floor 8 cm thick were poured. Thus, a hydraulic lock was created between two layers of concrete. According to a forum member, 35 years have passed since it was built, and there hasn’t been a drop of water in it!
In addition to waterproofing, when constructing a cellar, one should remember the phenomenon of floating or squeezing the structure out of the ground due to the forces of frost heaving and the presence of nearby groundwater. To be on the safe side, you can perform a calculation.
viktor50:
– It’s quite simple to calculate whether the cellar will “float” or not. Concrete weighs on average 2.5 tons per 1 m3. The size of the cellar is 3x2x2 meters. Based on this, its volume will be 12 m3x2.5 = 30 tons. Let's assume that the thickness of the walls is 20 cm. Based on these data, we calculate the volume of the walls and find the mass of the cellar: 5.6x2.5 = 14 tons.
Considering the buoyant force, if the groundwater level is not higher than 1 meter, a cellar with such a mass will not float. If the groundwater level is higher and there is no thick layer of soil above the pit, then the structure may be squeezed out. To avoid this and not make the walls even thicker (to increase the mass of the cellar), you can anchor it. To do this, when pouring concrete, the base of the cellar should be made 20 cm wider than the distance between the outer walls. If the walls are poured 2x3 meters, then the size of the base is 2.4x3.4 meters. As a result, a protrusion is obtained along the entire perimeter of the structure. Because the cellar is filled with soil, which is compacted, then, thanks to the protrusion, it will be reliably anchored like the TISE foundation.
There are cases when even high-quality waterproofing and drainage do not save the cellar from flooding. And then heavy artillery comes into play - the so-called caissons made of metal or plastic. Their main disadvantage is their high cost.
Spdim:
– The price of a caisson welded from 3 mm stainless steel will make you doubt the need for such a vegetable storage facility.
Alexey-1:
– I myself welded a caisson for the cellar from 3 mm steel sheets measuring 2x3x2 meters. I coated all the walls with waterproofing. I have a high groundwater level, I remember that I had to constantly pump water out of the dug pit. When the caisson was installed, I covered it on all sides with clay 20 cm thick. Result: dry, temperature in winter +2°C, in summer +5°C. But I spent the whole summer on this construction! Moreover, I did it in the early 90s, when iron prices were not yet so high. I don’t even know how much it would cost me now.
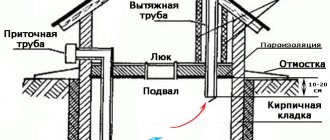
Ventilation is also necessary. Two plastic pipes with a diameter of 15 cm can be used as ventilation pipes. One pipe starts from the floor of the cellar, and the second from the ceiling. This ensures traction. Alternatively, you can insert a supply and exhaust fan into one of the pipes.
If the groundwater level is high, then it is better to abandon the construction of a buried cellar and build a semi-buried one. Moreover, it will be better if it is made not under the house, like an underground floor, but in the form of a free-standing structure.
To do this, dig a hole 4x4 meters and 1 meter deep. The bottom of the pit is filled with sand, crushed stone, with obligatory layer-by-layer compaction. The base is filled with bitumen, a layer of roofing felt and a layer of thick reinforced polyethylene film are laid (you can use used banners). Then, on top of this inner pie, a metal mesh with a cell of 10x10 cm is laid, and a layer of concrete 5-8 cm thick is poured.
OnlyOn:
– When I made myself a semi-recessed one, I put polyethylene under the base slab, but I forgot under the steps of the stairs. I can say that at the time when the slab had already dried, the steps were still damp, because... sucked water out of the ground.
vit678:
– My plot is damp in the spring, almost standing in water. I can’t afford a caisson made of stainless steel financially, and if you make it from simple steel, then in 10-15 years it will rust in an aggressive environment, so I decided to make a semi-buried cellar.
The forum member removed the fertile layer of soil. Then, directly on the clay, I laid two layers of plastic film and poured a 3x3 meter monolithic reinforced slab with silicate glue added to the concrete. After this, vit678 laid out a cellar 2 meters high from an expanded clay block on the slab. The roof is monolithic. Expanded clay is plastered with a cement mixture with the addition of silicate glue, and the walls are sheathed on the outside with extruded polystyrene foam 10 cm thick.
After this, the cellar is completely covered with earth (only the entrance, the so-called sleeve, or trunk, remains uncovered). On top, for aesthetics, you can plant grass on the ground. In winter, this structure can be used as a slide for children to ride on.
vit678:
– It turns out more like a storehouse, but this does not change the essence. Products are stored perfectly!
FORUMHOUSE users can learn how to build a semi-buried cellar in this topic. A detailed photo report on the construction of a cellar with an arched vault is here.
Here's how to kill mold in your cellar. And if you follow this link, you can watch a video on how to make a basement with a high groundwater level.
External drainage
Along the entire perimeter of the future structure, it is necessary to dig drainage trenches about 40 cm wide, preferably 20-30 cm below the proposed base.
It is necessary to dig trenches at a slight slope so that the water drains faster, and to make digging easier and the bottom does not wash away, you need to dig so that the shovel goes towards the flow of water.
Then, at the bottom of the trench, a compacted sand cushion is created, which is covered with geotextile to prevent mixing of layers.
It is important to remember that some inexpensive types of geotextiles conduct water in only one direction, which must coincide with the direction of water flow in the trenches.
Larger drainage material in the form of pebbles, expanded clay or crushed stone is laid on top of the geotextile.
Special drainage pipes made of asbestos or polymers, equipped with holes on top or on all sides, are laid in prepared trenches and connected into a single system.
The number of trenches and the size of the pipes must correspond to the amount of water in direct proportion. Pipes with one-sided perforation are laid with the holes down.
If there is too much groundwater, then it is likely that at the place of its main exit from the drainage pipe system it is necessary to dig a special reservoir into which it will flow during a flood or after rains, and then seep out of it back into the ground.
The storage tank will also have to be protected from the soil sliding with geotextiles, concrete walls or a large plastic container.
When filling drainage trenches with pipes, the operation is repeated: first sand, then geotextiles, then gravel.
The area under the bottom of the cellar is leveled with gravel. The advantage of external drainage is that it removes water before it reaches the structure, but requires a little more excavation.
Metal cellar-caisson
A caisson is a chamber or box made of metal or plastic with sides. Sometimes it is made of reinforced concrete, but in the conditions of country house construction this is very expensive. In case of high groundwater, a caisson cellar reliably protects the reserves stored in it.
The caisson, due to the high tightness of the joints, is used even at very high groundwater levels. Before installation, the metal bunker is treated from corrosion on the outside, and the inside is painted with metal paint.
The plastic caisson does not require additional processing. A pipe with a shut-off valve is welded in one of the corners at the bottom of the box. When the caisson is lowered into the pit, the tap opens and water flows into the chamber. After installation, the cellar is secured in the ground by concreting the sides, the water is pumped out and the tap is closed. Install the ladder and manhole cover. To prevent the caisson from floating when the groundwater level rises, it is additionally secured with anchors and equipped with devices for pumping water from under the bottom.
A metal caisson cellar has a lot of advantages that are fully justified by its price.
Internal drainage
Internal drainage is a worse option, which does not allow moisture to rise above a certain level and is carried out along with the installation of the base.
Drainage channels are laid in the floor of the base, increasing its thickness, while they are arranged in exactly the same way as in the first case, observing the drainage layers and arranging the storage tank.
If flood waters rise too high in an area, then a combination of two methods would be the best choice.
External drainage will drain water under normal conditions, and internal drainage will save you if the situation gets out of control during a flood.
In order for water to flow better from the groundwater storage tank, you can install a pump with an automatic float sensor that discharges water to the sewer or outside the site.
A cellar that is not afraid of water
In conditions of high soil moisture, there can be no talk of any earthen cellars. Wood is also not the best option, because no matter how you treat it, sooner or later it will still rot. But if the cellar is above ground, then why not? And yet, there is nothing more reliable in such a situation than clay bricks and concrete.
Even if the walls are wooden, the floor must be monolithic - and this is the first condition for a cellar that may be at risk of flooding. The final result depends on how carefully the foundation is laid out, because water most often seeps into the basement through the floor.
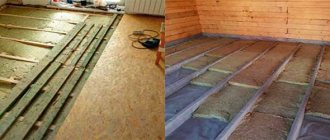
Floor installation in the cellar
Once the location for the cellar and its burial mark have been determined, you can begin to develop the soil. The site should be completely cleared of vegetation: uproot trees and shrubs, if any, remove rhizomes, remove the fertile layer of soil. In accordance with the size of the building, the contour of the pit is marked by driving in pegs and tensioning the cord.
- How to carry out excavation work is up to you. If the hole is very small and the size of the cellar is small, most owners do it manually. This will create a small pit like the one we see in the picture. The worst situation for a cellar is when the soil in the area is clayey.
Shallow pit for a cellar
- Clay is a waterproof material, that is, it does not allow water to pass through easily. Therefore, after the rain, it, having fallen into the sinuses between the walls of the pit and the cellar, will stagnate there, gradually eroding the backfill. In such a situation, it is necessary to immediately take care of the drainage of surface water.
- Drainage trenches can perfectly cope with this task, through which water will be discharged outside the site: into a ditch, the nearest pond or drainage tank.
Note! The best way to drain water is when the entire yard is ringed with drainage pipes. They collect and drain both ground and surface moisture into storage tanks, because not only the cellar needs protection, but also the rest of the buildings on the site.
- If the groundwater level is high, such drainage can be done not only around the perimeter of the cellar, but also drains can be laid under the floor. After a sand cushion 15 cm thick has been compacted at the bottom of the pit and the same amount of crushed stone has been poured, it’s time to think about drainage. If there is no need to lay perforated pipes (drains), you can immediately begin creating a waterproof base.
Making the bottom
The bottom is a very important element, representing both the floor and the foundation of the future cellar. A lot will depend on the correctness of its construction.
Whatever the method of drainage and the level of groundwater (even if there is none at all), the base is prepared in exactly the same way as for drainage pipes: compacted sand, geotextiles, and then a coarse fraction.
Then the formwork is assembled for the future concrete slab, the bottom and walls of which are lined with roofing felt or film, which will not allow water to escape from the cement into the ground during pouring until it hardens.
The thickness of the lining should be about 20 cm, and it must be reinforced, otherwise the floor will crack due to ground movements, especially characteristic of flooded areas.
Pouring also needs to be done at the same time, if possible, so that the concrete sets all at once, otherwise the slab will not be monolithic, will quickly collapse, and will also be able to allow moisture to pass through.
Cement for the floor must be taken of the highest quality possible, for example, M300, and when pouring it, use special additives that provide a water-repellent effect.
The floor in the basement pit will take much longer to dry, so it will be possible to erect walls no earlier than after 28 days.
Monolithic concrete cellar
As soon as there is no water on the site, you need to dig a hole for the cellar of the required depth. It is necessary to take into account that when deepening by more than 2 meters, formwork will have to be made to strengthen the walls of the pit. It will also be required in cases where the soil is clayey. Landslides are very common in wet soil.
Completely cast concrete structure.
Making the base
Having dug a pit to the required depth, it is necessary to level the bottom. Before building a cellar on land with a high groundwater level, you need to think about the material for its floor.
The first step is to lay a moisture-proof material (any modern one will do), after which it is covered with several layers of roofing felt or durable cellophane. At the next stage, sand and gravel filling is carried out. The first layer is 5–10 cm, the second – a little more. Gravel and sand must be compacted well. If compaction is done poorly, this will negatively affect the operation of the cellar in the future. Therefore, each stage of construction should be given due attention.
The formwork must be made to the very top of the pit. After its construction, the walls must be covered with polyethylene or roofing felt. It is best to cover with an overlap of about 10-15 cm. Ruberoid should be laid clockwise, because this approach will simplify pouring concrete.
Additional internal formwork must be installed next to the walls that support the soil. It must be lined with waterproofing materials from the inside. There is no need to immediately make high internal formwork, because with a low height it will be more convenient to pour the mortar and lay the reinforcing material.
We concrete the walls
At the next stage, the walls of the pit are concreted: the opening between the formwork and the wall is filled with pre-prepared concrete mortar. The proportions of such a solution are quite standard: cement and sand in a ratio of 1:3. To increase the strength of concrete, a reinforcement network must be laid inside the formwork. Reinforcement with a diameter of 10-12 mm is enough. If the reinforcing mesh is not used, this can result in very disastrous consequences: after a few years, under pressure, the cement will begin to collapse, which in the future can lead to flooding of the cellar or destruction of the walls.
Filling should be done in a circle and layer by layer. With this approach, the concrete will better press the roofing material sheets, thereby increasing the waterproofing of the walls to a high level.
As soon as the first layer has set, it will be possible to build up the formwork, lay down new elements of the reinforcing mesh and continue concreting. The formwork can be dismantled a week after completion of the work.
Fill the bottom
At the final stage, the bottom of the future cellar is concreted. The base is also reinforced with iron mesh. Of course, this action does not cause nearly as many difficulties as installing formwork. After the concrete has dried and acquired a working appearance, it is recommended to additionally coat the bottom with a special waterproofing mastic, which can be purchased at any hardware store.
If for some reason it was not possible to make a drainage system for the site in advance, then you should take a closer look at the following method that will help drain water from the cellar: a so-called drainage well is dug a few meters from the pit. Its depth should slightly exceed the depth of the cellar. Both pits must be connected with a drainage pipe. Then a pump is installed, which must be turned on as needed. This simple solution will allow you to keep the cellar, located in the ground with a high groundwater level, dry and tidy throughout its entire operation.
Walling
Building walls is one of the simplest tasks: they are simply built to the required height from the selected material.
If the walls are assembled from individual bricks or blocks, then a water-repellent additive must be added to the cement mortar for the joints, prepared from the same cement, that was used to fill the bottom.
Monolithic walls should be filled with the same composition as the bottom.
However, for better waterproofing, it is much more convenient to build walls from blocks, since they can be coated on the outside with special liquid rubber, which causes the material to absorb water and collapse.
It also wouldn’t hurt to cover the finished walls with a layer of waterproofing.
What tools and materials will be needed
To build a bulk cellar using tools you will need a shovel, hammer, axe, saw, level, meter.
The following materials are used as consumables:
- bricks or cinder block,
- waterproofing film;
- roofing felt;
- boards, logs;
- bitumen;
- clay;
- crushed stone
Wood consumables are pre-treated with a waterproofing primer and a special antiseptic.
Wood impregnated with resins will last longer and will be resistant to water, pests, and fungi
Ceiling
The roof for a cellar is usually made of less durable materials, since it is not constantly in water, unlike the walls and floor.
To equip it, you can use at least a slab, and at a maximum, timber, which will be treated with an antiseptic against fungus (copper sulfate is also suitable).
A layer of clay is compacted on top, which in turn is covered with waterproofing material, which can be ordinary roofing felt, and filled with soil taken from the foundation pit during construction.
If winters in the region have little snow or the snow cover is blown away by the winds, you can additionally insulate the roof with a layer of dry leaves or sawdust.
Backfilling of the roof must be done after installing the ventilation pipes.
Features of the bulk cellar design
There are a number of requirements for harvest storage: it must be dry, ventilated, and maintain a temperature level ranging from + 3 ᵒС to + 7 ᵒС all year round. To ensure these parameters, the bulk cellar is equipped in a special way.
Device Features:
- It is better to build the storage facility on a natural hill to avoid flooding.
- There should be no various types of communications in the construction area: sewerage, powerful power lines, water pipes.
- The entrance to the room is located on the north side.
- It is better to uproot trees that grow nearby and plant shrubs nearby to strengthen the soil.
Also, the interior of the storage must be large enough to accommodate the entire harvested crop and its preparations.
A simple structure will help you save money: you won’t have to buy a large refrigerator or chest freezer