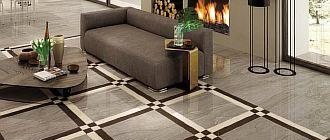
The abundance of search queries like “warm floor cable” is easily explained. Any floor heating systems have already managed to fully prove their worth, efficiency, and ability to create truly comfortable indoor conditions. And if you choose between water and electric (cable) heated floors, then according to the criteria of ease of self-installation and the necessary initial material investments, the cable wins unconditionally.
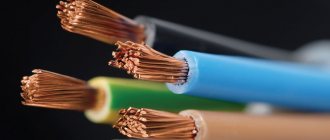
Warm floor cable
Indeed, even if you have basic knowledge and skills in electrical engineering and general construction issues, having mobilized your efforts, skills and attentiveness, such a system can be installed and launched independently. And in this article we will try to convince you of this.
How to choose?
Before you think about which electric heated floor is better to choose, you should solve two questions:
- Firstly, will the heated floor be used for the main heating of the room or only as an additional one.
- Secondly, how it will be mounted: in the screed layer or on top of it.
If the heated floor becomes the main source of heat, then the recommended power per square meter should be from 130 to 150 W. If as an additional one – 110-130 W.
It is also worth considering the possibility of changing the power density of the floor by the distance between the loops of the heating cable. The closer the turns are, the more cable will be needed, but less powerful models can be used. In this case, the area of the heated floor should not be less than 70% of the total area of the room.
It is not the total area of the room that should be taken into account, but only the area free from massive furniture.
Another consideration when choosing cable length to achieve the required power is the type of floor covering on top of the heated floor.
There will be minimal heat loss when laying cables under the tiles. Accordingly, you can get by with less power per square meter.
Laying cables under parquet or carpet will require more power due to the low thermal conductivity of these coatings.
The type of cable also depends on the installation method. When it is located inside a cement screed, cables of any diameter can be used for these purposes.
If it is laid on top of the screed, then in this case it will not be possible to do without an ultra-thin cable
However, the ultra-thin cable has one important limitation: it is only suitable for additional heating
When selecting components for a heated floor, you must also take into account the condition of the electrical wiring. If it cannot withstand the high power of a heated floor, then all calculations and work should begin only after replacing the wiring. The next point when choosing components is the question of which cables to use: single-core or double-core
This will depend on the method of connecting the heated floor to the thermostat and the possibilities of laying the cable itself
The next point when choosing components is the question of which cables to use: single-core or double-core. This will depend on the method of connecting the heated floor to the thermostat and the possibilities of laying the cable itself.
If it is possible to evenly spread the cable over the area of the room and connect both ends to the thermostat, then it is quite possible to get by with a simple single-core cable.
However, if the configuration of the room does not allow laying the cable according to all the rules and bringing their ends to one point, then in this case the choice should be made in favor of two-core models. Cables with two cores are connected to the thermostat with only one end, while the other end can remain in any convenient place.
When ordering a heated floor, you should not forget about choosing a suitable thermostat.
Without this device, it is simply impossible to achieve the desired floor temperature. In addition, the thermostat will help significantly reduce energy costs.
In total, there are three types of thermostats.
Manual models. Their features are simplicity, low cost and minimum functionality. Their entire interface consists of a power key and a manual power control.
Thermostats with display. Such models are interesting because they allow you to set the temperature to the nearest degree. In this case, the current and desired temperature can be reflected on the existing screen. However, to use these features you will also need to install a temperature sensor.
Thermal sensors should be installed at an equal distance from nearby turns of the heating cable. If this requirement is not met, then setting the desired floor temperature will become impossible.
Programmable thermostats. Their capabilities allow you to set a specific floor temperature for a given period of time. For example, with their help you can automate turning off the heated floor during the daytime during the work week. In addition, some models of such thermostats can control several zones of heated floors at once.
Characteristics
Regardless of the type, heating cables are characterized by a number of basic indicators:
Core material. According to their composition, the wires are divided into:
- aluminum (more suitable for stationary installations);
- copper (flexible but heavy);
- aluminum-copper (the most convenient and economical option).
- The number and thickness of wires in the core. This indicator is directly proportional to the flexibility of the wire, that is, the more thin wires, the more elastic the cable.
- Insulation material. In order to protect the cable fiber from mechanical damage, as well as prevent leaks, all wires are strengthened and divided according to the type of insulation into:
- armored;
- heat resistant;
- waterproof;
- pressure protected and so on.
- Operating temperature range (heat resistance). The higher this indicator, the higher the heating temperature of the cable without losing its original properties.
- Cross-section or cut area of the current-carrying conductor. For single-core wires, the cross-section is determined by the formula for the area of a circle (the product of the square of the radius and the number Pi - 3.14). For two-core cables, the cross-section is the sum of the cut areas of both cores. According to the “Rules for Electrical Installations”, the cross-sectional size is selected taking into account the planned loads (such as current power, for example) using special tables or average values.
- Life time. On average it ranges from 20-25 years. Having studied the basic characteristics of electrical cables, we can conclude that for heated floors you should choose copper or aluminum-copper heat-resistant wires with a cross-section of at least 1.5-2.5 mm2, which allows you to turn on the thermostat at the maximum heating temperature.
Film floor installation
Infrared heated floor - Installation, laying and connection of film flooring.
As mentioned above, installing a warm electric film floor is simple. But you need to start, as when installing any heated floor, with the film location diagram (do not lay it under furniture). The film is placed at a distance of at least 10 cm from the furniture.
Then the power of the floor is determined. When laying laminate as a finishing coating, the power should not exceed 150 W, if there are tiles - up to 200 W. Afterwards, the quantity of the product is calculated - with film this is easy, it should cover the entire required surface, a maximum length of 8 meters.
The process of constructing an electric heated film floor is similar to cable systems, the only difference is in the arrangement of the heating element.
Preparatory work
You should start by preparing the area for the thermostat. It is installed in an accessible place on the wall. A recess is made for it, in which the junction box is placed.
Then the subfloor is prepared - leveled and cleaned.
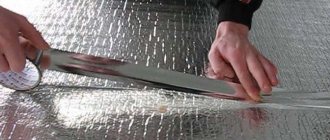
A polyethylene film is laid down - it is necessary for protection from moisture. Foil insulation (no more than 5 cm thick) is laid on top of it, with the metallized side up, this will help avoid heat loss. The sheets are glued together with tape.
The location of the film is marked on the insulation, and a recess is made for the sensor. The temperature sensor should be placed under the second section of the infrared floor - this will allow more accurate reception of information about surface heating.
Film editing
Floor strips are laid according to the prepared diagram. To reduce the length of the wire, the film is placed with its end sides to the wall where the thermostat will be, the distance from the wall is 15 cm, the copper contacts should be located down.
Laying the sheets overlapping is not allowed; they must be positioned end to end. If necessary, the film can be cut, but only along specially designed lines; the maximum length is 8 meters. The product is fixed with tape to the heat-insulating material.
Connecting the system
The film is connected to the power supply using terminals. To do this, the insulation is removed from the edge of the wire, it is inserted into a clamp, one contact of which is inserted inside the film, and the second is installed on a copper busbar. All contacts are fixed with pliers and insulated with bitumen tape; the places where the film is cut must also be insulated.
After this, a temperature sensor is installed, it is attached to the bitumen insulation to the black silicon strip at the bottom of the film, and the wire is pulled to the thermostat along a recess in the substrate.
The thermostat is installed. The sex cables from the sensor are connected to it. Then the power supply wire is connected. To check the functionality of the system, you need to turn it on at full power for a few minutes.
Laying the finishing coating
Before laying the finishing product, the structure is covered with thick polyethylene - this will protect it from moisture.
Laminate flooring can be laid directly on plastic film. If you are going to lay carpet or linoleum, then sheets of plywood are placed on top of the waterproofing.
How to properly install tiles on a warm film floor - this can be done in two ways:
- A painting mesh is placed on the polyethylene to improve adhesion. A thin layer (1 cm) of self-leveling compound or screed is poured.
- The waterproofing is sheathed with GVL, the sheets are fixed with self-tapping screws. It is important not to damage the film. The tiles are mounted using underfloor heating adhesive.
Electric film floors can be installed on old flooring.
To do this, it is cleaned, a heat-reflecting product is placed on top, on which the film is laid.
Forged swing metal gates
Forged structures are decorations for barriers made of metal. Despite the huge number of models of modern devices that provide unimpeded entry into the territory of a personal plot, it is the swing design that is in high demand and deserved trust of owners of private houses located within the city or beyond.
Swing gates
It is swing structures that are installed in most cases. Such devices can be:
- Completely transparent, made from individual rods bent into an intricate pattern.
- Partially or completely deaf, not allowing strangers to see what is behind the openwork fence.
Advantages and disadvantages
To achieve this goal, craftsmen create structures in two ways:
- cold forging;
- hot.
Cold forging Hot forging
The main advantages of forged gate leaves are a high level of strength and resistance to mechanical damage. During the work, specialists carry out calculations with particular accuracy of the level of load on the supporting structure
It is also important that such products:
- universal;
- exclusive;
- can have any shape;
- compatible with all building materials that were used in the construction of the fence.
However, there are also certain disadvantages that make you think about the extent of the need for work related to the installation and installation of openwork gates. Among them:
- Heavy weight.
- The need for careful preparation and high-quality installation of supports that will have to withstand significant weight.
Despite all the existing difficulties, installing gates attracts many homeowners due to the opportunity to create various compositions, decorate the entrance to the territory not only with simple drawings, but also with complex ornaments, equip the structure with automation, install video surveillance and an intercom system.
Perform power calculations for heating cables
When calculating thermal power for a cable system, the purpose of this heat supply method is taken into account. If the heating cable for a heated floor is planned to be used to provide auxiliary heating for a property, then 110-140 W will be required for each “square” of area. When the system is the main one, in this case 150 W or more is needed.
In addition, you should know the size of the area where the cable will be laid out. It should not pass under furniture, plumbing fixtures or objects located low above the floor surface. This is especially true for resistive cables, which are at risk of overheating, but for self-regulating wires there is no danger.
By subtracting the area of these zones, you can find out the actual heat supply area and the power of the entire underfloor heating system, for which the heating area is multiplied by the norm for one square meter.
Next, you should calculate the length of the floor heating cable: in the passport for this product, manufacturers indicate the power of one meter. The required footage is determined by dividing the total power by the cable capacity. For example, the result of calculations was 93 meters.
You need to purchase several bays, the total length of which is close to the calculated value. It should be remembered: if there are extra meters of cable left, they cannot be cut off, since there are couplings at their ends, secured using special equipment.
You can make something similar yourself, but the service life instead of 10 - 20 years will be several years, and sometimes months. Therefore, the cable is laid along its entire length.
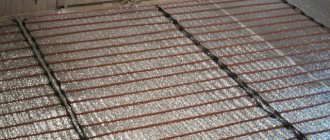
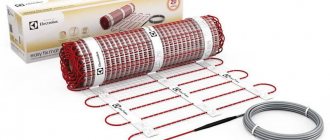
Do-it-yourself cable heated floor installation technology
Installation of cable heated floors.
It is easier to install an electric heated floor than a water one, but there are some nuances here too. Let's look at step-by-step instructions for installing a cable floor.
Laying scheme
Before installing a warm electric floor, you need to read the installation instructions and draw a diagram on paper. It should be remembered that it does not creep under furniture and appliances. In addition to the fact that this is not rational, it can also lead to overheating of the system and its failure.
There are two main ways to lay floor wires - “snail” and “snake”. When installing the heating element correctly, the distance from the walls should be at least 10 cm.
Calculation of materials
At the next stage, it is necessary to calculate the amount of material that will be needed to install a warm electric floor in the room. To do this, it is better to use ready-made tables that are developed by system manufacturers or special calculators.
The main task is to correctly calculate heat loss. After this, the optimal laying step is determined and the required cable length is calculated. When calculating the length, you must not forget about the section that runs along the wall to the thermostat.
The wire length is calculated using the formula
h=S x100/L , where:
- h - cable length;
- S—area;
- L is the total length of the wire.
In addition, you will need fastenings, a copper grounding cable, connecting wires, an RCD protection system, a regulator and a sensor.
Calculation of power and laying pitch
The required power of the device is influenced by climatic conditions and the material from which the house is made. It is different for different regions, for central Russia it is:
- In the kitchen, hall, hallway - 150 W per m2;
- In the bedroom and children's room - 120 - 150 W;
- In a glazed loggia - 200;
- In the bathroom - 180 W per m2.
In addition, the choice of power depends on the purpose of the system:
- main heating - 140 - 180 W per m2, while covering at least 70% of the area;
- additional - 140 W is enough.
The energy consumption per room is calculated, with the removal of zones where furniture will be placed. That is, only the heated area is taken into account, and not the one indicated in the BTI documents.
Power is calculated by the formula: P1= P2*S*1.3
- P1 - power;
- P2 - heating power m2;
- 1.3 is the coefficient.
The laying step is calculated based on indicators such as:
- Number of linear meters of heating element;
- Heated surface area;
- The coefficient for a given room is W per m2.
Let's consider an example of calculation for a room of 25 m2 - a hall. 5 m2 is filled with furniture, 20 m2 remains for heating. The power indicator for such rooms is 150 W. As a result, a heating element with a power of 3 kW is required.
Cables are regulated by linear power, the range ranges from 12 - 24 W per linear meter. It follows that you can buy 125 or 250 m. This depends on the laying step - the distance between the loops. It is believed that the smaller the step, the more uniform the heating. But at the same time, the more frequently the branches are located, the more difficult and time-consuming the installation will be. The average standard laying step is 7 cm.
Control block
A thermostat is required to control and control the temperature level. He is responsible for turning the floor on and off, as well as for its operating mode.
Thermostats are either electronic or mechanical. According to the recommendation of professionals, the regulator should be installed on the wall, at a distance of one meter from the floor, preferably closer to the electrical wiring. To place it, you need to make a recess in the wall, from which you make grooves for wiring to the floor.
Preparing the base
Laying any electric heated floor, including cable, is possible on a flat, clean surface.
If there is old finishing material, it is dismantled. The floor is cleaned of dirt with a broom or construction vacuum cleaner. Then, the base should be inspected for irregularities and cracks.
If there are minor irregularities, they can simply be rubbed off. If the differences in the base are large, then you will need to pour a thin layer of leveling screed, 3 - 7 cm. Before pouring the self-leveling compound, the surface is primed. Only after the solution has dried can you proceed to the construction of the next layer.
It is possible to install a warm electric floor directly on the floor slabs; they also need to be cleared of debris.
Thermal insulation
Hydro and thermal materials are laid on the subfloor; they are necessary for the efficient operation of the system.
First, a polyethylene film is laid - it will serve as waterproofing. Insulation is spread over it - it can be foam foam with a foil layer. The slabs are placed butted against the walls, the seams are connected with tape. Expanded polystyrene or polypropylene foam is also suitable as thermal insulation.
After this, the perimeter of the entire room is glued with damper tape, this compensates for the expansion of the screed when heated.
To simplify the fixation of the heating element, it is recommended to lay reinforcing mesh on top of the thermal insulation. It will make the structure stronger, and the cable will be attached to it.
Cable laying and fastening
The wire must be laid according to the prepared diagram, with a planned step. Start from the place where the cable will be connected to the thermostat. If a single-core wire is used, then it must also return to the thermostat; when using a two-core wire, this is not required.
If there is fittings, the heating element will be attached to it with plastic clamps. If it is not available, a steel mounting tape is mounted on the thermal insulation, to which the wire will be fixed with dowels or self-tapping screws. Perhaps fastening with mounting tape directly to the insulation boards.
Installing a Temperature Sensor
The temperature sensor is placed on the floor, the distance from it to the wall with the regulator is 1.5 meters. To do this, recesses are made in the thermal insulation for it and the wiring going to the device.
This is necessary so that the sensor does not rise above the surface. It is placed in this recess, placed in a corrugated pipe, which has a plug at one end, and is tightly fixed.
Connection - diagrams
This is the most critical stage on which the performance of the floor depends. The sequence of actions is as follows:
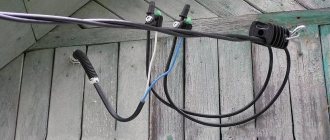
- Checking the wiring - after all, installing an electric floor significantly increases the load on the electrical wiring of the entire house. Using a multimeter, the cross-section of the cable in the network is determined, then it is analyzed whether the wire of the warm electric floor matches it. If the diameter of the cores does not match, it is necessary to change the wiring. An RCD with a circuit breaker is selected for the new load.
- Connecting the device involves connecting the heating cable and the wire from the temperature sensor to the thermostat. After which, the thermostat is connected to power.
- Additional grounding of the cable and power cord.
Before pouring the screed, the device is turned on for a few minutes to check its functionality.
Installation of screed layer
After checking the system, you can install the next layer of the structure. There are several options:
- Pouring wet screed. For this, both ready-made mixtures and it is possible to make the solution yourself. The mixture is made from sand, cement, water, with the obligatory addition of plasticizers. The layer thickness is 3 - 5 cm. The solution is applied from the central corner of the room towards the door. The surface is leveled according to the rule and left for 28 days until completely dry.
- Pouring tile adhesive. The cable is covered with a layer of 5 - 8 cm and left to dry for a while.
- Laying dry screed. For this, fine quartz sand or slag is used. The method is simpler and faster than with concrete mortar. The mixture is distributed over the floor surface; it should cover the structure completely. After 12 o'clock you can begin further work.
Arrangement of the finishing coating
Only after the solution has hardened, according to the instructions, can you proceed to laying the selected topcoat. This could be laminate, linoleum, tile, the main thing is that the product is allowed to be adjacent to heating systems.
Installation of heating cable in grooves
The heating cable can be installed in grooves, but this is a complex process. It is recommended only if there is a clean cement-sand screed, and when it is not possible to raise the floor level yet.
After hollowing out the grooves in the concrete for the wires, the recesses are filled with tile adhesive. Then the cable is pressed into the composition so that there are no air voids.
For uniform heating, with grooves measuring 1 cm, a wire of 10 - 12 W/m is used, with 2 cm - 20 W/m.
Installing a cable on an old base
When installing a heating cable on an old concrete base or tile, the heat loss is 30%.
First, insulation is laid on the floor, then a mounting tape is placed to which the heating element will be attached. Only then, the wire is covered in an even layer with tile adhesive.
Scarecrow
If you need to scare away birds, you should make a device from compact discs. They need to be secured to a hoop and attached to the board.
Installation of a core floor
How to make a warm floor under tiles? It's simple. DIY installation!
Technology of laying rod-based heated floors with laying of cable mats. First, a layout is made for the placement of the canvas, and the amount of material required is calculated.
Rod floors are sold as a kit, but sometimes it is necessary to purchase additional components. The required power is calculated by analogy with the cable mats that we discussed above.
Laying a core floor consists of several stages:
- Preparatory work - determining the location for the temperature sensor, cleaning and leveling the base, placing the foil backing - these works are carried out in the same way as when installing any electric floor. If the floor is planned to be screeded, then the perimeter is covered with damper tape.
- Installation of rods - the rod roll unwinds on the surface, the distance between adjacent strips should be 50 - 70 mm. The length of one strip should not exceed 25 m. The strips are fixed to the substrate with tape.
- Connection - a thermostat is installed in the prepared area, to which the floor wires are connected. The sensor, placed in the corrugation, is placed in the groove of the substrate and connected to the regulator, which in turn is connected to the power source. A prerequisite is to conduct a test test of the system before the next stage of work.
- Pouring the screed - this can be concrete mortar, dry adhesive mixtures, or dry screed, layer thickness 20 - 30 cm.
- Installation of the finishing coating - only after the screed has completely dried is the finishing material applied. When laying tiles, no screed is required; the mats are filled with tile adhesive.
It is permissible to lay a core heated floor on an old coating. The installation principle is the same as when installing a thermomat.
Common Mistakes
How to install electric floors correctly with your own hands - this question often arises for beginners who want to do this heating at home.
The main mistake is installing floors under large furniture. Underneath, the surface is not cooled, which leads to overheating and then failure of the system.
You cannot bend the cable either, as this will disrupt the functioning of the device. When laying cable mats, cutting the wire is unacceptable, so you should correctly calculate the size of the heated area.
A common mistake when constructing electric floors is inappropriate control of the insulation resistance during installation. The indicator should not exceed that specified by the manufacturer by more than 10%.
When using a film heated floor, it may stop heating if the film is damaged. Its current-carrying parts must be properly insulated, otherwise electric current will leak and the system will eventually shut down.
If we talk about the temperature sensor, then you should not pour it into the screed. In case of breakdown, replacement will be difficult. It is placed in a corrugated pipe.