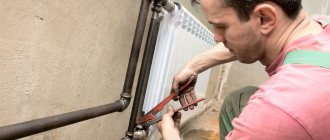
To protect wastewater from freezing, there is a heating cable for sewer pipes. Heating of sewerage is necessary in situations where pipes have to be located in unheated rooms, basements, and basement levels of buildings.
Sometimes it is not possible to lay the system at the required depth, which makes the pipeline susceptible to the risk of freezing drains and the formation of an ice plug. In such cases, it is necessary to insulate the pipes. The best option is a heating cable for sewer pipes, which allows you to solve the problem effectively and reliably. Let's take a closer look at this issue.
Advantages and disadvantages of internal and external heating systems
A positive quality of internal heating is that it can be easily installed in existing pipelines without opening the soil and using thermal insulation. Heating the directly passing drain liquid does not require much electricity consumption.
Negative points include:
- Reducing the internal cross-section of the pipe.
- Possibility of congestion.
- A labor-intensive installation process on long sections with transitions and bends.
- The need to install an inlet tee.
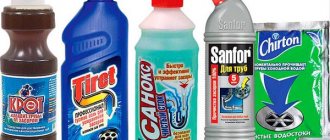
Please note! The cord is well protected from mechanical damage, but is susceptible to aggressive chemical attack by wastewater.
The external heating cable for sewerage is attached directly to the outer wall of the pipe using plastic clamps or adhesive tape, which greatly facilitates installation work.
The disadvantages of an external heating system include:
- Higher electricity consumption.
- The need to open a trench when installing on an existing pipeline.
- Additional costs for installing thermal insulation.
Types of wires
There are several types of cable used for pipeline heating, which have different technical characteristics and installation methods, which allows the use of one or another type depending on the technical specifications.
The operating principle of a heating cord is quite simple: an electric current heats the pipe to above-zero temperatures, preventing the passing liquid from freezing. The cable used for heating can be:
- Shielded, having a metal braid, used as additional protection against mechanical damage.
- Unshielded, double insulated.
- Zonal. Spot heating of certain areas.
- Self-regulating. A pair of copper conductors and a working matrix between them.
- Resistive, single or double wire.
Installation of the heating wire can be done both outside and inside the system; the latter option is economical in terms of electricity, but more expensive when performing installation work.
The most effective use of external heating is in combination with the use of thermal insulation materials, which reduce heat losses. Sewage systems made of metal and plastic of almost any diameter can be effectively heated.
Installation of an external heating cord, recommendations
When installing the wire, two methods are used: linear arrangement along the pipe or tangential wrapping.
Adhesive tape or synthetic cable bandage is used as fastening. The distance between the fastening points should not exceed 200 millimeters.
Often, to increase the efficiency of heat transfer, the pipe is initially wrapped in aluminum foil (this can significantly increase the heating area), to which the heating cable is directly attached. This method is recommended for installation on plastic products, which have low thermal conductivity compared to metal ones.
When laying the heating element, you should avoid creating kinks and make turns at an acute angle to avoid accidental damage to the electrically conductive wires and damage to the insulating layer. The final stage will be the installation of thermal insulation material.
Shielding
In the price lists of cable manufacturers, the list of options indicates “shielded” or “unshielded”. What does this mean?
Twisted copper braid solves three problems at once:
- Grounding. If the sheath is mechanically damaged, current will flow between the phase current-carrying conductor and the braid. A situation in which a sewer, water pipe or drain is energized is completely excluded;
The braid, of course, must be grounded to the body of the electrical panel, a metal sheet dug into the ground, or a circuit welded from a rod.
The braid is connected to ground.
- The likelihood of mechanical damage itself will also noticeably decrease: the braiding is not so easy to break through with an accidental blow;
- Finally, grounded shielding will protect nearby electronics from interference. With a certain installation configuration, the cable will act as an inductor that induces currents in all adjacent circuits.
Rules for installing cables on pipes
Laying a heating cable is a relatively simple process. It is simply fixed to the surface of the pipe, usually lengthwise, in one strip. Some projects include spiral installation. In this case, the calculated pitch between the turns of the spiral must be precisely maintained so that the pipe is heated evenly.
After the heating cable is fixed to the sewer pipe, it is recommended to additionally lay a layer of thermal insulation to improve the quality of heating
Crossing individual sections of the heating cable is unacceptable. Depending on the type, the cable is secured using heat-resistant adhesive tape or mounting ties. The pitch between the fastening points must be at least 200 mm. To secure the cable in the mineral sheath, metal fasteners are used: tie strips or a special bandage.
But most often I still use heat-resistant tape. Fasteners must not only withstand high temperatures, but also be resistant to the influence of natural factors and chemicals. Sometimes aluminum tape is used as fastening. But at the attachment points, the thermal power of the cable will increase.
This is not always useful and can lead to overheating of communications. It is not recommended to use metal fasteners when installing a heating cable enclosed in a polymer insulating sheath. But in some cases, aluminum tape can even improve the situation.
The heating cable on a plastic sewer pipe can be secured with aluminum tape to increase the heating efficiency and make it more uniform
When laying on a polymer pipe, metallized tape is placed both under the cable and above it. This slightly increases the thermal output and also helps to heat the pipeline evenly. Heating cables are rarely used inside sewers.
Typically, small areas of the system that are not located in the ground are heated this way, for example, sewage pumps that stimulate the movement of wastewater if natural movement is difficult or impossible.
To install the internal cable, you may need a clamping and sealing sleeve, a coupling, a set of washers, as well as other elements (+)
To install the internal cable into a pipe whose installation has been completed, you will first need to cut a tee into the system. This will make a hole for inserting the cable into the pipeline.
Independent connection to the power grid
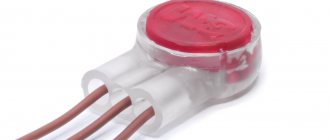
Quite often, a malfunction occurs precisely at the connecting junction, which leads to de-energization of the sewer cable. Correct installation is carried out in the following order:
- A large heat-shrinkable tube is placed on the end of the heating cord.
- The outer insulating layer is stripped from the end at a distance of 50 mm, the braid is cut 10 mm from the edge of the insulation.
- The heating cores are separated and the internal insulation of about 6 mm is removed.
- Next, on the cord, as well as on each core, a small-diameter tube and a medium-diameter tube.
- It is necessary to place the twisted braid in a metal tube and crimp it to make a tight connection with the braid.
- The end of the power supply wire is cleared of 80 mm of outer insulation.
- The cores are separated: the ground wire remains as is, and the phase and neutral wires are cut to a length of 35 mm.
- The ends of the wires are freed from secondary insulation by 6 mm.
- The stripped ends of the supply and heating cables are sequentially inserted into heat-shrinkable couplings and connected by heating with a hair dryer or open fire.
- Additionally, each joint must be wrapped with insulating tape.
- The ground wire is inserted into a metal sleeve crimped onto the braid and is also clamped.
- A medium-sized heat-shrinkable tube is moved onto the resulting joint, and after thermite treatment - a large one, followed by heating.
Such a connection completely prevents moisture from entering the connecting joint, so there will be no short circuit in the wiring.
An example of a heated sewer system
Let's consider an example of constructing a sewerage system for a private household. According to the project, several branches are connected to the common sewer main. All of them are laid above the horizon of seasonal soil freezing, therefore they are supplied with a heating cable.
In order for the operation of the heating electrical system to be effective and aimed directly at maintaining the positive temperature of the sewer pipe, communications are laid in an insulated trench:
Having made sure that the assembled sewer pipeline is tight or has eliminated the leakage, if any, proceed to laying the heating cable.
In the example, the heating cable is laid close to the bottom of the tray, but without touching it. Attached to the pipe in the form of a large loop, starting from the riser located in the house and returning back
Having decided on the optimal position of the heating cable, proceed to its fastening:
In order for the system for heating communications to function automatically, a temperature sensor is connected to it:
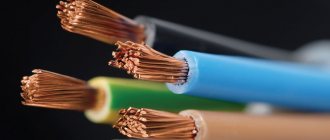
Lived
This is a metal wire, the core of any electrical conductor. The core can be solid monolithic or in the form of many thin wires twisted into a bundle. In the first case it is called single-wire, in the second - multi-wire, or flexible. The cross-sectional shape of the core can be flat or sectoral, especially for cables and wires of large diameter. Do not confuse a stranded core and a stranded cable; they are completely different things.
Stranded cable with solid cores
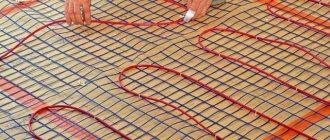
The conductors differ according to the type of conductor . At home, those made of aluminum, copper or aluminum-copper are used, although recently aluminum has been replaced by copper. In everyday life you can also find nichrome conductors with increased alloy resistance. The wires heat up during operation, similar to the filament in a light bulb, but not as much. They are used in the manufacture of heated floors.
Stranded copper core
One of the main characteristics of the core is cross-sectional area . Wire manufacturers always indicate it, but sometimes it becomes necessary to check the cross-sectional area yourself. This can be done using a regular tape measure or caliper. Having measured the diameter of the core, you can easily calculate its area using the formula: S = πr2, where S is the cross-sectional area (circle); number π = 3.141...; r is the radius. The wire cross-section is measured in square millimeters.
Aluminum cable
With a multi-wire conductor, the situation is more complicated, but you can quite accurately determine its cross-sectional area. To do this, you need to wind about 15 turns of the wire stripped of insulation onto a thick nail or screwdriver, squeeze them tightly and measure the length of the spiral with a regular ruler. The diameter of the core will be equal to this length divided by the number of turns. Another way is to measure individual wires and then multiply the resulting number by the number of wires. The cross-section of the core in its diameter is measured by the formula: S = 0.785d2, where d is the diameter of the core.
Choosing a heating cable for sewerage
For thermal insulation for external heating of household pipelines, we recommend using a self-regulating heating cable without braid (screen), with a power of 10/26/24/30 W/m. The cable is sold in ready-made kits (with an already mounted power cable and a Euro-plug for connecting to the network), or as a cut - in coils.
Heating cable power for sewer heating
The required power to maintain a positive temperature of the liquid in the pipe is calculated from the table. It gives the pipeline diameter (mm), thermal insulation thickness (mm) and ΔT, °C - the difference between the required temperature (for a pipeline this is +5 °C) and the minimum ambient temperature:
Typical calculations of heat loss from the surface of a pipeline
Calculated heat loss, Qv, W/m (with a thermal conductivity coefficient of thermal insulation of 0.05 W/m (m' ° C)
Using the table presented, calculations are made of the power of the heating cable both inside and outside the pipeline.
For example: A sewer pipe ø159mm, insulated with 50mm thermal insulation material, with a minimum ambient temperature of -15°C and the required temperature of +5°C, we obtain a difference of 20°C; according to the table, this power value (with a margin) will be 16 W/m.
Heating inside the system
Heating cables inside sewer pipes have been used for quite some time. In terms of its structure, it is an electrical cable where resistance regulates the temperature within the network. It uses a well-known property of metal conductors, which is heating when electricity passes through it. At the same time, with increasing resistance, the heating level rises.
From the above, it becomes clear that the heating cable for sewer pipes must be equipped with good waterproofing, because it is constantly in water.
The cable that is laid inside is arranged like this:
- metal conductor for heating;
- conductors enclosed inside heat-resistant insulation;
- another layer of fluoroplastic insulation;
- copper screen;
- outer layer of insulation.
In addition, the device for pulling inside the drain structure contains a temperature regulator. It prevents overheating of the mechanism and saves energy.
Self-regulating heating cable for heating sewer pipes
The distinctive ability of a self-regulating cable is the ability to cut it into sections of any length, thus, sections can be manufactured (coupled) directly at the installation site.
Self-regulating cable SAMREG 16-2
- Power: 16 W
- Purpose: pipeline
- Screen: no screen
- Type: self-regulating
- Type: low temperature
- Application: without explosion protection
Price src=”https://ProUteplenie.com/images/uploads/images/products/srl_kabel_122739-image_product_card.jpg” class=”aligncenter” width=”401″ height=”300″[/img]
Self-regulating cable SRL 16-2
- Power: 16 W
- Purpose: pipeline
- Type: self-regulating
- Type: low temperature
- Application: without explosion protection
- Max. temperature (operating): 65 °C
Wholesale price
Self-regulating cable SAMREG 24-2
- Power: 24 W
- Purpose: pipeline
- Screen: no screen
- Type: self-regulating
- Type: low temperature
- Application: without explosion protection
Price src=”https://ProUteplenie.com/images/uploads/images/products/srl_kabel_122739-image_product_card.jpg” class=”aligncenter” width=”401″ height=”300″[/img]
Self-regulating cable SRL 24-2
- Power: 24 W
- Purpose: pipeline
- Type: self-regulating
- Type: low temperature
- Application: without explosion protection
- Max. temperature (operating): 65 °C
Wholesale price
Self-regulating cable SAMREG 30-2
- Power: 30W
- Purpose: pipeline
- Screen: no screen
- Type: self-regulating
- Type: low temperature
- Application: without explosion protection
Price src=”https://ProUteplenie.com/images/uploads/images/products/srl_kabel_122739-image_product_card.jpg” class=”aligncenter” width=”401″ height=”300″[/img]
Self-regulating cable SRL 30-2
- Power: 30W
- Purpose: pipeline
- Type: self-regulating
- Type: low temperature
- Application: without explosion protection
- Max. temperature (operating): 65 °C
Wholesale price
Also, the heating system for a household pipeline based on a self-heating tape does not require complex controls. Sections up to 20 m long can be connected directly to the network without the use of controllers and automatic devices. The self-regulating cable is not subject to overheating even when installed overlapping.
The maximum length of one section of a heating cable depends on its linear power, as well as inrush currents.
More detailsMaximum length of the heating cable in a sectionMore detailsService life of the heating cable. Protection from UF raysRead more Heating cable in a pipe. Heating inside the pipeline
Which cable to choose?
The criteria for choosing one type of heater or another are:
- size and configuration of the problem section of the pipeline;
- line depth or conditions;
- temperature operating conditions in winter;
- cable cost;
- possibility of repair or replacement.
As a rule, an element for heating sewer pipes is selected based on the totality of these conditions and requirements. It is very difficult to name the most successful option without knowing the specifics and configuration of the system. However, according to experts, resistive types are used less and less, and self-heating cable is used much more often, although it costs users much more.
Resistive heating cable for sewer heating
For domestic use, ready-made sets of resistive heating cables (or constant power cables) are also convenient. The main advantage is the price, which is much lower than that of a self-regulating cable.
The difference between a resistive cable is that it lacks the ability to self-regulate temperature. This function is performed by a thermostat located in the section end coupling. For reliability, it is recommended to use a two-core resistive cable - one of the two wires is heating, the other is supplying. The advantage of a two-core resistive cable is that there is no need to return the cable.
Assembly
Is it difficult to assemble a section of heating cable with your own hands?
Finished section. All that remains is to plug it into the outlet.
The instructions are extremely simple and do not require special skills. From tools and additional materials we will need:
- Heat shrink tube in three sizes;
- Sleeves and pliers for crimping current-carrying conductors (two for unshielded cables and three for shielded cables);
- Silicone sealant;
- Sharp knife and side cutters for stripping insulation;
- Pliers;
- Hairdryer or regular lighter for heating the heat shrink;
- The cold end is a cord with a plug. The grounding wire located on the plug and the third wire are only needed to connect the shielding. If it is not there, you can get by with a two-core wire.
The procedure is as follows:
Section assembly algorithm.
- Remove the sheath from the heating cable and cord;
- We strip the veins on both sides. In this case, the shielding braid and ground must be stripped and twisted at a distance of 2 - 3 cm from the current-carrying conductors;
- We put pieces of heat shrink on individual cores, on a cable without screen/ground and on the outer sheath;
- We connect the current-carrying wires in pairs with sleeves;
- We apply a little sealant to each of them, shrink the heat-shrink tube and heat it until the cores are completely crimped;
- We repeat the operation with both current-carrying wires assembled together;
- We connect the screen and the ground with a sleeve, having previously put heat shrink on the core;
- We isolate the grounding separately, then heat-shrink the cable sheath and the cold end;
- We strip the sheath at the end of the cable and cut off all the cores with a length variation of 1 - 2 cm. They are separated in order to increase the resistance when water enters the end coupling;
- We alternately place the tube with sealant on individual cores, on the conductive matrix and on the cable sheath;
- We flatten the free end of each heat shrink using ordinary pliers.
The cable termination with squeezed out sealant is clearly visible in the photo.
Make it yourself or buy it
If you have special education and experience working with electricity, you can make a heating cable yourself. For this, low-power spirals and wires are used. Metal insulation is carried out using heat shrink tubing. The finished product can be no worse than industrially manufactured analogues.
However, the time and money spent on purchasing materials may not bring tangible benefits and savings.
Tips for choosing
Professionals recommend choosing products with such power that will ensure high-quality heating of the main line when the temperature drops critically. If it is possible to continuously monitor the condition of the cable, then it is advisable to choose a resistive option.
When the system operates in autonomous mode, it is better to install a self-regulating device from inside the highway.
Do-it-yourself cable making and installation
The best option for making homemade heating systems is to use a P-274 communication cable or its analogues. These products consist of copper wires and durable insulation that is resistant to moisture and mechanical stress. The wire is supplied with a direct current of 6-27 volts. Parameters are changed using a manual or automatic regulator adjusted to temperature changes.
Drawing and diagrams
The drawing is drawn up to scale on a computer or a sheet of paper.
It is necessary to schematically display the following design details:
- the beginning of the pipeline;
- the outlet of the main into the well;
- drainage line;
- corners, tees and taps;
- pipe diameter;
- trench depth.
Based on the created diagrams, the necessary materials and equipment are calculated.
Size calculation
The following table will help you correctly calculate the heating parameters for the sewer system:
| № | Pipe outer diameter (mm) | Power(W/m) | ||
| Depth 50 cm | Depth 75 cm | Depth 50 cm | ||
| 1 | 32 | 10 | 8 | 5 |
| 2 | 42 | 13 | 10 | 7 |
| 3 | 48 | 15 | 12 | 8 |
| 4 | 60 | 20 | 15 | 10 |
| 5 | 75 | 25 | 20 | 12 |
| 6 | 90 | 30 | 25 | 15 |
| 7 | 110 | 40 | 30 | 20 |
| 8 | 160 | 50 | 38 | 25 |
Calculation and selection of cord
It is very important to correctly calculate the power of the heating cord, especially for plastic products, otherwise overheating will lead to deformation, leakage and damage to the network. When calculating, factors such as:
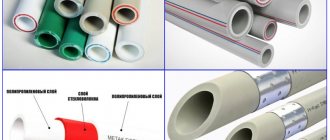
- Diameter of the sewer system.
- The material from which the pipeline is made.
- Network laying depth.
- Technical characteristics of insulating material.
Taking into account the totality of information, the heat loss of one linear meter of the network is calculated using the formula:
- Qtp – heat losses of the pipeline (W).
- Λ – thermal insulation coefficient.
- Ltp – pipe length.
- Tbh – liquid temperature in the network.
- Thap – minimum ambient temperature.
- D – outer diameter of the pipe together with thermal insulation (m).
- 1.3 – increasing thermal conductivity safety factor.
Purposes of application
The use of a heating cable to heat piping systems may be justified in the following situations:
- Great depth of soil freezing. If the ground freezes to more than 4-6 meters, installing a pipeline below this level can be a very labor-intensive undertaking.
- Complex soil types. Rocks in the area where sewerage is planned to be laid.
Of course, it is worth talking about all these phenomena only in relation to regions where there is periodic or constant presence of negative air temperatures that can cause damage to the sewer system.
It is worth noting that the use of internal heating cable for sewerage systems is not without some disadvantages.
Thus, due to the presence of an additional element, the throughput of the pipeline decreases. Also, the risk of blockages increases and the tightness indicators deteriorate, since it is necessary to additionally install a tee. For extended sewer systems, this option may be unreasonably expensive.
But for private farmsteads where sewer systems of a fairly large cross-section and short length are used, an internal cable is ideal.
For sewerage systems based on polyvinyl chloride, concrete or asbestos-cement pipes, internal pipeline heating may be the only option available. These materials have very low thermal conductivity, so it is very difficult to effectively heat them from the outside.
Why do the sewers freeze?
The problem of sewer pipe freezing is not immediately detected. Unlike water supply communications, here the flow of liquid is not constant and does not completely fill the cross-section of the pipe.
In addition, sewage entering the sewer system usually has a higher temperature than, for example, water from a well. Therefore, freezing of wastewater occurs gradually.
At first, only a small part of the contents of the sewer may freeze, then another layer of frozen sewage appears, etc. Gradually, the entire lumen of the pipe is filled with a dense frozen mass, after which the problem becomes obvious. Faulty plumbing, such as a leaky faucet or tank, can make the problem worse.
Small portions of water enter the sewer, quickly cool down and freeze. Even the correct installation of sewer pipes and the presence of a layer of insulation do not always prevent freezing of drains. Defrosting a frozen sewer is troublesome; in addition, this phenomenon can lead to damage to the pipes, some of which will have to be replaced.
Freezing of a sewer pipe can occur gradually, layer by layer, and slightly leaking plumbing only increases the danger of this unpleasant phenomenon
Therefore, it is recommended to lay sewerage below the ground freezing level with mandatory insulation of communications. If in the southern regions and the middle zone digging a sufficiently deep trench is usually not a problem, then in the north everything is a little more complicated. In this situation, the use of a special heating or hot cable is more than appropriate.
When using a system of this type, the volume of excavation work is noticeably reduced, since the depth of the trench can be reduced to an acceptable level without worrying about soil freezing.
To lay or not
To understand whether there is a need to use a heating wire, you should proceed from several parameters:
- depth of placement of water supply and sewerage pipes. In situations where pipes are placed above the freezing level of the soil, it is highly desirable to install the cable along its entire length. It should be borne in mind that for different areas of our country, the depth of soil freezing may have different values. So in Kaliningrad this level corresponds to 70 cm, and for Chelyabinsk – 190.
- region of residence. This characteristic can also influence the decision of whether a heating wire is needed. In regions with a frostier climate, emergencies occur more often, from which we can conclude that water supply systems should be protected with the help of such a device. If the pipes are placed to a considerable depth, then you can limit yourself to only insulating certain sections of the pipe. The most susceptible fragments in the water supply and sewerage system are those that are located closest to the surface of the earth. Usually these are plots laid next to the house.
Fiber optic communication cables. How it's done
In several of my posts published more than a year ago, I raised such an interesting and somewhat exciting topic for many as backbone fiber optic communication cables, in particular, the topic of “underwater” optics. The information in these publications was incomplete, hasty and scattered, since the articles were written “on the knee” during the lunch break. Now I would like to share structured and, as far as possible, complete material on the topic of optics, with a maximum of tasty details and geek porn, which will make the soul of any techie warm. Inside are diagrams, gifs, tables and a lot of interesting text.
You are ready?
Conditional classification
Unlike the familiar twisted pair cable, which, regardless of the place of application, has approximately the same design, fiber optic communication cables can have significant differences based on the scope of application and location of installation.
The following main types of fiber optic cables for data transmission can be distinguished based on the scope of application:
- For installation inside buildings;
- for cable ducts, unarmored;
- for cable ducts, armored;
- for laying in the ground;
- suspended self-supporting;
- with cable;
- underwater.
The simplest design is for cables for laying inside buildings and unarmored sewer cables, and the most complex ones are for laying in the ground and underwater.
Cable for installation inside buildings
Optical cables for laying inside buildings are divided into distribution cables, from which the network as a whole is formed, and subscriber cables, which are used directly for laying throughout the premises to the end user. Like twisted pair, optics are laid in cable trays, cable ducts, and some brands can also be stretched along the external facades of buildings. Typically, such a cable is led to an interfloor distribution box or directly to the subscriber connection point.
The design of fiber optic cables for installation in buildings includes an optical fiber, a protective coating and a central strength element, such as a bundle of aramid threads. Optics installed indoors have special fire safety requirements, such as non-propagation of combustion and low smoke emission, so polyurethane, rather than polyethylene, is used as a shell for them. Other requirements are low cable weight, flexibility and small size. For this reason, many models have a lightweight design, sometimes with additional protection against moisture. Since the length of optics inside buildings is usually small, the signal attenuation is insignificant and does not affect data transmission. The number of optical fibers in such cables does not exceed twelve.
There is also a kind of cross between a “bulldog and a rhinoceros” - a fiber-optic cable, which additionally contains a twisted pair cable.
Unarmored sewer cable
Unarmored optics are used for installation in sewers, provided that there are no external mechanical influences on them. Also, such a cable is laid in tunnels, collectors and buildings. But even in cases where there is no external influence on the cable in the sewer, it can be laid in protective polyethylene pipes, and installation is carried out either manually or using a special winch. A characteristic feature of this type of fiber optic cable is the presence of a hydrophobic filler (compound), which guarantees the ability to operate in sewer conditions and provides some protection from moisture.
Armored sewer cable
Armored fiber optic cables are used in the presence of large external loads, especially tensile loads. Reservations can be different, tape or wire, the latter is divided into one- and two-layer. Cables with tape armor are used in less aggressive conditions, for example, when laid in cable ducts, pipes, tunnels, and bridges. Tape armor is a smooth or corrugated steel tube with a thickness of 0.15-0.25 mm. Corrugation, provided that this is the only layer of cable protection, is preferable, as it protects the optical fiber from rodents and generally increases the flexibility of the cable. For more severe operating conditions, for example, when laying in the ground or on the bottom of rivers, cables with wire armor are used.
Cable for laying in the ground
For laying in the ground, optical cables with single-strand or double-strand wire armor are used. Reinforced cables with tape armor are also used, but much less frequently. The optical cable is laid in a trench or using cable layers. This process is described in more detail in my second article on this topic, which provides examples of the most common types of cable layers. If the ambient temperature is below -10 °C, the cable is preheated.
In wet soil conditions, a cable model is used, the fiber-optic part of which is enclosed in a sealed metal tube, and the armored wire is impregnated with a special water-repellent compound. This is where calculations come into play: engineers working on cable laying must not allow tensile and compressive loads to exceed the permissible limits. Otherwise, either immediately or over time, the optical fibers may be damaged, rendering the cable unusable.
Armor also affects the permissible tensile force. Fiber optic cables with double-layer armor can withstand a force of 80 kN, single-layer cables - from 7 to 20 kN, and tape armor guarantees the “survival” of the cable under a load of at least 2.7 kN.
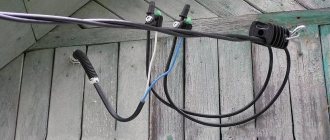
Suspended self-supporting cable
Suspended self-supporting cables are mounted on existing supports of overhead communication lines and high-voltage power lines. This is technologically simpler than laying the cable in the ground, but there is a serious limitation during installation - the ambient temperature during work should not be lower than 15 °C. Suspended self-supporting cables have a standard round shape, which reduces wind loads on the structure, and the span between supports can reach one hundred meters or more. The design of self-supporting suspended optical cables necessarily contains a central power element - a central strength element made of fiberglass or aramid threads. Thanks to the latter, the fiber optic cable can withstand high longitudinal loads. Suspended self-supporting cables with aramid threads are used in spans of up to one kilometer
. Another advantage of aramid threads, in addition to their strength and low weight, is that aramid is by nature a dielectric, that is, cables made on its basis are safe, for example, when struck by lightning.
Depending on the structure of the core, there are several types of overhead cable:
- Cable with a profiled core - contains optical fibers or modules with these fibers - the cable is resistant to stretching and compression;
- Cable with twisted modules - contains optical fibers, loosely laid, the cable is resistant to stretching;
- Cable with one optical module - the core of this type of cable does not have power elements, since they are located in the sheath. Such cables have the disadvantage of inconvenient fiber identification. However, they have a smaller diameter and a more affordable price.
Optical cable with rope
Rope optical cables are a type of self-supporting cables that are also used for aerial installation. In such a product, the cable can be load-bearing and wound. There are also models in which the optics are built into the lightning protection cable.
Reinforcing an optical cable with a cable (profiled core) is considered a fairly effective method. The cable itself is a steel wire enclosed in a separate sheath, which in turn is connected to the cable sheath. The free space between them is filled with a hydrophobic filler. Often this design of an optical cable with a cable is called a “figure eight” because of its external similarity, although I personally have associations with overfed “noodles”. "Eights" are used for laying overhead communication lines with a span of no more than 50-70 meters. There are some restrictions in the operation of such cables, for example, a figure eight with a steel cable cannot be suspended on power lines. I hope there is no need to explain why exactly.
But cables with a winding lightning protection cable (lightning cable) can be easily mounted on high-voltage power lines, being attached to the grounding wire. Ground wire cable is used in places where there is a risk of damage to optics by wild animals or hunters. It can also be used on longer flights than a regular figure eight.
Submarine optical cable
This type of optical cable stands apart from all others, as it is laid in fundamentally different conditions. Almost all types of submarine cables are armored in one way or another, and the degree of armor depends on the bottom topography and burial depth.
The following main types of submarine cables are distinguished (by type of armor):
- Not armored;
- Single (one-step) reservation;
- Enhanced (single-layer) reservation;
- Reinforced rock (two-layer) armor;
I looked at the design of the submarine cable in detail more than a year ago in this article, so here I will give only brief information with a picture:
- Polyethylene insulation.
- Mylar coating.
- Double-layer steel wire armor.
- Aluminum waterproofing tube.
- Polycarbonate.
- Central copper or aluminum tube.
- Intramodular hydrophobic filler.
- Optical fibers.
Paradoxically, there is no direct correlation between cable armoring and burial depth, since the reinforcement protects the optics not from high pressures at depth, but from the activities of marine life, as well as nets, trawls and anchors of fishing vessels. This correlation is rather the opposite - the closer to the surface, the more anxiety, which is clearly visible in the table below:
Table of types and characteristics of submarine cables depending on laying depth
Production
Now that we have become acquainted with the most common types of fiber optic cables, we can talk about the production process of this entire zoo.
We all know about fiber optic cables, many of us have dealt with them personally (as subscribers and as installers), but as is clear from the information above, fiber optic, especially trunk, cables can be seriously different from what you dealt with in the past. indoors. Since laying a fiber optic backbone requires thousands of kilometers of cable, entire factories are engaged in their production.
Manufacturing of fiber optic thread
It all starts with the production of the main element - the fiber optic thread. This miracle is produced at specialized enterprises. One of the technologies for producing optical filament is its vertical drawing. And this happens as follows:
- At a height of several tens of meters, two tanks are installed in a special shaft: one with glass, the second, lower down the shaft, with a special polymer primary coating material.
- A glass thread is pulled from the precision feed unit of the workpiece or, more simply, the first reservoir with liquid glass.
- Below, the thread passes through a fiber optic diameter sensor, which is responsible for monitoring the diameter of the product.
- After quality control, the thread is coated with a primary polymer coating from a second reservoir.
- After going through the coating procedure, the thread is sent to another oven, in which the polymer is fixed.
- The optical fiber thread is stretched for another N-meters, depending on the technology, cooled and supplied to a precision winder; in other words, it is wound onto a reel, which is then transported as a workpiece to the cable production site.
The most common fiber optic cable sizes are:
- With a core of 8.3 microns and a shell of 125 microns;
- With a core of 62.5 microns and a shell of 125 microns;
- With a core of 50 microns and a shell of 125 microns;
- With a core of 100 microns and a shell of 145 microns.
It is not easy or almost impossible to solder optics with a core diameter of 8.3 microns in the field without high-precision equipment or installing concentrators.
Control of the diameter of the light guide is of great importance. It is this part of the installation that is responsible for one of the main parameters at all stages of thread production - the constant diameter of the final product (standard - 125 microns). Due to the difficulties in welding threads of any diameter, they strive to make them as long as possible. The linear footage of the fiber optic “blank” on a reel can reach tens of kilometers
(yes, exactly kilometers) and more, depending on the customer’s requirements.
Already at the enterprise itself, although this can be done at a glass factory, it all depends on the production cycle; for convenience, a colorless thread with a polymer coating can be rewound onto another bobbin, in the process painting it in its own bright color, by analogy with the familiar twisted pair cable. For what? For the glory of sat... for quickly distinguishing channels when, for example, repairing or welding cables.
Cable making
Now we have the heart of our product - the fiber optic thread. What's next? Next, let's look at the cross-sectional diagram of such an average underwater (yes, I like them the most) cable:
At the factory, the resulting optical filaments are launched into machines, which together form an entire conveyor for the production of one type of cable. At the first stage of production of unarmored models, the threads are woven into bundles, which ultimately constitute the “optical core”. The number of threads in the cable may vary, depending on the declared bandwidth. The bundles, in turn, are wound into a “cable” using special equipment, which, depending on its design and purpose. This equipment can also cover the resulting “cable” with a waterproofing material to prevent moisture from entering and fading of the optics in the future (called “in-module hydrophobic filler” in the diagram).
This is how the process of twisting bundles assembled together into a cable takes place at the Perm fiber optic cable plant:
After the required number of optical fiber bundles have been collected into the “cable,” they are filled with polymer or placed in a metal or copper tube. Here, at first glance, it seems that there are no pitfalls and there cannot be, but since the manufacturer strives to minimize the number of connections and seams, everything turns out to be not entirely simple. Let's look at one specific example.
To create a tube-body, shown in the diagram above as a “central tube,” a huge-length strip of the material we need (steel or copper) can be used. The tape is used so as not to have to deal with all the obvious rolling and welding around the entire circumference of the joint that we are familiar with. Agree, then the cable would have too many “weak” points in the design.
So here it is. The metal strip blank passes through a special machine that tensions it and has a dozen or two rollers that perfectly align it. Once the sliver is aligned, it is fed to another machine where it meets our fiber optic strand bundle. An automatic machine on a conveyor bends the tape around the stretched optical fiber, creating a perfectly shaped tube.
This entire, still fragile, structure is pulled further along the conveyor to a high-precision electric welding machine, which at high speed welds the edges of the tape, turning it into a monolithic tube into which a fiber-optic cable is already laid. Depending on those. process, the whole thing can be filled with a hydrophobic filler. Or don’t flood it, it all depends on the cable model.
In general, everything became more or less clear with production. Different brands of fiber optics, primarily trunk cables, may have some design differences, for example, in the number of cores. Here the engineers did not invent a bicycle and simply combine several smaller cables into one large one, that is, such a backbone cable will have not one, but, for example, five tubes with optical fiber inside, which, in turn, are also filled with polyethylene insulation and, when necessary, reinforced. Such cables are called multi-module
.
One of the cross-sectional models of a multi-module cable
Multi-module cables, which are mostly used for long highways, have another mandatory design feature in the form of a core, or as it is also called, a central power element. The CSE is used as a “frame” around which tubes with fiber optic cores are grouped.
By the way, Perm, the production process of which is presented in the gifs above, with its volumes of up to 4.5 thousand kilometers of cable per year, is a dwarf compared to the plant of the same infrastructure giant Alcatel, which can produce several thousand kilometers
fiber optic cable in one piece, which is immediately loaded onto the cable-laying vessel.
A steel tube is the least radical option for armoring optics. For non-aggressive operating and installation conditions, ordinary insulating polyethylene is often used. However, this does not negate the fact that after such a cable is manufactured, it can be “wrapped” in an armor winding made of aluminum or steel wire or cables.
Reservation of cable with polyethylene insulation at the same Perm plant
Conclusion
As you can understand from the material above, the main difference between different types of fiber optic cable is their “winding”, that is, what the fragile glass strands are packaged in, depending on the application and the environment in which the cable will be laid. If you liked this material, then feel free to ask questions in the comments, based on which I will try to prepare another article on this topic.
Thank you for your attention.
Frequent errors and problems during installation
When installing heating systems, such mistakes are most often made.
- Installation of heating devices below the freezing point. These are unnecessary and unnecessary expenses.
- Ignoring additional thermal insulation over pipes. The cable cannot heat them over the entire area, which leads to the formation of ice.
- Operation of electrical equipment in continuous mode without sensors and relays. This leads to high and unjustified energy costs.
Cables used for installation inside a private home
All previously considered non-flammable brands of electrical cables (VVGng, VVGng-ls, NYM) are also suitable for use inside a private residential building. You need to pay attention mainly to the fire safety index, which is mandatory indicated on electrical cable products.
When laying cables in a wooden house, a prerequisite is the use of PVC corrugated hoses or metal sleeves to provide additional protection to the cable and reliability of its operation.