The main purpose of cable channels is to protect wiring from mechanical damage and protect against fire in the event of a malfunction in the electrical network. At first glance, determining the required type of cable support systems should not cause difficulties. But when choosing, you can get confused by the widest range. Do you agree?
We will tell you how to correctly select a cable channel for electrical wiring, taking into account the complexity of the wiring diagram and operating conditions. The article we presented describes in detail the most popular varieties and provides their technical characteristics. Using our tips, you can't go wrong in finding the best option.
Constructions
The market offers cable ducts of various designs and sizes. The choice of a specific design depends on the installation location and the size of the cable to be laid.
Types of plastic boxes:
- Skirting. These structures are used at the junctions of walls and floors. To install structures of different shapes, manufacturers produce additional devices - bends, plugs, external and internal corners and other elements. Skirting-type cable channels fit well into the interior of most houses and apartments.
- Floor-standing. They are used for convenient movement when conducting electrical wiring to tables, lighting fixtures, and equipment located far from the walls. The cable channel easily replaces extension cords and carriers.
- Parapet cable channels are similar in appearance to baseboard ones. They are mounted above the floor level, using additional elements to obtain the desired configuration.
- Angled cable ducts are used at joints and under the ceiling. Thanks to the triangular design, these boxes fit perfectly into corners and fit into the design of the room. Due to the high possibility of damage due to impacts, these structures are mounted in the upper areas.
- The smallest type is mini cable channels. Great for telephone wires, television and internet cables. The boxes are attached to the walls and ceiling using an adhesive backing or self-tapping screws. The small size of the cable channels allows them to be organically combined with the interior.
- Perforated. The open access design has less weight and cost than other options. This option is used when appearance does not matter.
- Flexible. Ideal for installing electrical wiring on uneven surfaces when it is not possible to use hard options. They are divided into two types - corrugated and chain. Problems with hard-to-reach places are solved by round-section cable channels.
- Transparent. This look is ideal for the exterior decoration of a room. An LED strip is glued to the partition of the box and covered with a transparent lid. The result is a pleasant light.
- Metal cable ducts for electrical wiring are often used in industrial production. They are necessary for fixing a large number of heavy cables.
On this topic:
BACK FORWARD 1 of 2
Skirting
These types of cable channels allow you to quickly lay the cable without the need to violate the integrity of the walls or cause damage to them. The advantage is not only the color variety, thanks to which you can choose a design that best suits the interior design style, but also the complete set of auxiliary devices.
To simplify mounting, you can purchase corners for internal and external mounting, various bends, and plugs. Often, mounting or multimodule type boxes are purchased as a kit. They have sockets and even switches. This solution makes it possible not to focus on the wiring, but creates some inconvenience for older people when accessing connection points.
White, gray and black boxes are sold, as well as wood or metal samples. There are also a variety of standard sizes, but this design is not cheap.
Buying cable channels: what to look for?
It is recommended to purchase a cable channel according to the following algorithm:
- Draw up a plan for the installation of electrical wiring. It calculates the required number of cables to be purchased and their cross-section. It is also recommended to purchase wires before purchasing cable channels (to take into account the thickness of the insulation).
- Calculate the length of all necessary boxes for laying the wiring. The standard length of one cable channel is 2 meters. This is not true for flexible grooves, since they are produced in coils. An additional 10 - 15% should be added to the resulting length as a reserve.
- Decide on the type of cable channels required: plastic for indoors, metal for outdoors, rounded plastic for the floor.
- Approximately calculate the required size of the cable channel. For calculations, you can use the cross-sectional area of the groove (often indicated in the technical documentation for cable ducts) and bundles of cables (the area of one wire is calculated by the formula S=πr2, where r is the radius of the section taking into account insulation).
- Make a purchase in the store. It is recommended to buy complete cable channels, which are supplied immediately with fittings, plugs, corner adapters, and locks. If you buy all this separately, it will be more expensive.
As for fire safety, with plastic ones it is enough to set fire to a small piece of the cable channel. It will melt, but should not ignite or smoke heavily. These are the basic safety requirements for such gates. As for metal ones, it is recommended to purchase only with a material thickness of 0.15 mm or thicker. Thinner grooves are short-lived and will quickly become rusty when placed outdoors.
A popular cable channel for offices - this way you can connect your workplace without any visible wires at all. Minimalism is trending now
How to hide heating pipes in an apartment or house
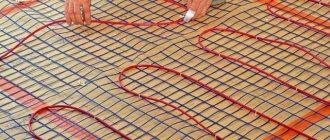
It may be necessary to hide heating pipes so that only heating devices and outlets that go into the floor or wall remain visible. To prevent them from being visible at all, they use the lower connection of the heating radiator, which can only be seen by bending down and looking under the radiator. In the case of individual heating, the most correct solution is to lay pipes with coolant in the floor screed. This ensures both minimal installation costs (the pipes just need to be spread on the floor) and additional floor heating, since the lower the heat source is located, the more efficient the convection of the heat flow. In the case of central heating, it is prohibited to hide heating pipes in a screed for a number of reasons:
- First, you need to obtain permission from the management company or service organization to reinstall the pipes. This requires the development of a new project. In addition, the housing department is extremely reluctant to make any kind of alterations, and in case of any problems, you will be independently responsible for your desire to hide the water pipes.
- Downstairs neighbors may be harmed if water leaks occur in a bricked-up pipe due to a broken connection, loose seal, or worn-out pipes. In addition, it is difficult to check the quality and technical condition of installation when there is no direct access.
- The third reason is a weakening of heat transfer and a decrease in temperature in the apartment, which can lead to condensation, increased humidity or fungus.
Stage 1. Checking and Troubleshooting
We check the condition of the heating system in the house. We estimate wear and approximate remaining service life. Then we decide on the feasibility and possibility of installing hidden wiring. It is highly undesirable to install metal pipes (especially old ones) in a wall, in a screed or even in plasterboard boxes. It would be more correct to replace them with plastic ones, which are more durable and not subject to corrosion. In a newly built house, it is necessary to plan all communications and hide heating pipes at the design stage.
Stage 2. Pipeline laying plan
It is better to draw the location of the future heating system on a paper drawing, since after installation and completion of repairs it is very difficult to remember where they are and not get into them while drilling fastening and mounting holes, for example, for furniture.
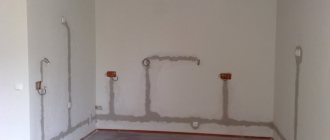
Stage 3. Preparing the grooves
The grooves can be prepared manually or mechanically. If there is no special tool, then you should use a regular hammer and scarpel. In places with limited, inconvenient access, this is the only way to prepare a groove. Where space allows, it is better to use an angle grinder (“grinder”) equipped with a metal disk with diamond chips. The fastest way is a wall chaser, which is a “grinder” with two discs, a vacuum cleaner for sucking out dust and a large, comfortable handle. After two grooves have been cut, we remove the remaining material between them with a hammer drill or jackhammer. The groove to hide the heating pipes is ready.
Stage 4. Pipe installation
We lay heating pipes in the finished grooves and connect them and tie them with radiators, a boiler, a pump, and sensors.
Stage 5. Pressure testing of the system and sealing the grooves
After assembly, it is necessary to carry out crimping before the grooves are sealed. This is done in order to avoid leaks that may occur due to improper installation, defective pipes, fittings or shut-off valves. In addition, the entire system must be securely fastened using special clips or binding wire if the width of the groove does not allow hiding the pipes along with the clips.
Pressure testing is carried out under pressure exceeding the operating pressure of the system by 20-100%. Exact data can be taken from the instructions for the boiler to which the system is connected. In a central heating system, pressure testing is more difficult to do, since it is performed collectively for the entire house and usually only at the beginning of the heating season. Test pressure - 10 atmospheres. At startup, it can be even greater due to water hammer. Therefore, the requirements for the tightness of the central heating system are much higher, and it may be better to hide the pipes in other ways.
Read material on the topic: How to choose heating pipes: types, criteria, manufacturers
Advantages and disadvantages of various designs
- For perforated products.
The main advantage of this type of cable ducts is their lower weight compared to products made from sheet metal and solid molded plastic. In addition, the advantages of this design are:
- Ventilation of the internal space allows you to maintain a more favorable operating mode for wires and cables laid inside such products;
- Low cost in comparison with analogues;
- Availability for inspection of laid cables and wires;
- Possibility of installation on curved surfaces.
- Skirting boards and floor structures.
The use of cable channels in the form of a plinth allows you to avoid additional elements mounted on the surface of the walls. In this case, the wires are laid inside the baseboard, which covers the joint between the wall surface and the floor.
Cable channel plinth, available in various colors and profiles
Advantages:
- A variety of colors and profiles allows use in various rooms (office, living rooms, public buildings);
- Possibility of repeated use;
- Resistant to sunlight (ultraviolet radiation).
Floor cable ducts are used when laying in places where it is not possible to install electrical wiring on walls, ceilings or floors.
Floor cable channels have a flattened shape
Advantages:
- Allows you to lay cables and wires along the floor surface;
- Due to their shape, they do not create difficulties for people to move in places where electrical wiring is carried out using them.
- Flexible (corrugated) and chain products.
A flexible cable channel is essentially a corrugated pipe
Advantages:
- Possibility to mount at different angles and in different planes of space;
- There is no need to install additional elements (plugs, corners, etc.).
Flaws:
Only one conductor is allowed in one pipe, serving to connect one consumer.
Chain structures consist of a certain number of elements connected into a single chain.
Chain structures are used to connect process equipment
Advantages:
- The ability to make a secure connection in difficult, from a technical point of view, places;
- Easy installation;
- Maintainability by replacing circuit elements;
- Availability of maintenance and repair of installed cable lines.
Floor-standing
Their use is not so much aesthetic as functional. The design is used when it is necessary to connect wiring, for example, to a desktop or to the opposite side of the room.
- How to conveniently unwind a cable coil on site during electrical installation
Electrical cables. Purpose and selection criteria
External cable routing in corrugation
The boxes are mounted on the floor, and therefore one of the horizontal sides has a rounded shape to eliminate inconvenience when moving a person. You won't need to use extension cords or special carriers.
For joints, various shaped angles, joining inserts, and turn signals are used. When fastening, the base is placed, then the cable is placed, and the cover is attached on top.
The fastening devices snap easily and provide the required degree of protection, as can be seen in the photo of the cable channels. Among the sizes you can choose options 50x12; 75x17; 92x20 and 160x65 mm in gray, white and black.
Tips for installing cable ducts
hide wiring
Before attaching the box to the surface, you should check its evenness
It is important that there are no bumps or bends, but the owner must take care of this even before the installation of open electrical wiring begins. The cable duct should be cut using a grinder, as jigsaws and knives leave burrs and damage the integrity of the structure. Try to secure cable ducts with liquid nails or special glue. In these cases, it is better not to use self-tapping screws. It is advisable to buy boxes that have an internal partition - this property is very convenient during installation.
Important! By following our advice and selection rules, you will get the ideal aesthetic solution for your home
Mounting methods
The choice of method is determined by the material of the enclosing structures. For example, hollow slabs on the ceiling do not allow grooves, so the boxes are fixed only from above.
Use cable channel mounting options :
- wood screws are used for fixing to wood, drywall;
- flea screws are installed if the channel is fixed to a metal surface with a thickness of at least 2 mm;
- using plastic dowels and screws;
- glue is used for installation on any surface, cardboard, wood, concrete;
- double-sided tape is a type of adhesive fixation if the weight of the channels with wires is small.
They produce channels with ready-made holes for fasteners - this makes the work faster and more convenient. Boxes can be mounted to a concrete wall using a gun, which allows you to drive in special mounting dowels.
Flexible protection channels
The appearance of flexible protective channels was dictated by the need to conduct wiring along the walls of structures with architectural irregularities. If hard channels are used under these conditions, they will exactly follow the differences in planes, which will ruin the appearance. If in brick or concrete buildings the walls can be more or less leveled, then in wooden buildings traditional leveling is not applicable. In this case, flexible cable ducts will be an excellent solution.
There are the following types of flexible protective channels:
- Tubular. As a rule, they are used when moving to the door plane.
- Rubber.
- Flexible chains (so-called tracks).
- Made from soft plastic by injection molding.
Since the production of flexible cable ducts is quite complex and labor-intensive, they have a higher price compared to rigid ones.
Trucks are widely used in private housing construction to connect small household machines, as well as in factories and factories to connect working equipment. The width of these devices can be from 20 to 234 mm.
Rubber cable ducts, like those made of soft plastic, due to their large wall thickness, provide reliable protection of electrical conductors from various damages. They are well suited for rooms with high humidity (with the exception of a steam room in a bathhouse or sauna).
Tubular channels are a strip of metal twisted into a spiral. Its main advantage is the ability to bend in different directions without harming the structure. A flexible wire is laid inside the device. Typically, electric door locks are connected using these channels.
Mini structures
Such boxes are used for laying television or telephone wires. They are smaller in size. The width varies between 10-100 mm, and the height 10-60 mm. In this case, you can select models with different combinations of dimensional parameters. To bring the tray to an angle, the structure is cut and bent at a given angle.
Perforated cable tray: characteristics- Wire connector: instructions on how to make the connection yourself. Instructions for use of clamp, clamp and lugs
Wire lugs: instructions on how to select and install a lug. Overview of all types, photos, instructions, diagrams
Tips for choosing cable channels
Having figured out the type of boxes for laying wires indoors, you should also decide on their dimensions. For this, the following factors are taken into account:
- There is no point in buying a large box for one or two cables. At the same time, you should not cram a large number of wires into the mini-channel. It is necessary to take into account that the cables should lie close to each other with a small margin. The cable duct needs to be of such a size that it can accommodate a couple more wires in the future.
- The main channels for electrical wiring should be slightly larger than the outlets for switches, sockets or appliances.
- The standard length of one box is two meters. To find out how many channels you need to buy, before going to the store you should measure the length of the entire room in which the structure will be laid. Plastic channels break easily, so it is better to purchase 10–15% more material.
One of the main elements of the cable is the lock. When choosing it for a box, you need to make sure that it snaps tightly and can be easily opened by hand. Otherwise, the lock may constantly come off at the slightest touch or become too tight.
In addition to the lock for the cable channels, you need to select fasteners, corners, couplings, and plugs. It is not worth buying a box without fittings. It will greatly facilitate installation, and the finished structure will look much more attractive with it. You need to calculate the number of necessary accessories in advance. If the product was chosen in a certain color, then it will be difficult to find elements of the same shade.
Recommendations
- The first thing you need to look at is the appearance. The appearance must meet your requirements.
- After this, you need to look at the plasticity of the device. To do this, the box needs to be twisted. If the profile comes back, then the quality of the plastic is good.
- The easiest way to check the model is to bend it and open the lid. The device must bend and not break. If the lid breaks, it means too much has been added to the other ingredients.
- Naturally, you need to pay attention to the presence of a double lock. Once you close the lock, it should lock and not open.
What else can you do to check the quality? Considering that the specialized box will be located somewhere on the wall or ceiling, the cover must withstand the weight of the cable that will press on it. Let's indicate what characteristics of the model can be found out experimentally.
In order to see how firmly the lid is attached to the box itself, you need to make a simple device - hang a piece of the box and cut the lid into 2 parts. First you need to secure 1 part.
The double lock should slam shut. Then you need to make an ordinary piece of metal strip and rope. The bar is inserted into the box and closed with a lid. The result is a special system. In order to check the strength of the structure, you can pick up a brick or other object.
Corrugated plastic pipes
Plastic corrugation for wiring
Metal and plastic products are used on flat surfaces. But there are cases when the surface has frequent bends and turns. Using a large number of components is difficult and economically unprofitable, so it is better to use flexible pipes that can be bent at any angle. Corrugated pipes are attached to regular clips.
Visually, a corrugated PVC pipe is similar to an elastic channel with a circular cross-section. Such products can be used for laying any cables.
The standard internal diameter of pipe channels is from 16 to 32 mm. Depending on their purpose, they can be light or heavy. The former are suitable for installing electrical circuits inside buildings. Heavy corrugations can be used in difficult conditions and even under water. Additionally, corrugated pipes can be equipped with metal probes. They allow you to push the wire into the tube itself without damaging it.
The ability to install corrugated pipes outdoors is an advantage
Advantages of plastic corrugated pipes:
- Possibility of installation on uneven surfaces;
- tightness;
- reliable protection from external negative conditions and mechanical damage;
- easy to attach with clips;
- ease of installation and maintenance;
- fire safety;
- wide range of applications;
- Possibility of installation outdoors and underwater (depending on the type of corrugated pipe).
Flaws:
- Difficulty working at sub-zero temperatures. They lose their elasticity and break.
- Difficulty in laying wires in case of frequent bends.
Box options from manufacturers
To mask heating pipes, you can use a ready-made plastic box
The heating radiator box can be made from the following material:
- Plastic. The production uses polymers that are heat resistant and environmentally friendly. Plastic screens are lightweight, flexible and come in a variety of shapes. Channels and slabs are available in different colors, including printed patterns and ornaments. If you wish, you can make a drawing yourself using paints or adhesive film. Don’t forget about the affordable cost of polymer skirting boards for heating pipes.
- Metal. This material is characterized by high strength, reliability and durability. The metal box for the battery is heated by it and transfers heat to the room. Brass, copper, but most often stainless steel are used in production. If an exterior finish is used, the coating is applied with powder paint, which is then baked at high temperature. If desired, the cladding can be changed using aerosol cans of paint.
- MDF. Light and beautiful panels have low thermal conductivity, which is compensated by perforation and arrangement of slots for the release of warm air. For home decoration, the material that best matches the interior is selected. You can also use paint or wallpaper. The disadvantage is that over time, MDF may warp due to changes in temperature and humidity.
- Tree. Products made from natural raw materials are expensive, but have a representative appearance, are durable and environmentally friendly. A beautiful wooden box for a heating radiator fits perfectly into all interior styles. To disguise the heating system, boards, slats, perforated panels and floor plinth channels are used. Wood must be periodically treated with an antiseptic and varnish to protect it from parasites and dampness.
- Decorative boxes. There are many ways to close communications and make them the basis for part of the interior of the room. A shell made of polyurethane foam or polystyrene is put on the risers, which is then finished to resemble a tree trunk. Another option is to paint or tape the pipes to match the background of the surrounding environment. A good solution might be to use colored or frosted glass. It is even better to use monolithic polycarbonate, which is highly durable. It is much easier and safer to process than glass.
Decorative capabilities of functional products: photo examples of interesting solutions
Such structures are installed in prominent places, so aesthetic characteristics should be studied separately. However, even in this case they must be assessed in conjunction with other consumer parameters.
Questionable decision
Here the author of the project used a floor box that was too high, which creates significant obstacles to the free movement of staff and visitors in the office. Round corrugated cable channels for electrical wiring look like alien elements in this design. They do not provide reliable fixation of cable products, which implies the possibility of accidental damage.
A well-installed decorative cable channel looks impeccable
Example of correct application of flexible design
Harmonious and functional interior design
This triangular cable channel was created as a special modification of the standard plinth. The central strip is fixed with latches after installing the lines
Here a cutout is made in a typical wooden product. Plastic trays are used to secure cable products
Transparent cable channels are produced in different designs
When installing such lamps below, the effect of “floating” furniture is created.
This ensures good illumination of the work area
Another option that increases the level of comfort in the kitchen
How to hide pipes in a toilet (photos and tips)
The bathroom and toilet rooms contain the maximum number of pipes per square meter of area. These are, first of all, hot and cold water risers and sewer pipes. A water supply manifold and an exhaust hood complete the picture of communications. Moreover, the matter is not limited to pipes alone: there are a lot of valves, meters, filters, audits and other elements that need to be hidden.
Despite the fact that the bathroom is usually the smallest room in the apartment, it is the most logical place for their location. The easiest way to improve the aesthetics of your bathroom is to hide the pipes in the wall. If at the design stage it was possible to collect all serviceable and access-requiring elements into one cluster, then this is the best option for compactly hiding them.
First we need to decide which material is best suited for our purposes.
However, you should not limit yourself to appearance alone. The properties of the materials used must be selected according to their purpose. The result should be a structure that will faithfully serve for many years. We will take into account the following material features in order to aesthetically hide pipes in the bathroom:
- The materials used should provide a lightweight and compact design that is easy to use and does not take up much space.
- Materials must be wear- and corrosion-resistant and can withstand interaction with water and other finishing materials.
- Moisture resistance and temperature resistance must correspond to operating conditions and ensure safety.
The construction industry offers a variety of materials for finishing and improving bathrooms. First of all, these are various plastic structures. The next most commonly used material is aluminum. And finally, the last one is waterproof MDF (as well as plywood and chipboard). This is by no means a complete list.
Let's look at interesting solutions that were used at different times on real objects in order to hide pipes in the bathroom:
- Blinds
Blinds
- the best option for cases where the possibility of hiding the pipes in one way or another was not provided in advance. Blinds are a simpler option compared to drywall and even plastic structures. Installing blinds takes little time and produces a minimum of construction waste. In fact, it consists only of installing the upper fasteners. Blinds can be either floor to ceiling or from the middle of the wall to the ceiling.
Not every structure can be installed in one way or another. This is explained by the peculiarities of fastening, the number and intricacy of pipes and risers in the bathroom.
- Special furniture
Special furniture.
Furniture in this case can be divided into two types.
- Ordinary furniture that is used in rooms or in the kitchen. It is not highly moisture resistant, therefore, before hiding the pipes, they must be additionally insulated to avoid condensation and, as a result, warping and cracking of the furniture.
- Specialized furniture for bathrooms and toilet rooms. It is initially made from moisture-resistant materials that are resistant to possible condensation.
Sometimes you have to use combined solutions to hide pipes in the bathroom.
- Design solutions
In conclusion, a few words must be said about creative solutions that defy classification and logical approach. They are completely based on your preferences and taste.
How to choose cable channel size
Some “experts” advise choosing a size based on the “just fit” principle. That is, the size of the channel must be such that when it is filled with a group of cables, the basic requirement is met - that its lid closes. This is fundamentally wrong.
Cables heat up when exposed to electric current. Regardless of the current and cable cross-section, heat generation always occurs; this is described by the Joule-Lenz law, about which, by the way, there is a whole article on the website. This means that the cables must cool down, and before that they must give off heat to the environment. If the cables completely fill the space of the cable channel, they will transfer heat to each other, thereby heating up even more.
The PUE states that when laying cables in a pipe, it is not recommended to fill it more than 40%. We believe that it is reasonable to apply the same rule when choosing a cable channel for wiring. But you can make the fill factor a little higher - up to 50-60%, otherwise you simply will not be able to make a turn when installing the cable, or the box on it will not close.
That is, the cable channel must be selected according to the cross-section of the wires and their number. Therefore, if you are planning to lay two cables in one box (for example, 3x2.5 for a socket and 3x1.5 for lighting), based on the size of the cables, the dimensions of the cable channel should be from 25x16. By this logic, count for a larger number of cables of different sections.
Table for filling the cable channel, which will help you choose the appropriate size according to the cable cross-section (click on the picture to enlarge):
Finally, we recommend watching a useful video on the topic:
To summarize, I would like to note. To choose the right cable channel for electrical wiring, first of all you need to decide on its type based on the installation method and location in space, then on the required size, and only then on the appearance and color. Do not forget about the required dimensions of the cable box, otherwise the wires will heat up, and in case of wiring repairs, it will be difficult for you to find the right cable if there are too many of them in a small volume of the channel.
You probably don't know:
Material of the outer skin of the frame
As a finishing material, you can use:
- eurolining,
- MDF panel,
- plastic,
- perforated metal plates (grids).
The most popular material for finishing boxes is (considered) gypsum plasterboard sheet (GPS). This is explained by the fact that in the future the surface of the gypsum plasterboard box can be decorated with facing tiles, film, wallpaper, or simply painted in any color at will or in accordance with the design project. Despite the fact that masking communications screens and boxes have a sufficient number advantages:
- Very low cost (if installed by yourself). They can be made from leftover material left over from repairs.
- Arbitrary sizes. This is especially true for hard-to-reach areas and non-standard pipe layouts.
- They also have a number of disadvantages:
- If an emergency occurs with a water supply (heating) pipe, to eliminate it you will need to remove the entire lining of the box.
- Restoring the cladding will require new (partially or completely) materials.
What is a cable channel?
The use of narrow and long protective boxes for laying wiring is practiced not only in warehouses or workshops; this method is often used in residential areas to avoid costly repairs. These products are now available in attractive designs, different colors, and have a wide selection of standard sizes. The design of the cable channel depends on its type and material. There are floor, parapet and baseboard options. To improve the aesthetic appearance and ease of assembly, the boxes are supplied with additional elements:
- plugs;
- L-shaped and T-shaped corners;
- tees;
- internal and external corners.
Why do you need a cable channel?
Open wiring is cheaper. With this installation method, there is no need to cut recesses in the walls and do labor-intensive plastering work. The main disadvantages of this method are that bundles of wires are poorly protected from mechanical damage, often interfere with movement and look unpresentable in the interior. Cable channels for electrical wiring can perfectly hide all the listed shortcomings, simplifying repair work and reducing the cost of the estimate.
Advantages of using cable channels:
- Exposed electrical wiring does not spoil the interior.
- Wires are better protected from damage.
- When repairing the cable, it is easy to pull it out of the boxes for replacement.
- Reduces the risk of flame propagation during a short circuit.
Disadvantages of cable channels:
- They do not always match the interior style.
- The tray takes up some wall space.
- In areas of movement, the channel can be accidentally knocked off the fasteners or damaged.
- Laying cable channels in many cases requires the use of additional accessories.
What is the cable duct made of?
Depending on local conditions, budget, installation method and interior style, the choice of material for electrical installation products may vary. For example, concrete trays are easier to install in high-rise buildings, while steel and aluminum boxes have good rigidity and will protect wiring even in the most dangerous places. PVC boxes are the most inexpensive in cost, are famous for their varied designs, and are excellent for routing lighting or communication cables in the private sector and residential premises.
Types of cable channels according to materials:
- Metal
cable channels are durable, strong, covered with an anti-corrosion layer of the product, their base is often perforated to facilitate installation. The disadvantage of steel trays is their relatively large weight. - Aluminum
electrical installation cable channel - famous for its strength, fire resistance and moisture-resistant qualities, the rigid housing provides excellent protection. - Plastic
cable channels are available in shaped shapes and different colors and are inexpensive. PVC trays have acceptable flexibility and fire resistance; they are easier to choose according to design for any interior. ABS plastic is a self-extinguishing material. - Concrete
cable channels for wires are relatively heavy and cause installation difficulties. They do not conduct current, are fireproof, and are used in high-rise buildings in emergency evacuation areas.
Metal
They can be solid, perforated or wire. Channels are popular when installed in walls made of combustible materials. In this case, boxes are mounted in the walls or ceilings, a cable is placed in them, which is taken out in the right place. But for suspended and suspended ceiling structures, it is advisable to use wire modifications. For such trays, only a few hangers are attached with quick laying of wires.
These are metal structures with a strip length of up to 3 m. The width varies in the range of 50-600 mm, and the height – in the range of 50-100 mm.
Heat shrink for wires: all types and characteristics. Detailed description of how to choose and use heat shrinkPvs wire: full decoding, technical characteristics, types, where to buy and how to choose a manufacturer
- Wire VVG: description of the main characteristics of the cable and its application. 120 photos of modern types and models
No. 4. Types of cable channels according to installation features
Wiring, telephone and internet lines can run along walls, ceilings, floors and corners. Each case has its own type of cable channel:
- wall products have a square or rectangular cross-section, sizes vary in a wide range, which allows you to equip systems of any complexity;
- mini cable channels - a variation of wall boxes. The main feature is its minimal dimensions, which allows the product to fit very neatly into the interior. The channel remains almost invisible, especially if you match it to the color of the wall. This product is designed for laying single wires or several thin cables, often used when installing television, telephone and Internet lines. To create various configurations, corners, plugs and tees are used, but these elements are not cheap, and they are rarely found on sale, so craftsmen simply file the channels at the desired angle to create a right angle, which works out well. Attach mini cable channels to self-tapping screws, dowels or adhesive tape. The latter option is especially convenient when laying wires along furniture (for example, under a table);
- The floor cable channel has a hemispherical cross-section. Thanks to this solution, the risk of tripping over the box and getting injured is eliminated. In apartments, this type of channel is not used very often. The products are much more popular in large office spaces such as open space, when it is necessary to provide appropriate conditions for many workplaces in one area. In this case, electricity, Internet, and a telephone line are supplied to the tables in floor ducts. The requirements in terms of strength for such products are increased. It's better to take an aluminum box. Plastic will also work, but not ordinary, but reinforced, with additional partitions that can also be used as a separator between wires for different purposes;
- corner ones have a cross-section in the form of a right triangle, designed for installation under the ceiling, at the junction of the surface of the wall and the ceiling. In appearance, such a box can easily be confused with the simplest ceiling plinth, so the product cannot harm the aesthetics of the room. Like other cable channels, it consists of a tray and a cover, and the latter can be transparent or opaque. Products with a transparent cover are used for installing LED strips;
- A plinth with a cable channel is the best example of combining business with pleasure. In appearance, the product is no different from a regular floor plinth; it can be of almost any color and shape. The internal cavity is intended for the location of wiring cables, the Internet, cable television, and thanks to the external and internal corners, turns and splitters, a very complex configuration can be created. There are even sockets and socket groups that can be successfully fitted into the floor plinth. If you need to stretch a whole bundle of wires, then this option is unlikely to work, since there must be enough space inside. The main disadvantage of such channels is their high cost, but they allow you to avoid the dirty and complex process of wall slitting;
- parapet cable channels resemble baseboard ones, but are installed at a small height from the floor (80-100 cm), they have a symmetrical cross-section and sufficient width. The products have gained wide popularity when laying wiring in offices and various institutions; such channels are not suitable for home interiors, as they will be very noticeable, with the exception of loft-style interiors.
Parapet
The products are similar to baseboard models. They contain auxiliary elements, thanks to which various structures are assembled. And the laying is carried out at a level slightly higher than the floor and baseboard.
The main colors are white and milky shades. Used to mask connections between indoor and outdoor units of the air conditioning system.