Kitchen furniture standards and design rules
In order not to reinvent the wheel every time when designing kitchen furniture, all furniture today is created in accordance with established standards.
These standards were previously invented by trial and error and depended on the comfortable use of furniture by the consumer, as well as on the dimensions of CNC processing machines.
No matter how stylish your kitchen is, when designing it, certain standard dimensions must always be maintained, on which the comfortable operation of all work areas in the kitchen will depend.
Pitfalls of self-installation
Those who want to try their hand at assembling furniture need to understand that only professionals can get a guaranteed good result. If this is your first experience, the result may not be the best. Those who already have the skill of working with MDF, chipboard or veneered wood have a greater chance of success. These are rather capricious materials.
Mistakes during operation can ruin them. It will be impossible to return the coating to its original appearance, which will lead to unnecessary expenses. If you intend to install a difficult-to-install panel, such as glass or stone, it is better to immediately contact professionals. Let us list the main difficulties in working with various materials:
- Natural wood. If handled carelessly, dents or chips may occur. True, in most cases they can be sanded and restored to an attractive appearance, but this is a job for a master.
- Wood boards. Inaccurate cutting will result in chips that cannot be disguised. There is also a high probability of mechanical damage.
- Stone, artificial or natural. The heavy weight of the coating makes installation much more difficult, this is especially true for the latter. In addition, without special skills it is impossible to make cutouts for the sink and hob, as well as cut the blade.
- Metal. It is quite simple to install and dock, but dents and scratches may appear during processing. However, they can be removed.
Standard sizes
When designing kitchen furniture, it is necessary to follow certain rules and maintain certain distances and dimensions:
- The working surface (tabletop) should be at a distance of 850 mm from the floor. The height was not invented casually, but in accordance with the average height of a European woman and based on working conditions while standing.
- Standard tabletop depth is 600mm.
- The distance from the tabletop to the bottom edge of the upper wall cabinets is ideally 600mm
- The depth of wall cabinets should be 300mm.
- The height of the base of the lower cabinets is 100mm. – This makes it possible to adjust the height of the legs within 10cm.
- The tabletop canopy over the facades is 30mm.
What to do if the modules are at different levels
The design of a kitchen set sometimes involves multi-level modules. This furniture looks unusual and elegant. In this case, focus on the lower shelves. The rule here is that it won’t be difficult to reach them.
Variety of heights
Longer items are hung higher, so that the lower shelf is accessible. Sometimes furniture modules can be hung at the same height level.
Then the long sections are placed below 45 cm from the tabletop.
There's nothing wrong with that. The main thing is to plan the space so that nothing is placed under these sections.
Planning plays a crucial role in the placement of kitchen utensils. Well-accessible cabinets and drawers house items that are used frequently. Things that are rarely needed are put on the top shelves.
In the village
Rules for the arrangement of elements
Also, in addition to the approved generally accepted standards, there are rules and advice on the location of individual kitchen modules depending on their purpose.
For example, it would be better to install a dishwasher next to the sink; this will allow less water to spill on the floor, and it will be easier to place dishes in the dishwasher.
- There should be a minimum of 1.2m of free space at the front of the dishwasher to allow for easy loading of dishes.
- To conveniently open the oven doors down to easily pull out the baking sheet, the distance from the oven to the nearest object should be 1.2 m. If the oven doors open to the side, the free space should be 1 m, as well as the distance from the door hinges to the adjacent wall at least 30 cm - this will make it possible to open the side door by 150-1700.
- The oven should be built into a pencil case at the height of an adult’s eyes - this is the optimal height for comfortable use, as well as absolute safety for children.
- It is not recommended to place drawers next to the stove - they are not very convenient to use, and children can also use them as a ladder and climb onto the hot stove.
- A worktop space of at least 60 cm must be maintained between the hob and the sink. The oven should be combined with a pencil case or with a stove.
- Electrical sockets should be installed in a place convenient for you (away from the stove and sink) at a distance of 100-110 cm from the floor.
- When designing a kitchen, you should also leave a 3-5cm margin between the outermost wall of the kitchen and the wall.
- Typically, the lighting of the main lamp in the kitchen cannot provide normal illumination of the work area of the countertop. Therefore, it will not be superfluous to design and place additional lighting under the upper cabinets.
- A working area of 120cm long is enough for two cooks to work at this table.
- The free space in front of the drawers must be at least 75 cm for comfortable drawers.
- The hob should not be installed near a window or refrigerator; to prevent the fire from being blown out, place it at a distance of at least 30cm from the window.
If you design and arrange all the modules of our kitchen correctly, in the future they will help you save up to 30% of your time on cooking and about half the distance you walk and circle around the kitchen.
How to install a countertop in the kitchen with your own hands: step-by-step instructions
You can independently install a canvas made of artificial stone, MDF or chipboard. It is better not to use other materials due to the rather complex installation, which requires certain skills. The installation is approximately the same and includes several steps.
1 step. Preparatory work
They begin with fitting and adjusting the slab or slabs, if they are intended to be joined. Alignment is carried out along the facade of the cabinet. The tabletop should protrude in front of it by 30-50 mm. This is done in order to protect the facade from splashes and drops flying from above. Taking this into account, measurements and markings for trimming are carried out. It is optimal to carry out the latter in two stages:
- We make an oblique cut. This is necessary so that the edge of the slab pressed to the apron is parallel to the facade. Cut off the excess using a hand saw or electric jigsaw. In the second case, some experience will be required, since the board is thick and it is difficult to cut it at a right angle. If your hand slips, the material may be hopelessly damaged. It is optimal to leave a small allowance and process it with a belt sander. To ensure that the cutting line is smooth, we use a guide rail.
- We trim the edge to accommodate the unevenness of the wall. We make recesses for pipes, protrusions, etc. If there are bumps on the vertical surface or the tile has a pronounced relief, additional trimming or sanding will be required if the unevenness is small. Using a thin marker, mark a line on the board along which the cut will go and very carefully perform the trimming.
We prepare fasteners for the base. They fix it to the box, which will prevent possible displacement. These are steel corners, which are attached with one side to the bottom side of the stove, and the other to the side wall of the cabinet. Their fastening depends on the material. Self-tapping screws are used for wood boards and boards. They secure the brackets. They are glued to the composite or stone.
To do this, we clean the areas where the parts will be installed and then degrease them. We take a suitable two-component glue, apply it to the surface of the corner and press it firmly to the surface. We wait for the composition to dry, which will take an average of 24 hours. After this, you can begin installation.
Step 2. Joining fragments
Necessary only for prefabricated countertops, more often for corner ones. It is assumed that there are two or more fragments that need to be connected into a common canvas. Regardless of the material, ties are installed at the joint area. It is advisable to prepare areas for their installation in a workshop; it will be easier to carry out drilling and milling there. The fragments are trimmed so that they can be joined.
If you are working with a fabric coated with polyester or acrylic, the connection can be made without an additional profile:
- We process the ends of the parts with glue.
- We connect the elements, lay and tighten the ties.
- Remove excess glue.
- After the composition has dried, polish the joint. It becomes almost invisible.
- We reinforce the seam with an overlay strip on the reverse side.
For chipboard, MDF, etc. An aluminum docking strip is used. Several varieties are supplied to stores. The one that is intended for the connection being made is selected.
- We treat the end areas with silicone.
- Apply the strip and align it flush. We secure it on one side with small self-tapping screws.
- We connect the fragments and place the clamps in the prepared seats. We tighten them.
There is another way to join parts. This is the so-called euro saw. It involves the design of the joint area without any additional details. A pattern cut is carried out on a milling machine, which results in an interlocking joint. Its quality largely depends on the correctness of the work. You need to know that the use of a Euro saw requires precise fitting of parts and the absence of even slight curvature of the corners of the room. Otherwise, installation will not be possible.
Step 3. Installation of the canvas
Before putting the prepared panel in place, you need to cut holes for the sink, sockets, and hob. For correct marking, the easiest way is to use the template that the manufacturer includes in the packaging with the equipment. Holes are made along the marked lines. You should cut carefully so as not to damage the coating. The sections must be treated with silicone to prevent possible contact with moisture.
The stove is now completely ready for installation. It is placed on pedestals and aligned with the facades. After that, all that remains is to secure the panel. To do this, the remaining loose parts of the corner brackets are screwed with furniture screws to the side walls of the cabinets. It is advisable to do this together with an assistant who will press the plate with force during the fastening process.
All that remains is to install the baseboard on the countertop in the kitchen. It will cover the unsightly area of the joint and protect it from moisture. You can attach the part in two ways: with adhesive and with self-tapping screws. The first one is good for stone, ceramics, etc. surfaces. When choosing it, you need to know that when dismantling the part it will be difficult to remove without damaging the base. Installation on self-tapping screws is carried out as follows:
- We take measurements and cut a fragment of the plinth to the required length. We process the edge with abrasive.
- We treat the installation area with silicone to prevent subsequent possible ingress of moisture.
- We put the profile in place and fasten it with self-tapping screws. We twist them at a distance of no more than 0.3 m from one another.
- We install the decorative trim. We insert it into the special groove until it clicks.
- We cover the joints, ends and corners with special overlays, not forgetting to additionally treat them with silicone.
The instructions on how to attach a baseboard to a kitchen countertop using glue are almost the same. The only difference will be that the profile is glued to a previously degreased base.
Installing a countertop yourself is not very difficult. If you have any questions, you can view all its stages in detail in the video.
Basic recommendations
If you don't know how much the countertop protrudes in the kitchen, use the following rules:
- In most cases, the width of the tabletop is about 60 centimeters. This is quite enough to comfortably carry out various cooking-related procedures;
- The working surface should protrude above the cabinets in the front by approximately 3-5 cm. In this case, the drawers located below will be reliably protected from splashes;
- It is desirable that the overhang of the kitchen countertop at the back be 5 cm. The thing is that this gap will contain the necessary communications (pipes, electrical wiring, etc.).
Mistress's height
The question of how far the kitchen countertop should protrude is extremely important, but we should also not forget about the height of the stone structure. For a long time it was believed that in this case it is best to stop at around 85 cm. This standard was popular in the 50s of the last century.
Practice has shown that in our time such norms are no longer relevant. And all because the height of the average woman has increased. A height of 85 cm will be comfortable only for housewives with a height of 165 cm. If you are taller, then fatigue cannot be avoided during long-term work (the spine receives a strong load).
Try a simple experiment. Bend your arm at a 90° angle. Measure down 15 centimeters. It is at this height that the ideal working surface for you should be.
Increased depth
As mentioned above, the standard installation depth (from the edge to the apron) is 60 cm. You can deviate from the rules if your kitchen is very spacious, and you know from your own experience that 60 cm is not enough for you.
As a rule, the width of the tabletop in such cases is increased by 14-16 cm. This opens up the following advantages for the housewife:
- At the standard depth, the wall cabinets are too close. Yes, they don’t interfere much, but in any case it causes discomfort. You will definitely notice this when you have to open their doors too often. Each time you will automatically move back;
- 76 cm countertops provide an expanded workspace. In the free zones you can conveniently place kettles, plates, mixers and other utensils necessary for cooking.
How much should the tabletop protrude from the side?
Homo Antecessor
Group: Members Messages: 701 Registration: 10/9/2011 From: Veliky Novgorod User No.: 94021 Thanks said: 51
Reputation: 16
Installing the countertop is the final step in assembling the “bottom” portion of the kitchen. Before installing the tabletop, all lower drawers must be in place, connected to each other with ties or self-tapping screws. Approximately level. The final leveling is done with the tabletop secured.
Sometimes it is convenient to make cuts for the sink in a loose countertop. Hidden cuts must be coated with silicone sealant, otherwise it will swell. The corner connection of the table tops is made using a special corner connecting strip (its profile must be matched to the front end of the table top) or a Euro saw. In both cases, the connection should be carefully treated with sealant. As a rule, there is usually a sink in the corner, and the result is increased humidity, which leads to damage to the countertop.
Before placing the tabletop on the drawers, holes should be drilled in them to secure the tabletop. Through these holes, the tabletop is attached to the drawers with self-tapping screws. After which, by twisting and unscrewing the legs on the drawers, the tabletop along with the drawers is leveled. When attaching the tabletop, you should pay attention to the distance by which the tabletop protrudes above the drawers - it should be the same above all cabinets. Otherwise, then the facades will protrude or be very deep under the countertop.
Review by Alexander D.
Review by Alexander D. about Enitop company
I'm glad I met your company. Everything is done well, with high quality. I am grateful to the sales manager Alina, the measurer Maxim and the installers. Please encourage me.
Corner tabletop for Alexander
This kitchen surface has a familiar shape and is quite compact in size. At one end the table top ends with a smooth curve. There are holes for mounting the hob and sink. The overhang of the countertop (the distance by which it protrudes above the front of the kitchen cabinets) is 20 mm.
Drawing of a kitchen countertop for Alexander
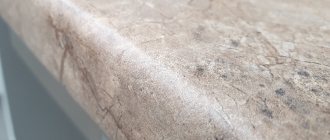
Stone for countertops
We recommend paying attention to the stone that Alexander chose. This is Vicostone Taj Mahal quartz stone. Its appearance exactly repeats the pattern of natural marble, but at the same time it retains all the unique properties of durable and reliable quartz.
Alexander countertops are made from Vicostone Taj Mahal quartz stone
Details about the order
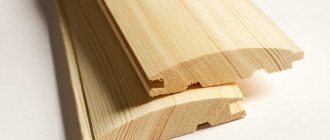
Popular edge
Alexander asked us to make one of the most popular T-40 edges for the tabletop. It is especially good in combination with a skirting board of a similar size: 40 mm in height.
Skirting for Taj Mahal stone countertops
Skirting board 40×12 R3
The order also included a plinth: it served as an excellent decorative element, creating an aesthetic transition from the plane of the tabletop to the wall. The top of the plinth is slightly rounded - just like the edge of the tabletop.
What is the depth of kitchen cabinets? Simple examples
Hello dear friends.
Today we will talk about the depth of kitchen unit modules.
What can it be in the case of top and bottom?
So, first, let's decide where this size comes from?
And it “dances” (in the case of lower modules) depending on the size of the tabletop.
As you probably know, the width of a standard countertop is 600 millimeters. So, relative to this size, the dimensions of the upper and lower boxes are calculated.
But, in addition to being tied to the size of the countertop, the dimensions of the boxes are also tied to the size of the fittings and equipment built into them.
Typically, any kitchen includes upper and lower boxes, as well as pencil cases.
Let's look at everything in order.
Depth of lower boxes
The bottom of the kitchen is planned so that the countertop protrudes beyond the frame along the front and rear edges.
There should be a protrusion along the front edge, since the facades (which are 16-18 millimeters thick) are still attached to the frame. There should be a small “canopy” of the countertop above the facades, so that if water gets on it, it does not fall on the facades, but runs off it (by the way, for these purposes, some countertops have a so-called “drip pan”).
So, the tabletop should protrude beyond the box along the front edge by 40-50 millimeters.
But, often, the specific indentation is determined by the built-in technology.
For example, when designing lower boxes for some models of dishwashers (which have certain tolerances for installation depth), this indentation has to be made 30 millimeters in size so that this equipment can be built into the box.
Along the rear edge, indentations are also made to accommodate all kinds of communications and other things in the resulting niche. Its size, on average, can be 90-100 millimeters.
In such cases, the depth of the lower boxes is taken to be 460 mm (for guides measuring 450 mm, plus 10 millimeters of free gap)
This is how it turns out:
- Tabletop width – 600mm
- Table protrusion along the front edge – 40mm
- Overhang along the rear edge – 100mm
- Box depth – 460mm
We check:
40+460+100=600 (mm). Everything fits together.
But this is not an axiom.
For example, for a standard tabletop, the depth of the box can be 510mm. (for possible guides, size 500mm).
Then, the protrusion of the table along the front edge will also be 40mm, and along the rear edge – 50mm.
Also in options with an angular bottom, when one of the kitchen wings is planned to be 420mm deep, then the depth of the lower box is usually planned to be 355mm (for guides measuring 350mm).
Tabletop width – 420mm
Its protrusion along the front edge is 40mm
Rear – 25mm
Of course, all sizes can be changed in one direction or another. The main thing is not to forget that having determined the depth of the box, it would be possible to build the appropriate fittings into it (the same retractable systems that have a certain gradation in size).
That's all for the lower modules.
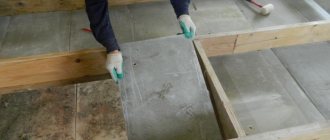
Kitchen :: Renovation
You can't think of anything better than tiles. And the laminate will be rubbed at the joints. They stomp around there all the time. Plus frequent wet cleaning. It won't be pretty. Whatever others write here, from the laminate manufacturer, from all sorts of different additional protective ones, incl. and waterproof layers do not depend on this.
18 years old on the site user #7993
20 years on the site user #1101
19 years old on the site user #4603
For me, everything hits the linoleum, so lay the tile - it rules
20 years on the site user #100
I have tiles - great! The laminate will swell because... moisture may get in. You can do it with heating, but it’s more expensive.
19 years old on the site user #4175
I wouldn’t want to lay a single tile (everything hits it)
Don't drop it. With this approach, we can say about laminate flooring - if you drop a hammer or dumbbell on it from a height of 1.5-2 meters, there will be a hole.
IMHO tiles are the best option, and preferably large ones (40x40 for example).
20 years on the site user #1101
I expressed my opinion as an interior designer
And as a simple man in the street, I will say that nothing can be better than a natural wooden floor.
18 years old on the site user #7993
Try the Parquet board - you won’t regret it. I (!) answer
18 years old on the site user #7993
By the way, it (the board) is natural
19 years old on the site user #1247
— floor heating is not possible, because the house has wooden floors and covered ceilings;
— I don’t like the tiles because they are cold and because the fall of any glass object (which is inevitable in the kitchen) definitely ends in its death;
— parquet boards (as far as I know) are afraid of moisture, and in the kitchen this is very critical;
Nadine
, but how to find out the wear rate of the laminate and what other parameters it has?
2All
, and what is the process of laying laminate?
18 years old on the site user #5715
Tch
, there are all kinds of markings.
. the price for such a laminate ranges from 28 to 49 bariks per square meter, and 49 is already for public places
or rather, read on the pages of the magazine Ideas for your home https://www.ivd.ru there are installations and so on
20 years on the site user #1101
18 years old on the site user #7993
I told you about moisture - buy a vacuum cleaner, if you install it well it will last a long time :) Compared to laminate, it’s heaven and earth. So, if for that kind of money it’s laminate, then the board is cheaper - if you don’t believe me, ask any specialist
rent an apartment in Moscow for a month cheap
18 years old on the site user #5715
Nadine
, I looked at the article at your link and came to the conclusion that prices need to be looked at on the market, they vary greatly
18 years old on the site user #6099
18 years old on the site user #5798
In general, they illegally ran into linoleum. There are different types of linoleum! I put Tarkett in my kitchen (on a wooden base), thick, soft, under the cork - class. And it looks decent (not to be confused with cheap Russian imperfections), and is practical - dirt does not stick to it, does not stick, and is not afraid of water (although I don’t remember when, seriously, with the means, the floor there was washed, just with a rag wiped away wet and that's it).