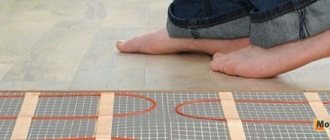
Duralight, also known as LED strip, is used as a main or additional source of lighting, a decorative element in an apartment, and as an alternative to neon lighting, but not everyone knows how to connect it themselves. Having studied all the intricacies of installation and operating features, you can install it at home without the help of specialists.
Installing LED strips is easy to do yourself.
Connection rules
In order not to spoil the duralight and ensure that the backlight works properly, you must follow a number of rules.
- Make all necessary measurements in advance. Most often, the length of the tape is 5 m; it can be cut in specially designated places or extended by connecting several sections.
- Observe polarity since you are dealing with a semiconductor device. If the connection is incorrect, the LEDs will not light up, then you need to change the connection of the supply wires.
- Perform all installation operations on a disconnected device and check connections before plugging it into the network.
- Mount the tape on a special profile made of aluminum or plastic; it will act as a heat sink and reduce the risk of rapid burnout.
- Choose a power supply with at least 30% power reserve for the entire electrical circuit. This is necessary so that the power supply does not operate at its limit, then the service life of the device will be longer.
- Connect the LED strip in parallel in sections of no more than 5 m each. With a series connection, the load will be greater than permissible, the device will not work properly, and uneven glow of the diodes will also appear.
The LED strip should be mounted on an aluminum profile, which acts as a heat sink.
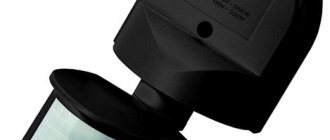
Advantages
The touch light switch has a lot of advantages.
- Easy to turn on and off the device by pressing the sensitive surface;
- Possibility of adjusting the brightness of lighting in a fairly wide range: 10–100%;
- No sound discomfort. When changing the operating mode or adjustment, the device makes virtually no sounds;
- High degree of protection. The switch is not susceptible to moisture. It can be safely installed not only in the kitchen, but also in the bathroom or toilet;
- Presentability. Modern models can become part of any interior, blending harmoniously into the surrounding space;
- Compactness. The devices are characterized by small sizes. This allows you to install the switch anywhere, including in confined spaces. Most often, the switch is mounted in the profile of the LED strip;
- Availability of light indication, allowing you to find devices in conditions of limited visibility.
Required Tools
Installation of this type of lighting does not require complex professional equipment; in addition, some components can be included in the kit with tape. To install duralight you need to have the following materials and tools:
- duralight coil;
- 3-core cable VVGng-Ls with a cross-section of 1.5 mm2;
- installation wire 1.5 mm2;
- power unit;
- dimmer/control panel;
- scissors or stationery knife;
- side cutters (nippers);
- heat shrink tubing or electrical tape;
- 2-sided tape (in case the adhesive base of the tape is not enough);
- soldering iron;
- aluminum or plastic profile of the required length;
- liquid for degreasing the surface (alcohol/acetone/solvent, etc.).
Tools for installing LED strip.
Calculation of the cross-section of connecting wires
The cross-section of the conductors should not be less than permissible - this leads to overheating and subsequent problems. Too large a cross-section means financial costs and inconvenience of installation. The current on the low voltage side can be calculated knowing the total power consumed (Ptotal) and the operating voltage of the tape:
I=Ptotal/Uwork.
| Conductor cross-section, sq. mm | 0,5 | 0,75 | 1 | 1,2 | 1,5 |
| Allowable current, A | 11 | 15 | 17 | 20 | 23 |
The current from the 220 V side is calculated by the formula I220 = Ilow * (U tape / 220 V , where:
- I220 – current from the 220 volt side;
- Ilow – lamp current;
- U tape – the supply voltage of the lamp.
You also need to take a small safety factor for the efficiency of the power supply.
Important! For outdoor installation, the cross-section of the conductors must provide not only the required economic current density, but also mechanical strength.
Connection diagram via power supply
The rated voltage of standard duralight is 12 V or 24 V, so you should connect the LED strip to a power supply that converts alternating current to direct current.
Depending on the desired length of the segment and its color characteristics (monochrome/multicolor), the connection has its own nuances.
For short length
Standard duralights are sold in coils of 5 m; to connect such a section or less, use the following instructions.
- If 2 power wires are not initially connected to the tape, connect them to 1 end of the tape using special connectors or a soldering iron.
- Clamp the free ends of the contacts into the corresponding power supply terminals (+V, -V), observing the polarity.
- Connect the power cable to terminals L and N (220V AC).
When connecting the LED strip to a 12 volt power supply in several sections, follow the same steps.
Connection diagram for LED strip (up to 5 meters).
Tapes over 5 meters
The connection diagram for LED strips longer than 5 m is slightly different from the standard one. There are several possible connection options.
- One powerful power supply unit, providing a load current of up to 20 A, for several pieces of duralight. To ensure a uniform glow, you need to apply power voltage from 2 sides to each section.
- Separate power supplies for each 5 m section. In this case, you can connect the entire circuit to one outlet or each unit to its own 220 volt source. This method is inconvenient because you have to lay an additional number of connecting wires.
- The use in the circuit of several 12 V DC voltage sources, a dimmer to control brightness and a 1-channel amplifier that duplicates the dimmer signal for a section powered from another power supply.
Connecting RGB and RGBW LED
The peculiarity of such duralights is that they create multi-colored lighting:
- RGB – red, green, blue;
- RGBW – 3 above colors and white.
The connection is made according to the same rules as with a monochrome LED device, but the circuit should be supplemented with a controller that allows you to select the inclusion of different diodes, control the brightness and create color effects.
In addition, the number of pins from the tape to the controller increases (1 wire for each color and 1 common plus).
A simple circuit for 1 section of multicolor tape is arranged as follows: 220 V source - 12 V power supply - RGB controller - tape reel. To assemble a chain with several long sections, follow the connection rules for strips longer than 5 m.
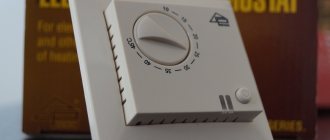
Which to choose
A large selection of touch switches causes certain difficulties in selecting the optimal option. Such products are boards with average dimensions of 40 × 10 × 2 mm, allowing them to fit into an LED profile, external modules placed in a plastic case, or a controller equipped with a remote control.
We advise you to pay attention to the wireless pass-through switch, which is also convenient to use, especially when lighting long corridors. By turning the light on at the beginning, you can turn it off at the end.
To choose the appropriate option, you must first decide on the type of LED switch. After this, it is worth considering the technical specifications. Noteworthy meaning:
- The voltage that is supplied to the input of the device and created at its output;
- The strength of the current flowing through the device in standby mode and generated when the load is connected;
- Power.
If you decide to install a monochrome LED strip, you should decide on the operating principle of the circuit breaker. Manufacturers offer devices:
- Capacitive, inside of which there is a spring that fits tightly to the plate. When your hand touches the switch, it creates a vibration. As a result, the contact closes and the lighting turns on. However, having decided to opt for such a device, it is worth considering that if the thickness of the plexiglass diffuser is more than 1 mm, you may encounter a lack of operation. This will cause serious inconvenience during operation;
- Infrared, triggered every time there is an object at a distance of 10 cm from the surface, from which the signal is reflected and returns to the receiving element. If the gap between the protective screen and the sensitive element exceeds 5 mm, you will have to use a profile with a shallower depth or take care of the presence of a hole in the light-scattering lens.
If the choice is made in favor of a model with a dimmer, you should also decide on the principle of operation. Such touch switches are most often turned on/off by a short touch. To change the brightness, you need to hold your hand longer on the control panel.
Some models have a slightly different operating principle. They can have several pre-programmed operating modes. Similar devices are suitable for RBG tapes. They are equipped with a control panel equipped with a touch ring. To change the shade of the glow, you need to smoothly move your finger along the spectral circle. As a result, diodes of the selected color or a combination of them will be switched on.
Attention! When choosing a switch, pay attention to the frequency of the PWM pulses. It should be more than 300 Hz so as not to have a negative effect on vision and the nervous system.
How to connect via a switch
If there is a switch in the electrical circuit, it is more convenient to use the backlight. To create such a diagram, you need to complete the following steps.
- Connect the power supply to the 220 V home network switch. The phase is connected to the brown input conductor L, the neutral conductor to the blue N.
- Connect the power supply to the duralight, observing the polarity (“+” to “+”, “-” to “-”), and it is best to mark it at a minimum distance from the tape. If the cable length is more than 7 m, the brightness of the lighting may decrease; to prevent this, a conductor with an increased core cross-section should be used.
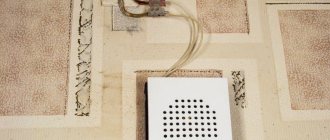
Battery powered
This connection option allows you not to use electricity, which is convenient in some circumstances. Powering the LED device from batteries is possible if you plan to connect a short section with low power for short-term use. In this way, you can connect duralight, for example, to illuminate shelves, pictures or a work surface in the kitchen.
Any batteries will do; their total voltage should be from 8 to 12 V.
The work order is as follows.
- Strip the contacts on the batteries, tin the ends of the wires and solder them to the plus and minus of the battery, respectively.
- When connecting the toggle switch, the plus from the battery is connected to its input, and the output is connected to the minus of the duralight.
- Solder the free ends of the contacts to the tape, remembering the polarity.
LED strip connected to a battery.
Selecting the glow color
For some reason, few people pay attention to such an important point as the accuracy of color reproduction. The colors themselves are divided into:
- warm white
- neutral white
- cold white
For residential premises, warm white is best - 2700 Kelvin. Mount neutral (4000K) and cold (6000K) where you work most often.
The color accuracy parameter is indicated as CRI (Color Redering Index). If you choose a tape with a CRI<70 for a living or work area, then some items and objects will appear bluish or greenish.
Imagine a blue lemon on the kitchen counter. Here, inadvertently, your appetite may disappear. Therefore, it is best to use brands with a CRI of 80 to 90 for such places.
Use via computer
Duralight can be used to illuminate the workplace. In this case, you don’t have to connect it to a power outlet or through a switch and use the device without a power supply; just connect the LED strip directly to the computer. This can be done in several ways.
Via USB connector
Most standard duralights require a supply voltage of 12 V or 24 V, while the USB port has a voltage of 5 V with a permissible current of up to 500 mA.
The easiest option in this case is to purchase a non-standard 5-volt duralight with a connector for a USB connection (for example, made in China); it can be connected to any device equipped with a USB port.
A more complicated way is to use a step-up voltage converter from 5 V to 12 V; you can purchase it or make it yourself. When assembling with your own hands, you can use the LM3488 integrated circuit; all the necessary information on assembly is indicated in the instructions for it.
The option using USB is the only possible one for connecting to a laptop; there are other less labor-intensive methods for powering it from the system unit of a desktop computer.
Via one of the molex connectors
There are several of these connectors in the PC; they are located under the side cover of the system unit and have 4 contacts with insulation color coding - yellow (+12 V), 2 black (GND) and red (+5 V). To connect the LED strip, yellow and 1 of the black wires are used. To make the connection detachable, you can use a MOLEX-SATA adapter. To connect duralight, the following steps are required.
- Turn off the computer and remove the side cover of the system unit.
- Remove the SATA plug from the adapter; it will not be needed.
- Solder a duralight contact with a “-” sign to the free ends of 1 of the black wires, and a contact with a “+” sign to the yellow one.
- Cut or insulate the remaining black and red pins.
- Find an unused molex connector and connect it to the adapter to test turn on the duralight.
Direct to motherboard
Some PC models allow you to connect the LED strip to the corresponding connector on the motherboard, but not every device has it. The easiest and most convenient way to connect duralight to the motherboard is to purchase a ready-made installation kit, which includes an RGB strip and all installation components.
The main thing is to make sure that your computer allows this connection option.
Connection diagram via controller
A controller or dimmer is needed to control lighting, for example, adjust brightness, turn on/off individual sections of the tape, and create lighting effects. Depending on the desired result, you can install the controller on the wall or use a flush-mounted device.
Connection diagram for LED strip with controller.
You can choose the control method:
- turning;
- button;
- sensory;
- remote controlled.
When choosing a device, read its characteristics. So, the power of duralight should be less than the values indicated on the controller body. In the electrical circuit, the dimmer must be placed between the power supply and the tape itself and the connection must be made, remembering to observe the polarity.
A monochrome strip is connected to the dimmer with 2 wires; when connecting an RGB strip, a connection is made with 4 contacts, each to its own socket.
Additional sensor functionality: 5 important points
This device has a variety of activations. It may also have additional features. With certain skills, a homemade sensor can be equipped with a good range of functions. Today, similar switches are produced with the following versions of added functions:
- Remote control. It greatly facilitates control over the light spectrum of multi-color tape. In this case, the use of a controller is mandatory. Otherwise the remote control will not work. The remote control is also good at controlling sconces. And when connecting to a tape, the remote control must be selected in tandem with the controller.
- Timer. Thanks to this device, significant energy savings can be achieved. In the timer, you can set the time to turn off the lights when there are no people in the room or in the house.
- Volume response. This product reacts even to light contact. Often this device is made independently and complements the timer.
- View without contact. The reaction of these devices occurs when the situation in the room somehow changes. These may be different movements, temperature and lighting changes.
- Dimmer. Any designated touch strip devices can be equipped with a dimmer. This addition allows you to control the brightness of the light in the room.
Optimal for a residential apartment is 1 netxt LED lamp with a touch switch. But it is not prohibited to work on modern electrics with your own hands. More on this below.
Connecting and cutting LED strips
As mentioned above, you cannot connect sections longer than 5 m, but sometimes you have to deal with the installation of several sections of 1 five-meter bay (for example, if some elements have stopped working and need to be replaced). In such situations, you have to resort to cutting and joining.
Places to cut the LED strip.
Duralight is a set of segments in which there are 3 LEDs and 1-3 current-limiting resistors; at the end of each such section there are connecting contact pads, between them there is a cutting line (many manufacturers mark it with a “scissors” sign or a vertical line).
The sections are spliced using the same contact pads.
Solderless methods
This method is possible when using connectors 1 of two options: wired and wireless for end-to-end connections.
A wired connector is needed for rotary splicing of fragments or connection to a power supply. To connect such a connector with pieces of tape, you just need to insert parts with contact pins (“+” to “+”, “-” to “-“) into it on each side and close its cover until it clicks.
When using a wireless connector, the segments are connected to it on both sides with contact pins end-to-end on the connecting pads of the device.
Using a soldering iron
This method is more reliable and does not require additional costs. It is suitable for those who have already encountered soldering before. To implement this connection option, you need to clean the contact pads of the tape, heat the soldering iron, tin the contact tracks with flux and solder the wire. Do not heat the duralight for more than 10 seconds, as this may damage it.
More about LED strip (hereinafter referred to as S.L.): 3 main points
The tape can be either ready-made or homemade. Its types:
- Invoice. Variety - linear. Can be purchased as a set or individually. In the set, the modules are connected into one complex by a special adapter.
- Invoice. Variety - dotted. Look at the picture:
Invoice.
Variety - dotted. Today you can buy items 1 and 2, which already have touch switches built into them. It is enough to lightly touch their body in a certain area to turn the light on or off.
Touch sensor
The touch sensor usually appears as a constantly lit blue LED.
- Mortise tape. It can also be linear or pointwise. A good advantage is the thickness. Installation of the mortise strip usually occurs in the lower shelf of the cabinet towards the lower surface.
Mortise strip
This type of lighting fits entirely into the bottom shelf. Installation requires certain skills.
Recommendations for placement and installation
In order for duralight to last as long as possible, to be beneficial, and for the lighting to be comfortable for the eyes, it is worth following some recommendations for its installation and use.
- To securely fix the tape to some surfaces, the adhesive layer of the tape may not be enough; in this case, use 2-sided tape.
- When using duralight to illuminate the ceiling, the question often arises of where to hide the power supply for the LED strip. Both the power supply and the tape itself can be placed under the ceiling plinth at a distance of at least 5 cm from the ceiling to ensure maximum luminous flux.
- Place the LED strip so that it does not shine into people's eyes.
- Use open duralight only for home use; for outdoor placement, choose a sealed device.
- Carefully install and fasten the tape, do not allow mechanical stress, bending, twisting or stretching of its sections.
- Do not place the device on hot surfaces or near heat sources. In the room where the LED strip operates, the temperature should not be higher than 40°C.
- Avoid getting moisture on the surface of the unsealed tape.
- Mount the duralight on a flat, clean and grease-free surface.
Layout of LED strip on the ceiling.
Main mistake
It is worth noting a common mistake made when splicing two segments - many connect them in series. It is believed that it is enough to connect the two ends of the tape in a direct way and obtain the required length. This switching is incorrect, since the tapes must be connected in parallel.
In practice, this error leads to an increase in resistance in the circuit: towards the end of the chain, the LEDs will glow very dimly or not work at all. In this case, excess voltage will be supplied to the initial sections of the tape, which will lead to rapid failure of the lighting elements.
Also, increased voltage is fraught with increased temperature of the LED strip, which is also not a plus. It has been practically proven that incorrect connection of two pieces of tape leads to their rapid wear and significantly reduces their service life.
PC area backlight Source pinimg.com