220 volt doorbell connection diagram
Replacing a doorbell with a power supply of 220 alternating volts usually does not cause difficulties, since a certain bell from builders is already hanging in the corridor and a new bell just needs to be connected to the wires coming out of the wall in the same way. But what if the task is to make a doorbell from scratch, or you want to use the 220 volt voltage available there as an “outlet” to power something else, or you’re just wondering why there are 4 wires sticking out of the wall and two of them are twisted. Let's figure it out.
So, the original “oil painting”:
Photo 1. Doorbell Cricket on the wall of the corridor under the ceiling
Previously, “from the beginning of time,” there was such a call:
Photo 2. Typical Soviet electric doorbell ZP-220
But it was very loud and immediately hit the brain sharply and therefore was replaced with that modern “Cricket” that is in Photo 1.
Now, in connection with the need to install an electrical outlet in the corridor to the front door (to power the wi-fi router and the door video peephole), the question arose: is there a constant 220 volt power supply here, i.e., in fact, an “outlet” "?
Photo 3. What is the purpose of the 4 ends of the wires sticking out of the wall?
The fact that the wire marked in red is the 220VAC phase voltage was quickly established using an indicator screwdriver. Another fact: this voltage is turned off if you turn off the charger (protective device in the electrical panel) of the “upper” (which is for chandeliers, lights) voltage.
At first it seems that the call is connected according to the following scheme:
Diagram 1. Button, doorbell, 220 volts
and the same two twisted wires are either grounding, or just a randomly passing zero power supply with some reason (according to the gloomy idea of Soviet builders) the output is here (for example, to power a doorbell that requires constant power; or maybe for a doorbell , combined with a night light).
This diagram (Scheme 1) is not correct. But the Internet is full of pictures with exactly this recommended doorbell connection diagram - with the phase passing through the button. (Just in case, I wrote “You can’t do that.” on the picture, so that if someone sees it from an image search and doesn’t go from there to this text, then they wouldn’t think of doing it).
As a result of careful voltage testing and continuity testing with a multimeter, the following situation was discovered:
Photo 4. Purpose of the doorbell wires from the wall
Photo 5. How a doorbell is connected in a Soviet panel apartment building
Thus, the following scheme is implemented:
Scheme 2. Scheme (according to SNiP) for connecting a doorbell
Just in case, I wrote “SNiP” (building codes and regulations) on this diagram, because that’s how it is, that’s how it was done in the valiant Soviet times. But what is actually special/correct here? The fact that the doorbell button is connected to the neutral wire, and not to the phase wire.
Here you need to understand that the current “hits” even despite the isolation of your body from the ground/zero, even if you touch only one phase contact of the socket. Why?
Firstly, because a person is approximately a “spherical” capacitor and a certain amount of coulomb of electric charge can enter/descend onto him (at the moment of touch and further due to the variability of the current with an amplitude of ±310 volts 50 times per second).
Secondly, a person in a reinforced concrete building is one capacitor plate (with an area of 2 m2), while the second plate is the reinforcement inside the concrete, which is everywhere around, which is grounded (may not be grounded, but due to the size of the entire structure - about Togo); and through such a capacitor, alternating current flows quite well (even more “not bad”, the shorter the distance from a person to the walls and floor).
So, there is a difference between touching the phase like this:
In the second case, the current strength is significantly limited by the resistance of the bell. Sometimes down to zero: the resistance of the “Cricket” bell from Photo 1 is 6 MOhm, i.e. it will not “hit” with current at all. So, for example, with an indicator screwdriver
Photo 6. Indicator screwdriver disassembled
the resistance is 1.2 MOhm and, as we all already know, current flows through this screwdriver, but is not felt at all, i.e. it does not “hit”.
With the Soviet classic bell, everything is not so simple:
Photo 8. What's inside the Soviet doorbell ZP-220 GOST 7220-66
Inside there is an electromagnet, a coil, so its total resistance (electrical impedance) to alternating current according to the formula
equals 1846 Ohms. This is already not enough... but this is exactly the kind of call that was in front of the button in that same electro-shock childhood of mine.
And finally, the purpose of the study:
220VAC power supply to the socket above the door to power all sorts of small useful devices near the door: Internet router/switch/modem, video intercom, landline radio telephone base.
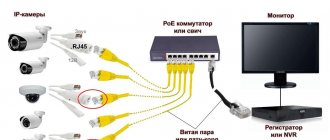
Main types of cables
- Transmission of video signal from the camera to the subscriber device;
- Supply voltage to the electronic lock.
Coaxial cable type RK-75
RK-75 - Coaxial cable for connecting a video intercom with a copper central conductor
The main type of cable used to transmit an analog signal is coaxial cable. It has an asymmetrical design consisting of the following components:
- Central conductor;
- Insulating layer;
- Shielding braid;
- External insulation.
The central conductor through which the signal is transmitted is made of copper wire and can be single-core or multi-core. Next comes a layer of insulating polymer, which protects the cable from negative climatic factors. It can be polypropylene or polyethylene foam. For installation, it is more convenient to use cables for video intercoms with a protective sheath made of foamed polyethylene, since they allow bends of small radii.
The shielding braid is made of specially woven wire and a layer of aluminum foil. It performs the function of a screen and must be connected to a grounding point, otherwise it will simply work in the reverse order, namely, attract interference like an antenna. Coaxial cable is available in various sizes and is characterized by certain electrical parameters:
- Transmitted frequency band;
- Attenuation coefficient;
- Wave resistance.
Comments (5):
I noticed that in my house the chandelier is connected in exactly the same way (the switch is set to “zero” and not to “phase”) - i.e. the chandelier is always energized, even when the lights are off. Why is that? Is this really right? This is an unnecessary risk for someone who goes to change a light bulb... Can it give you an electric shock? And is it possible to redo it and do it “humanly” so that the chandelier is de-energized when it is turned off? Again, as far as I’ve heard, this is harmful for modern LED and other energy-saving lamps (and some lamps even manage to flicker even when the light is turned off, because they still remain energized).
Subscribe to the newsletter
Currently, there is a large selection of different doorbells on the consumer electronics market, ranging from simple models to options with a video camera and alarm. If you are interested in the question “how to connect a doorbell,” in this article you will find information on methods for connecting various devices.
Electric doorbell - types and features
Wired calls work from the network
220V, and their body and button are connected by wire. An electric wired doorbell, provided it is properly connected, ensures reliability and durability, as well as operation in all weather conditions.
A wireless electronic doorbell has its advantages: no wires are required for its installation, and in the event of a power outage, the bell will continue to work. However, the signal transmission range of such a call is not great, and it is also possible that it may not work in bad weather.
Doorbells can be divided by voltage consumption. Currently, both a standard 220V doorbell and electronic bells from 4.5 to 60V are quite common. The latter are equipped with batteries or step-down transformers.
A doorbell with a camera has also appeared on the modern market. The remote model includes a covert surveillance camera that records both image and sound. This remote doorbell does not require any connection - just insert the batteries and attach the elements to the wall.
If you are not satisfied with the models sold on the market, you can assemble the doorbell yourself using special kits. If you are interested in how to make a doorbell yourself, you can use special kits, for example, “Two-tone doorbell”. This kit allows you to assemble a device that performs bell and alarm functions.
Wired doorbell - do-it-yourself connection
In order to independently connect a wired doorbell, you will need the following tools:
The materials you will need are the doorbell itself, a button, and two two-wire cables.
When selecting a cable, it is also worth considering the core material - aluminum or copper. It is best to have a cable with cores made of the same material as the rest of the wiring of the general apartment network.
Wired doorbell connection diagram
The doorbell button is designed in such a way that when pressed it closes the contacts. In order for a doorbell to sound, it is necessary that both a zero, permanently connected to the bell, and a phase, open at rest, appear on its contacts.
The doorbell circuit shown in the diagram includes two two-wire cables that are laid from the junction box to the bell button, as well as from the box to the installation location of the bell itself.
How to install a doorbell - step-by-step instructions
If you are using a low voltage doorbell, install the doorbell as follows.
A cable is laid from the distribution box to the bell button and the bell itself. In the distribution box, using an indicator, you need to find the voltage supply wires and determine the phase and zero. Next, everything needs to be connected according to the connection diagram.
A hole is drilled in the door frame or wall for the button wire to come out.
The wire is connected to the terminals of the button, after which it is fixed to the wall above the hole.
The second end of the wire is connected to two terminals located on the bell battery. If the bell battery is not located in the device body, but separately from it, you need to stretch the wire from the button to the bell, separate the two-core cable and connect each of the wires to a separate terminal.
If there is a transformer in the bell housing, you must connect it to the distribution box and two of the three terminals corresponding to the voltage.
Once you have connected your doorbell, turn on the power and check its operation.
Source
Restrictions when installing wireless devices
We are talking about radio frequencies, the range of operation and signal transmission. If there is a powerful radiation source nearby, the bell will ring on its own, or vice versa - its signal will be completely muted. This situation happens extremely rarely. This is observed much more often: the bell sometimes makes quiet sounds and spontaneously goes off at half power. The rest of the time it produces noise and interferes with sleep.
There are two ways out of the situation:
- install a protective screen in the direction of radiation. This can be either a special material or regular foil.
- choose a suitable place and place the bell where the waves cannot reach it.
Most often, this situation is impossible, since in any multi-storey building there are large numbers of routers and radios, so shielding is the only adequate way.
You can wrap the inside of the bell with foil and hide it with a lid, the main thing is not to install the screen in the direction of the useful signal.
How to connect an electric doorbell in an apartment
Usually the bell is connected to a 220 V network. In this case, operations similar to connecting lighting fixtures are performed. Before installation, you should decide on the location of the devices. Also, do not perform work with the switch on. There are two types of doorbells - wireless and wired. Wireless ones are easier to install, but they are less reliable and trouble-free, and also require battery or battery replacement. Options with an electrical wire can work without maintenance for decades; they usually work with 220 V alternating current, but they are more difficult to install. Let's look at how to connect a doorbell in all possible ways.
Video on the topic
A system such as a video intercom consists of separate electronic devices that are connected to each other by cable lines. You should know that connecting wires play a role no less important than the electronic components themselves when organizing any video systems. A video intercom cable that is incorrectly selected or of poor quality can cause not only malfunctions in the operation of the device, but also its complete failure. In order to choose the right cable, you need to understand its main characteristics, as well as well-known brands.
Content:
Installing a bell with a wire
What tools will be needed to carry out the work?
To set up a call you will need:
If a bell has not previously been installed in the house, then you need to choose a suitable place to install it. Typically, a call consists of two elements - a button and the call itself (speaker).
There should be a diagram on your bell indicating in what position it should be locked.
Speaker Installation
This is the first step towards connecting a bell in your apartment. The speaker usually has technological holes for mounting and for electrical wire entry. First you need to place it on the wall and drill a hole for the conductors. Use a level to fix it evenly. After the hole is ready, you need to insert the wire into it and stretch it to the place where the button will be installed.
Installing a button
You need to drill a hole for the conductor in the wall where the button is installed. After this, you need to thread the cable into the hole so that it sticks out from the outside by 15 cm. Strip the cable using a stripper or other available tools. Expose no more than 2 cm.
Tip: the recommended installation height for the button is 1.5 meters. It is considered the most versatile and comfortable.
Connecting the electrical wire to the button
Move both stripped conductors apart from each other. Insert the ends into the special clips located on the back of the button. The wires are first bent so that they wrap around the base of the clamp. The clamp is then tightened tightly using a screwdriver. This way the electrical wire will be held securely and will not fall out during operation. Once both wires are secured, you can attach the button to the wall using a drill, screws and dowels. It is advisable to set it according to the level.
Masking and securing wiring
The wire must be secured using plastic clamps. The clamps wrap around the cable and are attached to the wall using a drill and screws. Then the wiring can be masked using skirting boards or all kinds of decorative inserts.
Connecting the main bell unit
A cable consisting of two wires goes to the main unit - one that supplies power and one that transmits a signal when someone calls. It is recommended to mark the electrical wires with different colors (if they are the same color), for example, paint them with a marker.
The conductor from the button needs to be folded in half and passed through the hole in the wall, then passed through the hole in the main block, brought out and left about 25 cm of reserve.
It is necessary to take into account: one end of the wire folded in half goes to the button, and the second will be connected to the power supply. Therefore, its length should be calculated.
After this, you can attach the main unit to the wall using a drill. Thus, we get an open main unit box attached to the wall, with a cable protruding from it, folded in half. Both ends of the cable go into the hole and are located behind the wall.
Now, inside the main unit, we separate both wires of this cable from each other and cut one of them (it is desirable that it be white and the other wire black). As a result, you will receive two ends of the electrical wire, which need to be distributed among the clamps inside the main bell unit.
Strip the ends of the insulation using a stripper. Insert one end into the clamp that leads to the transformer (will be responsible for returning the current to the transformer), and the other end into the one that is responsible for the button (information about this should be in the device documentation, diagram or on the device itself).
Comment on the picture: connecting wires to the main unit: Front front door bell (button); Trans – transformer; Rear – optional, additional bell for the rear door.
Important! If the clamp is shaped like a screw, first screw the wire onto it clockwise, and then tighten the screw (fix it). This way you will ensure good contact and durability of the connection.
After all steps are completed, carefully hide the excess wire in the main unit box.
Power connection
To connect your electric bell to the switchboard, you need to make a technological hole in the panel from which your house is powered and fix the transformer included in the kit there. It is better to securely secure the transformer with screws. Then the wire coming from the bell is attached to the outside of the transformer. It has two ends, they can be attached regardless of where the phase is and where the zero is. Since after the transformer both of these contacts are equivalent to phase. The wires should be securely fixed in the clamps. Typically, the supply voltage after the transformer is about 20 Volts, which makes it very safe.
The wires from the transformer are attached to the shield. For Russia and the CIS: brown wire - phase, blue wire - neutral, striped green - ground. If the wires coming out of the transformers are too short and you cannot attach them to the panel, then you need to increase their length by connecting additional wires using clamps or blocks.
Always connect the ground wire first. After it, the neutral is usually connected, and then the phase.
Final stage
Now you need to check if everything works. If the bell is functioning, you can close the main unit with a protective cover. Also, do not forget to close the panel panel and make a note where the transformer is connected and what it is responsible for. To turn off the doorbell, you must first turn off the power to the machine, then remove the covers, disconnect the wires, turn off the transformer and remove the main and additional units.
If the call is connected without a transformer
They connect in almost the same way as a doorbell with a transformer, but in this case one wire from the button goes directly to the machine and is connected to a phase. The second wire goes to the main bell unit. There is another wire coming from the main unit, which is connected to the machine at zero (neutral).
Main conditions for intercom cable
Depending on the location where the video intercom will be located, problems may arise in laying wires inside and outside buildings. Therefore, there are special rules regarding the thickness of the wires.
Classic intercom panel
Copper wire is mainly used, the size of which may vary depending on the type. Cheaper options have steel cores. But then the wire needs additional insulation. Such conductors are used:
- in a coaxial wire, which is used to connect elements of an analog video system;
- in twisted pair (twisted wire), which is used to connect digital equipment.
Note! Basically, intercoms and video cameras are connected indoors to increase security, so it is not advisable to use products with steel conductors. They are less safe and can allow the fire to spread if a fire occurs.
Connection diagram
If the intercom is located inside the apartment/house, then there are no special installation rules for it. At home, wiring is not affected by weather or humidity. For outdoor installation, it is advisable to use wires with insulation made of PVC materials. They do not allow moisture to get inside the wire.
Wireless calls
Nowadays, wireless electric bells are very popular, which consist of two separate blocks - a button and the bell itself.
They are easier to connect and more secure. You will not need to make holes in the walls, and also work with wiring, panels and machines. Typically, such mechanisms operate on batteries or mains power (the main unit is connected to an outlet), so the only problem will be fixing the bell in the right place. They can be attached with double-sided tape, bolted, glued, and so on.
Preparation
First you need to find “Zero”, “Phase” and grounding, make sure that they have quick access. Next, you need to unpack the call and find the corresponding markings on it.
If the markings are not applied, then it is better to consult with a specialist so as not to waste time. You also need to test the radio field for frequency blocking and interference.
If there is a large amount of electronics emitting waves near the bell unit, there will inevitably be noise and background that will prevent you from working and sleeping.
Types of residential calls
There are two types of electric residential bells based on the connection method - wired and wireless. Wired ones are connected to a 220 V network, there are models that operate on a reduced voltage of 12 V. They are called wired because the bell button and the indoor unit must be connected by wires.
Wired calls - the button and the internal unit must be connected by wires
In wireless electric calls, the button and the internal unit are not physically connected. They contain a miniature transmitter (in the button) and a receiver (in the indoor unit). They communicate with each other at some frequency. There are two types of wireless call power:
As already mentioned, in the wireless version, the button and the electric bell “communicate” with each other through signals. Signals can be transmitted in analog or digital form. More reliable signal transmission in digital format - less susceptible to distortion. In addition, such models have the ability to change the channel through which reception/transmission occurs. This is not possible when transmitting an analog signal. Why is this bad? Call range is 100 m or more. And if there is some device in this area that operates on the same frequency (bell or other), your receiver can pick up its signals. In this case, false positives occur.
There are also doorbells that separate apartment and street doorbells. They differ in that for those installed outdoors, the buttons are sealed and dustproof. In addition, it is recommended to install them under a small canopy - there will be fewer problems.
Situation three, no handset.
That is, we need to determine what type of system we have. As we already know, this can be done in the following ways: - by the presence of a constant voltage of 6 - 7 Volts - this is definitely a DIGITAL system, - by the type of handset from a neighbor (presence/absence of an apartment number block).
Buying a handset : I recommend handsets from Laskomex, which is a leading Polish manufacturer of intercom systems, their products are compatible with most devices from other manufacturers (not an advertisement!).
Connecting wired electric bells
As mentioned earlier, wired doorbells differ in that the button and the internal unit must be connected by wires. The connection diagram through the junction box is in the photo below.
Electric doorbell wiring diagram
A phase wire is connected to the button; from the second bell terminal it goes to one of the wires of the indoor unit. On the second remaining free wire we connect the “zero” (if the color marking is observed, it is usually blue or light blue) of the junction box. If the indoor unit has a grounding terminal, a yellow-green conductor is connected to it, which should also come from the distribution box. If there is no such terminal, but there is a conductor, it is isolated.
The difficulty in connecting an apartment bell is that the wires must be routed through the wall. Sometimes this is too inconvenient, then a hole is made near the door frame.
If this connection seems too complicated for you, look for wired bell models with an internal unit that plugs into an outlet. There are others like that. Example in the photo.
Wired bell 220 V with connection to Volsten DB-951 socket
Everyone knows how to connect a bell in an apartment if it has an electrical plug. In this case, you will only need to stretch the wire connecting the two blocks through the wall. To do this, you will need to disconnect it from one of the parts, pull it through the prepared hole, then connect the wires in place.
Price category
The pricing policy for wires depends on several factors.
- how long did you live under the main insulation;
- How protected is the wiring from external influences?
- wire length;
- manufacturing company, country of manufacture.
Note! All these are key points when buying a cable. But in general, it all comes down to the fact that the more material that goes into creating a product, the more expensive it costs.
Connection diagram for a private house
Choosing a quality cable is a rather difficult procedure, and it will be difficult for a person without experience to carry it out. Therefore, it is recommended to consult with the seller and refuse Chinese counterfeits, which can cause short circuits and fires.
You might be interested in Pipe heating cable
Connecting and powering wireless calls
First, we will talk about those models whose internal units are connected to a 220 V network. If there is a plug on the case, you know exactly what to do. If there is no plug, but there are two wires, connect the two wires that come from the junction box to them. If there are three wires, isolate the yellow-green one, and connect the blue and the second one (maybe brown, red, black, white, etc., but definitely not green or yellow-green).
If both units are powered by batteries
There are no problems with how to connect a bell in an apartment or house if both units are powered by batteries. Simply drive a nail or tighten a screw into a suitable place in the house, attach the indoor unit to it, and install the batteries. Do the same with the button, but mount it outside - near the door or gate. In order to secure the button, the case must be opened (there may be small screws, but usually you just need to pry the case off with a screwdriver).
There are several holes for fasteners on the back wall. Fasten the back cover with screws or dowels (depending on the material), then install the batteries and close the cover. This completes the wireless call connection.
This is what the wireless call button will look like when disassembled
How to provide power to a wireless button in cold weather
Wireless calls are good for everyone, except that in winter there can be problems: some types of batteries freeze and stop working. They have to be changed every 10-15 days. It is very inconvenient, as it can be difficult to understand that the call has stopped working due to a dead battery. You can get rid of this situation in the following ways:
By modifying the system using any of the proposed methods, you will have significantly fewer problems with power supply to the bell button on the street. Now you know not only how to connect a bell indoors and outdoors, but also how to ensure its operation in cold weather.
Rules for choosing cables for intercom
The first step is to select the device model. You can't skimp on cable. The combined type KVK, produced by Russian factories, has all the parameters and can be used without restrictions.
Types of intercoms
When purchasing coaxial wire, it is recommended to give preference to CommScope. It is advisable to buy RG-6 or RG-59 wire, it has a fairly long service life.
Twisted pair cables are produced by many companies; when purchasing, you need to pay attention to the material from which the cores are made. It is not advisable to buy Chinese analogues from well-known companies. Such wires are cheap, but not safe, and also have thin insulation.
Important! You need to carefully select the wire so that the signal from the intercom is transmitted without interference.