Installation of kitchen “built-ins” does not require great skill, so owners of new appliances try to cope on their own, without asking for help from qualified specialists.
As in any other matter, there are nuances that should be considered before the start of a responsible event. Let's look at the process of installing slabs in more detail.
How to integrate a gas surface into a countertop?
For those who are too lazy to read, we have prepared an interesting video collection at the very end on installing built-in stoves.
Premises requirements
Gone are the days when tiny Khrushchev-era kitchens quietly placed four-burner gas stoves by the window, next to hanging curtains. Now the situation has changed . A new regulatory document has been approved and put into effect - SP 402.1325800.2018 “Residential buildings. Rules for the design of gas consumption systems."
It includes a number of requirements for premises in which gas stoves are allowed to be installed:
- purpose of the premises - kitchens, kitchen-dining rooms, corridors;
- ceiling height - at least 2.2 m;
- the presence of natural ventilation, an exhaust ventilation duct and a window with an opening sash or window;
- the door from the room opens outward;
- there is a gap of at least 0.02 m² between the floor and the door leaf (for air flow);
- minimum room volume: for two-burner stoves - at least 8 m³, for three-burner stoves - at least 12 m³, for four-burner stoves - at least 15 m³;
- window glazing area - at the rate of at least 0.03 m² per 1 m³ of room volume (glass acts as an easily removable enclosing structure in the event of an explosion).
These requirements apply to both free-standing and built-in devices.
Making the markings
Having decided on the dimensions, outline the contours of the future recess:
- Set aside the length of the indent from one of the side edges.
- Through this point, draw a line parallel to the edge, across the entire width of the tabletop.
- From the front edge along this new line, also set aside the width of the indent (it may be wider than the side, depending on the model of the slab).
- Draw a line through the mark parallel to the front edge.
- Check the angle between the lines - it should be straight.
- On a line parallel to the side edge, mark the width of the tabletop, and on the line parallel to the front cut, its length.
- Draw lines through these points and make sure that all the corners are right and that they run strictly parallel to the edges of the tabletop.
- You can round the corners by hand or using a pattern.
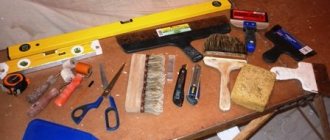
- Drill holes where the notch will begin.
- Place a fine-toothed file into the jigsaw.
- Cut out the hole.
- Sand the cuts with sandpaper.
- Don't forget to remove sawdust - the easiest way to do this is with a vacuum cleaner.
- Place the hob in the recess and check whether the hole corresponds to the required parameters.
Important! If you have a hand router, it is even more convenient than a jigsaw - the corners can be cut with a radius cutter.
Posting rules
Gas stoves use flammable natural or liquefied gas. This is high-risk equipment. Therefore, SP 402.1325800.2018 defines the requirements not only for the premises, but also for the installation site:
- unplastered wooden walls or structures made of other combustible materials are insulated with non-combustible materials;
- the insulation must protrude beyond the dimensions of the device: on each side - at least 100 mm, above - at least 800 mm;
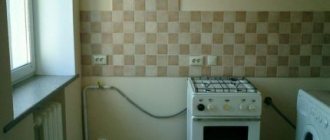
- the minimum distance between the device and the opposite wall is 1 m;
- Installation in a niche is not allowed.
Non-combustible finishing materials include ceramic and porcelain tiles, screens made of tempered laminated glass (GOST 30698-2014), some types of wall panels with the flammability group NG.
Important! The minimum distance from the gas stove to the adjacent wall, insulated with non-flammable finishing material, is taken in accordance with the installation and operation instructions for the device from the manufacturer. In most cases it is at least 100 mm.
There are requirements for placing a free-standing gas stove next to the kitchen modules. They are indicated in the installation and operating instructions for the equipment:
- the minimum distance between the stove and the adjacent module is 20 mm;
- only on one side of the slab can there be a module whose height exceeds its height;
- the distance from the side edge of the stove to the kitchen module protruding above it is at least 100 mm;
- the vertical distance from the working surface of the device to the wall cabinet is at least 650 mm.
The heat resistance of walls, floors and coatings of kitchen modules must be at least +90°C.
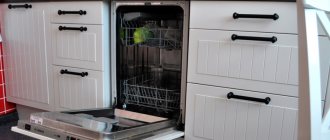
The following requirements apply to the installation of a built-in gas panel:
- The distance from the panel to the adjacent wall or high kitchen module is at least 100 mm.
- The panel is inserted so that at least 70 mm remains from it to the rear wall.
- If the distance between the upper hanging modules, located on both sides of the gas panel, is 600–730 mm, they are hung at a height of at least 530 mm from the tabletop. If it exceeds the width of the panel - at a height of at least 400 mm.
The minimum distance between the working surface of the gas stove and the hood is determined according to the instructions, but is left at least 750 mm.
Sawing and sealing
The starting points for cutting out a niche will be small holes (about 0.8-1 cm in diameter), which are drilled on each marked side (they should not extend beyond the outer limits of the lines, which will automatically violate the boundaries of the contour). In most cases, installers resort to the services of a jigsaw, and to prevent the edges of the furniture from crumbling, a file with the smallest teeth possible is selected.
At the end of the work, the panel must be tried on to the formed “socket”, and if the need arises, all defects must be corrected. Then the craftsmen begin sealing - a silicone compound, nitro varnish or self-adhesive sealant will do for this purpose. In the first two cases, the sections should be carefully processed; As for the sealing material, it is applied on top and serves as a kind of “cushion” for the edges of the slab. By the way, aluminum tape, which is also valued for its ability to smooth out temperature changes, copes with the same function.
It is recommended to once again insulate the installed surface with silicone along the outer contour: it will increase the reliability of the structure by providing an additional moisture-repellent barrier.
Installation of a stove in a private house
The installation of a gas stove in a private home is not regulated by separate rules and regulations. It is not much different from placing an appliance in the kitchen of an apartment building. However there are a few additions:
- installation is allowed in a room with a height of up to 2 m inclusive, if it has a volume of at least 1.25 times greater than that specified in clause 6 of the section “Requirements for premises”;
- in a house without a dedicated kitchen, the volume of the room should be 2 times greater than the figure specified in paragraph 6 of the section “Requirements for premises”;
- if there is a sloping ceiling with a height in the middle part of at least 2 m, installation is carried out in the part where the ceiling height is at least 2.2 m;
- when installing the device outdoors, under a canopy, make barriers to prevent the flame from being blown out by the wind;
- The same requirements apply to the placement of gas stoves in summer kitchens as for ordinary premises.
The installation and location of gas boilers intended for heating and hot water supply are subject to increased safety requirements. They are reflected in SP 402.1325800.2018.
Cutting out a notch
Regardless of whether you are going to build in models specially designed for this purpose or the most ordinary freestanding one, you need to cut a hole in the tabletop itself. New built-in models come with instructions that indicate the dimensions of the recess - they correspond to the width and depth along the inner edge.
If there are no instructions, you will have to act independently:
- Turn the panel over.
- Measure the width and length along the inner edge.
Important! Pay attention to the indentations from the edges of the tabletop - they are indicated in the instructions, but these are the minimum values. They cannot be reduced, but they can be increased.
Installation standards
The rules for installing gas stoves or built-in gas panels are described in detail in the instructions from the manufacturer. The technical characteristics of each type of burner are also given there.
Important! Installation of any gas-using equipment, including stoves, is carried out by a specialized organization that has a license for this type of work. If the device is connected by unqualified personnel, there is a risk of gas leakage and explosion. Independent installation and connection of gas-using equipment, which includes stoves, is considered a violation. The consumer is only allowed to perform actions that are performed without a tool.
The work is carried out according to the manufacturer's instructions, taking into account the existing technical connection conditions and the requirements of the local gas service in the following order:
- Make sure that the stove complies with GOST 33998-2016 and is equipped with a “gas control” system that stops the gas supply to the burner when the flame goes out.
- Before installation and connection, check that the type and pressure of gas in the local gas network are compatible with the settings of the device. If necessary, adjust to a different type of gas by replacing the nozzles.
- The device is placed in a strictly horizontal position using set screws and legs.
- Connect the equipment to gas using certified flexible hoses, which should not touch the heated back wall of the appliance and the top of the oven.
- A dielectric insert is placed between the gas tap and the hose, meeting the standards for interrupting the current and passing the full gas flow.
- Seals are used only once.
- After installation, check the tightness of the connections made with a soapy sponge. Apply soap foam to the connection points and see if air escapes.
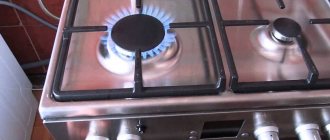
- Light all burners, checking the stability of the flame at low and high temperatures.
Fastening and connection
Once the device has taken its rightful place in the thickness of the tabletop and is securely held by the mounting clips, you can begin connecting to the power source. The metal hose is attached to the gas tap using a wrench; the place where they are fastened must be sealed with a special winding.
The free end of the hose is connected to the stove. Most modern models allow connection to a gas cylinder; a separate outlet is provided for it.
Further actions are standard for all gas devices: after opening the tap, the joints of the hose are treated with thick soapy foam, which will become an indicator of a possible leak (if everything is done correctly, it should maintain a static position and not form bubbles). But an open fire like a candle flame is absolutely not suitable for testing - the consequences can be fatal.
When installing dependent electrical equipment, the hassle is reduced significantly. First of all, you need to organize channels for common wires connecting the hob to the oven. If the headset is made to order specifically for installation, this issue is taken care of by the manufacturers.
The cross-section of the wire connecting the stove to the socket is selected based on the power of the network (by the way, the socket requires mandatory grounding); the optimal diameter is 6 mm. If the stove demonstrates high power, it is advisable to draw a separate line for it. Manufacturers display a detailed connection diagram on the back of the panel.
Determining the location of household appliances
The functionality, ease of use, and service life of household appliances depend on the correct location. A kitchen set with a built-in stove is suitable for those who have already decided on the location of the equipment and ordered furniture taking into account the characteristics of the room. Conventionally, the space in the kitchen can be divided into three zones:
- Water. This includes a sink, washing machine, dishwasher, and refrigerator.
- Hot. Stove, all household appliances designed for thermal exposure.
- Working. Surface for preparing food for cooking, frying, baking.
Designers propose the triangle rule, which will allow for optimal distribution of household appliances. But this option is only possible in medium and large rooms. With minimal dimensions, preference is given to a linear layout. A kitchen set with a stove must include an exhaust hood; it is prohibited to install a refrigerator or dryer next to the stove.
The location of the stove in the kitchen is often dictated by the placement of communications. But often the design requires moving household appliances. The placement is influenced by the configuration of the kitchen, the power and potential danger of the household appliance, and the open “neighborhood” with another room. Below is a photo of a kitchen with hoods above the stove, the design of which is closer to Provence.
Pipe transfer
The decision whether it is possible to cut or move the gas pipe in the kitchen will be up to the relevant services. You are only free to propose network redevelopment and voice your option. And professionals will tell you whether such changes are real, whether they will pose a threat to people’s lives, and will also tell you how much such an “upgrade” will cost you. Where to begin? Where should I knock?
Registration of permission
Remember the step-by-step instructions for preparatory actions and coordination of plans for moving gas pipes:
- Contact the gas service according to the place of registration. It happens that you need to “knock” on some subsidiary structure of this organization: they will explain everything to you on the spot.
- Filling out an application. You will be provided with a sample application, on the basis of which you must write statements on your behalf on what changes you want to make (the application serves as the basis for a specialist to visit you).
- Inspection of the home by a gas service representative. The master will listen to you, examine everything, check it, make the correct calculations (taking into account compliance with all standards). It is not a fact that the expert will reject your plan; it happens, especially with a diligent approach and the homeowner studying the rules, that the master does not have to edit anything.
- Drawing up an estimate. This is, in fact, what the office you contacted does.
- Coordination of the estimate. When the plan is ready, it will be given to you so that you can read the documents and give your consent to carry out this type of work.
- Payment. If you are satisfied with the estimate, you should pay for this service. If not, then don’t be upset, it can be improved, you just tell the master what you don’t agree with, and he will find a compromise offer.
Worth paying attention! If it is not possible/safe to make the network configuration according to the “scenario” you propose, or the estimate proposed by the service does not suit you, then it is too early to give up. Buy or order a beautiful box for the gas pipe in the kitchen, and your problem will be solved and the beauty will be increased.
Preparation for the process
If you agree on the estimate, then within 5 days (usually) a team will knock on your house, ready to move the pipes according to your wishes. Do you need to prepare for the arrival of the masters? If you want the work to be carried out quickly, efficiently, and your home not to be damaged by the workers’ visit, you should do the following:
- contact the craftsmen and find out if you need to provide any consumables (so as not to run after them while the team is working, frantically looking for someone of your own who will look after the apartment, after all, strangers are working);
- free up the space where it is planned to dismantle and install new pipes - workers must have unhindered access to the network;
- cover all kitchen surfaces, appliances and other valuable items, because the craftsmen will be cutting, cooking, dusting and littering (it is better to use coatings that are not prone to burning as a material, for example, tarpaulin, burlap);
- close the valve to stop the flow of blue fuel to the pipes.
(2 ratings, average 4.5 out of 5)
How to install new glass?
How to install new glass on a gas stove?
If the original glass broke due to your fault during transportation or burst during operation, then you can install new glass on the gas stove yourself.
First you need to understand exactly how the glass is attached to your stove. As a rule, the upper part of the glass is hidden under the bar. And from below the glass is kept from falling by two stops. There are rubber inserts only on the door itself, in the middle. The bar is held on the frame with screws; you may not notice them right away, since the glass is in a groove. And the lower stops are iron corners, which are also held on by screws.
So, to install new glass:
- Unscrew the screws on the stops, but not all the way, so that the glass does not immediately fall to the floor.
- Next, open the door completely, hold the glass on top with your fingers and push it out of the bar.
- After the old glass has been removed, you can install the new one. To do this, place it in the groove of the bar to the end.
- And then, holding the glass, close the door. And tighten the screws on the stops.
How to seal the gap between the bathtub and the wall to prevent water from leaking
When installing any plumbing fixtures, an important point is sealing the joints. This refers not only to the junction of the parts of the device and the sewer system, but also to the cracks and seams between the plumbing fixtures and the floor or wall.
The need to seal the joint
At first glance, the gap between the bathtub and the wall does not cause any concern. It is assumed that water rarely gets there from a deep bowl. And if the bathtub is on legs, the floor underneath can always be wiped. In reality, it's not that simple.
First of all, it is not water that gets into the gap, but condensate . Hot water evaporates, steam hangs in the air for some time. When the temperature in the room decreases, steam settles on the walls, condenses, and then water flows into any gaps and cracks.
Why is it dangerous:
- Whatever the wall of the room is decorated with, constant contact with water leads to gradual destruction . Of course, this will not harm porcelain tiles, but other materials will suffer.
- Dirt and dust settle much faster on a wet wall. The lining becomes dirty , absorbs some of the dirt, and it turns out to be extremely difficult to wash it later.
- Dirt, high humidity and temperature create an environment for the growth of bacteria , fungi and mold . They destroy the finish, even stone, and harm human health.
- The gap and floor in this part of the bathroom remain wet for a long time and slowly evaporate water. dampness remains in the room . It is impossible to dry laundry in the bathroom; towels and bathrobes remain unpleasantly damp and cold.
Not the most important, but significant factor is aesthetic. The gap between the font and the wall looks sloppy and gives the impression of temporary residence.
Methods for sealing cracks
The method of sealing the joint is determined by the distance between the bathtub and the wall. If the width of the gap is less than 3 cm, the joint can be sealed and sealed with viscous hardening substances. If the gap is larger, it is necessary to install a supporting structure, or fill the space with concrete and brick.
Cement mortar
The simplest and cheapest insulation is cement mortar. The material hardens and remains durable in high humidity conditions. It is very cheap and even a beginner can work with it. However, if an acrylic bathtub is installed, it cannot be used: cement corrodes the plastic .
The instructions are very simple.
- The gap is cleaned, dried, then measured.
- Prepare cement mortar according to the instructions on the package. The consistency should be thick.
- Apply the solution with a spatula, trying to avoid getting the material into the bathroom or onto the walls. The still uncured cement is trimmed so that the seam does not rise above the side of the font by more than 5 mm. The edges of the seam should be slightly sloped.
- The cement mortar hardens in 1 to 2 days. It is recommended to additionally seal the seam with impregnation after sealing.
Polyurethane foam
This option is suitable for wide cracks. The foam substance remains hard and “dry” during application and is held in the gap by a very rapid expansion in volume. The foam does not need support to fill the gap and not fall out during hardening. In addition, the rate of hardening of the substance is very high.
A prerequisite for work is a dry room . Moisture negatively affects the hardening process.
- The gaps between the bathtub and the wall are cleaned, thoroughly dried and degreased.
- It is recommended to apply masking tape to the wall and edges of the bathroom to prevent foam from getting on the product. Once cured, the material is very difficult to remove.
- Fill the gap about halfway. The material expands twice or even more, so you need to apply it carefully.
- An hour after treatment, the remaining foam is cut off - at this point it retains some softness. Then remove the masking tape.
- It sets completely within a day.
Polyurethane foam is sensitive to high humidity. The sealed gap must be additionally insulated with waterproof sealant.
Silicone sealant
Waterproof putty option. Performs 2 tasks at the same time: fills gaps between plumbing fixtures and the wall and seals the space. The material has antiseptic properties, therefore it prevents the development of mold and fungi.
- The gaps are cleaned of dirt, dried, and degreased. Paste tape or even a paper strip onto the side and wall.
- The gap is filled with sealant completely, in an even, continuous motion so that “waves” do not appear. If the seam turns out to be uneven, it can be corrected by first wetting your hands with liquid soap.
- The material dries within 24 hours. You cannot use the bathroom during this time.
Sealant is used to fill gaps no more than 1 cm wide. The material does not expand and, with a larger gap width, falls inward.
Ceramic baseboard
You can hermetically seal the joint between the bathtub and a medium-sized wall - from 3 to 10 cm - with a special plinth. It is attached to the side and wall and closes the space. They produce narrow elements - a pencil, corner ones - for installation in corners, and a frieze - a Cartesian variety with an ornament.