Many people wonder which sealant is best for a shower stall. It can be said that the requirements for such material are not complex or incomprehensible.
Water treatments are a mandatory start to the day for almost every person who lives on our planet. Taking a shower is not only about washing the body, but also about relaxation, invigoration and refreshment. In the morning, a shower adds strength to your overall mood, which will last for the whole day.
And in the evenings, water reduces unnecessary stress and helps you relax. But the pleasure provided by taking a shower can last for a relatively short time if, after all the water procedures, water or even a whole puddle remains on the floor covering.
Sealing various seams, joints or joints of various coverings plays the most important role in the assembly of shower enclosures. Only by using high-quality materials and a professional approach to work can you design and assemble high-quality shower equipment.
If there are connections between glass and plastic, acrylic and plastic, or ceramics and acrylic, then you need to be especially careful when applying the sealant.
The main task of the sealant is to create high-strength connections that will not allow water to pass through. A good sealant can prevent possible moisture seepage and fungal growth in areas where there is constant contact with water.
And moisture in bathrooms is not the only problem. Constant release of steam can contribute to the appearance of fungus or mold. Therefore, the compositions that constitute the protective substance have to be constantly improved, either as a whole or some of its components.
Therefore, a fungicide is often mixed into the sealant for shower stalls. If it contains such a substance, then you can remain calm. Mold will never appear in the areas where the sealant was applied.
But there are many more problems with the fungus, because its spores are constantly increasing in size and quantity, and their removal is not an easy task. But any modern sealant can protect against such problems.
Often, manufacturers develop a separate line of formulations intended for use in the bathroom. The most popular of these is silicone sealant. The question of sealing a shower stall may arise before any owner during installation or operation of the device.
What does a shower cabin consist of?
Each manufacturer produces several types of shower designs with their own characteristics, for example, an audio system and a control panel. However, most shower cabins have a corner shape and consist of a standard set of basic elements:
- pallet with apron;
- back panel;
- side walls with vertical posts;
- sliding door;
- roofs.
Shower cabin diagram
Product installation location
The dimensions of the room and the layout features must allow for unobstructed access to the product components, otherwise installation will be impossible. Carefully study the overall dimensions of the hydromassage cabin and determine the possibility/impossibility of installing it.
The hydromassage cabin must be installed before installing other equipment.
The room for assembling the cabin, as well as the installation site, must be cleared of foreign objects, construction debris and dust; the quality of assembly of the installed equipment largely depends on the cleanliness of the place.
ATTENTION! For the safety of people, the safety of equipment, and to obtain high-quality and correct assembly, no other work is allowed during installation of the product.
To carry out technical maintenance, it is necessary to provide access to the product components by moving the product from the walls or corner of the bathroom; therefore, it is recommended to install other bathroom equipment at the distances indicated in the figure above.
If these requirements for the installation location of the product are not met and other equipment is installed close to the product, then the dismantling and subsequent installation of this equipment for maintenance is carried out at the expense or by the Customer.
How to choose the right option
To choose the right sealant, you need to pay attention not only to the composition of the mixture, but also to other distinctive features such as:
- Color. In order not to spoil the appearance of the structure, it is best to select a sealant that matches the color of the application site or use a transparent option.
- Water resistance. When purchasing a material, it is very important to make sure that it is moisture resistant, otherwise it will not be able to withstand conditions of constant humidity.
- Antibacterial protection. It is best to always choose products that contain substances that prevent the formation of mildew and mold.
- Additives in silicone. There can be a huge number of them. The most optimal option can be considered where the number of such additives does not exceed one tenth of the total volume. Otherwise, the purchased substance may be of low quality.
Don't forget about the price-quality ratio. When buying a cheap sealant, you can hardly expect that it will last a long time and be of high quality.
Assembly steps common to all cabin types
The shower enclosure is delivered from the retail outlet in disassembled and packaged condition. The multitude of packages with parts can be confusing at first due to their diversity. All components are sorted, grouped and arranged in packages in such a way as to suggest how to properly assemble the shower cabin in order to consistently complete all the steps for assembling the kit.
Some box models are designed to allow for self-assembly from the inside. This is convenient when installing a shower enclosure in cramped conditions of a small room.
Installation of the corner requires compliance with a certain sequence. Assembling a shower cabin with your own hands can be done alone within a few hours. This provides the user with some advantages when minor repairs are required.
The owner of a modern device, who has completed the installation himself, will not be at a loss when faced with the question: how to disassemble the shower stall. At any time, he can partially disassemble, carry out minor repairs, and reassemble the structure again, without resorting to paid cabin repair services.
Functionality check
Upon completion of installation, it is recommended to check the shower enclosure yourself for operation of the following functions:
- Guided by the instructions on how to assemble the shower cabin and the rules of use, alternately pressing the buttons on the control panel, make sure that they are working.
- Be sure to make sure that the pallet is in a stable position. If swaying is detected, it is eliminated by turning the adjustable heels of the legs.
- The drain should be inspected especially carefully. Its reliability will protect against leaks, which lead, at a minimum, to unpleasant explanations with the neighbors below. Reliable drainage is ensured by special gaskets on the threaded connections of the siphon. To obtain the best result, use silicone sealant.
Source: https://beautyvanna.ru/santehnika/sborka-dushevoj-kabiny.html
Removing and sorting shower components
The cabin is delivered to its destination in several packages. Separately packed:
- Rear walls;
- Glass, doors and vertical profiles;
- Central panel;
- Pallet, roof, horizontal profiles and components.
Markings on the boxes allow you to determine what components are contained in them without looking inside. Assembling a shower cabin with your own hands begins with one by one opening the packages with the necessary parts. Manufacturers recommend that after purchasing the box, you unpack it and check the contents.
To assemble the shower cabin you will need the following tools
The shower cabin is not included in the package!
- Sealant (with application gun)
- Screwdriver
- Drill Ø1-3mm
- Phillips screwdriver
- Pencil
- Pliers or wrenches
- Level
According to the manufacturer, some shower cabins are assembled without sealant. But even for these types of showers, you will still need a sealant. They need to process the shower drain hole, install water traps and magnetic seals, and other small options if available, such as processing the hole for the radio and nozzles.
In all other shower stalls, sealant is required.
With its help, all fixed elements are processed. The joints of the rear wall between the central panel and the pan, the joints of the front frame and the pan, fastening the drain and nozzles, installing seals and water shut-offs.
Glass shower cabins are supplied unassembled, in cardboard boxes. The number of boxes per shower cabin is from 3 to 5 (depending on the manufacturer)
Removing excess sealant
Excess silicone sealant is removed with a solvent containing white spirit. They remove from the walls with a metal brush, a knife, scissors, pumice (any tool that has a lower hardness on the Mohs scale than tiles). Removal methods are chosen so as not to harm the underlying surface. After removing the sealant layer, the seams are dried for further use. For example, when repairing and replacing some spare parts. During the removal process, do not use soapy water so as not to impair the adhesion of new sealants to the surface.
The easiest way to remove silicone is with alcohol-containing solutions, but they are not safe in all cases. After applying the solvent, wait 30 seconds, during which time the seam turns into jelly, easily removed from the surface.
Types and types
First of all, shower cabins differ in shape: corner and straight. In our country, corner ones are more common, because they are easier to fit into small rooms.
Straight shower cabin
But corner ones can also be of different shapes. They are more common with a rounded front part - in the form of a sector of a circle, but there are also ones with a beveled and rectangular base.
The shape of the front wall can be not only round
Now about the packaging itself. On this basis, shower cabins are divided into closed and open. The open ones do not have a top panel or side walls. They are in closed ones. Open shower stalls are most often referred to as “shower corners” or nooks. Its configuration can also be different - with or without a pallet.
Various equipment
Some closed shower cabins have many additional functions - various types of jet massage, shower - regular, tropical, etc., a built-in sauna or steam generator for hammam. Such multifunctional devices are correctly called “hydromassage cabins”, or simply hydroboxes.
It is clear that the more complex the “filling”, the more labor-intensive the assembly will be. But hydromassage cabins are assembled at the very beginning in the same way as a shower corner with a tray. If you understand how to assemble the basics, installing the walls and roof will be easier. The main thing, as usual, is the foundation, and the assembly of a shower cabin of any complexity begins with the installation of a shower tray and door guides.
Factors influencing the cost of an aquabox
The price range of shower stalls with trays from 80 to 120 cm depends on several factors.
- quality and country of origin of manufacturing materials (especially for branded ones). The reliability, durability, wear resistance and aesthetics of the aquabox depend on them. As already mentioned, luxury 120x80 cabins are decorated with semi-precious precious stones, ivory elements, gold and silver.
- functionality. Some models with a depth of up to 120 cm are equipped with various entertainment or relaxation functions. Such as: lighting, shelves, seats, radio, many massage units (water and simple), telephone and much more;
- dimensions of the cabin and especially the pallet;
- company or country of manufacture;
- cabin purchase point. Each seller can make a different markup for the same model.
Stores today offer shower cabins with deep trays 120x80 from various manufacturers. This could be a corner cabin from the Italian manufacturer Art-x; Czech shower cabins with trays 120x120 LUXUS; TIMO (Finland); German manufacturer of shower cabins with deep tray 80x80 Pauli.
You can also purchase Chinese factory-made Victoria 100x80 or Serena 120x100 cabins. The sales leaders are Italian manufacturers. They are recognized as the highest quality and most sophisticated, but also practically the most expensive.
The next price category is American manufacturers of shower cabins from 80 cm, followed by German and Finnish companies that produce high-quality, functional and comfortable water boxes (80x100 cm).
Chinese factory equipment (width from 80 to 120 cm) amazes with its functionality, and their assembly is of such high quality that it cannot be distinguished from European ones. Prices and warranty are also comparable.
Secrets of proper shower installation
- installation begins with the installation of a pallet, which is carefully leveled;
- the seams are sealed using proprietary high-quality sealant;
- Before final installation, it is recommended to assemble the structure “roughly” without using sealant. Such an operation will allow you to understand all the nuances of the assembly, determining the need and features of additional work and materials.
- the best option is to install the shower stall as close as possible to the sewer drain;
- all connections should be checked for leaks before installing subsequent parts using water fill/drain;
- after completion of the work, it is necessary to coordinate the equipment of the new water consumption point with the relevant authorities (if a shower cabin is installed instead of a bathtub, such approval will not be required)
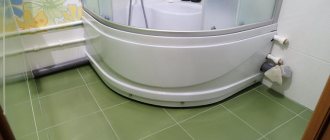
Installing a shower tray
Installing a shower tray is not a very difficult task, especially if you pay attention to a few important aspects.
- Firstly, before installing the shower tray, you should make sure that the floor is level. Small deviations can be eliminated by adjusting the height of the legs.
- Secondly, you must place the floor drain in the right place, since the opening of the shower stall should be at a short distance from it. If for some reason the match cannot be achieved, the project can still be completed with the help of additional adapters and a long flexible hose, but this will require more time and effort.
- Thirdly, you must properly connect and seal all the elements, otherwise water may leak when operating the shower stall.
You should start by purchasing the tools and materials that you will need to complete this project. You will need an adjustable wrench, a spirit level, silicone caulk, and a gun to apply it. We recommend using only quality materials, otherwise you will have to make minor repairs every few weeks.
As a rule, they try to ensure that the drain hole of the pan is located exactly above the hole in the floor leading to the sewer pipe. In our case, the bathroom was already tiled, and we didn’t want to open up the floor to move the drain that had already been made to the right place. But even in difficult situations you can find a way out, so we bought a flexible hose and elbow.
Using these elements, we will connect the shower stall drain to the sewer system. It may take a little longer, but eventually no one will notice the difference. Accordion drain hose and sewer elbow at an angle of 900 with a diameter of 50 mm.
Using a spirit level, make sure the floor surface is level. It is better to do this before tiling the floor.
If it turns out that the floor in the place where the shower stall will be located has a slope, we recommend pouring a layer of self-leveling coating to level it. In the meantime, carefully read the shower cabin manufacturer’s instructions and become familiar with the installation methods. Drain hole in the floor.
The next step of the project is to connect the flexible hose to the elbow and seal the joint with silicone. If the flexible hose fits into the elbow tightly enough, then sealing is not required. Allow the silicone to dry before connecting the hose to the shower tray.
Sealing the joint between the hose and the elbow.
Now inspect the shower tray. We installed a shower tray with a high base, but the installation methods are the same for any type of tray. As you can see in the photo, the base has several adjustable feet to allow for leveling during installation.
Pay attention to the drain hole. As a rule, they try to ensure that it is located above the drain in the floor. In our case, this is not the case, which is why we needed a fairly long flexible hose to connect them. Legs and base of shower stall.
Attach the siphon body to the pan drain hole, then secure the flexible hose to the siphon.
Connecting the siphon and hose to the drain hole of the pan.
Insert the other end of the hose (elbow) into the drain hole in the floor. Make sure that the pipe is buried deep enough. How to connect a shower stall to a sewer.
It is necessary to connect the pan to the sewer using a siphon. Some models of siphons consist of one flexible hose, from which it is necessary to form a bend of the desired shape and secure it using special devices included in the kit. A siphon formed from a flexible hose should have a similar bend.
It is very important not to skip this step, otherwise you will constantly smell an unpleasant smell from the drain.
As we already mentioned, the shower tray is equipped with adjustable legs. To level it, you need to change the height of the legs using a wrench.
Tip: Clockwise rotation will lower the shower tray slightly, counterclockwise will cause the shower tray to rise. Pallet legs.
Level the shower tray along all its edges, using a spirit level to check. If necessary, adjust the height of the legs using the appropriate key.
After adjusting the height of the shower tray and securing it to the wall, seal the gaps between the shower base and the wall using silicone sealant.
List of problems
Those who try to use sealant with their own hands testify that the task is not as simple as it seems at first glance. Many people complain about poor adhesion of silicone glue. Even the best composition will lag after a few years if applied incorrectly. The mistake people make is that basic installation rules are not followed. The surface is not cleaned, not dried, and does not get rid of dirt or grease.
Shower may leak
Whatever sealant you intend to use, you should carefully study the instructions. The trouble is that the problem only affects itself over time. Initially the adhesion looks great, but after some time the coating peels off. MS sealant quickly becomes moldy in damp and dirty rooms. In this case, acrylic or silicone should be used instead. But MS sealant adheres perfectly to acrylic paint.
It is impossible to determine the best composition. However, the most common plumbing material is silicone sealant. This is what should be used in the most general case.
Self-installation of a shower cabin
It is not difficult to carry out sequentially, following the instructions for installing and connecting the cabin. A detailed description of the installation scheme is described in the instructions from the manufacturer.
More often than others, corner models are installed in apartments. They save space in the room. At their cost, many of them are affordable to the average buyer.
The evenness of the wall surface is easy to establish: the coincidence of the distance between the walls at any height from the floor is checked. Unevenness will lead to distortion of the structure and the appearance of leaks in the cracks between the side panel of the cabin and the walls of the room. If the walls are not level, then pressing the frame tightly will cause the structure to deform and the doors will not fall into place.
Installation of shower cabins is carried out on site under certain conditions:
- the cabin should be next to the ventilation hood;
- equipping the cabin with grounding, since additional options are powered by electricity.
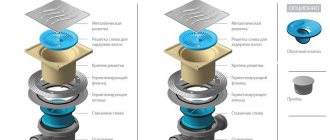
- Cabin drainage system
- Pallet installation
- Treatment of the junction of the drain hole and the siphon pipe
- Connecting the siphon to the drain hole
- Connecting the corrugation and the sewer entrance hole
Without assembling and strengthening the position of the pallet, connection to the sewerage system cannot be made. The procedure is carried out in stages.
- The horizontal position of the pallet is checked using a building level.
- Its position is strengthened by a special frame. Adjustable legs adjust the height of the bottom.
- In relation to the wall, the bottom is set at an angle of 90°. If the angle is not maintained, the pallet will not be installed tightly to the wall. All these errors lead to water leaking on the floor during bathing.
Main difficulties during installation
Each model of plumbing equipment comes with instructions for assembling the shower cabin. The instructions describe in detail, step by step, the process of assembling the device, but are often silent about the difficulties that an inexperienced craftsman may encounter.
When starting to install the booth, you need to be prepared for the following nuances:
- The shower cabin must be assembled on a completely flat floor. Therefore, before starting work, the floor in the bathroom is usually opened up and then filled with screed, leveling it using a laser level. If the floor in the bathroom is uneven, then it is almost impossible to properly install a shower.
- Choosing the right place to install a shower stall on your own is quite difficult. After all, this plumbing fixture is placed in close proximity not only to sewerage and water supply, but also next to the hood and electrical wiring. The further the installation site is from communications, the more difficult it is to connect it.
- To connect the cabin, be sure to use fine or coarse flow-through water filters. The filter prepares the water to enter the device and cleans it of impurities so that the shower can last as long as possible.
- To install a shower, high-quality waterproofing is required. Moreover, experienced plumbers recommend insulating not only the floor, but also the adjacent walls.
Remember that to connect models of shower cabins with additional functions (lighting, hydromassage, audio system), you will need the skills of not only a plumber, but also an electrician. Experts say that if you can save money on plumbing work, then it is better to entrust the electrical part of the installation to a professional, because electricity, especially in a damp room, is very dangerous.
Customer Reviews
In conclusion, we can highlight brands of sealants that contain silicone and have the largest number of positive customer reviews.
"DownCorning 7091". Most buyers note the high-quality waterproofing of shower cabins, a high degree of adhesion, durability, good resistance to humidity and temperature changes. However, there are often comments regarding the high cost of these products.
"CikiFix". In consumer reviews it is sometimes called a “death grip” because it has good water resistance, elasticity, increased adhesion and durability. However, there are also negative reviews associated with the lack of antifungal components.
"S 400". Reading almost any forum about sealing a shower stall, you will notice that buyers quite often note the outstanding resistance to mold formation and the growth of fungi on the surface of the seams as the positive properties of this sealant. In addition, a high degree of adhesion, durability and elasticity, as well as the presence of color variations, are often noted.
What is required for self-assembly?
Before assembling the shower stall, you need to make sure that you have everything you need that will be useful during installation. It is better to prepare all materials and tools in advance so that they are at hand. So, to complete the work you will need the following materials:
- Shower stall assembled or separate tray and shower walls.
- Compact sanitary siphon with flexible hose.
- Elbow type pipe.
- Silicone moisture-resistant sealant.
- Mild detergent.
- Clean rags.
All the tools used to assemble a shower cabin are usually available in the homeowner's arsenal. To complete the work you will need:
- Spanners.
- Phillips screwdriver.
- Electric drill.
- Jigsaw.
- Proven construction level.
- Roulette or ruler.
- Adjustable plumbing wrench.
- Sharp knife.
Remember! Before starting work, carefully study the installation instructions for the device, prepare all the necessary tools and materials. Also, before installation, experienced plumbers recommend checking the evenness of the floor in the bathroom with a laser level, and also changing the pipes to modern plastic ones.
general information
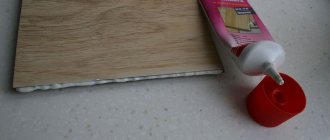
First you need to find out what a sealant is, what types it comes in and how it should be used. Sealant is a paste-like material that is widely used to seal joints of various types and sizes.
It began to be used to strengthen joints in building materials, gaps around window and door openings, pipes, and during the installation of ceramic tiles. The sealant consists of a polymer, a filler and several additional elements. Their main difference is the type of polymer compound.
Sealants
The most popular in the modern construction world is the use of silicone sealant. This is a material that can be suitable for both the kitchen and the bathroom. Silicone is a composition that is resistant to ultraviolet radiation.
Sewage connection
High-quality instructions for the correct assembly of a shower cabin usually contain information on how to equip a drain and install a siphon. So how is this done?
First, the protective film is removed from the drain pipe. Then a pipe with a diameter of 4 cm with a special adapter is supplied to the installation site of the pallet. The adapter must have sufficient rigidity - this will increase the functionality of the sewer system and there will be no stagnation in the corrugation area.
Next, you need to lift the back of the shower tray and lay the shower hose on the shower drain elbow from below. The other end of this hose should be secured to the drain. Its edge, reinforced with fiber, must be attached to the side nipple on the drain elbow.
When is the best time to install a shower cabin?
Sometimes installing a shower stall is the only possible option for organizing a bathing area:
- A shower stall is a way out when the bathroom area is small, also if the bathroom is combined. Thanks to the ergonomic design, there is enough space left to accommodate necessary household appliances, special furniture, green spaces and various accessories.
- In apartments where students live, young families without children leading an active lifestyle. The shower allows you to quickly wash away the fatigue of the working day and get a boost of energy in the morning. The conditions are comfortable, and you can save on utilities.<>
- For families with elderly people or people with disabilities, a shower cabin will allow them to organize comfortable hygiene procedures. It is easier for the elderly and sick to climb into a stall that has a special seating area than to climb into the bathroom. In addition, with age, bathing becomes dangerous.
Pros and cons of the design
Giving preference to this type of design, it is worth noting its advantages:
- Saving resources - even a long procedure will require less water than when filling a bathtub.
- Rational use of space - the booth does not take up much space in a small room, but in a large one it can be placed even if there is a bathroom.
- Hygienic – washing under running water is much healthier and healthier.
- A hardening effect can be obtained by adjusting the water temperature and using a contrast shower.
- Hydromassage using shower settings is available without leaving the cabin.
- Safety thanks to non-slip coating, multiple handles and sealed doors.
- Assembling the shower cabin does not take much time and does not require special preparation.
Another advantage is that there are various models available for the consumer to choose from: open, closed. In cabins with additional functions, you can use the “tropical shower” option, take a steam bath, enjoy aromatic ethers, listen to music and even make a phone call.
The main disadvantage is the inability to immerse your body completely in water, that is, to “take a bath” for the purpose of washing, as well as for medicinal and cosmetic purposes. It is not suitable for washing babies. As for the need to regularly clean it from limescale, it is no different in time and financial costs from cleaning the bathroom coating.
Five main mistakes in installing a shower box
- Insufficient slope of drainage into the sewer.
- Deviation during the installation process from the points of the factory instructions for assembling the shower cabin.
- Using cheap sealants.
- Connection using rigid pipes instead of flexible hoses.
- Lack of grounding of the box in which electrical equipment is used.
Our craftsmen have studied all the rules for installing and connecting shower cabins of various models. A preliminary express examination of the premises provides an opportunity to develop an effective plan for installation work. If necessary, additional wiring is done with the installation of additional shut-off valves. The consumables used have stood the test of time. All work is guaranteed.